2023 SUBARU SOLTERRA headlights
[x] Cancel search: headlightsPage 160 of 628

1603-1. Instrument cluster
Owners Manual_USA_M42C01_en
■Suggestion to turn off the
headlights
If the headlights are left on for a
certain amount of time after the
power switch has been turned
off, a suggestion message will
be displayed.
When the headlight switch is in
the AUTO position: The mes-
sage asking if you wish to turn
the headlights off is displayed.
To turn the headlights off, select
“Yes”.
If the driver’s door is opened after
the power switch is turned off, this
suggestion message will not be dis-
played.
■Customization
The suggestion function can be
turned on/off. (Customizable fea-
tures: P.566)
Page 200 of 628

2004-4. Adjusting the steering wheel and mirrors
Owners Manual_USA_M42C01_en
*: If equipped
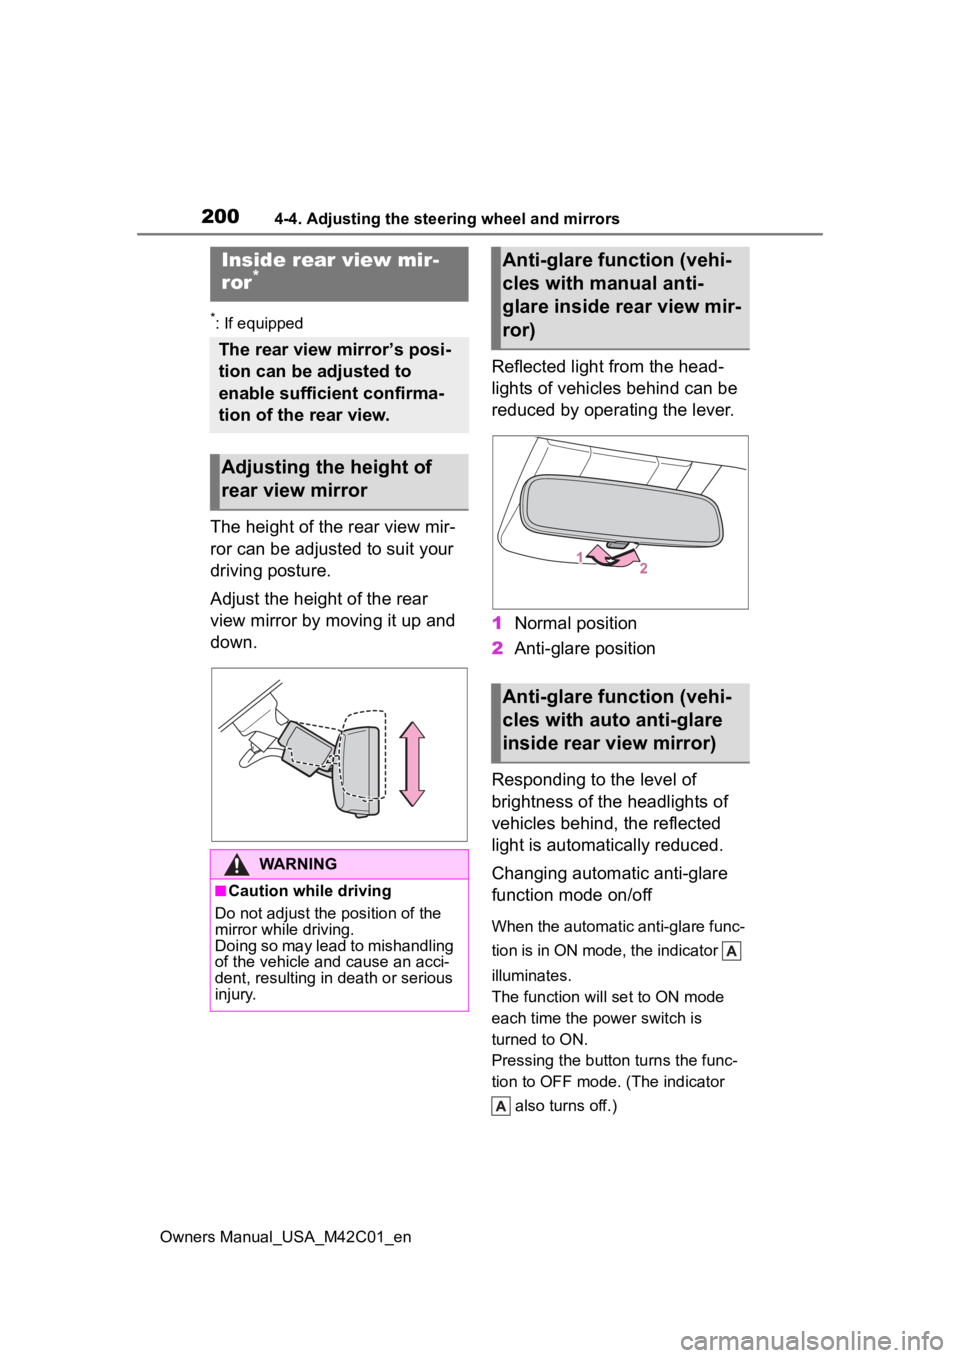
The height of the rear view mir-
ror can be adjusted to suit your
driving posture.
Adjust the height of the rear
view mirror by moving it up and
down.Reflected light from the head-
lights of vehicles behind can be
reduced by operating the lever.
1
Normal position
2 Anti-glare position
Responding to the level of
brightness of the headlights of
vehicles behind, the reflected
light is automatically reduced.
Changing automatic anti-glare
function mode on/off
When the automatic anti-glare func-
tion is in ON mode, the indicator
illuminates.
The function will set to ON mode
each time the power switch is
turned to ON.
Pressing the button turns the func-
tion to OFF mode. (The indicator also turns off.)
Inside rear view mir-
ror*
The rear view mirror’s posi-
tion can be adjusted to
enable sufficient confirma-
tion of the rear view.
Adjusting the height of
rear view mirror
WARNING
■Caution while driving
Do not adjust the position of the
mirror while driving.
Doing so may lead to mishandling
of the vehicle and cause an acci-
dent, resulting in death or serious
injury.
Anti-glare function (vehi-
cles with manual anti-
glare inside rear view mir-
ror)
Anti-glare function (vehi-
cles with auto anti-glare
inside rear view mirror)
Page 204 of 628

2044-4. Adjusting the steering wheel and mirrors
Owners Manual_USA_M42C01_enThe icons will be displayed.
2
Press the menu button
repeatedly and select the
item you want to adjust.
3 Press or to
change the setting.
The icons will disapp ear if a button
is not operated fo r approximately 5
seconds or more.
*: This is a functi on for the optical
mirror mode, however, the setting
can also be changed while using
the digital mirror mode.
■Enabling/disabling the
automatic anti-glare func-
tion (optical mirror mode)
The automatic anti-glare func-
tion in the optical mirror mode
can be enabled/disabled. The
setting can be changed in both
the digital mirror mode and the
optical mirror mode.
When using the digital mirror
mode
P.203
IconsSettings
Select to adjust the bright-
ness of the display.
Select to adjust the area
displayed up/down.
Select to adjust the area
displayed to the left/right.
Select to adjust the angle of
the displayed image.
Select to zoom in/out the
displayed image.
Select to enable/disable the
automatic anti-glare func-
tion.
*
Responding to the bright-
ness of the headlights of
vehicles behind, the
reflected light is automati-
cally adjusted.
The automatic anti-glare
function is enabled each
time the power switch is
changed to ON.
Select to display Home-
Link
® Training Tutorial to
assist customers to train
their Garage Door Opener
System. ( P.440)
Select to change the lan-
guage of the Homelink
®
Training Tutorial.
IconsSettings
Page 206 of 628

2064-4. Adjusting the steering wheel and mirrors
Owners Manual_USA_M42C01_en
■Cleaning the mirror surface
If the mirror surface is dirty, the
image on the display may be dif-
ficult to see.
Wipe the mirror surface gently
using a soft dry cloth.
■Cleaning the camera
If it is difficult to see the Digital
Rear-view Mirror image
because water, snow, mud, etc.
is stuck to the camera lens,
operate the rear camera washer
or change to optical mirror
mode. ( P.253)
■The camera
The camera for the Digital Rear-
view Mirror is located as shown.
■Cleaning the camera with
washer fluid
●When cleaning the camera, it may
be difficult to see the image due to the washer fluid. Therefore, take
care in the surrounding area while
driving.
●If washer fluid remains on the
camera lens surface after clean-
ing, the image may be difficult to
see at night due to the height or
inclination of the
headlights of the
vehicle behind. In this case,
change to optical mirror mode.
●Some dirts may n ot be removed
completely after cl eaning. In this
case, rinse the camera lens with a
large quantity of water and then
wipe it clean with a soft cloth
dampened with water.
●Washer fluid is sprayed onto the
camera lens surface. Therefore,
the ice, snow, etc. adhering
around the camera cannot be
removed.
WARNING
■To prevent causes of fire
If the driver continues using the
Digital Rear-view Mirror while
smoke or odor comes from the
mirror, it may res ult in fire. Stop
using the system immediately and
contact your Toyota dealer.
Cleaning the D igital Rear-
view Mirror
NOTICE
■To prevent the Digital Rear-
view Mirror from malfunction-
ing
●Do not use detergents, such as
thinner, benzene, and alcohol to
clean the mirror. They may dis-
color, deteriorate or damage the
mirror surface.
●Do not smoke, use matches,
use cigarette lighters or allow
open flames near the mirror. It
may damage the mirror or
cause a fire.
●Do not remove, d isassemble or
modify the mirror.
■To prevent the camera from
malfunctioning
●Observe the fo llowing precau-
tions, otherwise the Digital
Rear-view Mirror may not oper-
ate properly.
Page 208 of 628

2084-4. Adjusting the steering wheel and mirrors
Owners Manual_USA_M42C01_en
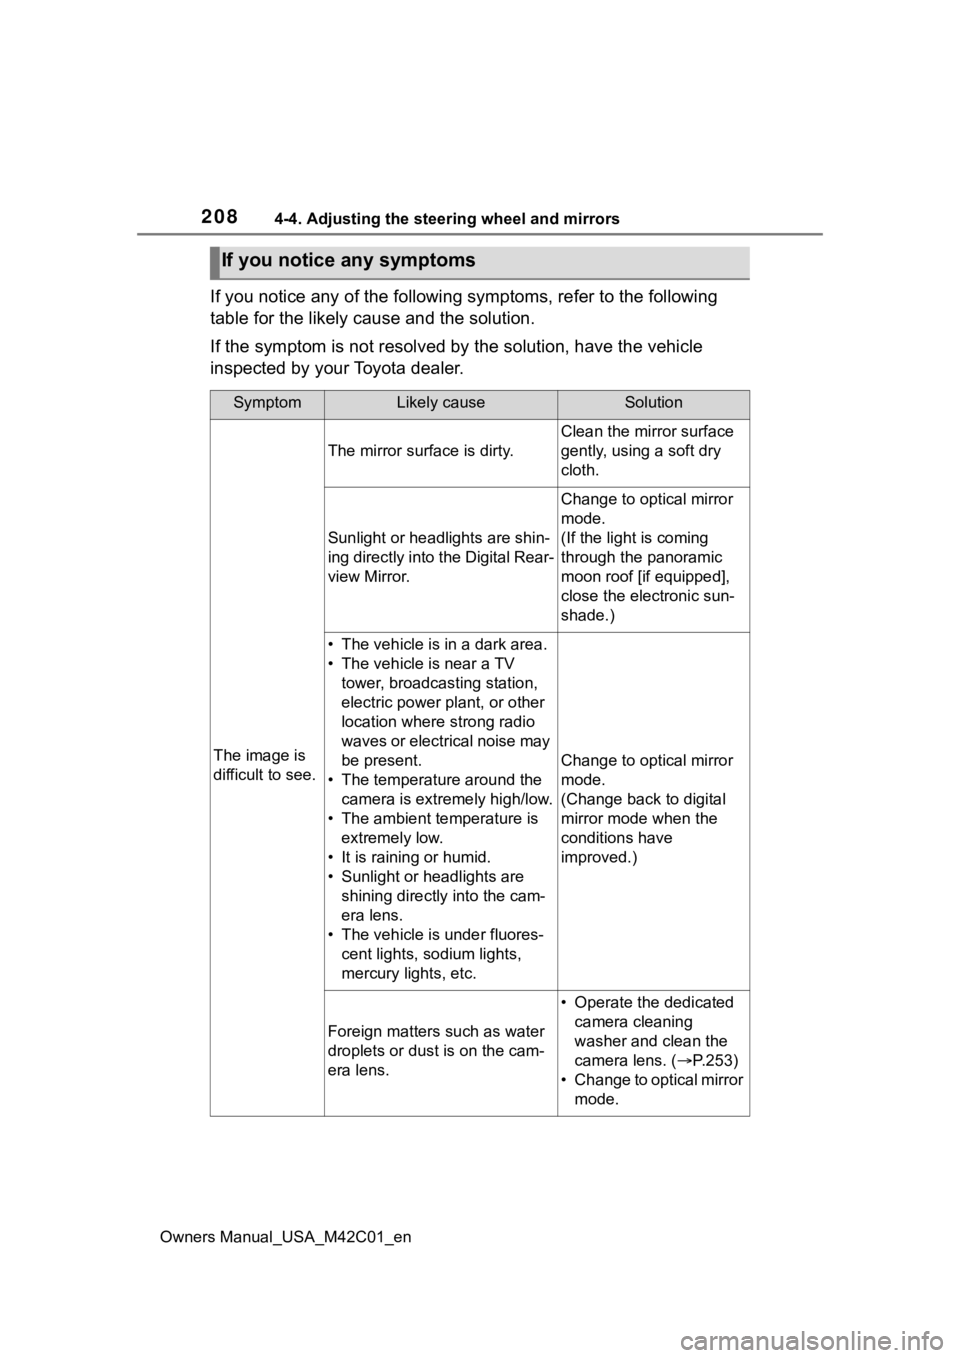
If you notice any of the following symptoms, refer to the following
table for the likely cause and the solution.
If the symptom is not resolved by the solution, have the vehicl e
inspected by your Toyota dealer.
If you notice any symptoms
SymptomLikely causeSolution
The image is
difficult to see.
The mirror surface is dirty.
Clean the mirror surface
gently, using a soft dry
cloth.
Sunlight or headlights are shin-
ing directly into the Digital Rear-
view Mirror.
Change to optical mirror
mode.
(If the light is coming
through the panoramic
moon roof [if equipped],
close the electronic sun-
shade.)
• The vehicle is in a dark area.
• The vehicle is near a TV tower, broadcasting station,
electric power plant, or other
location where strong radio
waves or electrical noise may
be present.
• The temperature around the camera is extremely high/low.
• The ambient te mperature is
extremely low.
• It is raining or humid.
• Sunlight or headlights are shining directly into the cam-
era lens.
• The vehicle is under fluores- cent lights, sodium lights,
mercury lights, etc.
Change to optical mirror
mode.
(Change back to digital
mirror mode when the
conditions have
improved.)
Foreign matters such as water
droplets or dust is on the cam-
era lens.
• Operate the dedicated camera cleaning
washer and clean the
camera lens. ( P.253)
• Change to optical mirror mode.
Page 248 of 628

2485-3. Operating the lights and wipers
Owners Manual_USA_M42C01_en
5-3.Operating the lights and wipers
Operating the switch turns
on the lights as follows:U.S.A.
Canada
1 The side marker, parking,
tail, license plate, instrument
panel lights, daytime running
lights ( P.248) turn on.
2 The headlights and all
lights listed above (except
daytime running lights) turn
on.
3 The headlights, daytime
running lights ( P.248) and all the lights listed above turn
on and off automatically.
4 Off (for the U.S.A. only)
■AUTO mode can be used when
The power switch is in ON.
■Daytime running light system
●The daytime runn ing lights illumi-
nate using the same lights as the
parking lights and illuminate but at
a higher intensity. (On some mod-
els: Using the same lights as the
headlights but at a lower intensity.)
●To make your vehicle more visible
to other drivers during daytime
driving, the daytime running lights
turn on automatically when all of
the following conditions are met.
(The daytime running lights are
not designed for use at night.)
• The EV system is operating
• The parking brake is released
• The headlight switch is in the
or position
• The surroundings are bright
The daytime running lights remain
on after they illumi nate, even if the
parking brake is set again.
●For the U.S.A.: Daytime running
lights can be turned off by operat-
ing the switch.
●Compared to turning on the head-
lights, the daytime running light
system offers greater durability
and consumes less electricity, so
it can help improve electricity con-
sumption.
■Headlight control sensor
The sensor may not function prop-
erly if an object is placed on the sen-
sor, or anything that blocks the
sensor is affixed to the windshield.
Doing so interferes with the sensor
detecting the level of ambient light
and may cause t he automatic head-
light system to malfunction.
Headlight switch
The headlights can be oper-
ated manually or automati-
cally.
Turning on the headlights
Page 249 of 628

2495-3. Operating the lights and wipers
Owners Manual_USA_M42C01_en
5
Driving
■Automatic light off system
●When the headlights are on: The
lights turn off 30 seconds after the
power switch is turned to ACC or
OFF and a door is opened and
closed. (The lights turn off immedi-
ately if on the key is
pressed after all the doors are
closed.)
●When only the tail lights are on:
The tail lights tu rn off automati-
cally if the power switch is turned
to ACC or OFF and the driver’s
door is opened.
To turn the lights on again, turn the
power switch to ON, or turn the light
switch to the or position
once and then back to or
position.
■Light reminder buzzer
A buzzer sounds when the power
switch is turned to ACC or OFF and
the driver’s door is opened while the
lights are turned on.
■Automatic headlight leveling
system
The level of the headlights is auto-
matically adjusted according to the
number of passengers and the load-
ing condition of the vehicle to
ensure that the headlights do not
interfere with other road users.
■Windshield wiper linked head-
light illumination
When driving during daytime with
the headlight switch turned to , if the windshield wipers are used, the
headlights will turn o
n automatically
after several seconds to help
enhance the visibility of your vehi-
cle.
■12-volt battery-saving function
In order to prevent the 12-volt bat-
tery of the vehicle from discharging,
if the headlights and/or tail lights are
on when the power switch is turned
to OFF, the battery saving function
will operate and au tomatically turn
off all the lights af ter approximately
20 minutes.
When any of the following are per-
formed, the 12-volt battery-saving
function is canceled once and then
reactivated. All the lights will turn off
automatically 20 minutes after the
12-volt battery-saving function has
been reactivated:
●When the headlight switch is oper-
ated
●When a door is opened or closed
■If “Headlight System Malfunc-
tion Visit Your Dealer” is dis-
played on the multi-information
display
The system may be malfunctioning.
Have the vehicle inspected by your
Toyota dealer.
■Customization
Settings (e.g. light sensor sensitiv-
ity) can be changed.
(Customizable features: P.572)
NOTICE
■To prevent 12-volt battery dis-
charge
Do not leave the lights on longer
than necessary when the EV sys-
tem is not operating.
Page 250 of 628

2505-3. Operating the lights and wipers
Owners Manual_USA_M42C01_en
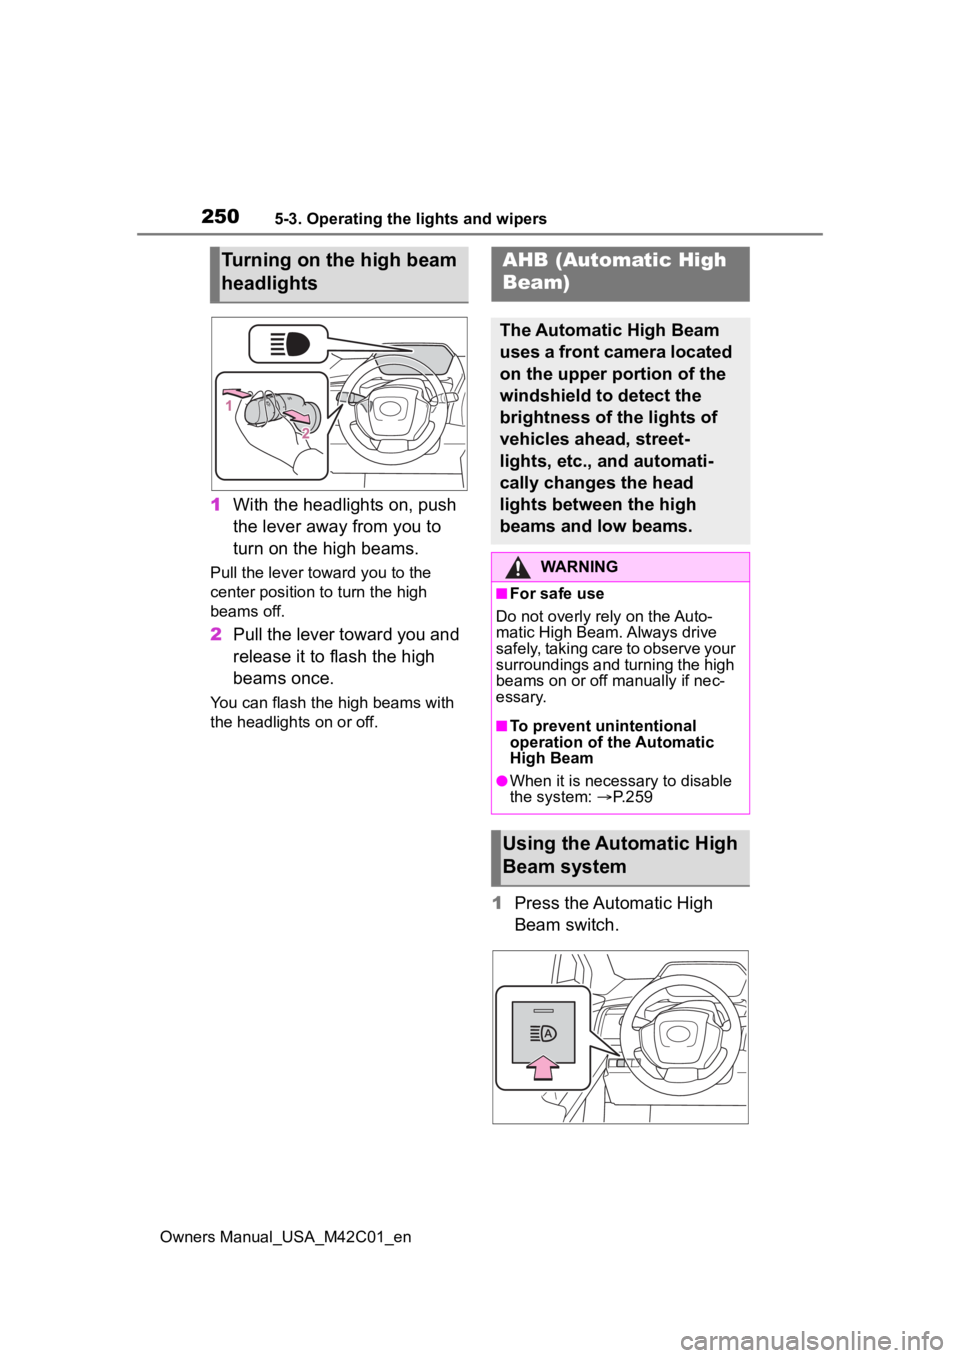
1With the headlights on, push
the lever away from you to
turn on the high beams.
Pull the lever toward you to the
center position to turn the high
beams off.
2Pull the lever toward you and
release it to flash the high
beams once.
You can flash the high beams with
the headlights on or off.
1Press the Automatic High
Beam switch.
Turning on the high beam
headlightsAHB (Automatic High
Beam)
The Automatic High Beam
uses a front camera located
on the upper portion of the
windshield to detect the
brightness of the lights of
vehicles ahead, street-
lights, etc., and automati-
cally changes the head
lights between the high
beams and low beams.
WARNING
■For safe use
Do not overly rely on the Auto-
matic High Beam. Always drive
safely, taking care to observe your
surroundings and turning the high
beams on or off manually if nec-
essary.
■To prevent unintentional
operation of the Automatic
High Beam
●When it is necessary to disable
the system: P.259
Using the Automatic High
Beam system