2023 SUBARU BRZ mirror
[x] Cancel search: mirrorPage 20 of 432
Exterior
14Exterior
1
11
4
5
3
2
10
8
76
9
002012
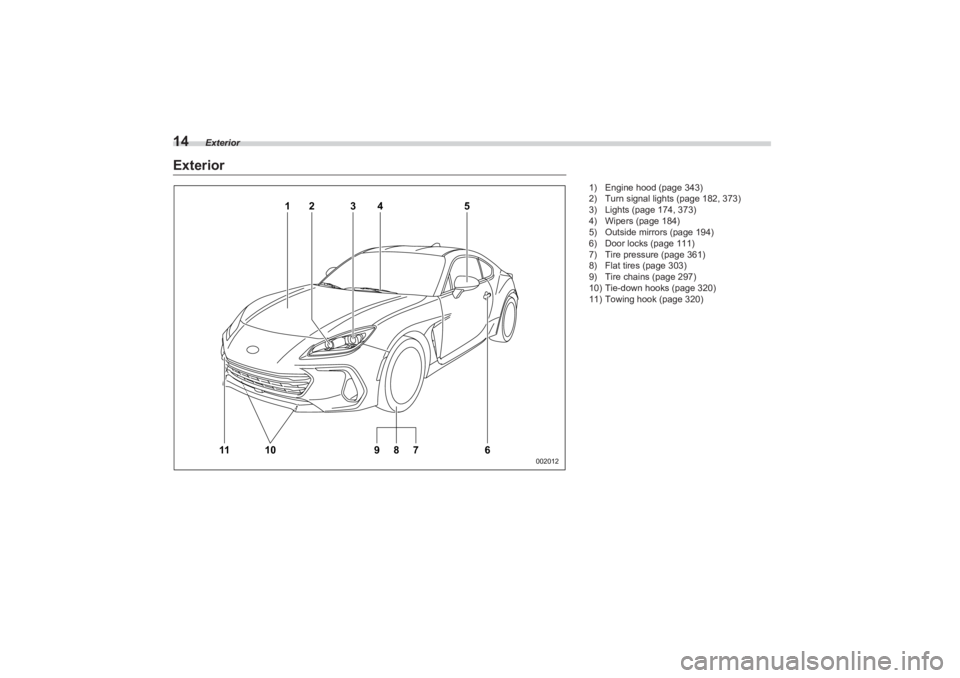
1) Engine hood (page 343)
2) Turn signal lights (page 182, 373)
3) Lights (page 174, 373)
4) Wipers (page 184)
5) Outside mirrors (page 194)
6) Door locks (page 111)
7) Tire pressure (page 361)
8) Flat tires (page 303)
9) Tire chains (page 297)
10) Tie-down hooks (page 320)
11) Towing hook (page 320)
BRZ_U.book 14 ページ 2022年3月29日 火曜日 午後3時59分
Page 25 of 432
Instrument Panel
19
Illustrated Index
Instrument Panel
1
2
3
4
5
7
6
12
10
9
8
11
002018
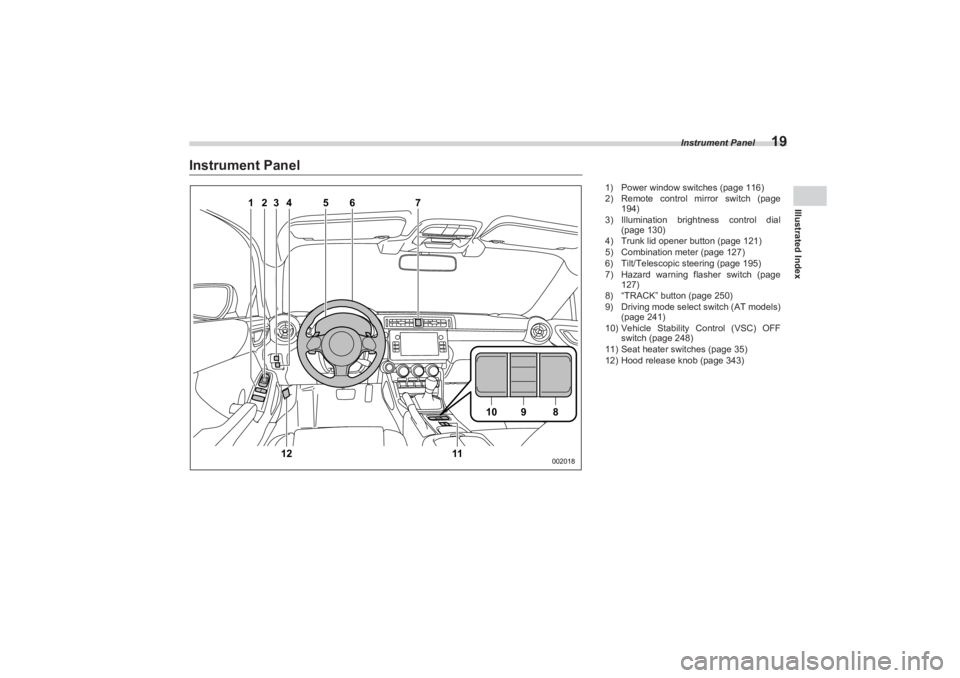
1) Power window switches (page 116)
2) Remote control mirror switch (page
194)
3) Illumination brightness control dial (page 130)
4) Trunk lid opener button (page 121)
5) Combination meter (page 127)
6) Tilt/Telescopic steering (page 195)
7) Hazard warning flasher switch (page
127)
8) “TRACK” button (page 250)
9) Driving mode select switch (AT models)
(page 241)
10) Vehicle Stability Control (VSC) OFF
switch (page 248)
11) Seat heater switches (page 35)
12) Hood release knob (page 343)
BRZ_U.book 19 ページ 2022年3月29日 火曜日 午後3時59分
Page 69 of 432

SRS Airbag (Supplemental Restraint System Airbag)
63
Seat, Seatbelt and SRS Airbags1
– CONTINUED –
■General Precautions
regarding SRS Airbag
System for Accessories and
Any Objects
102683102218
WARNING
Do not put any objects (including
straps or cord) over the steering
wheel pad, column cover, or
dashboard.
- These objects could be entan- gled with the steering wheel,
preventing the SRS frontal
airbag, etc. from operating
properly.- If the SRS frontal airbag
deploys, these objects could
be propelled inside the
vehicle, causing injury.
Do not put any objects under the
driver’s side of the instrument
panel. If the SRS knee airbag
deploys, those objects could
interfere with its proper operation
and could be propelled inside the
vehicle, causing injury.
WARNING
Do not attach accessories to the
windshield, or fit an extra-wide mir-
ror over the inside rear view mirror.
If the SRS airbag deploys, those
objects could become projectiles
that could seriously injure vehicle
occupants.
101940
BRZ_U.book 63 ページ 2022年3月29日 火曜日 午後3時59分
Page 130 of 432

Instruments and Controls
RAB Warning Indicator (If Equipped) ......................... 151
RAB OFF Indicator (If Equipped) ................................ 151
Master Warning Light .................................................. 151
3-7. Combination Meter Display (Color TFT) ...........151
Basic Operation............................................................ 152
Meter Information Screen ........ .................................... 152
Drive Information ......................................................... 153
Exclusive Content for SUBARU BRZ ......................... 154
Navigation System-Linked Disp lay ............................ 156
Audio System-Linked Display..................................... 156
Driving Support System Settings Display ................. 157
Settings Display ........................................................... 157
Warning Message Display ....... .................................... 159
Telltale Screen .............................................................. 159
3-8. Center Information Display (CID).......................160
Features ........................................................................ 160
Touch Screen Operations ........................................... 160
Main Screen .................................................................. 161
3-9. Clock ....................................................................172
Setting the Clock Manually ......................................... 172
Setting the Clock Automatically ................................. 173
3-10. Light Control Switch ........................................ 174
Headlights ..................................................................... 174
High/Low Beam Change (Dimmer) ............................. 176
Headlight Flasher ......................................................... 176
High Beam Assist Function (If Equipped).................. 177
Daytime Running Light System .................................. 180
3-11. Steering Responsive Headlight (SRH)
(If Equipped) ..................................................... 180
3-12. Headlight Beam Leveler .................................. 182
3-13. Turn Signal Le ver ............................................. 182
One-Touch Lane Changer ........................................... 182
3-14. Wiper and Washer ............................................ 183
Windshield Wiper and Washer Switches ................... 184
3-15. Defogger ........................................................... 185
3-16. Mirrors ............................................................... 186
Inside Mirror.................................................................. 186
Auto-Dimming Mirror/Compass with HomeLink
®
(Dealer Option) ........................................................... 186
Outside Mirrors............................................................. 194
3-17. Tilt/Telescopic Steering Wheel ....................... 195
3-18. Horn ................................................................... 195
BRZ_U.book 124 ページ 2022年3月29日 火曜日 午後3時59分
Page 185 of 432
Light Control Switch
179
Instruments and Controls3
– CONTINUED –
- In bad weather (fog, snow, sand
storm, heavy rain, etc.).
- When the windshield glass is dirty or
fogged.
- When the windshield is cracked or
damaged.
- If there are lights similar to the head-
lights or the tail lights in the surrounding
area.
- When an oncoming vehicle or
vehicle ahead is driven without its
headlights and tail lights on.
- If the headlights of an oncoming
vehicle or the tail lights of a vehicle
ahead are dirty or discolored, or if the
light beams are not aimed correctly.
- When a rapid change of brightness
continues while driving.
- When driving on a road with many
ups and downs or uneven surfaces.
- When driving on a road with many
curves.
- When there are some objects that
reflect light strongly, such as a road
sign or a mirror in vehicle ahead.
- When the rear part of the vehicle
ahead, such as a container, reflects
light strongly.
- When the headlights of your vehicle
are damaged or dirty.
- When your vehicle is tilted, such as
in case the vehicle has a flat tire or is
being towed. - When the stereo camera is
deformed or the stereo camera lenses
are dirty.
- Immediately after the engine has
started.
In the following conditions, the head-
light mode will not be automatically
changed from the high beam to the low
beam.
- When your vehicle passes an
oncoming vehicle suddenly in a blind
curve.
- When another vehicle passes in
front of your vehicle.
- When an oncoming vehicle or
vehicle ahead comes in and out of view
because of continuous curves, median
strips, roadside trees, etc.
If the stereo camera detects the light of
the front fog lights of an oncoming vehicle,
the headlight mode may change from the
high beam to the low beam automatically.
The headlight mode may change from
the high beam to the low beam, or the low
beam mode may continue, when affected
by a street light, traffic signal, illumination
of an advertisement board, or a reflective
object such as a road sign and signboard.
The timing of the change of headlight
mode may differ due to the following
factors. - Color or brightness of the headlights
of an oncoming vehicle or the tail lights
of a vehicle ahead.
- The headlights of the oncoming
vehicle or the tail lights of the vehicle
ahead are covered with mud, snow,
etc.
- Movement and direction of an
oncoming vehicle or a vehicle ahead.
- When the headlights of an
oncoming vehicle or the tail lights of a
vehicle ahead illuminate on only one
side.
- When the oncoming vehicle or
vehicle ahead is a motorcycle.
- Conditions of a road (slope, curve,
road surface, etc.).
- Number of passengers and weight
of loaded cargo.
- Limitation of the detection ability of
the stereo camera.
BRZ_U.book 179 ページ 2022年3月29日 火曜日 午後3時59分
Page 191 of 432
Defogger
185
Instruments and Controls3
– CONTINUED –
interval can be adjusted in several steps
from the shortest interval to the longest.▼ Windshield washerTo wash the windshield, pull the wiper
control lever toward you. The washer fluid
sprays until you release the lever. The
wipers operate while you pull the lever.
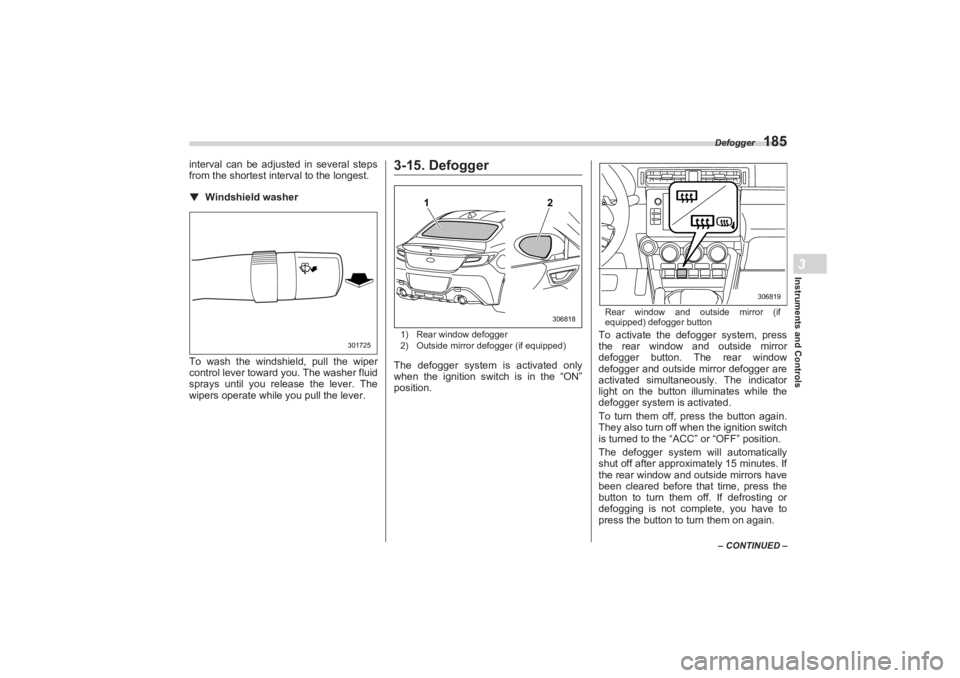
3-15. Defogger1) Rear window defogger
2) Outside mirror defogger (if equipped)The defogger system is activated only
when the ignition switch is in the “ON”
position.
Rear window and outside mirror (if
equipped) defogger buttonTo activate the defogger system, press
the rear window and outside mirror
defogger button. The rear window
defogger and outside mirror defogger are
activated simultaneously. The indicator
light on the button illuminates while the
defogger system is activated.
To turn them off, press the button again.
They also turn off when the ignition switch
is turned to the “ACC” or “OFF” position.
The defogger system will automatically
shut off after approximately 15 minutes. If
the rear window and outside mirrors have
been cleared before that time, press the
button to turn them off. If defrosting or
defogging is not complete, you have to
press the button to turn them on again.
301725
1
2306818
306819
BRZ_U.book 185 ページ 2022年3月29日 火曜日 午後3時59分
Page 192 of 432

Mirrors
186It is possible to set the defogger system
for the continuous operation mode by
operating the center information display.
For details, refer to "Car settings" P165.NOTEWhile the defogger system is in the
continuous operation mode, if the bat-
tery voltage drops below the permissi-
ble level, continuous operation of the
defogger system is canceled and the
system stops operating.
3-16. MirrorsAlways check that the inside and outside
mirrors are properly adjusted before you
start driving.■ Inside Mirror1) Normal position
2) Anti-glare positionPush the tab on the mirror for normal use.
To reduce glare from the headlights of the
vehicle behind you, pull the tab to the anti-
glare position.
■ Auto-Dimming Mirror/
Compass with HomeLink
®
(Dealer Option)
1) Display
2) HomeLink
® buttons
3) Switch
During nighttime driving, the auto-
dimming feature senses distracting glare
from vehicle headlights behind you and
automatically dims to eliminate the glare
and help preserve your vision.
▼ To Operate the Auto-Dimming
FeaturePress the “ ” switch to turn the auto-
dimming feature on/off. The auto-dimming
feature is enabled when the switch’s
green LED indicator is on. The auto-
CAUTION
To prevent the battery from being
discharged, do not operate the
defogger system continuously
for any longer than necessary. Do not use sharp instruments or
window cleaner containing abra-
sives to clean the inner surface of
the rear window. They may
damage the conductors printed
on the window.
305310
1
2
2 3
3048671
BRZ_U.book 186 ページ 2022年3月29日 火曜日 午後3時59分
Page 193 of 432
Mirrors
187
Instruments and Controls3
– CONTINUED –
dimming feature will default to on with
each ignition cycle.▼ To Operate the Compass Feature
1. To turn the compass feature on/off,
press and hold the “ ” switch for more
than 3 seconds or until the display turns
on/off. The compass feature will default to
on with each ignition cycle.
2. If the display reads “C”, slowly drive
the vehicle in circles until compass is cali-
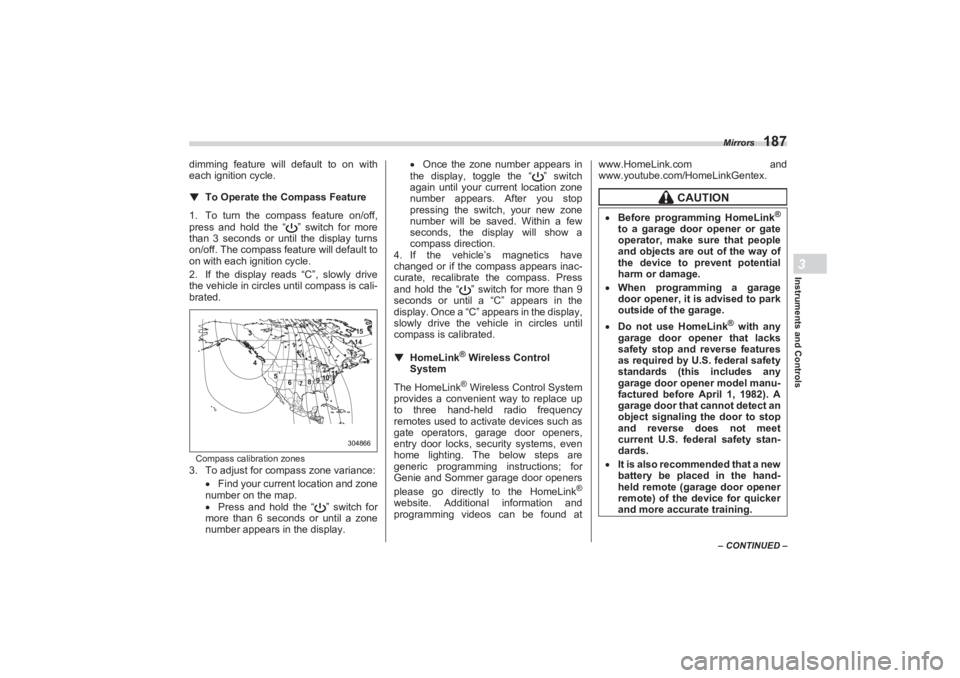
brated.Compass calibration zones3. To adjust for compass zone variance:
Find your current location and zone
number on the map.
Press and hold the “ ” switch for
more than 6 seconds or until a zone
number appears in the display.
Once the zone number appears in
the display, toggle the “ ” switch
again until your current location zone
number appears. After you stop
pressing the switch, your new zone
number will be saved. Within a few
seconds, the disp lay will show a
compass direction.
4. If the vehicle’s magnetics have
changed or if the compass appears inac-
curate, recalibrate the compass. Press
and hold the “ ” switch for more than 9
seconds or until a “C” appears in the
display. Once a “C” a ppears in the display,
slowly drive the vehicle in circles until
compass is calibrated.
▼ HomeLink
® Wireless Control
System
The HomeLink
® Wireless Control System
provides a convenient way to replace up
to three hand-held radio frequency
remotes used to acti vate devices such as
gate operators, garage door openers,
entry door locks, se curity systems, even
home lighting. The below steps are
generic programming instructions; for
Genie and Sommer garage door openers
please go directly to the HomeLink
®
website. Additional information and
programming videos can be found at www.HomeLink.com and
www.youtube.com/HomeLinkGentex.
304866 15
14
13
12
11
10
9
8
7
6
5
4
3
CAUTION
Before programming HomeLink
®
to a garage door opener or gate
operator, make sure that people
and objects are out of the way of
the device to prevent potential
harm or damage.
When programming a garage
door opener, it is advised to park
outside of the garage. Do not use HomeLink
® with any
garage door opener that lacks
safety stop and reverse features
as required by U.S. federal safety
standards (this includes any
garage door opener model manu-
factured before April 1, 1982). A
garage door that cannot detect an
object signaling the door to stop
and reverse does not meet
current U.S. federal safety stan-
dards.
It is also recommended that a new
battery be placed in the hand-
held remote (garage door opener
remote) of the device for quicker
and more accurate training.
BRZ_U.book 187 ページ 2022年3月29日 火曜日 午後3時59分