2023 SUBARU BRZ change time
[x] Cancel search: change timePage 195 of 432
Mirrors
189
Instruments and Controls3
– CONTINUED –
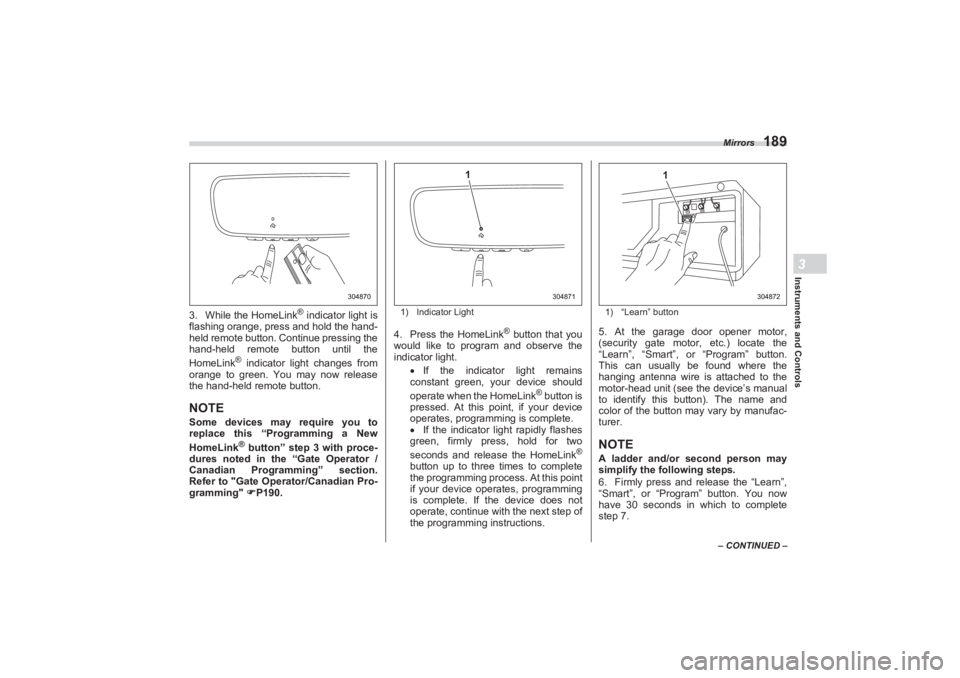
3. While the HomeLink
® indicator light is
flashing orange, press and hold the hand-
held remote button. Continue pressing the
hand-held remote button until the
HomeLink
® indicator light changes from
orange to green. You may now release
the hand-held remote button.
NOTESome devices may require you to
replace this “Programming a New
HomeLink
® button” step 3 with proce-
dures noted in the “Gate Operator /
Canadian Programming” section.
Refer to "Gate Operator/Canadian Pro-
gramming" P190.
1) Indicator Light4. Press the HomeLink
® button that you
would like to program and observe the
indicator light.
If the indicator light remains
constant green, your device should
operate when the HomeLink
® button is
pressed. At this point, if your device
operates, programming is complete.
If the indicator light rapidly flashes
green, firmly press, hold for two
seconds and release the HomeLink
®
button up to three times to complete
the programming process. At this point
if your device operates, programming
is complete. If the device does not
operate, continue with the next step of
the programming instructions.
1) “Learn” button5. At the garage door opener motor,
(security gate motor, etc.) locate the
“Learn”, “Smart”, or “Program” button.
This can usually be found where the
hanging antenna wire is attached to the
motor-head unit (see the device’s manual
to identify this button). The name and
color of the button may vary by manufac-
turer.NOTEA ladder and/or second person may
simplify the following steps.
6. Firmly press and release the “Learn”,
“Smart”, or “Program” button. You now
have 30 seconds in which to complete
step 7.
304870
304871
1
304872
1
BRZ_U.book 189 ページ 2022年3月29日 火曜日 午後3時59分
Page 196 of 432
Mirrors
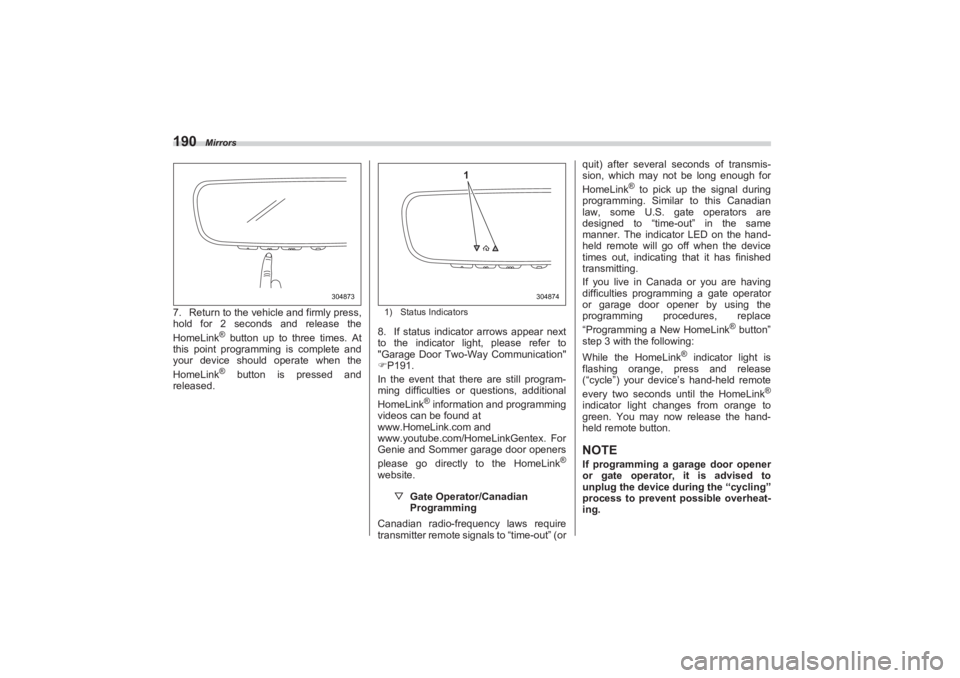
1907. Return to the vehicle and firmly press,
hold for 2 seconds and release the
HomeLink
® button up to three times. At
this point programming is complete and
your device should operate when the
HomeLink® button is pressed and
released.
1) Status Indicators8. If status indicator arrows appear next
to the indicator light, please refer to
"Garage Door Two-Way Communication"
P191.
In the event that there are still program-
ming difficulties or questions, additional
HomeLink
® information and programming
videos can be found at
www.HomeLink.com and
www.youtube.com/HomeLinkGentex. For
Genie and Sommer garage door openers
please go directly to the HomeLink
®
website.
▽ Gate Operator/Canadian
Programming
Canadian radio-frequency laws require
transmitter remote signals to “time-out” (or quit) after several se
conds of transmis-
sion, which may not be long enough for
HomeLink
® to pick up the signal during
programming. Similar to this Canadian
law, some U.S. gate operators are
designed to “time-out” in the same
manner. The indicator LED on the hand-
held remote will go off when the device
times out, indicating that it has finished
transmitting.
If you live in Canada or you are having
difficulties programming a gate operator
or garage door opener by using the
programming procedures, replace
“Programming a New HomeLink
® button”
step 3 with the following:
While the HomeLink
® indicator light is
flashing orange, press and release
(“cycle”) your device’s hand-held remote
every two seconds until the HomeLink
®
indicator light changes from orange to
green. You may now release the hand-
held remote button.NOTEIf programming a garage door opener
or gate operator, it is advised to
unplug the device during the “cycling”
process to prevent possible overheat-
ing.
304873
304874
1
BRZ_U.book 190 ページ 2022年3月29日 火曜日 午後3時59分
Page 197 of 432
Mirrors
191
Instruments and Controls3
– CONTINUED –
Proceed with “Programming a New
HomeLink
® button” step 4 to complete.
▽ Using HomeLink
®
To operate, simply press and release the
programmed HomeLink
® button. Activa-
tion will now occur for the trained device
(i.e. garage door opener, gate operator,
security system, entry door lock, home/
office lighting, etc.). For convenience, the
hand-held remote of the device may also
be used at any time.
▽Erasing HomeLink® buttons
To erase programming from the three
buttons (individual buttons cannot be
erased but can be “reprogrammed” as
outlined below), follow the step noted:
Press and hold the two outer HomeLink
®
buttons for at least 10 seconds. The LED
indicator will change from continuously lit
to rapidly flashing. Release both buttons.
Do not hold for longer than 20 seconds.
HomeLink
® is now ready to be
programmed at any time beginning with
“Programming a New HomeLink
® button”-
step 1. ▽
Reprogramming a Single
HomeLink
® button
To program a previously trained button,
follow these steps:
1. Press and hold the desired
HomeLink
® button. DO NOT release the
button.
2. The indicator light will begin to slowly
flash orange after 20 seconds. The
HomeLink® button can be released at this
point. Proceed with “Programming a New
HomeLink® button”- step 3.
3. If you do not complete the program-
ming of a new device to the button, it will
revert to the previously stored program-
ming.
▽Garage Door Two-Way Commu -
nication
HomeLink® has the capability of commu-
nicating with your garage door opener.
HomeLink® can receive and display
“closing” or “opening” status messages
from compatible garage door opener
systems. At any time, HomeLink
® can
also recall and display the last recorded
status communicated by the garage door
opener to indicate your garage door being
“closed” or “opened”. HomeLink
® has the capability of receiving
this communication from the garage door
opener at a range up to 820 feet (250 m).
Range may be reduced by obstacles such
as houses or trees. You may have to slow
your vehicle speed to successfully receive
the garage door opener communication.
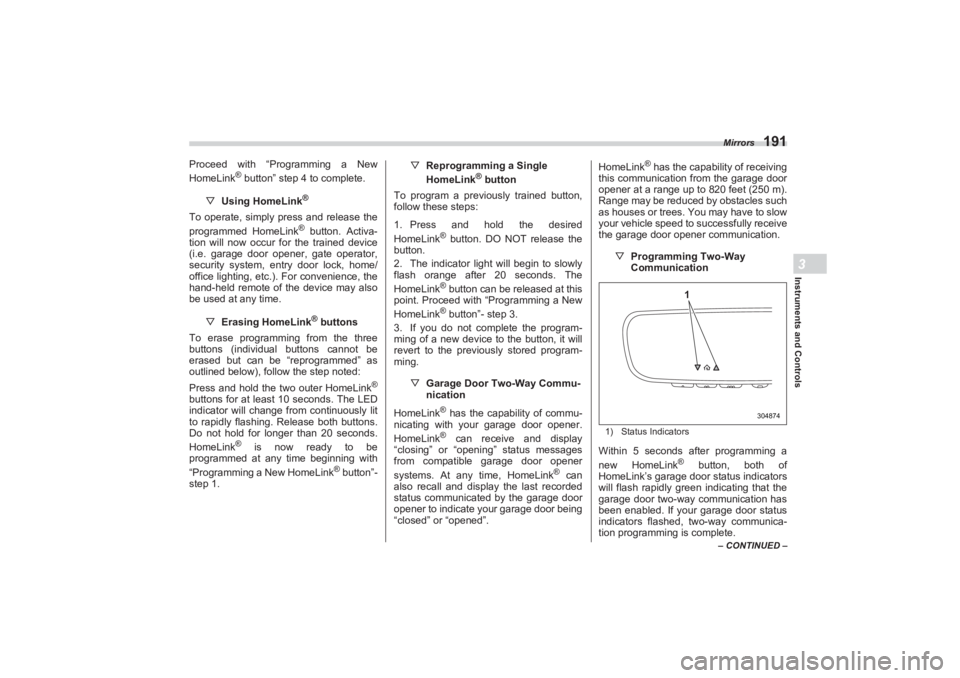
▽Programming Two-Way
Communication
1) Status IndicatorsWithin 5 seconds after programming a
new HomeLink
® button, both of
HomeLink’s garage door status indicators
will flash rapidly green indicating that the
garage door two-way communication has
been enabled. If your garage door status
indicators flashed, two-way communica-
tion programming is complete.
304874
1
BRZ_U.book 191 ページ 2022年3月29日 火曜日 午後3時59分
Page 198 of 432
Mirrors
192If the garage door status indicators do not
flash, additional HomeLink
® information
and programming videos can be found
online at www.HomeLink.com and
www.youtube.com/HomeLinkGentex.
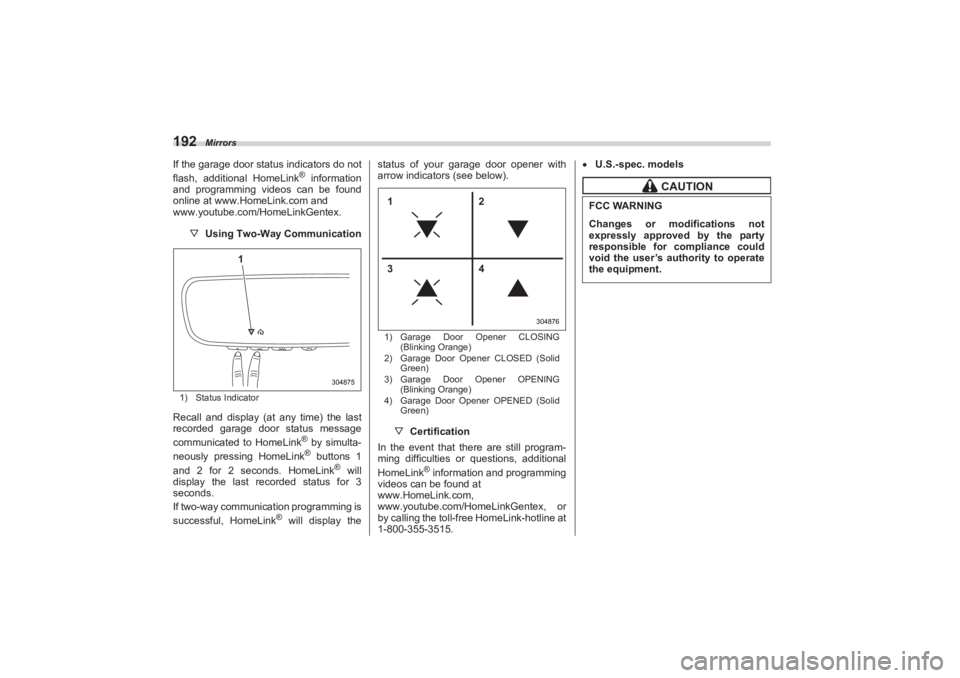
▽ Using Two-Way Communication1) Status IndicatorRecall and display (at any time) the last
recorded garage door status message
communicated to HomeLink
® by simulta-
neously pressing HomeLink® buttons 1
and 2 for 2 seconds. HomeLink
® will
display the last recorded status for 3
seconds.
If two-way communication programming is
successful, HomeLink
® will display the status of your garage door opener with
arrow indicators (see below).
1) Garage Door Opener CLOSING
(Blinking Orange)
2) Garage Door Opener CLOSED (Solid
Green)
3) Garage Door Opener OPENING
(Blinking Orange)
4) Garage Door Opener OPENED (Solid
Green)▽ Certification
In the event that there are still program-
ming difficulties or questions, additional
HomeLink
® information and programming
videos can be found at
www.HomeLink.com,
www.youtube.com/HomeLinkGentex, or
by calling the toll-free HomeLink-hotline at
1-800-355-3515.
U.S.-spec. models
304875
1
304876
12
34
CAUTION
FCC WARNINGChanges or modifications not
expressly approved by the party
responsible for compliance could
void the user’s authority to operate
the equipment.
BRZ_U.book 192 ページ 2022年3月29日 火曜日 午後3時59分
Page 211 of 432
Air Filtration System
205
Climate Control4
– CONTINUED –
■Cooling and Dehumidifying
in High Humidity and Low
Te mperature Weather Condi -
tionUnder certain weather conditions (high
relative humidity, lo w temperatures, etc.)
a small amount of water vapor emission
from the air outlets may be noticed. This
condition is normal and does not indicate
any problem with the air conditioning
system.■ Air Conditioner Compressor
Shut-Off Whe n Engine Is
Heavily LoadedTo improve acceleration and gas mileage,
the air conditio ner compressor is
designed to temporarily shut off during air
conditioner operation whenever the accel-
erator is fully depressed such as during
rapid acceleration or when driving on a
steep upgrade.
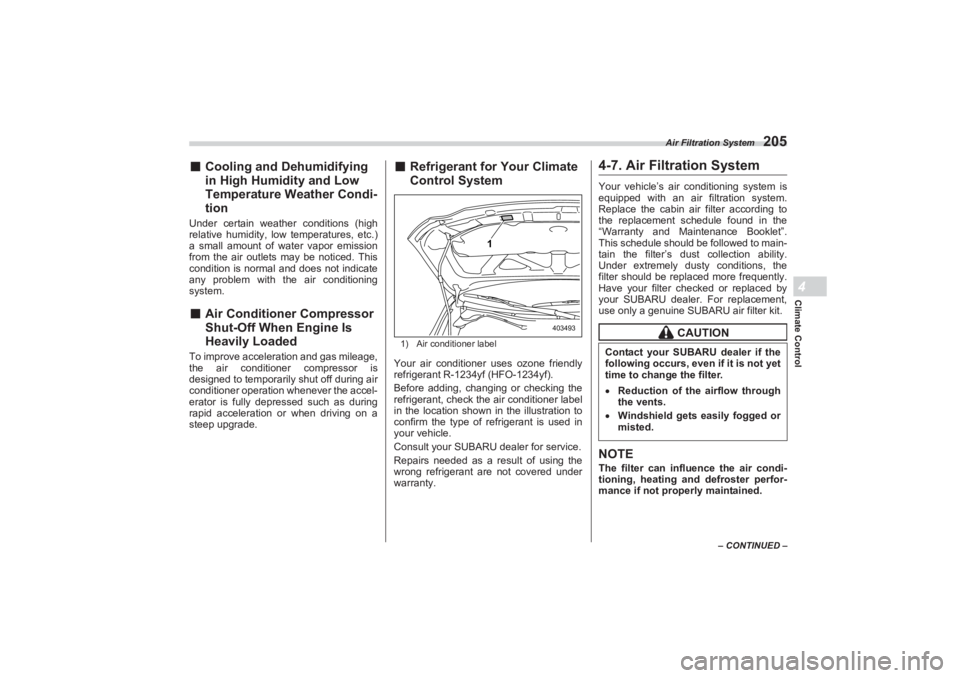
■ Refrigerant for Your Climate
Control Syste m1) Air conditioner labelYour air conditioner uses ozone friendly
refrigerant R-1234yf (HFO-1234yf).
Before adding, changing or checking the
refrigerant, check the air conditioner label
in the location shown in the illustration to
confirm the type of refrigerant is used in
your vehicle.
Consult your SUBARU dealer for service.
Repairs needed as a result of using the
wrong refrigerant are not covered under
warranty.
4-7. Air Filtration SystemYour vehicle’s air conditioning system is
equipped with an air filtration system.
Replace the cabin air filter according to
the replacement schedule found in the
“Warranty and Maintenance Booklet”.
This schedule should be followed to main-
tain the filter’s dust collection ability.
Under extremely dusty conditions, the
filter should be replaced more frequently.
Have your filter checked or replaced by
your SUBARU dealer. For replacement,
use only a genuine SUBARU air filter kit.NOTEThe filter can influence the air condi-
tioning, heating and defroster perfor-
mance if not properly maintained.
1
403493
CAUTION
Contact your SUBARU dealer if the
following occurs, even if it is not yet
time to change the filter. Reduction of the airflow through
the vents. Windshield gets easily fogged or
misted.
BRZ_U.book 205 ページ 2022年3月29日 火曜日 午後3時59分
Page 218 of 432
Interior Light
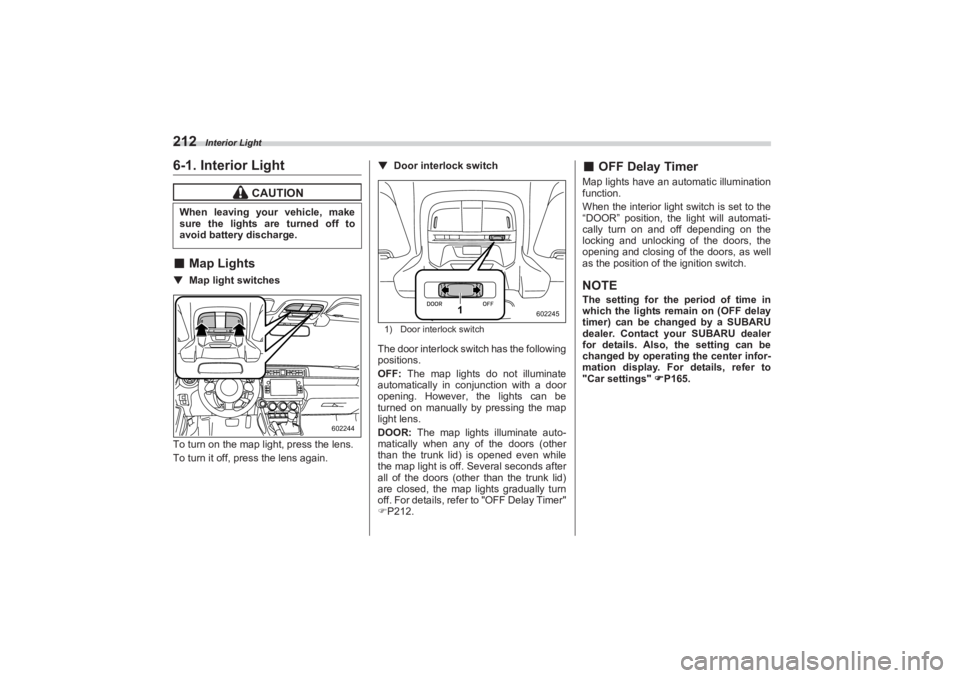
2126-1. Interior Light■Map Lights▼ Map light switches
To turn on the map light, press the lens.
To turn it off, press the lens again. ▼
Door interlock switch
1) Door interlock switchThe door interlock switch has the following
positions.
OFF: The map lights do not illuminate
automatically in conjunction with a door
opening. However, the lights can be
turned on manually by pressing the map
light lens.
DOOR: The map lights illuminate auto-
matically when any of the doors (other
than the trunk lid) is opened even while
the map light is off. Several seconds after
all of the doors (other than the trunk lid)
are closed, the map lights gradually turn
off. For details, refer to "OFF Delay Timer"
P212.
■ OFF Delay TimerMap lights have an automatic illumination
function.
When the interior light switch is set to the
“DOOR” position, the light will automati-
cally turn on and off depending on the
locking and unlocking of the doors, the
opening and closing of the doors, as well
as the position of the ignition switch.NOTEThe setting for the period of time in
which the lights remain on (OFF delay
timer) can be changed by a SUBARU
dealer. Contact your SUBARU dealer
for details. Also, the setting can be
changed by operating the center infor-
mation display. For details, refer to
"Car settings" P165.
CAUTION
When leaving your vehicle, make
sure the lights are turned off to
avoid battery discharge.
602244
1
602245
BRZ_U.book 212 ページ 2022年3月29日 火曜日 午後3時59分
Page 245 of 432

Automatic Transmission
239
Starting and Operating7
– CONTINUED –
3. While depressing the brake pedal,
insert the screwdriver into the hole, press
the shift lock release portion using the
screwdriver, and then move the select
lever.
If the select lever does not move after
performing the above procedure, the shift
lock system may be malfunctioning.
Contact a SUBARU dealer for an inspec-
tion as soon as possible.■ Selection of Manual Mode▼ Selecting gears in manual modeShift the select lever to the “M” position to
change to manual mode.
When the upshift/downshift indicators are
illuminated, the vehicle can be driven in a
selected gear by shifti ng the select lever toward “-” or “+” or operating the “-” or “+”
shift paddle.
1) Upshift indicator
2) Downshift indicator
3) Upshift
4) Downshift
The gear changes once each time the
select lever or a shift paddle is operated.
The selected gear, from “M1” to “M6”, will
be displayed on the combination meter.
When in manual mode, the gear will not
change unless the select lever or a shift
paddle is operated, except in the following
situations.
When the vehicle speed drops
(downshift only)
When the engine oil temperature is
high and the engine speed approaches
close to the red zone
If an upshift is atte mpted while the vehicle
speed is low, the gear will not be changed.NOTE If a downshift is attempted at a
vehicle speed where a downshift is not
possible (when the engine speed
would enter the red zone if a downshift
is performed), the downshift warning
buzzer will sound to inform the driver
that a downshift cannot be performed.
You can perform a skip-shift (for
example, from 4th to 2nd) by operating
702770
13
4
2
3
4702773
CAUTION
Do not place or hang anything on
the shift paddles. Doing so may
result in accidental gear shifting.
BRZ_U.book 239 ページ 2022年3月29日 火曜日 午後3時59分
Page 261 of 432

Parking Your Vehicle
255
Starting and Operating7
– CONTINUED –
■When Initialization of the Tire
Pressure Monitoring System
has FailedInitialization can be completed in a few
minutes. However, in the following case,
the settings have not been recorded and
the system will not o perate properly. If
repeated attempts to record tire inflation
pressure settings ar e unsuccessful, have
the vehicle checked at your SUBARU
dealer.
When operating the TPMS set switch,
low tire pressure warning light does not
blink 3 times.
After carrying out the initialization
procedure, the low tire pressure warning
light blinks for 1 minute then stays on after
driving for 20 minutes.
■ Registering ID CodesEvery tire pressure warning valve and
transmitter has a unique ID code. In addi-
tion to the set of tire pressure monitoring
system sensor ID code s initially registered
to the vehicle, a second set of ID codes
can be registered.
A second set of tire pressure monitoring
system sensor ID codes can be registered
at your SUBARU dealer. When 2 sets of
ID codes have been registered, either ID
code set can be selected.■ Changing the ID code set1. Park the vehicle in a safe place and
turn the ignition swit ch to the “ON” posi-
tion.
2. Press the TPMS set switch 3 times
within 3 seconds.
3. The low tire pressure warning light will
illuminate for 3 seconds and then blink 3
times.
4. The low tire pressure warning light will
blink for 1 minute and then illuminate.
5. When the ID code change has
completed, the tire pressure monitoring
light will turn off.
Check that tire pressures are displayed on
the TPMS screen.
7-16. Parking Your Vehicle■ Parking BrakeTo set the parking brake, depress the
brake pedal firmly and hold it down until
the parking brake lever is fully pulled up.
WARNING
Do not operate the TPMS set switch
without first adjust ing the tire infla-
tion pressure to the specified level.
Otherwise, the low tire pressure
warning light may not come on even
if the tire inflation pressure is low,
or it may come on when the tire
inflation pressure is actually nor-
mal.
WARNING
Never leave unattended children
or pets in the vehicle. They could
accidentally injure themselves or
others through inadvertent oper-
ation of the vehicle. Also, on hot
or sunny days, the temperature in
a closed vehicle could quickly
become high enough to cause
severe or possibly fatal injuries to
people. Do not park the vehicle over flam-
mable materials such as dry
grass, waste paper or rags, as
they may burn easily if they come
near hot engine or exhaust
system parts. Be sure to stop the engine if you
take a nap in the vehicle. If engine
exhaust gas enters the passenger
compartment, occupants in the
vehicle could die from carbon
monoxide (CO) contained in the
exhaust gas.
BRZ_U.book 255 ページ 2022年3月29日 火曜日 午後3時59分