2023 SUBARU BRZ ESP
[x] Cancel search: ESPPage 175 of 432
Center Information Display (CID)
169
Instruments and Controls3
– CONTINUED –
*1: If equipped
*2: For details about EyeSight system, refer to the
Owner’s Manual supplement for the EyeSight system.
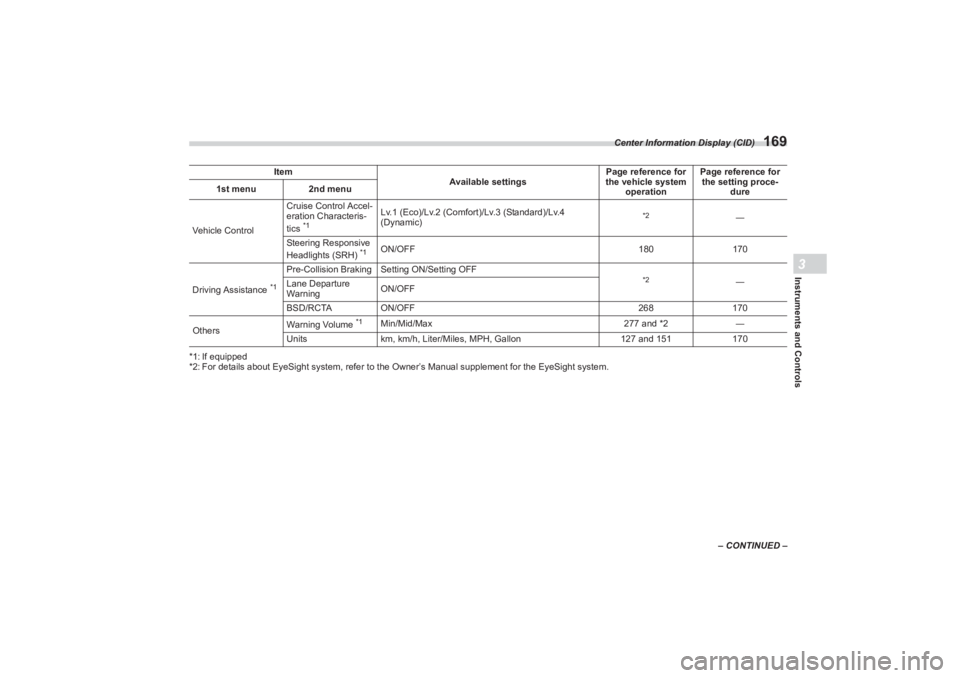
Item
Available settingsPage reference for
the vehicle system
operation Page reference for
the setting proce-
dure
1st menu
2nd menu
Vehicle Control Cruise Control Accel-
eration Characteris-
tics
*1
Lv.1 (Eco)/Lv.2 (Comfort)/Lv.3 (Standard)/Lv.4
(Dynamic)
*2
―
Steering Responsive
Headlights (SRH)
*1
ON/OFF 180170
Driving Assistance
*1
Pre-Collision Braking S etting ON/Setting OFF
*2
―
Lane Departure
Warning ON/OFF
BSD/RCTA ON/OFF 268170
Others Warning Volume
*1
Min/Mid/Max
277 and *2―
Units km, km/h, Liter/Miles, MPH, Gallon 127 and 151170
BRZ_U.book 169 ページ 2022年3月29日 火曜日 午後3時59分
Page 183 of 432
Light Control Switch
177
Instruments and Controls3
– CONTINUED –
When the headlights are on high beam,
the high beam indicator light “ ” on the
combination meter also illuminates.■ High Beam Assist Function
(If Equipped)
NOTE The high beam assist function
utilizes the stereo camera installed at
the position of th e front map lights.
For details on how to handle the
stereo camera, refer to the Owner’s
Manual supplement for the EyeSight
system.
The high beam assist function automati-
cally changes the headlight from high
beam to low beam (or vice versa).
When all of the following conditions are
met, the headlight will change to high
beam.
When the vehicle speed increases to or
above 20 mph (32 km/h).
There is no preceding or oncoming
vehicle.
The forward area of the vehicle is dark.
The road does not have a sharp curve.
When any of the following conditions are
met, the headlight will change to low
beam.
When the vehicle speed decreases to
or below 10 mph (16 km/h).
When the forward area of the vehicle is
bright.
When there is a preceding or oncoming
vehicle.
When the EyeSight system is malfunc-
tioning or is temporarily stopped.
NOTE Do not overestimate the capacity of
the high beam assist function. The
driver always has the responsibility to
understand the surrounding situation,
to drive safely, and to change the head-
light mode manually if necessary.
The factory setting (default setting)
for this function is set as “operational”.
This setting can be changed to OFF
(non-operation) at SUBARU dealers.
For more details, contact a SUBARU
dealer.
▼ How to use the high beam assist
function
The high beam assist function will be acti-
vated when all the following conditions are
met.
The light control swit ch is in the “AUTO”
position and the low beam headlights are
on automatically.
The turn signal lever is pushed forward.
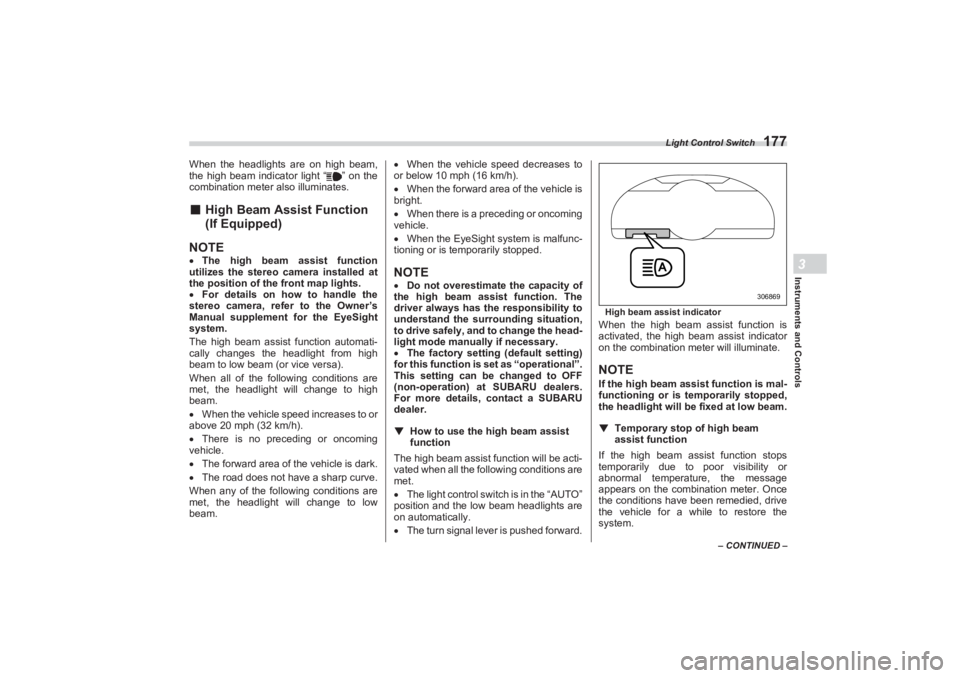
High beam assist indicatorWhen the high beam assist function is
activated, the high beam assist indicator
on the combination meter will illuminate.NOTEIf the high beam ass ist function is mal-
functioning or is temporarily stopped,
the headlight will be fixed at low beam.
▼ Temporary stop of high beam
assist functionIf the high beam assist function stops
temporarily due to poor visibility or
abnormal temperature, the message
appears on the combination meter. Once
the conditions have been remedied, drive
the vehicle for a while to restore the
system.
306869
BRZ_U.book 177 ページ 2022年3月29日 火曜日 午後3時59分
Page 186 of 432
Steering Responsive Headlight (SRH) (If Equipped)
180■Daytime Running Light
SystemThe daytime running lights will automati-
cally illuminate when the following condi-
tions are fulfilled.
The engine is running.
The parking brake is fully released.
The light control switch is in the
“AUTO”, “ ” or “OFF” position.
For AT models, the select lever is in a
position other than the “P” position.NOTE When the light switch is in the “ ”
position, the instrument panel illumina-
tion, side marker lights, tail lights and
license plate lights are also illumi-
nated.
While the headlight switch is in the
“AUTO” position and the headlights
turn on automatically, the daytime
running light is deactivated.
When the turn signal indicators are
flashing, the daytime running light on
the side that the turn signals are
flashing will turn off.
3-11. Steering Responsive
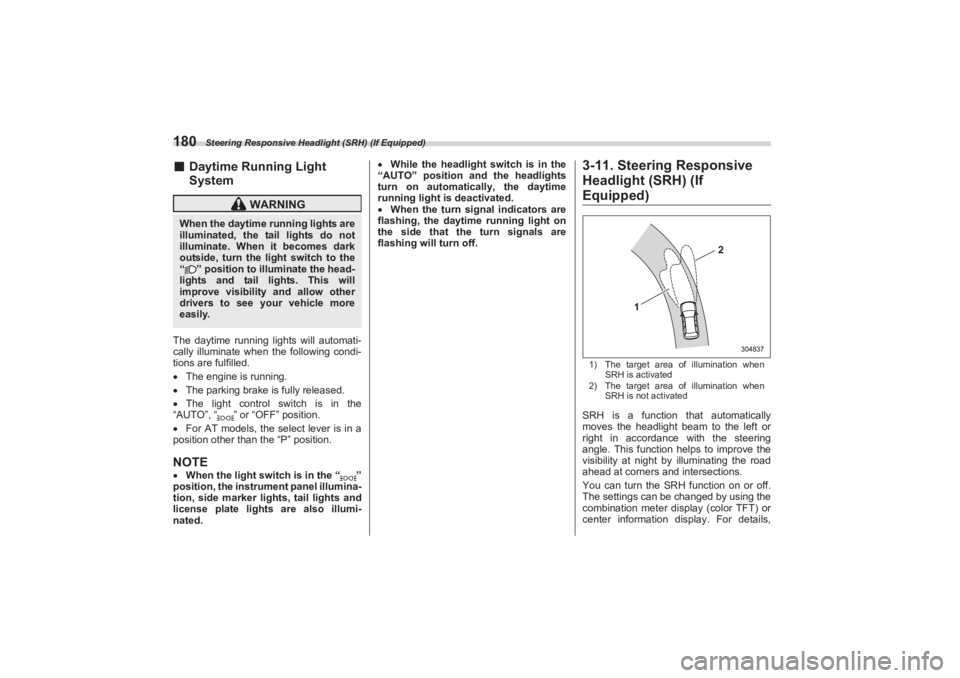
Headlight (SRH) (If Equipped)1) The target area of illumination when
SRH is activated
2) The target area of illumination when
SRH is not activatedSRH is a function that automatically
moves the headlight beam to the left or
right in accordance with the steering
angle. This function helps to improve the
visibility at night by illuminating the road
ahead at corners and intersections.
You can turn the SRH function on or off.
The settings can be changed by using the
combination meter display (color TFT) or
center information display. For details,
WARNING
When the daytime running lights are
illuminated, the tail lights do not
illuminate. When it becomes dark
outside, turn the li ght switch to the
“ ” position to illuminate the head-
lights and tail lights. This will
improve visibility and allow other
drivers to see your vehicle more
easily.
1
2
304837
BRZ_U.book 180 ページ 2022年3月29日 火曜日 午後3時59分
Page 187 of 432
Steering Responsive Headlight (SRH) (If Equipped)
181
Instruments and Controls3
refer to "Driving Support System Settings
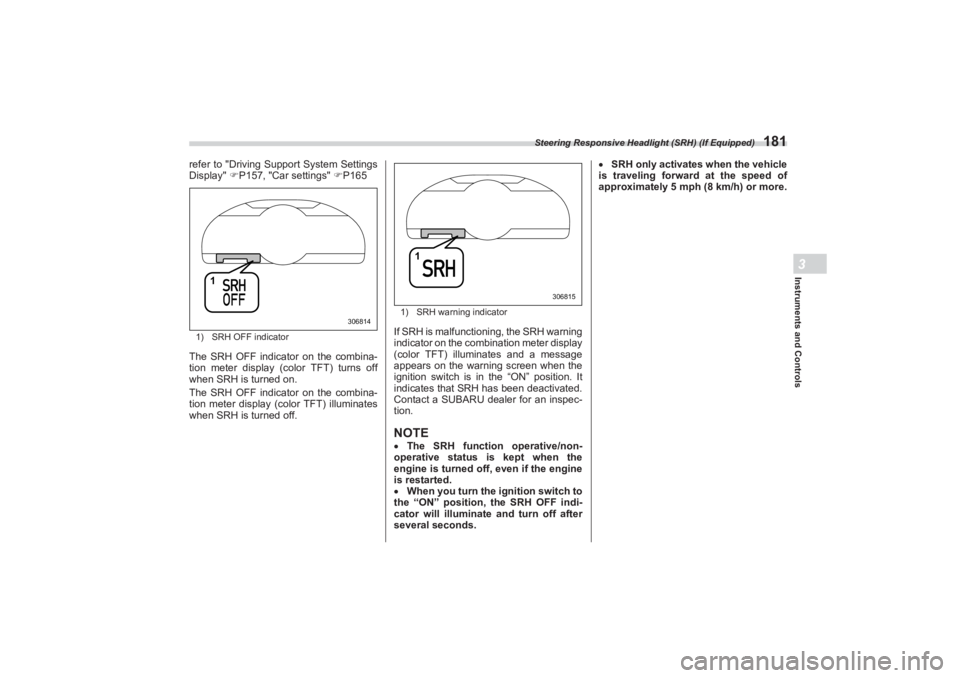
Display" P157, "Car settings" P1651) SRH OFF indicatorThe SRH OFF indicator on the combina-
tion meter display (color TFT) turns off
when SRH is turned on.
The SRH OFF indicator on the combina-
tion meter display (color TFT) illuminates
when SRH is turned off.
1) SRH warning indicatorIf SRH is malfunctioning, the SRH warning
indicator on the combination meter display
(color TFT) illuminates and a message
appears on the warning screen when the
ignition switch is in the “ON” position. It
indicates that SRH has been deactivated.
Contact a SUBARU dealer for an inspec-
tion.NOTE The SRH function operative/non-
operative status is kept when the
engine is turned off, even if the engine
is restarted.
When you turn the ignition switch to
the “ON” position, the SRH OFF indi-
cator will illuminate and turn off after
several seconds.
SRH only activates when the vehicle
is traveling forward at the speed of
approximately 5 mph (8 km/h) or more.
1
306814
1
306815
BRZ_U.book 181 ページ 2022年3月29日 火曜日 午後3時59分
Page 198 of 432
Mirrors
192If the garage door status indicators do not
flash, additional HomeLink
® information
and programming videos can be found
online at www.HomeLink.com and
www.youtube.com/HomeLinkGentex.
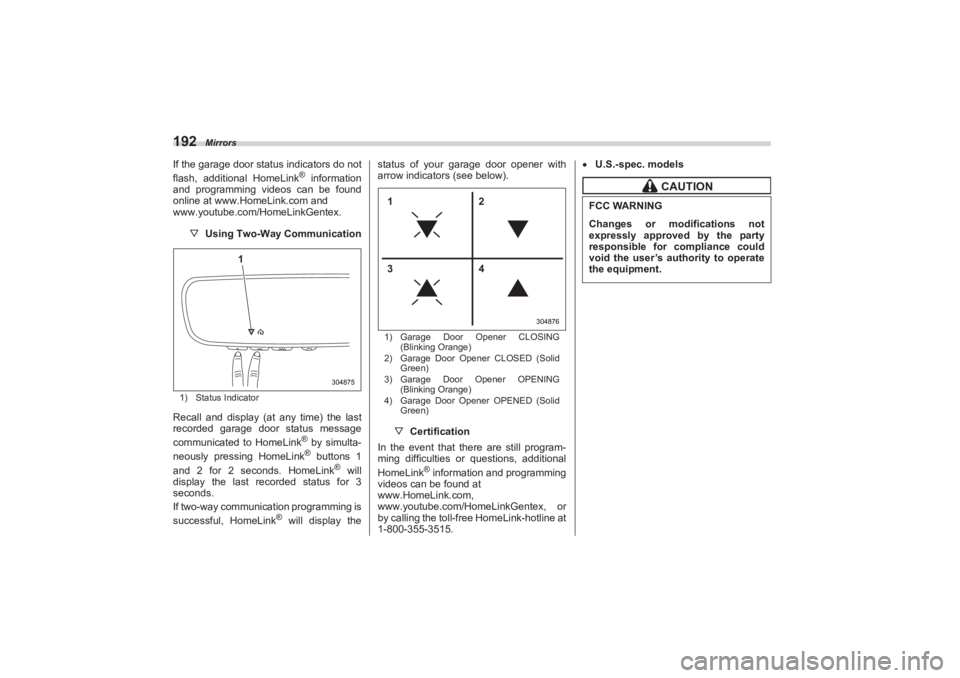
▽ Using Two-Way Communication1) Status IndicatorRecall and display (at any time) the last
recorded garage door status message
communicated to HomeLink
® by simulta-
neously pressing HomeLink® buttons 1
and 2 for 2 seconds. HomeLink
® will
display the last recorded status for 3
seconds.
If two-way communication programming is
successful, HomeLink
® will display the status of your garage door opener with
arrow indicators (see below).
1) Garage Door Opener CLOSING
(Blinking Orange)
2) Garage Door Opener CLOSED (Solid
Green)
3) Garage Door Opener OPENING
(Blinking Orange)
4) Garage Door Opener OPENED (Solid
Green)▽ Certification
In the event that there are still program-
ming difficulties or questions, additional
HomeLink
® information and programming
videos can be found at
www.HomeLink.com,
www.youtube.com/HomeLinkGentex, or
by calling the toll-free HomeLink-hotline at
1-800-355-3515.
U.S.-spec. models
304875
1
304876
12
34
CAUTION
FCC WARNINGChanges or modifications not
expressly approved by the party
responsible for compliance could
void the user’s authority to operate
the equipment.
BRZ_U.book 192 ページ 2022年3月29日 火曜日 午後3時59分
Page 221 of 432
Bottle Holders
215
Interior Equipment6
– CONTINUED –
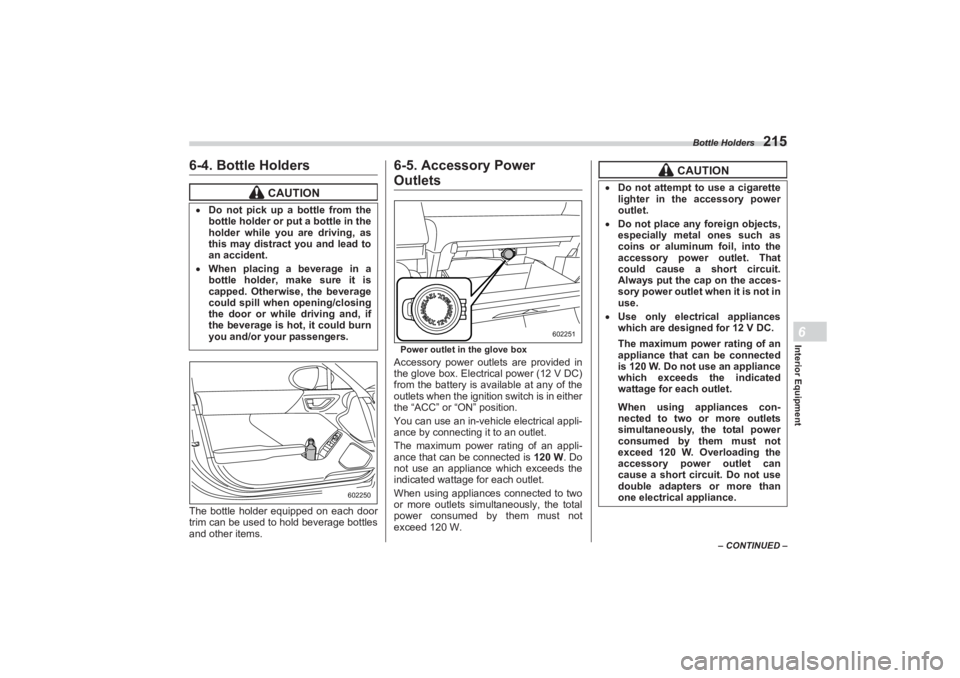
6-4. Bottle HoldersThe bottle holder equipped on each door
trim can be used to hold beverage bottles
and other items.
6-5. Accessory Power OutletsPower outlet in the glove boxAccessory power outlets are provided in
the glove box. Electrical power (12 V DC)
from the battery is available at any of the
outlets when the ignition switch is in either
the “ACC” or “ON” position.
You can use an in-vehicle electrical appli-
ance by connecting it to an outlet.
The maximum power rating of an appli-
ance that can be connected is 120 W. Do
not use an appliance which exceeds the
indicated wattage for each outlet.
When using appliances connected to two
or more outlets simultaneously, the total
power consumed by them must not
exceed 120 W.
CAUTION
Do not pick up a bottle from the
bottle holder or pu t a bottle in the
holder while you are driving, as
this may distract you and lead to
an accident. When placing a beverage in a
bottle holder, make sure it is
capped. Otherwise, the beverage
could spill when opening/closing
the door or while driving and, if
the beverage is hot, it could burn
you and/or your passengers.
602250
602251
CAUTION
Do not attempt to use a cigarette
lighter in the accessory power
outlet. Do not place any foreign objects,
especially metal ones such as
coins or aluminum foil, into the
accessory power outlet. That
could cause a short circuit.
Always put the cap on the acces-
sory power outlet when it is not in
use. Use only electrical appliances
which are designed for 12 V DC.
The maximum power rating of an
appliance that can be connected
is 120 W. Do not use an appliance
which exceeds the indicated
wattage for each outlet.When using appliances con-
nected to two or more outlets
simultaneously, the total power
consumed by them must not
exceed 120 W. Overloading the
accessory power outlet can
cause a short circuit. Do not use
double adapters or more than
one electrical appliance.
BRZ_U.book 215 ページ 2022年3月29日 火曜日 午後3時59分
Page 222 of 432
USB Power Supply
216
6-6. USB Power Supply
NOTEThe rated voltage of each USB
terminal is 5 V/2.1 A (total 4.2 A). For
details about the maximum rated
power, refer to "How to Use the USB
Power Supply" P217. Before
connecting a device, be sure to read
the instruction manual of the device
and check whether or not this specifi-
cation of the output is supported by the
device. If a device that requires power
exceeding the maximum rating is
connected, power supply or charging
may not be possible. Even if charging
could be completed, the time required
for charging may be longer than when
the genuine charger for that device is
used.
Depending on the device, charging
may be possible only when a special
If the plug on your electric appli-
ance is either too loose or too
tight for the accessory power
outlet, this can result in a poor
contact or cause the plug to get
stuck. Only use plugs that fit
properly. Use of an electric appliance in the
accessory power outlet for a long
period of time while the engine is
not running can cause battery
discharge. Before driving your vehicle, make
sure that the plug and the cord on
your electrical appliance will not
interfere with your shifting gears
and operating the accelerator and
brake pedals. If they do, do not
use the electrical appliance while
driving.
CAUTION
The specification of a USB
terminal that can be used is the A-
type. If a different specification of
terminal is connected, power
supply or charging may not be
possible, or the device may
malfunction. There is a risk that a connected
device may malfunction or data
may be damaged. The connection
of a device shall be performed at
your responsibility. To avoid an electric shock or a
malfunction, observe the
following precautions.
- Do not connect a USB hub.- Do not insert any metal or
other foreign object into the
USB terminal.- Do not spill water or other
liquid on the USB terminal.
Be careful not to pull the
connected cable. Doing so could
break the USB terminal and the
connected device.
If a device is connected for a long
time when the engine is not
running, doing so may cause the
risk of a discharged battery. Even
when the engine is running, we
recommend that you do not
connect a device for an unneces-
sarily long time. Do not connect a malfunctioning
device. Doing so may cause the
risk of smoke and fire.
BRZ_U.book 216 ページ 2022年3月29日 火曜日 午後3時59分
Page 231 of 432
Fuel
225
Starting and Operating7
– CONTINUED –
Press the unlock side of the power
door locking switch.
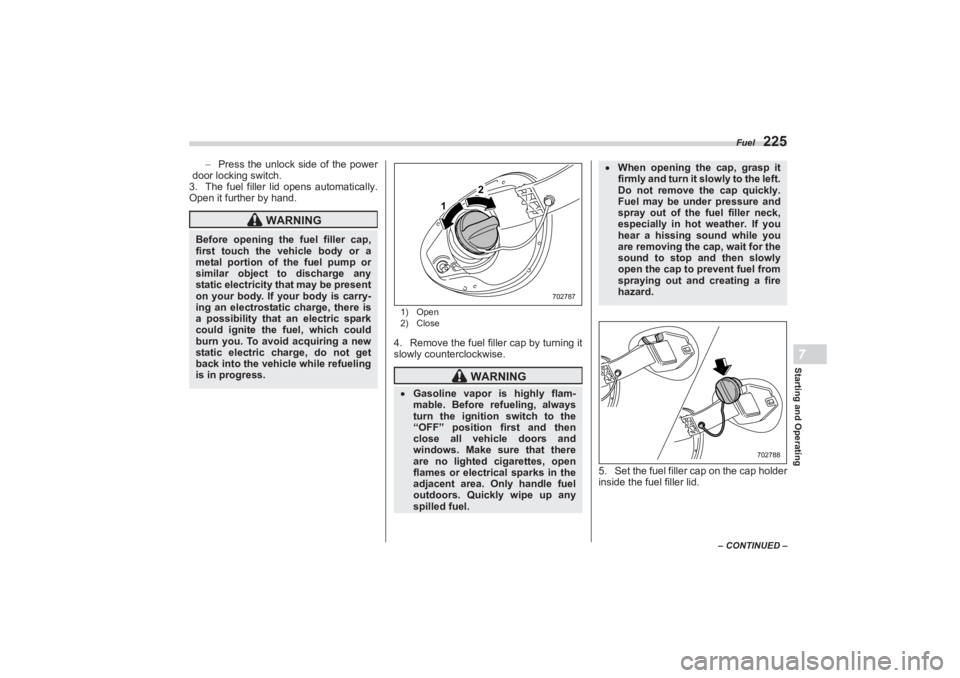
3. The fuel filler lid opens automatically.
Open it further by hand.
1) Open
2) Close4. Remove the fuel filler cap by turning it
slowly counterclockwise.
5. Set the fuel filler cap on the cap holder
inside the fuel filler lid.
WARNING
Before opening the fuel filler cap,
first touch the veh icle body or a
metal portion of the fuel pump or
similar object to discharge any
static electricity that may be present
on your body. If your body is carry-
ing an electrostatic charge, there is
a possibility that an electric spark
could ignite the fuel, which could
burn you. To avoid acquiring a new
static electric charge, do not get
back into the vehicle while refueling
is in progress.
WARNING
Gasoline vapor is highly flam-
mable. Before refueling, always
turn the ignition switch to the
“OFF” position first and then
close all vehicle doors and
windows. Make sure that there
are no lighted cigarettes, open
flames or electrical sparks in the
adjacent area. Only handle fuel
outdoors. Quickly wipe up any
spilled fuel.
1
2
702787
When opening the cap, grasp it
firmly and turn it slowly to the left.
Do not remove the cap quickly.
Fuel may be under pressure and
spray out of the fuel filler neck,
especially in hot weather. If you
hear a hissing sound while you
are removing the cap, wait for the
sound to stop and then slowly
open the cap to prevent fuel from
spraying out and creating a fire
hazard.
702788
BRZ_U.book 225 ページ 2022年3月29日 火曜日 午後3時59分