2023 PEUGEOT LANDTREK run flat
[x] Cancel search: run flatPage 12 of 164
10
Dashboard instruments
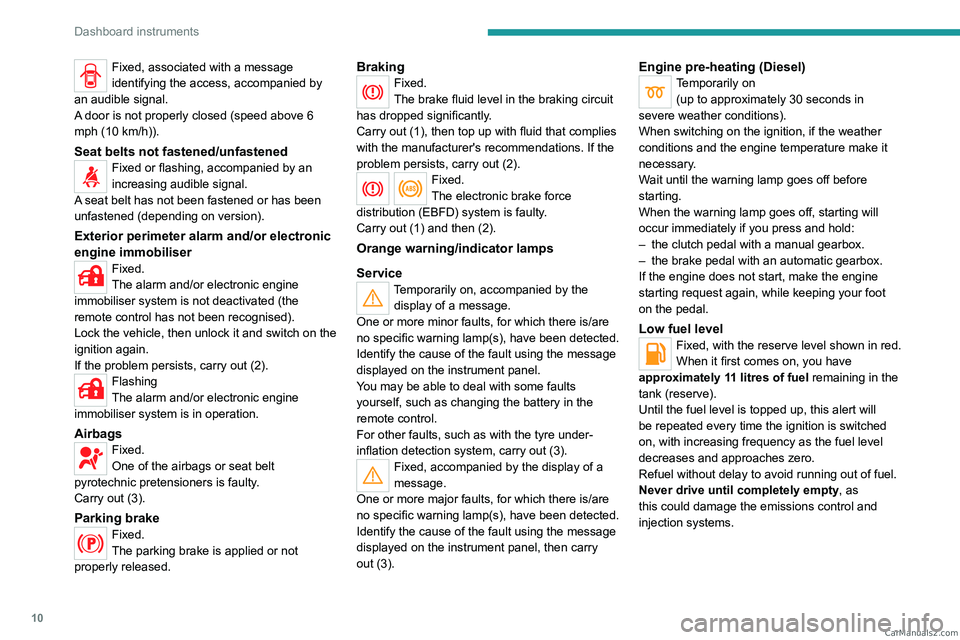
Fixed, associated with a message
identifying the access, accompanied by
an audible signal.
A door is not properly closed (speed above 6
mph (10 km/h)).
Seat belts not fastened/unfastenedFixed or flashing, accompanied by an
increasing audible signal.
A seat belt has not been fastened or has been
unfastened (depending on version).
Exterior perimeter alarm and/or electronic
engine immobiliser
Fixed.
The alarm and/or electronic engine
immobiliser system is not deactivated (the
remote control has not been recognised).
Lock the vehicle, then unlock it and switch on the
ignition again.
If the problem persists, carry out (2).
Flashing
The alarm and/or electronic engine
immobiliser system is in operation.
AirbagsFixed.
One of the airbags or seat belt
pyrotechnic pretensioners is faulty.
Carry out (3).
Parking brakeFixed.
The parking brake is applied or not
properly released.
BrakingFixed.
The brake fluid level in the braking circuit
has dropped significantly.
Carry out (1), then top up with fluid that complies
with the manufacturer's recommendations. If the
problem persists, carry out (2).
Fixed.
The electronic brake force
distribution
(EBFD) system is faulty.
Carry out (1) and then (2).
Orange warning/indicator lamps
Service
Temporarily on, accompanied by the display of a message.
One or more minor faults, for which there is/are
no specific warning lamp(s), have been detected.
Identify the cause of the fault using the message
displayed on the instrument panel.
You may be able to deal with some faults
yourself, such as changing the battery in the
remote control.
For other faults, such as with the tyre under-
inflation detection system, carry out (3).
Fixed, accompanied by the display of a
message.
One or more major faults, for which there is/are
no specific warning lamp(s), have been detected.
Identify the cause of the fault using the message
displayed on the instrument panel, then carry
out (3).
Engine pre-heating (Diesel)Temporarily on (up to approximately 30 seconds in
severe weather conditions).
When switching on the ignition, if the weather
conditions and the engine temperature make it
necessary.
Wait until the warning lamp goes off before
starting.
When the warning lamp goes off, starting will
occur immediately if you press and hold:
–
the clutch pedal with a manual gearbox.
–
the brake pedal with an automatic gearbox.
If the engine does not start, make the engine
starting request again, while keeping your foot
on the pedal.
Low fuel levelFixed, with the reserve level shown in red.
When it first comes on, you have
approximately 11 litres of fuel remaining in the
tank (reserve).
Until the fuel level is topped up, this alert will
be repeated every time the ignition is switched
on, with increasing frequency as the fuel level
decreases and approaches zero.
Refuel without delay to avoid running out of fuel.
Never drive until completely empty, as
this could damage the emissions control and
injection systems. CarM an uals 2 .c o m
Page 28 of 164
26
Access
From inside
► Pull the interior opening control of a door; this
unlocks the vehicle completely .
With selective unlocking activated:
– Opening the driver's door unlocks
the driver's door only (if the vehicle has not
already been completely unlocked).
–
Opening one of the passenger doors
unlocks the rest of the vehicle.
Closing
If a door is not properly closed, a message is
displayed on the instrument panel if the engine
is running, accompanied by an audible signal
when the vehicle is travelling at more than 12
mph (20
km/h).
Tailgate
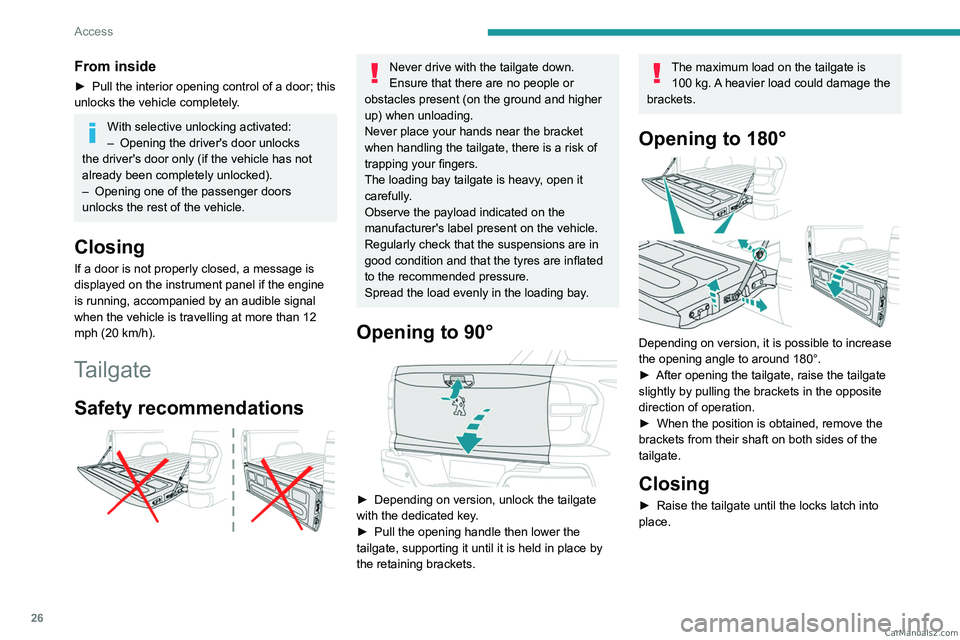
Safety recommendations
Never drive with the tailgate down.
Ensure that there are no people or
obstacles present (on the ground and higher
up) when unloading.
Never place your hands near the bracket
when handling the tailgate, there is a risk of
trapping your fingers.
The loading bay tailgate is heavy, open it
carefully.
Observe the payload indicated on the
manufacturer's label present on the vehicle.
Regularly check that the suspensions are in
good condition and that the tyres are inflated
to the recommended pressure.
Spread the load evenly in the loading bay.
Opening to 90°
► Depending on version, unlock the tailgate
with the dedicated key .
►
Pull the opening handle then lower the
tailgate, supporting it until it is held in place by
the retaining brackets.
The maximum load on the tailgate is 100 kg. A heavier load could damage the
brackets.
Opening to 180°
Depending on version, it is possible to increase
the opening angle to around 180°.
►
After opening the tailgate, raise the tailgate
slightly by pulling the brackets in the opposite
direction of operation.
►
When the position is obtained, remove the
brackets from their shaft on both sides of the
tailgate.
Closing
► Raise the tailgate until the locks latch into
place. CarM an uals 2 .c o m
Page 58 of 164
56
Safety
The electronic stability control system (ESC)
must not have any faults.
The vehicle speed must be less than
approximately 53 mph (85 km/h).
If the system detects that the trailer is
snaking, it applies the brakes to stabilise
the trailer and reduces engine power, if
necessary, to slow the vehicle (indicated by the
flashing of this warning lamp on the instrument
panel and the brake lamps coming on).
For information on weights and towed loads,
refer to the Engine technical data and towed
loads section or your vehicle’s registration
certificate.
To ensure safe driving with a Towing device,
refer to the corresponding section.
Malfunction
If a fault occurs, this warning lamp lights
up on the instrument panel, accompanied
by a message and an audible signal.
To continue towing a trailer, reduce speed and
drive carefully!
Have it checked by a PEUGEOT dealer or a
qualified workshop.
The trailer stability control system provides an extra safety feature under
normal driving conditions, when following the
recommendations for use of trailers and
current legislation in force in your country. It
must not encourage the driver to take extra
risks, such as using a trailer in unsuitable
conditions of operation (e.g. excessive load,
exceeded nose weight, worn or under-inflated
tyres, faulty braking system) or driving at
excessive speed.
In certain cases, the system may not detect
trailer snaking, particularly with a light trailer
.
When driving on slippery or poor surfaces, the
system may not be able to prevent sudden
trailer snaking.
Hill Assist Descent
Control
Hill Assist Descent Control system for steep
slopes and on road surfaces with poor grip
(e.g.
gravel, mud).
This system reduces the risk of loss of control
or slipping of the vehicle when descending in
forward gear.
During a descent, the system assists the driver
in maintaining a constant speed, depending on
the gear engaged, while progressively releasing
the brakes.
For the system to activate, the gradient
must be greater than 5%.
The system can be used with the gearbox in
neutral.
Otherwise, engage a gear corresponding to
the speed to prevent the engine stalling.
With an automatic gearbox, the system can
be used with the selector at
N
or D.
The system is no longer available and no longer active if the speed of the vehicle is
above 22 mph (35
km/h).
Switching on
By default, the system is not selected.
The state of the function is not saved when the
ignition is switched off.
The driver can select the system when the
engine is running, when the vehicle is stationary
or when moving at speeds up to approximately
31 mph (50
km/h).
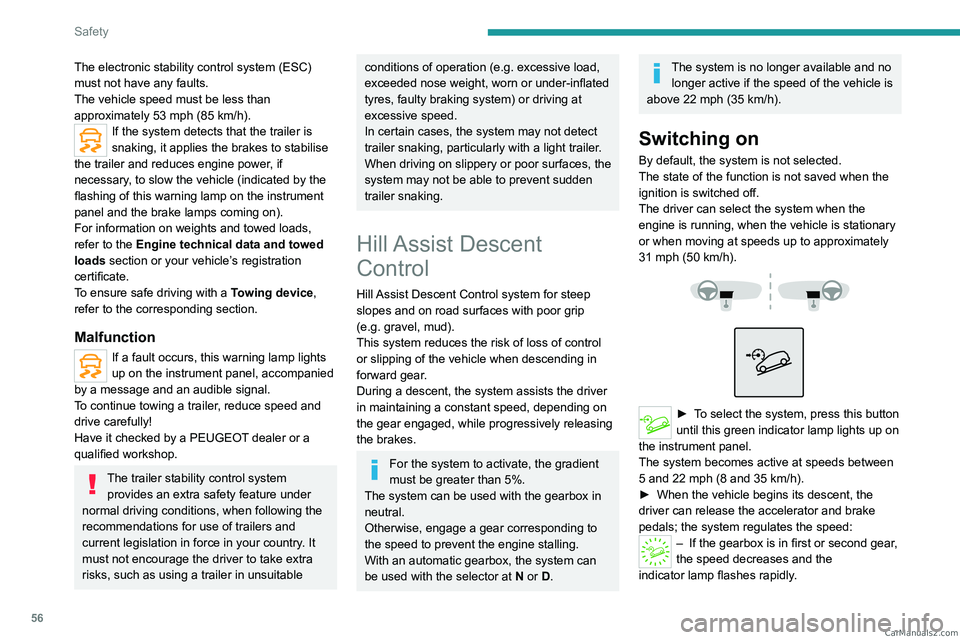
► To select the system, press this button
until this green indicator lamp lights up on
the instrument panel.
The system becomes active at speeds between
5 and 22 mph
(8 and 35 km/h).
►
When the vehicle begins its descent, the
driver can release the accelerator and brake
pedals; the system regulates the speed:
– If the gearbox is in first or second gear ,
the speed decreases and the
indicator
lamp flashes rapidly. CarM an uals 2 .c o m
Page 106 of 164
104
Practical information
Supply of AdBlue®
It is recommended that the AdBlue® be topped
up as soon as the first alert is issued indicating
that the reserve level has been reached.
For the correct operation of the SCR
system:
–
Use
only AdBlue
® fluid that meets the ISO
22241 standard.
–
Never
transfer AdBlue
® to another container
as it would lose its purity.
–
Never
dilute AdBlue
® with water.
You can obtain AdBlue
® from a PEUGEOT
dealer or a qualified workshop, as well as service
stations equipped with AdBlue
® pumps specially
designed for passenger vehicles.
Recommendations on storage
AdBlue® freezes at about -11°C and deteriorates
above +25°C. Containers should be stored in a
cool area and protected from direct sunlight.
Under these conditions, the fluid can be kept for
at least a year.
If the fluid has frozen, it can be used once it has
completely thawed out at room temperature.
Never store AdBlue® containers in your
vehicle.
Precautions for use
AdBlue® is a urea-based solution. This fluid is
non-flammable, colourless and odourless (when
kept in a cool place).
In the event of contact with the skin, wash the
affected area with soap and running water. In the
event of contact with the eyes, immediately rinse
the eyes with large amounts of water or with an
eye wash solution for at least 15 minutes. Seek
medical attention if you feel a persistent burning
sensation or irritation.
If swallowed, immediately wash out the mouth
with clean water and then drink plenty of water.
In certain conditions (high temperature, for
example), the risk of release of ammonia cannot
be excluded: do not inhale the fluid. Ammonia
vapours have an irritant effect on mucous
membranes (eyes, nose and throat).
Store AdBlue® out of the reach of
children, in its original container.
Procedure
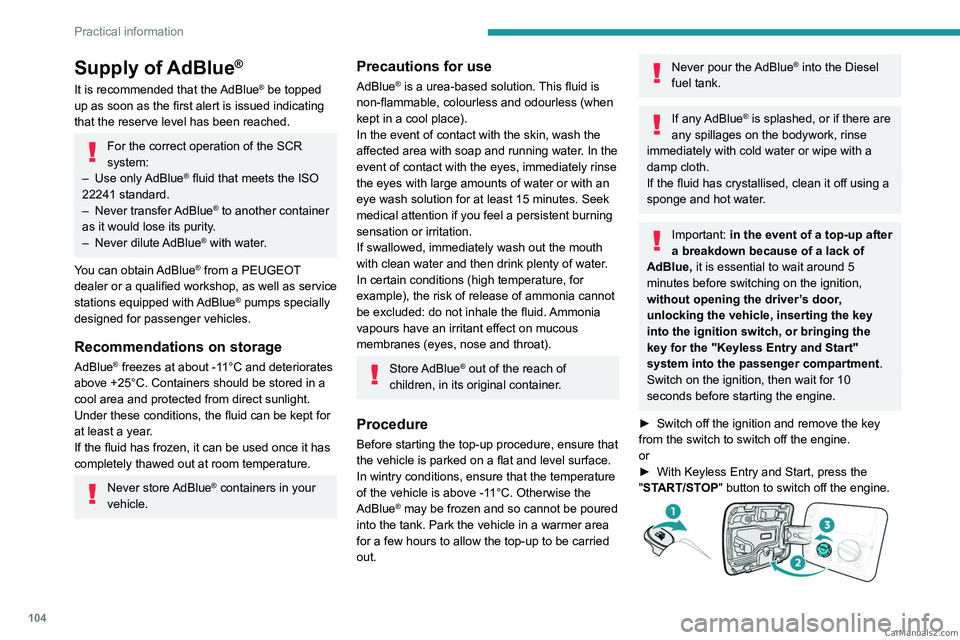
Before starting the top-up procedure, ensure that
the vehicle is parked on a flat and level surface.
In wintry conditions, ensure that the temperature
of the vehicle is above -11°C. Otherwise the
AdBlue
® may be frozen and so cannot be poured
into the tank. Park the vehicle in a warmer area
for a few hours to allow the top-up to be carried
out.
Never pour the AdBlue® into the Diesel
fuel tank.
If any AdBlue® is splashed, or if there are
any spillages on the bodywork, rinse
immediately with cold water or wipe with a
damp cloth.
If the fluid has crystallised, clean it off using a
sponge and hot water.
Important: in the event of a top-up after
a breakdown because of a lack of
AdBlue, it is essential to wait around 5
minutes before switching on the ignition,
without opening the driver’s door,
unlocking the vehicle, inserting the key
into the ignition switch, or bringing the
key for the "Keyless Entry and Start"
system into the passenger compartment.
Switch on the ignition, then wait for 10
seconds before starting the engine.
►
Switch off the ignition and remove the key
from the switch to switch off the engine.
or
►
With Keyless Entry and Start, press the
"
START/STOP" button to switch off the engine.
CarM an uals 2 .c o m
Page 128 of 164
126
In the event of a breakdown
BlueHDi Diesel engine
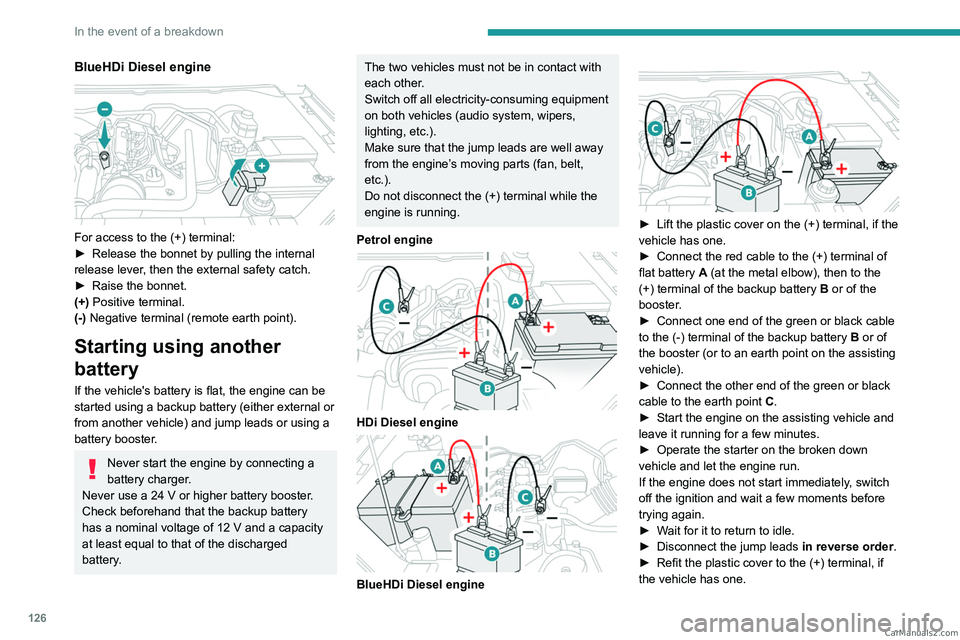
For access to the (+) terminal:
► Release the bonnet by pulling the internal
release lever
, then the external safety catch.
►
Raise the bonnet.
(+)
Positive terminal.
(-) Negative terminal (remote earth point).
Starting using another
battery
If the vehicle's battery is flat, the engine can be
started using a backup battery (either external or
from another vehicle) and jump leads or using a
battery booster.
Never start the engine by connecting a
battery charger.
Never use a 24
V or higher battery booster.
Check beforehand that the backup battery
has a nominal voltage of 12
V and a capacity
at least equal to that of the discharged
battery.
The two vehicles must not be in contact with
each other.
Switch off all electricity-consuming equipment
on both vehicles (audio system, wipers,
lighting, etc.).
Make sure that the jump leads are well away
from the engine’s moving parts (fan, belt,
etc.).
Do not disconnect the (+) terminal while the
engine is running.
Petrol engine
HDi Diesel engine
BlueHDi Diesel engine
► Lift the plastic cover on the (+) terminal, if the
vehicle has one.
►
Connect the red cable to the (+) terminal of
flat battery
A (at the metal elbow), then to the
(+) terminal of the backup battery
B or of the
booster.
►
Connect one end of the green or black cable
to the (-) terminal of the backup battery
B or of
the booster (or to an earth point on the assisting
vehicle).
►
Connect the other end of the green or black
cable to the earth point
C
.
►
Start the engine on the assisting vehicle and
leave it running for a few minutes.
►
Operate the starter on the broken down
vehicle and let the engine run.
If the engine does not start immediately
, switch
off the ignition and wait a few moments before
trying again.
►
W
ait for it to return to idle.
►
Disconnect the jump leads in reverse order.
►
Refit the plastic cover to the (+) terminal, if
the vehicle has one. CarM an uals 2 .c o m
Page 156 of 164
154
Alphabetical index
Markings, identification 135
Mat
42, 81
Mirror, rear view
33
Mirrors, door
33, 40
Mode, driving
77
Mountings, ISOFIX
64
N
Normal mode 77
O
Obstacle detection 86
Off-road camera
88
Oil change
98, 108
Oil consumption
98
Oil, engine
98, 108
On-board tools
115–116
Opening the bonnet
96–97
Opening the boot
22
Opening the doors
22, 25
Opening the windows
20
Over-speed buzzer
82
P
Pads, brake 101–102
Paint
112, 135
Paint colour code 135
Parking brake
72, 102
Parking (sensors)
86
Parking sensors, audible and visual
86
Parking sensors, front
87
Parking sensors, rear
86
Plates, identification
135
Player, Apple®
139
Player, USB
139, 143–144
Port, USB
41, 139, 143–145
Pressures, tyres
102, 136
Pre-tensioning (seat belts)
59
Priming pump
11 5
Priming the fuel system
11 5
Protecting children
60, 62–64
Puncture
11 6
R
Radio 138, 143
Range, AdBlue®
14, 100
Reading lamps
43
Rear bench seat
34–35
Rear differential locking
72
Rear screen (demisting)
40
Recharging the battery
124, 127
Recirculation, air
39
Recorder, trip distance
16
Regeneration of the particle filter
101
Reinitialising the remote control
25
Reinitialising the under-inflation
detection system
79
Reminder, key in ignition
70
Reminder, lighting on
48
Remote control
20–24
Removing a wheel
117–119
Removing the mat
42
Replacing bulbs
120, 123
Replacing fuses
124
Replacing the air filter
101, 108
Replacing the battery
106
Replacing the Diesel filter
109
Replacing the engine oil
108
Replacing the oil filter
101, 109
Replacing the passenger
compartment filter
100, 107
Reservoir, screenwash
100
Resetting the service indicator
13–14
Resetting the trip
16
Rev counter
8
Reversing camera
80, 87
Reversing lamps
123
Roof bars
96
Running out of fuel (Diesel)
11 5
S
Safety, children 60, 62–64
Saturation of the particle filter (Diesel)
101
Screen, monochrome
17
Screenwash
51 CarM an uals 2 .c o m