2023 PEUGEOT LANDTREK stop start
[x] Cancel search: stop startPage 107 of 164
105
Practical information
7► Turn the blue cap of the AdBlue® tank anti-
clockwise and remove it.
►
With a container of
AdBlue
®: after checking
the expiry date, read the instructions on the
label carefully before pouring the contents of the
container into the vehicle's AdBlue
® tank.
►
With an
AdBlue® pump: insert the nozzle and
fill the tank until the nozzle automatically cuts
out.
In order not to overfill the AdBlue® tank:
–
Add between 10 and 13 litres using
AdBlue® containers.
–
Stop after the nozzle’ s first automatic cut-
out, if you are refilling at a service station.
The system only registers AdBlue
®
intermediate top-ups of 5
litres or more.
If the AdBlue® tank is completely empty
– which is confirmed by the message
“Top up AdBlue: Starting impossible ” – it is
essential to add at least 10
litres.
Top-up detection may not be instantaneous
after addition. It may take a few minutes of
driving before the top-up detection is effective.
Maintenance
For more information on the Engine
compartment, in particular the location of the
components under the bonnet, refer to the
corresponding section.
For the maintenance of your vehicle, you can
also contact a PEUGEOT dealer or a qualified
workshop.
Vehicle maintenance must always be
carried out with the engine switched off
and the ignition off.
Take care when working under the bonnet, as
certain areas of the engine may be extremely
hot (risk of burns) and the cooling fan could
start at any time (even with the ignition off).
Wait at least one hour after switching off the
engine before working on the vehicle - risk of
burns!
Take care with objects or clothing that could
be caught in the blades of the cooling fan -
risk of strangulation!
Always wear gloves, protective glasses and
suitable clothing to avoid direct contact with
liquids against the skin or eyes.
In the event of contact with the skin, wash
the affected area thoroughly with soap and
running water.
In the event of contact with the eyes,
immediately rinse the eyes with large
amounts of water or with an eye wash
solution for at least 15 minutes. Seek medical
attention if you feel a persistent burning
sensation or irritation.
Never go underneath the vehicle raised
using a jack; always use an axle
stand-type support.
When working on the vehicle's electrical
system, take care not to cause a short circuit -
risk of burns and fire.
Flammable products and all sources of heat
(sparks, for example) must be kept away from
the battery, the fuel tank and all components
of the fuel system.
Never run the engine in a closed space
without sufficient ventilation; always use a
ventilation system such as an exhaust gas
extractor, for example.
Never leave liquids (oil, coolant) unattended.
Keep these liquids out of the reach of children
and animals.
The liquids and components replaced must have the same characteristics and
comply with the manufacturer's
recommendations.
General checks
Check the following components to ensure
proper operation and longevity of the vehicle.
For more information on the components
to be
checked, refer to the Checking levels, Checks
and Advice on care
sections. CarM an uals 2 .c o m
Page 129 of 164
127
In the event of a breakdown
8► Allow the engine to run for at least
30 minutes, with the vehicle stationary, so that
the battery reaches an adequate state of charge.
Driving immediately without having
reached a sufficient level of charge may
affect some of the vehicle's functions (e.g.
Stop & Start).
Charging the battery using a
battery charger
For optimum service life of the battery, it is
essential to maintain an adequate state of
charge.
In some circumstances, it may be necessary to
charge the battery:
–
When using the vehicle mainly for short
journeys.
–
If the vehicle is to be taken off the road for
several weeks.
Consult a PEUGEOT
dealer or a qualified
workshop.
To charge the vehicle's battery yourself, use only a charger compatible with
lead-acid batteries with a nominal voltage of
12
V.
Follow the instructions provided by the
manufacturer of the charger.
Never reverse polarities.
It is not necessary to disconnect the
battery.
►
Switch the ignition off.
►
Switch off all electrical consumers (audio
system, lighting, wipers, etc.).
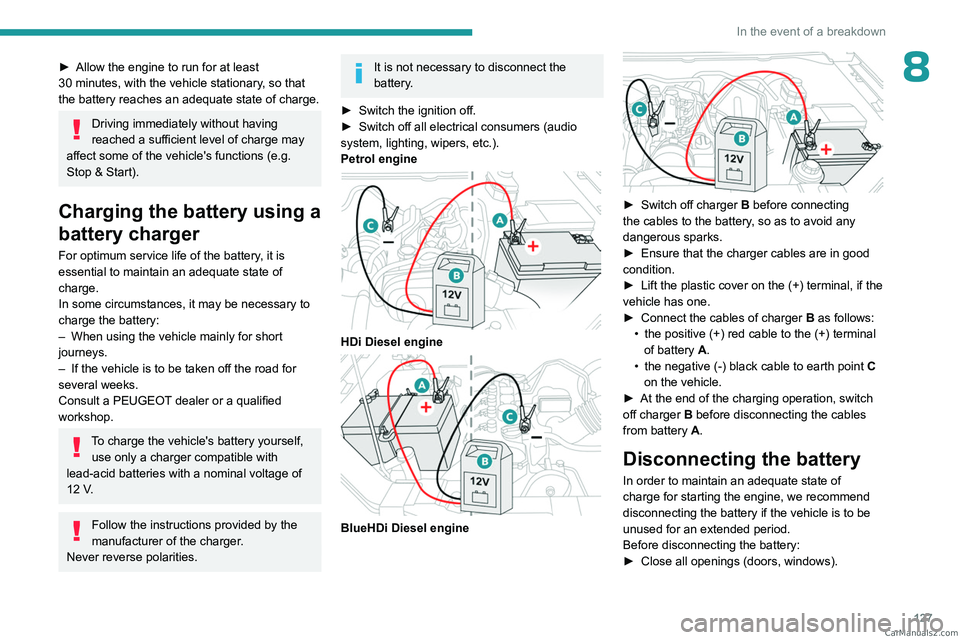
Petrol engine
HDi Diesel engine
BlueHDi Diesel engine
► Switch off charger B before connecting
the cables to the battery, so as to avoid any
dangerous sparks.
►
Ensure that the charger cables are in good
condition.
►
Lift the plastic cover on the (+) terminal, if the
vehicle has one.
►
Connect the cables of charger B
as follows:
•
the positive (+) red cable to the (+) terminal
of battery
A.
•
the negative (-) black cable to earth point C
on the vehicle.
►
At the end of the charging operation, switch
off charger B
before disconnecting the cables
from battery A.
Disconnecting the battery
In order to maintain an adequate state of
charge for starting the engine, we recommend
disconnecting the battery if the vehicle is to be
unused for an extended period.
Before disconnecting the battery:
►
Close all openings (doors, windows). CarM an uals 2 .c o m
Page 143 of 164
141
Peugeot Connect 10" Touchscreen
11Peugeot Connect 10"
Touchscreen
GPS navigation -
Applications - Multimedia
audio system - Bluetooth
®
telephone
The functions and settings described
vary according to the vehicle version and
configuration, as well as the country of sale.
For safety reasons and because they
require sustained attention by the driver,
the following operations must be carried out
with the vehicle stationary and the ignition
on:
–
Pairing the smartphone with the system via
Bluetooth.
–
Using the smartphone.
–
Connection to the CarPlay®, MirrorLinkTM
or Android Auto applications (certain
applications interrupt their display while the
vehicle is moving).
–
W
atching a video (the video stops when the
vehicle starts to move again).
–
Changing the system settings and
configuration.
To perform system and map updates, visit a Peugeot dealer.
First steps
With the engine running, a short press
mutes the sound. A long press (3 sec)
puts the system on standby. A very long press
(10 sec) restarts the system.
With the ignition off, a short press turns the
system on.
Increase or decrease the volume using the
thumbwheel.
Use the main menu buttons on the touch screen
to access the sub-menus.
Press this button to return to the menu
carousel.
Slide your finger on the touch screen from
top to bottom to display a set of quick
settings (Bluetooth
® connection, volume,
brightness) and notifications.
Press this button to directly access the
quick settings (depending on equipment).
Press the back arrow to go back a level.
The touch screen is of the "capacitive" type.
To clean the screen, use a soft, non-abrasive
cloth (e.g. spectacles cloth) with no additional
product.
Do not use sharp objects on the screen.
Do not touch the screen with wet hands.
Steering mounted controls
Short press: change of multimedia
source.
Long press: access to smartphone voice
commands via the system (available only via the
CarPlay
® or Android Auto).Decrease volume.
Increase volume.
Telephone: refuse an incoming call, hang
up a call in progress.
Radio: short press, access to the previous
memorised station; long press, automatic search
for the previous station.
Media: short press, access to the previous track/
video; long press, fast-rewind in the track/video.
Telephone: answering an incoming call.
Radio: access to the next memorised
station; long press, automatic search for the next
station.
Media: short press, access to the next track/
video; long press, fast-forward in the track/video. CarM an uals 2 .c o m
Page 157 of 164
155
Alphabetical index
Screenwash, front 51
SCR (Selective Catalytic Reduction)
15, 103
Seat angle
31
Seat belts
57–59
Seat belts, rear
58
Seat, bench front, 2-seat
31–32, 58
Seats, electric
31
Seats, front
30–31
Seats, rear
34, 62
Selector, gear
75
Sensors (warnings)
80
Serial number, vehicle
135
Servicing
13–14, 100, 103
Settings, equipment
17–19
Sidelamps
48–49, 120, 123
Snow chains
95–96
Socket, 12 V accessory
41, 45
Speed limiter
81–82
Speedometer
8, 81
Sport mode
77
Stability control (ESC)
54–55
Starting a Diesel engine
94
Starting the engine
68
Starting the vehicle
68–70
Starting using another battery
71, 126
Station, radio
138, 143
Stay, engine bonnet
97
Steering mounted controls, audio
138, 141
Steering wheel
102
Steering wheel (adjustment)
32
Stickers, customising
11 2
Stopping the vehicle
68–70Storage 41–45
Storage boxes
44
Storage compartments
41
Stowing rings
44
Sunshine sensor
36
Suspension
103
Switch, ignition
68, 70
Switching off the engine
68
Synchronising the remote control
25
T
Tables of engines 132–134
Tailgate
26
Tank, fuel
94
Technical data
132–134
Telephone
139–140, 145
Temperature, coolant
13
Ticket holder
41
Time (setting)
17, 147
Tipper truck fittings
44
Tipper truck lighting
46
Tools
115–116, 116–117
Topping-up AdBlue®
104
Top Tether (fixing)
64
Total distance recorder
16
Touch screen
18
Towbar
55, 95
Towed loads
131
Towing
128, 130
Towing another vehicle
128, 130
Towing the vehicle 128
Traction control (ASR)
54–55
Trailer
55, 95
Trailer stability assist (TSA)
55
Trajectory control systems
54
Transmission selector, 4x4
73
Triangle, warning
11 4
Trip computer
16–17
Tyres
102, 136
Tyre under-inflation detection
78
U
Under-inflation (detection) 78
Unlocking
20–22
Unlocking from the inside
23
Unlocking the doors
23
Updating the time
147
USB
139, 143–145
V
Vehicle data recording and privacy 148
Ventilation
36–38
Visibility
40
W
Warning and indicator lamps 9 CarM an uals 2 .c o m