2023 PEUGEOT LANDTREK parking brake
[x] Cancel search: parking brakePage 119 of 164
11 7
In the event of a breakdown
8
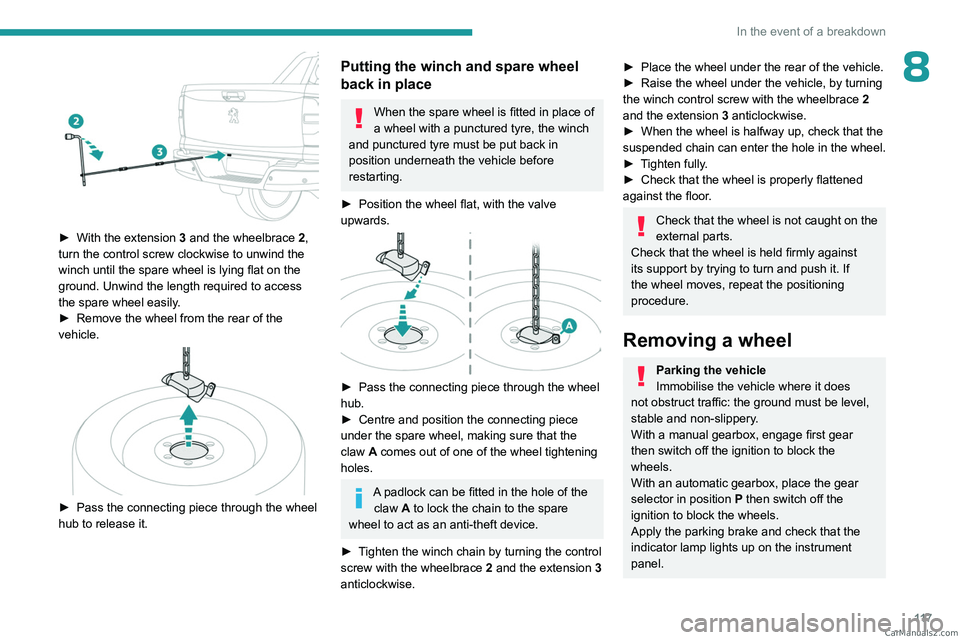
► With the extension 3 and the wheelbrace 2,
turn the control screw clockwise to unwind the
winch until the spare wheel is lying flat on the
ground. Unwind the length required to access
the spare wheel easily.
►
Remove the wheel from the rear of the
vehicle.
► Pass the connecting piece through the wheel
hub to release it.
Putting the winch and spare wheel
back in place
When the spare wheel is fitted in place of
a wheel with a punctured tyre, the winch
and punctured tyre must be put back in
position underneath the vehicle before
restarting.
►
Position the wheel flat, with the valve
upwards.
► Pass the connecting piece through the wheel
hub.
►
Centre and position the connecting piece
under the spare wheel, making sure that the
claw
A comes out of one of the wheel tightening
holes.
A padlock can be fitted in the hole of the claw A to lock the chain to the spare
wheel to act as an anti-theft device.
►
T
ighten the winch chain by turning the control
screw with the wheelbrace 2 and the extension 3
anticlockwise.
► Place the wheel under the rear of the vehicle.
► Raise the wheel under the vehicle, by turning
the winch control screw with the wheelbrace 2
and the extension 3 anticlockwise.
►
When the wheel is halfway up, check that the
suspended
chain can enter the hole in the wheel.
►
T
ighten fully.
►
Check that the wheel is properly flattened
against the floor
.
Check that the wheel is not caught on the
external parts.
Check that the wheel is held firmly against
its support by trying to turn and push it. If
the wheel moves, repeat the positioning
procedure.
Removing a wheel
Parking the vehicle
Immobilise the vehicle where it does
not obstruct traffic: the ground must be level,
stable and non-slippery.
With a manual gearbox, engage first gear
then switch off the ignition to block the
wheels.
With an automatic gearbox, place the gear
selector in position P then switch off the
ignition to block the wheels.
Apply the parking brake and check that the
indicator lamp lights up on the instrument
panel. CarM an uals 2 .c o m
Page 130 of 164
128
In the event of a breakdown
► Switch off all electricity-consuming devices
(audio system, wipers, lamps, etc.).
►
Switch off the ignition and wait for 4
minutes.
After accessing the battery, it is only necessary
to disconnect the (+) terminal.
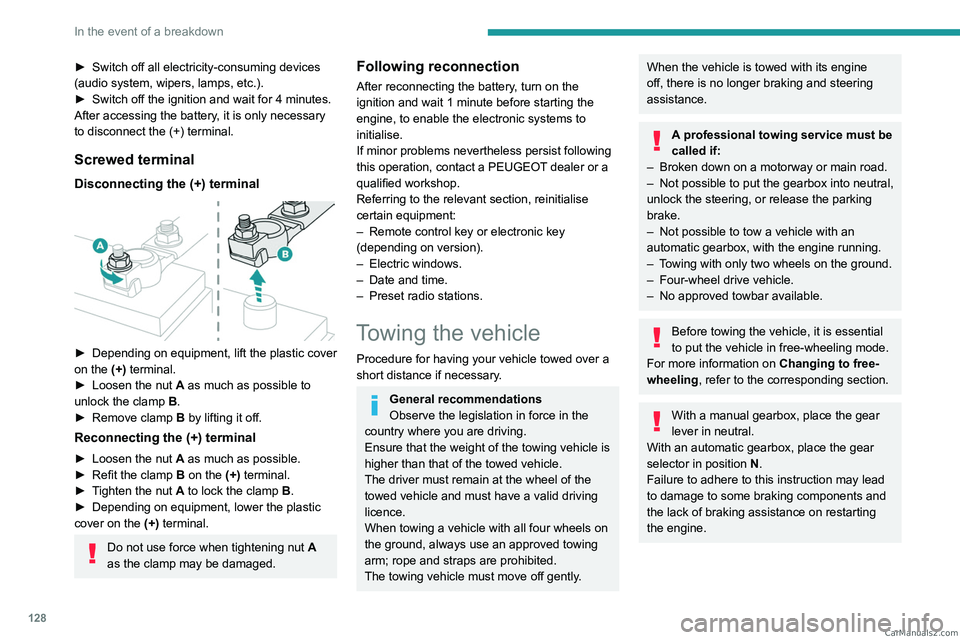
Screwed terminal
Disconnecting the (+) terminal
► Depending on equipment, lift the plastic cover
on the (+) terminal.
►
Loosen the nut
A as much as possible to
unlock the clamp B.
►
Remove clamp
B
by lifting it off.
Reconnecting the (+) terminal
► Loosen the nut A as much as possible.
► Refit the clamp B on the (+) terminal.
►
T
ighten the nut A to lock the clamp B.
►
Depending on equipment, lower the plastic
cover on the
(+) terminal.
Do not use force when tightening nut A
as the clamp may be damaged.
Following reconnection
After reconnecting the battery, turn on the
ignition and wait 1 minute before starting the
engine, to enable the electronic systems to
initialise.
If minor problems nevertheless persist following
this operation, contact a PEUGEOT dealer or a
qualified workshop.
Referring to the relevant section, reinitialise
certain equipment:
–
Remote control key or electronic key
(depending on version).
–
Electric windows.
–
Date and time.
–
Preset radio stations.
Towing the vehicle
Procedure for having your vehicle towed over a
short distance if necessary.
General recommendations
Observe the legislation in force in the
country where you are driving.
Ensure that the weight of the towing vehicle is
higher than that of the towed vehicle.
The driver must remain at the wheel of the
towed vehicle and must have a valid driving
licence.
When towing a vehicle with all four wheels on
the ground, always use an approved towing
arm; rope and straps are prohibited.
The towing vehicle must move off gently.
When the vehicle is towed with its engine
off, there is no longer braking and steering
assistance.
A professional towing service must be
called if:
–
Broken down on a motorway or main road.
–
Not possible to put
the gearbox into neutral,
unlock the steering, or release the parking
brake.
–
Not possible to tow a vehicle with an
automatic gearbox, with the engine running.
–
T
owing with only two wheels on the ground.
–
Four-wheel drive vehicle.
–
No approved towbar available.
Before towing the vehicle, it is essential
to put the vehicle in free-wheeling mode.
For more information on Changing to free-
wheeling , refer to the corresponding section.
With a manual gearbox, place the gear
lever in neutral.
With an automatic gearbox, place the gear
selector in position N.
Failure to adhere to this instruction may lead
to damage to some braking components and
the lack of braking assistance on restarting
the engine. CarM an uals 2 .c o m
Page 132 of 164
130
In the event of a breakdown
Towing your vehicle
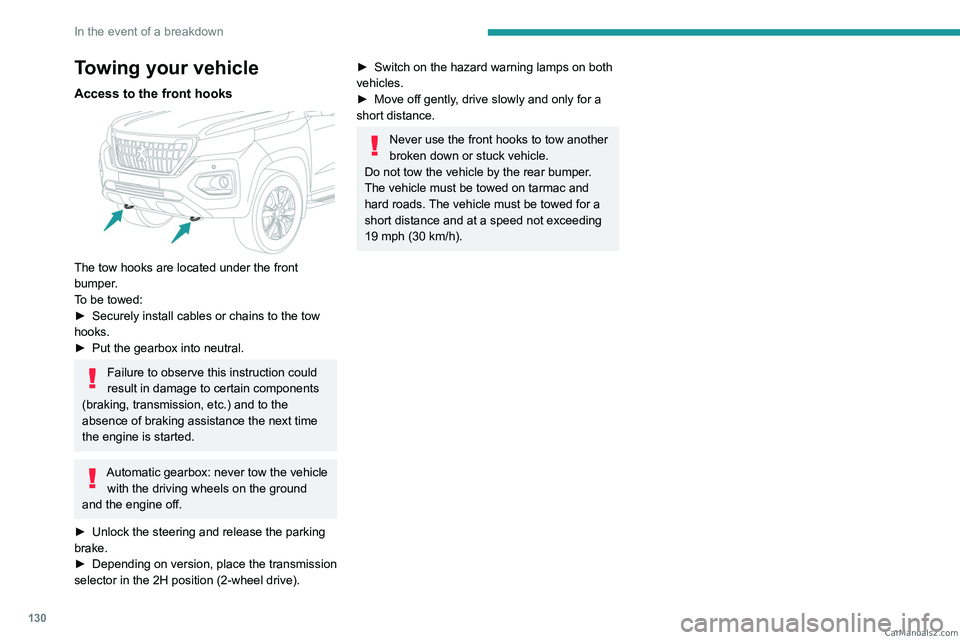
Access to the front hooks
The tow hooks are located under the front
bumper.
To be towed:
►
Securely install cables or chains to the tow
hooks.
►
Put the gearbox into neutral.
Failure to observe this instruction could
result in damage to certain components
(braking, transmission, etc.) and to the
absence of braking assistance the next time
the engine is started.
Automatic gearbox: never tow the vehicle with the driving wheels on the ground
and the engine off.
►
Unlock the steering and release the parking
brake.
►
Depending on version, place the transmission
selector in the 2H position (2-wheel drive).
► Switch on the hazard warning lamps on both
vehicles.
►
Move off gently
, drive slowly and only for a
short distance.
Never use the front hooks to tow another
broken down or stuck vehicle.
Do not tow the vehicle by the rear bumper.
The vehicle must be towed on tarmac and
hard roads. The vehicle must be towed for a
short distance and at a speed not exceeding
19 mph (30 km/h). CarM an uals 2 .c o m
Page 155 of 164
153
Alphabetical index
Grab handles 41
H
Hazard warning lamps 53, 114
Headlamp beam height
49
Headlamps (adjustment)
49
Headlamps, automatic operation
49
Headlamps, dipped beam
120, 122
Headlamps, halogen
120–121
Headlamps, main beam
120, 122
Head restraints, front
30
Head restraints, rear
32, 34
Heating
36–38, 40
Hill Assist Descent Control (HADC)
56
Hill start assist
77–78
Hooks
43
Horn
54
I
Ignition 71
Ignition on
71
Immobiliser, electronic
68
Indicator, AdBlue® range
14
Indicator, coolant temperature
13
Indicators, direction
49, 122
Indicator, service
13–14
Inflating tyres
102, 136
Information, vehicle
148
Infrared camera 80
Instrument panel
8, 16, 81
ISOFIX mountings
64
J
Jack 116–117
Jump starting
126
K
Key 20–21, 24
Key, electronic
22–23
Keyless Entry and Starting
22, 70
Key not recognised
71
Key with remote control
20–21, 68
Kit, hands-free
139–140
Klaxon
54
L
Labels, identification 135
Lamps, parking
49
Lamps, rear
123
Lamps with Full LED technology
48
Lane Departure Warning (LDW)
84, 86
Leather (care)
11 3
LEDs - Light-emitting diodes
48, 120, 123
Level, AdBlue®
100
Level, brake fluid 99
Level, Diesel additive
101
Level, engine coolant
13, 99
Level, engine oil
98
Level, power steering fluid
99
Levels and checks
97–100
Level, screenwash fluid
51, 100
Light-emitting diodes - LEDs
48, 120, 123
Lighting
46
Lighting, cornering
48
Lighting dimmer
16
Lighting, exterior
47
Lighting, guide-me home
50
Lighting, interior
43
Lighting, mood
16
Lighting, welcome
50
Loading
45, 96
Load restraint
45
Locating your vehicle
21
Locking
21–22
Locking from the inside
23
Locking the doors
23
M
Maintenance 105
Maintenance (advice)
111
Maintenance, routine
81, 100, 103
Manoeuvring aids (recommendations)
80
Map reading lamps
43
Map reading lamps, front
43 CarM an uals 2 .c o m
Page 156 of 164
154
Alphabetical index
Markings, identification 135
Mat
42, 81
Mirror, rear view
33
Mirrors, door
33, 40
Mode, driving
77
Mountings, ISOFIX
64
N
Normal mode 77
O
Obstacle detection 86
Off-road camera
88
Oil change
98, 108
Oil consumption
98
Oil, engine
98, 108
On-board tools
115–116
Opening the bonnet
96–97
Opening the boot
22
Opening the doors
22, 25
Opening the windows
20
Over-speed buzzer
82
P
Pads, brake 101–102
Paint
112, 135
Paint colour code 135
Parking brake
72, 102
Parking (sensors)
86
Parking sensors, audible and visual
86
Parking sensors, front
87
Parking sensors, rear
86
Plates, identification
135
Player, Apple®
139
Player, USB
139, 143–144
Port, USB
41, 139, 143–145
Pressures, tyres
102, 136
Pre-tensioning (seat belts)
59
Priming pump
11 5
Priming the fuel system
11 5
Protecting children
60, 62–64
Puncture
11 6
R
Radio 138, 143
Range, AdBlue®
14, 100
Reading lamps
43
Rear bench seat
34–35
Rear differential locking
72
Rear screen (demisting)
40
Recharging the battery
124, 127
Recirculation, air
39
Recorder, trip distance
16
Regeneration of the particle filter
101
Reinitialising the remote control
25
Reinitialising the under-inflation
detection system
79
Reminder, key in ignition
70
Reminder, lighting on
48
Remote control
20–24
Removing a wheel
117–119
Removing the mat
42
Replacing bulbs
120, 123
Replacing fuses
124
Replacing the air filter
101, 108
Replacing the battery
106
Replacing the Diesel filter
109
Replacing the engine oil
108
Replacing the oil filter
101, 109
Replacing the passenger
compartment filter
100, 107
Reservoir, screenwash
100
Resetting the service indicator
13–14
Resetting the trip
16
Rev counter
8
Reversing camera
80, 87
Reversing lamps
123
Roof bars
96
Running out of fuel (Diesel)
11 5
S
Safety, children 60, 62–64
Saturation of the particle filter (Diesel)
101
Screen, monochrome
17
Screenwash
51 CarM an uals 2 .c o m