Page 120 of 164

11 8
In the event of a breakdown
Ensure that the occupants have left the
vehicle and are located in a safe place.
Never start the engine while the vehicle is on
the jack.
Never go underneath a vehicle raised using a
jack; use an axle stand.
Always place a chock against the wheel
diagonally opposite to the one being replaced.
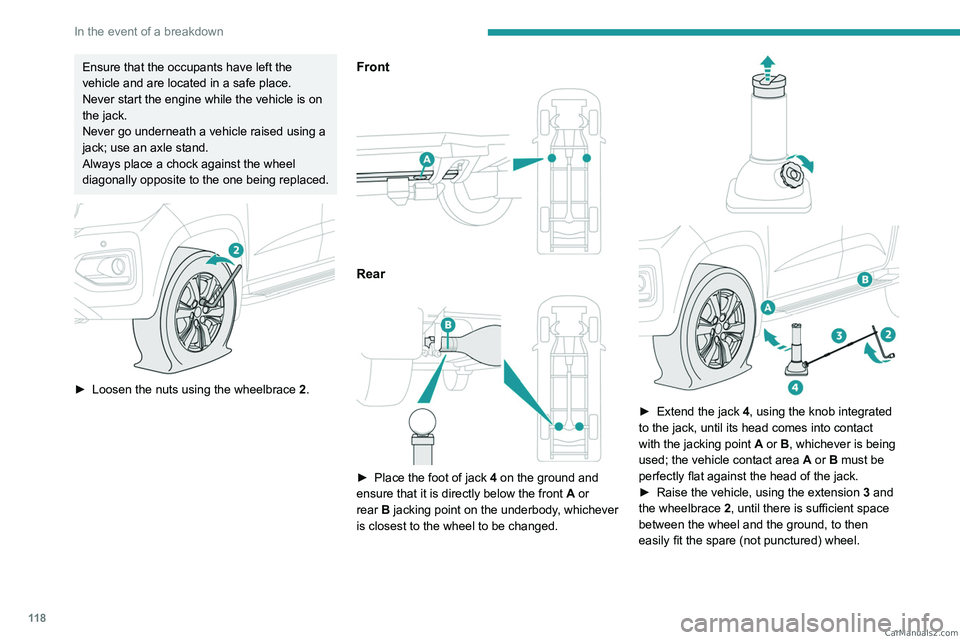
► Loosen the nuts using the wheelbrace 2 .
Front
Rear
► Place the foot of jack 4 on the ground and
ensure that it is directly below the front A or
rear
B jacking point on the underbody, whichever
is closest to the wheel to be changed.
► Extend the jack 4, using the knob integrated
to the jack, until its head comes into contact
with the jacking point
A
or B, whichever is being
used; the vehicle contact area
A
or B must be
perfectly flat against the head of the jack.
►
Raise the vehicle, using the extension 3
and
the wheelbrace 2, until there is sufficient space
between the wheel and the ground, to then
easily fit the spare (not punctured) wheel. CarM an uals 2 .c o m
Page 121 of 164

11 9
In the event of a breakdown
8Ensure that the jack is stable. If the
ground is slippery or loose, the jack may
slip or collapse - risk of injury!
Take care to position the jack strictly at
one of the jacking points
A
or B under the
vehicle, ensuring that the head of the jack is
centred under the contact area on the vehicle.
Otherwise, there is a risk of damage to the
vehicle and/or of the jack collapsing - risk of
injury!
Stop raising the vehicle when the yellow
warning line appears on the jack cylinder.
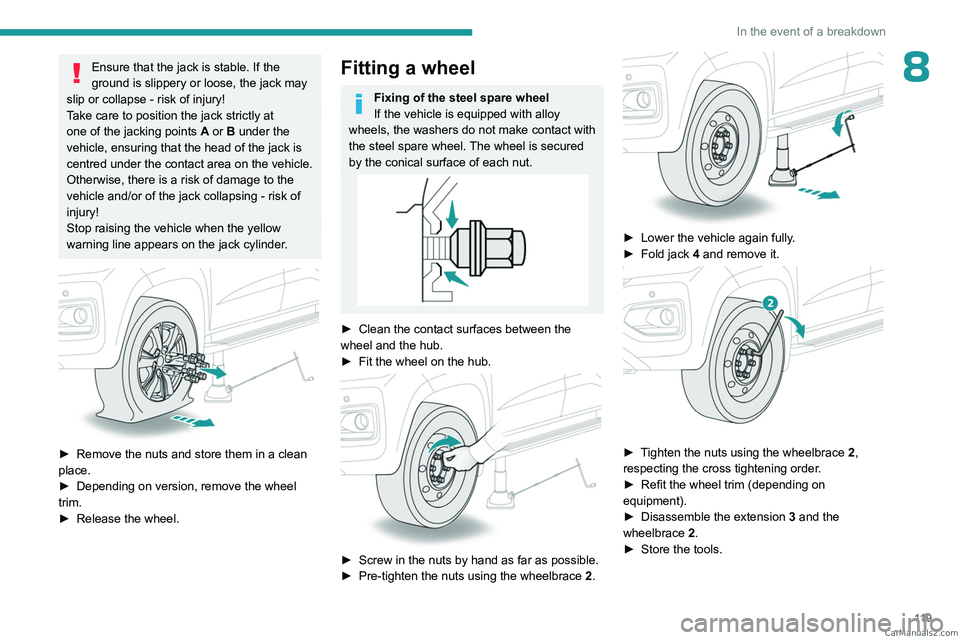
► Remove the nuts and store them in a clean
place.
►
Depending on version, remove the wheel
trim.
►
Release the wheel.
Fitting a wheel
Fixing of the steel spare wheel
If the vehicle is equipped with alloy
wheels, the washers do not make contact with
the steel spare wheel. The wheel is secured
by the conical surface of each nut.
► Clean the contact surfaces between the
wheel and the hub.
►
Fit the wheel on the hub.
► Screw in the nuts by hand as far as possible.
► Pre-tighten the nuts using the wheelbrace 2
.
► Lower the vehicle again fully.
► Fold jack 4 and remove it.
► Tighten the nuts using the wheelbrace 2,
respecting the cross tightening order.
►
Refit the wheel trim (depending on
equipment).
►
Disassemble the extension 3
and the
wheelbrace 2.
►
Store the tools. CarM an uals 2 .c o m
Page 122 of 164

120
In the event of a breakdown
After changing a wheel
The use of the non-standard steel spare wheel is temporary. The driver must drive
carefully at a moderate speed and limit the
distance covered.
Visit a PEUGEOT dealer or a qualified
workshop as soon as possible to have the
tightness of the nuts and the pressure of the
spare wheel checked.
Have the punctured tyre examined. After
inspection, the technician will advise you on
whether the tyre can be repaired or if it must
be replaced.
Changing a bulb
In some weather conditions (e.g. low
temperature or humidity), misting on the
internal surface of the glass of the headlamps
and rear lamps is normal, and will disappear
after the lamps have been on for a few
minutes.
The headlamps have polycarbonate lenses with a protective coating:
–
Do not clean them with a dry or abrasive
cloth, nor with detergent or solvent
products.
–
Use a sponge and soapy water or a pH
neutral product.
– When using a high-pressure washer on
persistent marks, do not keep the lance
directed towards the headlamps, lamps or
their edges for too long, so as not to damage
their protective coating and seals.
Changing a bulb must only be done with
the ignition off and after the headlamp /
lamp has been switched off for several
minutes - risk of serious burns!
Do not touch the bulb directly with your
fingers; use a lint-free cloth.
It is essential only to use anti-ultraviolet
(UV) type bulbs, so as not to damage the
headlamp.
Always replace a failed bulb with a new bulb
of the same type and specification. To avoid
lighting imbalance, replace the bulbs in pairs.
After changing a bulb
To refit, carry out the operations in
reverse order to removal.
Close the protective cover very carefully to
guarantee the sealing of the lamps.
Light-emitting diode (LED)
headlamps and lamps
Depending on version, the affected types of
headlamps/lamps are:
–
Offset daytime running lamps.
–
Direction indicator side repeaters.
– Rear sidelamps.
– Third brake lamp and loading bay lighting.
If you need to replace this type of bulb,
you must contact a PEUGEOT dealer or
a qualified workshop.
Front lamps
1. A: Sidelamps (W5W)
or
B: Daytime running lamps / sidelamps (LED)
2. A: Dipped beam headlamps (H8)
or
B: Dipped beam headlamps (LED)
3. A: Main beam headlamps (HB3)
or
B: Main beam headlamps (H9)
4. Direction indicators (PY21W)
5. Foglamps (H11)
6. Daytime running lamps (PY24W) CarM an uals 2 .c o m
Page 158 of 164
156
Alphabetical index
Warning lamp, driver's
seat belt not fastened
58
Warning lamps
9
Warning lamp, seat belts
58
Warnings and indicators
9
Washing
81
Washing (advice)
111 – 11 2
Weights
131
Wheel, spare
102, 115–117
Wiper blades (changing)
51
Wipers
50, 52
Wipers, automatic rain sensitive
52
Wipers, windscreen
50, 52 CarM an uals 2 .c o m