2023 PEUGEOT EXPERT seats
[x] Cancel search: seatsPage 4 of 348

2
Contents
■
OverviewOverview 4
■
Eco-driving
1Dashboard instrumentsInstrument Panel 9
Head-up display 10
Warning and indicator lamps 12
Indicators 18
Distance recorders 23
Lighting dimmer 24
Trip computer 24
Touch screen 26
Remotely operable additional functions (Electric) 27
Setting the date and time 28
2AccessElectronic key with remote control function and
built-in key 29
Unlocking/Complete or selective unlocking 31
Back-up procedures 34
Central locking 37
Electric sliding side door(s) 38
General recommendations for
the sliding side doors
39
Hands-free sliding side door(s) 42
Side-hinged rear doors 43
Tailgate 44
Tailgate rear screen 44
Alarm 45
Electric windows 47
3Ease of use and comfortCorrect driving position 48
Front seats 48
2-seat front bench seat 50
Steering wheel adjustment 51
Mirrors 52
Moduwork 53
Precautions for the seats and bench seats 56
Fixed one-piece bench seat 57
Fixed rear seat and bench seat 59
Rear seat and bench seat on rails 61
Individual rear seat(s) on rails 63
Crew cab, fixed 65
Crew cab, folding 66
Interior fittings 67
Loading area fittings 71
Seating area fittings 72
Panoramic sunroof 74
Retractable sliding table 74
Heating and Ventilation 77
Heating 78
Manual air conditioning 78
Dual-zone automatic air conditioning 79
Front demisting - defrosting 81
Demisting/de-icing the rear screen
and/or the door mirrors
82
Rear heating - air conditioning 82
Additional heating/ventilation system 83
Temperature pre-conditioning (Electric) 85
Courtesy lamp(s) 86
4Lighting and visibilityLighting control stalk 88
Direction indicators 89
Daytime running lamps/Sidelamps 89
Automatic illumination of headlamps 89
Guide-me-home and welcome lighting 90
Automatic lighting systems - General
recommendations
91
Automatic headlamp dipping 91
Headlamp beam height adjustment 92
Interior ambient lighting 93
Wiper control stalk 93
Automatic wipers 94
Changing a wiper blade 95
5SafetyGeneral safety recommendations 97
Hazard warning lamps 97
Emergency or assistance 98
Horn 100
Pedestrian horn (Electric) 100
Electronic stability control (ESC) 100
Advanced Grip Control 102
Seat belts 103
Airbags 107
Child seats 109
Deactivating the front passenger airbag 111
ISOFIX and i-Size child seats 11 7
i-Size child seats 128
Manual child lock 131
Electric child lock 131
Child lock on rear windows 131
6DrivingDriving recommendations 132
Starting/switching off the engine 134
Manual parking brake 138
Electric parking brake 138
Hill start assist 141 CarM an uals 2 .c o m
Page 8 of 348

6
Overview
"Ease of use and comfort - Precautions for
seats and bench seats" section:
"Ease of use and comfort - Retractable
sliding table" section:
"Ease of use and comfort - Additional
heating/ventilation" section:
"Safety - Child seats - Deactivating the front
passenger airbag" section:
"Safety - ISOFIX child seats" section:
"Safety - Manual child lock" section:
"Driving - Electric parking brake" section:
"Practical information - Compatibility of
fuels" section:
"Practical information - Charging system
(Electric)" section:
"Practical information - Charging the traction
battery (Electric)" section:
"Practical information - Bonnet" section:
"Practical information - Checking levels -
Engine coolant" section:
"In the event of a breakdown - Temporary
puncture repair kit" section:
"In the event of a breakdown - Spare wheel"
section:
"In the event of a breakdown - 12 V battery/
Accessory battery" section:
24V12V CarM an uals 2 .c o m
Page 9 of 348

7
Eco-driving
Eco-driving
Eco-driving refers to a range of everyday
practices that allow the motorist to optimise
the vehicle's energy consumption (fuel and/or
electricity) and CO
2 emissions.
Optimise your use of the gearbox
With a manual gearbox, move off gently and
change up promptly. While accelerating, change
up early.
With an automatic gearbox, favour automatic
mode. Do not depress the accelerator pedal
heavily or suddenly.
The gear shift indicator prompts you to engage
the most suitable gear. Whenever this indication
is displayed on the instrument panel, follow it
straight away.
With an automatic gearbox, this indicator
appears only in manual mode.
Drive smoothly
Maintain a safe distance between vehicles, use
engine braking rather than the brake pedal and
press the accelerator gradually. These practices
help to save on energy consumption, reduce
CO
2 emissions and decrease general traffic
noise.
When the traffic is flowing smoothly, select the
cruise control.
Control the use of electrical equipment
Before moving off, if the passenger compartment
is too warm, ventilate it by opening the windows
and air vents before using the air conditioning.
At speeds above 31
mph (50 km/h), close the
windows and leave the air vents open.
Consider using equipment that can help keep
the temperature in the passenger compartment
down (e.g.
sunroof blind, window blinds).
Unless automatically regulated, switch off the air
conditioning as soon as the desired temperature
has been reached.
Switch off the demisting and defrosting functions,
if they are not managed automatically.
Switch off the heated seat as soon as possible.
Adapt your use of the headlamps and/or
foglamps to the level of visibility, in accordance
with current legislation in the country in which
you are driving.
Avoid running the engine before moving off,
particularly in winter (other than in severe wintry
conditions: temperature below -23°C). The
vehicle will warm up much faster while driving.
As a passenger, avoid connecting your
multimedia devices (e.g.
film, music, video
game) to help reduce the consumption of energy.
Disconnect all portable devices before leaving
the vehicle.
Limit the causes of excess consumption
Spread loads throughout the vehicle. Place the
heaviest items in the boot as close as possible to
the rear seats. Limit the loads carried in the vehicle and
minimise wind resistance (e.g.
roof bars, roof
rack, bicycle carrier, trailer). Preferably, use a
roof box.
Remove roof bars and roof racks after use.
At the end of winter, remove snow tyres and refit
summer tyres.
Comply with the servicing instructions
Check tyre pressures regularly, with the tyres
cold, referring to the label in the door aperture on
the driver's side.
Carry out this check in particular:
–
before a long journey
.
–
at each change of season.
–
after a long period out of use.
Do not forget the spare wheel and, where
applicable, the tyres on your trailer or caravan.
Have your vehicle serviced regularly (e.g.
engine
oil, oil filter, air filter, passenger compartment
filter, etc.). Observe the schedule of operations in
the manufacturer's service schedule.
With a BlueHDi Diesel engine, if the SCR system
has a fault, your vehicle will emit pollution. Visit
a PEUGEOT dealer or a qualified workshop
as soon as possible to restore your vehicle's
nitrogen oxide emissions to legal levels.
When filling the fuel tank, do not continue after
the third cut-out of the nozzle, to avoid overflow.
You will only see the fuel consumption of your
new vehicle settle down to a consistent average
after the first 1,900 miles (3,000 kilometres). CarM an uals 2 .c o m
Page 50 of 348

48
Ease of use and comfort
Correct driving position
Before taking to the road and to make the most
of the ergonomic layout of the instruments and
controls, carry out these adjustments in the
following order:
–
the height of the head restraint,
–
the seat backrest angle,
–
the seat cushion height,
–
the longitudinal position of the seat,
–
the height and reach of the steering wheel,
–
the rear view mirror and door mirrors.
Once these adjustments have been
made, check the instrument panel can be
viewed correctly from your driving position.
Manually-adjusted front
seats
For more information on the Seat belts,
refer to the corresponding section.
Longitudinal
► Raise the control bar and slide the seat
forwards or backwards.
►
Release the control bar to lock the seat in
position on one of the notches.
Before moving the seat backwards,
ensure that there is nothing that might
prevent the full travel of the seat.
There is a risk of trapping or pinching
passengers if present in the rear seats or
jamming the seat if large objects are placed
on the floor behind the seat.
Height
► Pull the control upwards to raise or push it
downwards to lower , until you obtain the position
required.
Backrest angle
► Depending on equipment, turn the knob
or pull the control all the way up and tilt the
backrest forwards or backwards to obtain the
desired angle.
Lumbar
► Turn the knob to obtain the desired level of
lumbar support.
Table position of the driver's
The table position of the driver's allows rear
passengers to be helped out of the vehicle (by
the emergency services). CarM an uals 2 .c o m
Page 51 of 348

49
Ease of use and comfort
3Check that there is no object that could
interfere with the movement of a seat,
both above and below.
►
Place the head restraint in the low position,
and if fitted to your vehicle, raise the armrest and
fold the table fitted to the back of the seat.
► Pull the control fully up and tip the backrest
forward.
T
o return to the normal position, pull the control
up to release the backrest, then pull the backrest
up to its raised position.
Electric front seat
To avoid discharging the battery, carry out these adjustments with the engine
running.
For more information on the Seat belts,
refer to the corresponding section.
Longitudinal
► Push the control forwards or rearwards to
slide the seat.
Before moving the seat backwards,
ensure that there is nothing that might
prevent the full travel of the seat.
There is a risk of trapping or pinching
passengers if present in the rear seats or
jamming the seat if large objects are placed
on the floor behind the seat.
Seat cushion height
► Tilt the control upwards or downwards to
obtain the desired height.
Backrest angle
► Tilt the control forwards or rearwards to
adjust the angle of the backrest.
Head restraint height
adjustment
If fitted to your vehicle.
► T o raise it, pull it upwards as far as possible
(notch).
►
T
o remove it, press the lug A and pull it
upwards. CarM an uals 2 .c o m
Page 52 of 348

50
Ease of use and comfort
► To put it back in place, engage the head
restraint rods in the openings keeping them in
line with the seat backrest.
►
T
o lower it, press the lug A and push down on
the head restraint at the same time.
The head restraint has a frame with notches which prevents it from lowering;
this is a safety device in case of impact.
The adjustment is correct when the upper
edge of the head restraint is level with the
top of the head.
Never drive with the head restraints removed;
they must be fitted and correctly adjusted.
2-seat front bench seat
If fitted in the vehicle, this is fixed and has a seat
belt built into the backrest for the seat next to the
driver’s seat.
For more information on the Seat belts,
refer to the corresponding section.
Under-seat storage
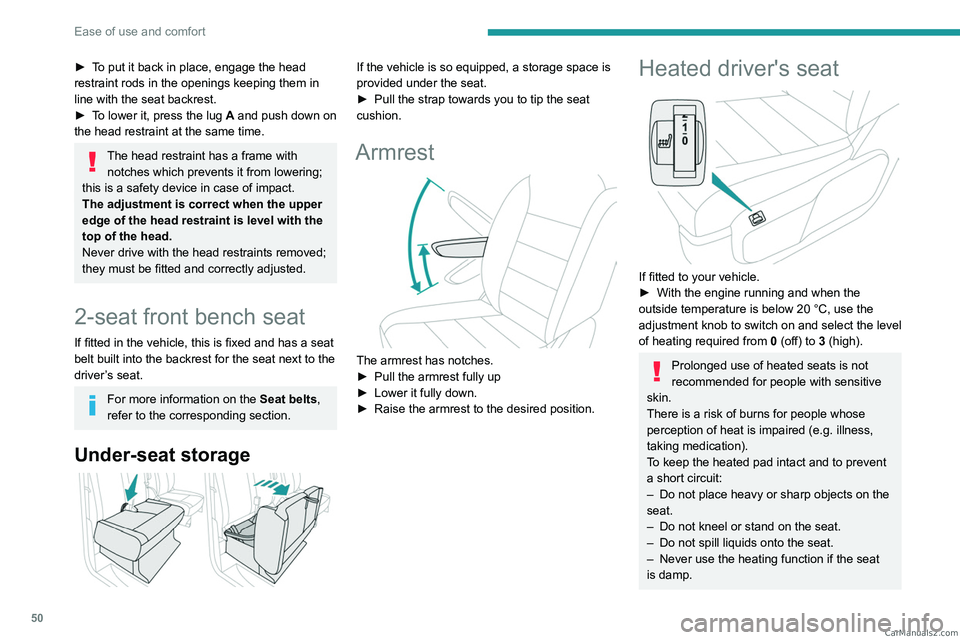
If the vehicle is so equipped, a storage space is
provided under the seat.
►
Pull the strap towards you to tip the seat
cushion.
Armrest
The armrest has notches.
► Pull the armrest fully up
►
Lower it fully down.
►
Raise the armrest to the desired position.
Heated driver's seat
If fitted to your vehicle.
► With the engine running and when the
outside temperature is below 20
°C, use the
adjustment knob to switch on and select the level
of heating required from
0
(off) to 3 (high).
Prolonged use of heated seats is not
recommended for people with sensitive
skin.
There is a risk of burns for people whose
perception of heat is impaired (e.g.
illness,
taking medication).
To keep the heated pad intact and to prevent
a short circuit:
–
Do not place heavy or sharp objects on the
seat.
–
Do not kneel or stand on the seat.
–
Do not spill liquids onto the seat.
–
Never use the heating function if the seat
is damp. CarM an uals 2 .c o m
Page 58 of 348

56
Ease of use and comfort
Install the anti-slip net (supplied with the
vehicle) every time that the seat is raised and
the partition flap removed.
Never use the net for any other purposes.
Regularly check the condition of the anti-
slip net. As soon as signs of wear or tear
appear, contact a PEUGEOT dealer to have
it replaced by an anti-slip net that meets the
specifications required by PEUGEOT for the
vehicle.
Always fit the removable flap back into place
when you are not carrying any long loads.
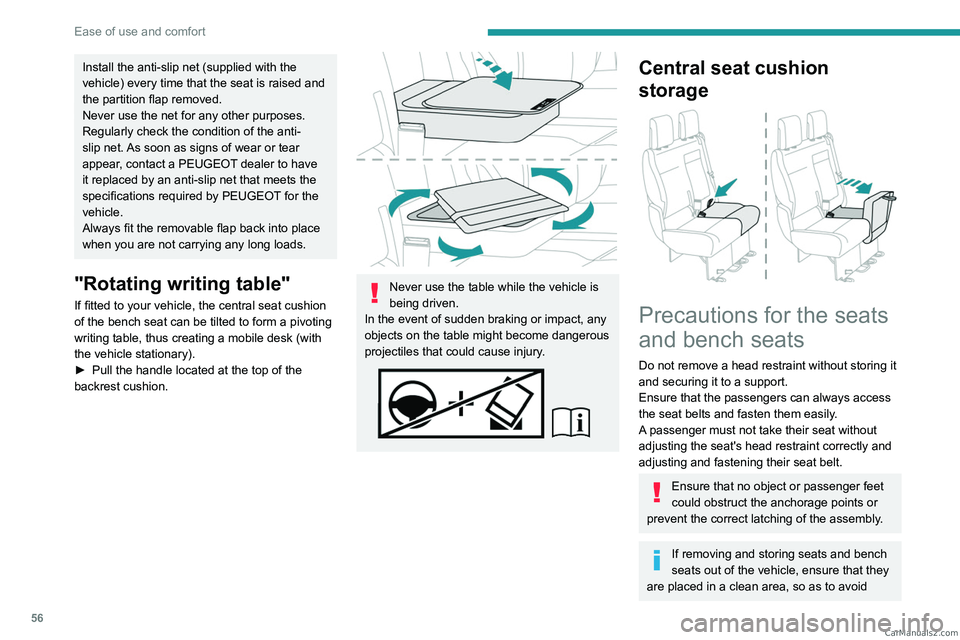
"Rotating writing table"
If fitted to your vehicle, the central seat cushion
of the bench seat can be tilted to form a pivoting
writing table, thus creating a mobile desk (with
the vehicle stationary).
►
Pull the handle located at the top of the
backrest cushion.
Never use the table while the vehicle is
being driven.
In the event of sudden braking or impact, any
objects on the table might become dangerous
projectiles that could cause injury.
Central seat cushion
storage
Precautions for the seats
and bench seats
Do not remove a head restraint without storing it
and securing it to a support.
Ensure that the passengers can always access
the seat belts and fasten them easily.
A passenger must not take their seat without
adjusting the seat's head restraint correctly and
adjusting and fastening their seat belt.
Ensure that no object or passenger feet
could obstruct the anchorage points or
prevent the correct latching of the assembly.
If removing and storing seats and bench
seats out of the vehicle, ensure that they
are placed in a clean area, so as to avoid CarM an uals 2 .c o m
Page 59 of 348

57
Ease of use and comfort
3introducing any foreign bodies into the
mechanisms.
The seats and bench seats are not designed for any other use than in the
vehicle. They are equipped with mechanisms
and features that may be damaged if used
improperly or if dropped.
Loading luggage or objects
behind the row 3 seat and
bench seat
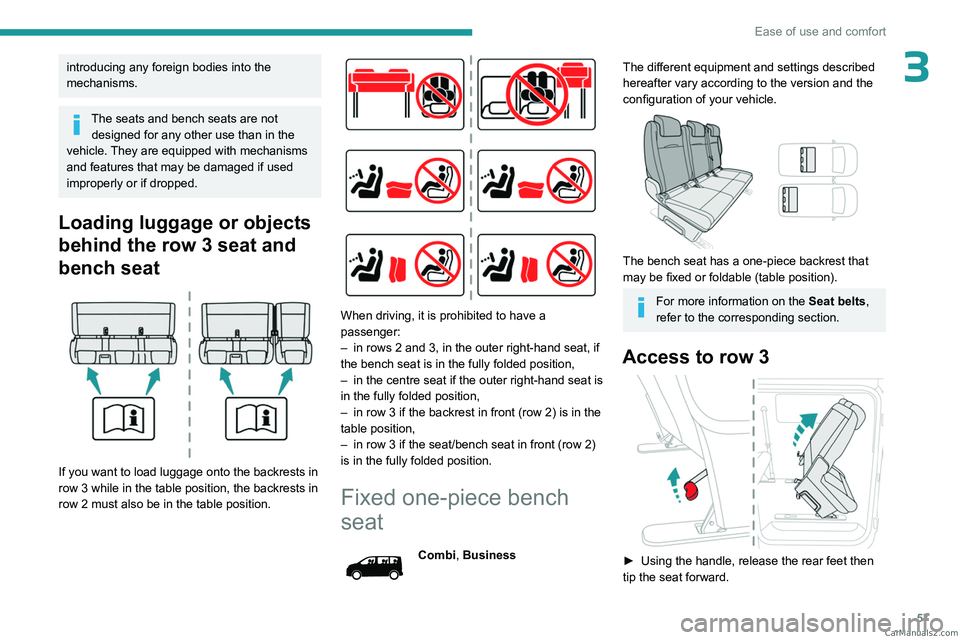
If you want to load luggage onto the backrests in
row
3 while in the table position, the backrests in
row
2 must also be in the table position.
When driving, it is prohibited to have a
passenger:
–
in rows 2 and 3, in the outer right-hand seat, if
the bench seat is in the fully folded position,
–
in the centre seat if the outer right-hand seat is
in the fully folded position,
–
in row 3 if the backrest in front (row 2) is in the
table position,
–
in row 3 if the seat/bench seat in front (row 2)
is in the fully folded position.
Fixed one-piece bench
seat
Combi, Business
The different equipment and settings described
hereafter vary according to the version and the
configuration of your vehicle.
The bench seat has a one-piece backrest that
may be fixed or foldable (table position).
For more information on the Seat belts,
refer to the corresponding section.
Access to row 3
► Using the handle, release the rear feet then
tip the seat forward. CarM an uals 2 .c o m