2023 PEUGEOT 508 key
[x] Cancel search: keyPage 156 of 244
154
Practical information
POWERCHARGE FAULT SymbolDescription
(red)
Control unit malfunction. No charging allowed.
If an error indicator reappears after a manual reset,
the control unit must be checked by a PEUGEOT
dealer before the next charge.
(green)
(green)
(red)
The control unit is in diagnostic mode.
Manual reset procedure
The control unit can be reset by simultaneously disconnecting the chargi\
ng connector and the wall socket.
Then, reconnect the wall socket first. For more information, refer to the handbook.
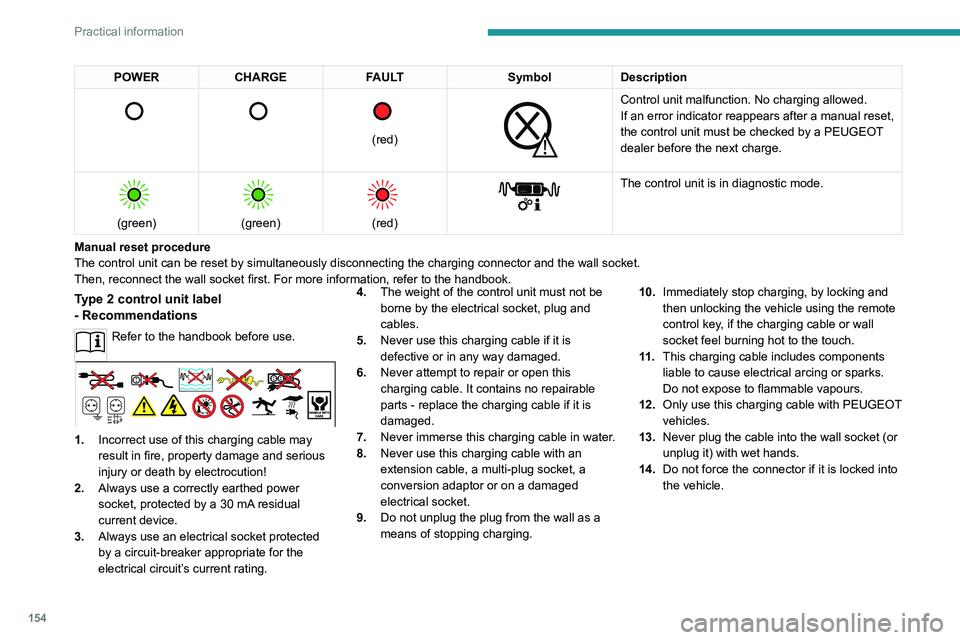
Type 2 control unit label
- Recommendations
Refer to the handbook before use.
1. Incorrect use of this charging cable may
result in fire, property damage and serious
injury or death by electrocution!
2. Always use a correctly earthed power
socket, protected by a 30
mA residual
current device.
3. Always use an electrical socket protected
by a circuit-breaker appropriate for the
electrical circuit’s current rating. 4.
The weight of the control unit must not be
borne by the electrical socket, plug and
cables.
5. Never use this charging cable if it is
defective or in any way damaged.
6. Never attempt to repair or open this
charging cable. It contains no repairable
parts - replace the charging cable if it is
damaged.
7. Never immerse this charging cable in water.
8. Never use this charging cable with an
extension cable, a multi-plug socket, a
conversion adaptor or on a damaged
electrical socket.
9. Do not unplug the plug from the wall as a
means of stopping charging. 10.
Immediately stop charging, by locking and
then unlocking the vehicle using the remote
control key, if the charging cable or wall
socket feel burning hot to the touch.
11 . This charging cable includes components
liable to cause electrical arcing or sparks.
Do not expose to flammable vapours.
12. Only use this charging cable with PEUGEOT
vehicles.
13. Never plug the cable into the wall socket (or
unplug it) with wet hands.
14. Do not force the connector if it is locked into
the vehicle.
Page 160 of 244
158
Practical information
For more information about driving with a
towing device fitted to a trailer and associated
with the Trailer stability assist, refer to the
corresponding section.
Comply with the maximum authorised
towable weight, as indicated on your
vehicle's registration certificate, on the
manufacturer's label and in the Technical
data section of this guide.
If using accessories attached to the
towing device (e.g. bicycle carriers, tow
boxes):
–
Comply with the maximum authorised nose
weight.
–
Do not transport more than 4 conventional
bicycles or 2 electric bicycles.
When loading bicycles onto a bicycle carrier
on a towball, be sure to place the heaviest
bicycles as close as possible to the vehicle.
Observe the legislation in force in the
country where you are driving.
Vehicle equipped with motorised
tailgate with hands-free function
(Hands-Free Tailgate Access)
To avoid unintentionally opening the
motorised tailgate when operating the towing
device:
– Deactivate this function in advance in the
vehicle's configuration application.
–
Or remove the electronic key from the
recognition zone, with the tailgate closed.
Towing device with retractable ball joint
When this towing device is not in use, it is folded
away underneath the rear bumper.
No tools are required to install or stow it.
Before any operation, the vehicle must
be stationary with the parking brake
applied.
The area close to the exhaust pipe may reach
a high temperature: risk of burns!
Vehicle equipped with motorised
tailgate with hands-free function
(Hands-Free Tailgate Access)
To avoid unintentional opening of the tailgate,
follow the recommendations on the Towing
device by referring to the corresponding
section.
Unlocking handle
The towball is locked in either the storage
position or the usage position.
The unlocking handle is behind the rear bumper,
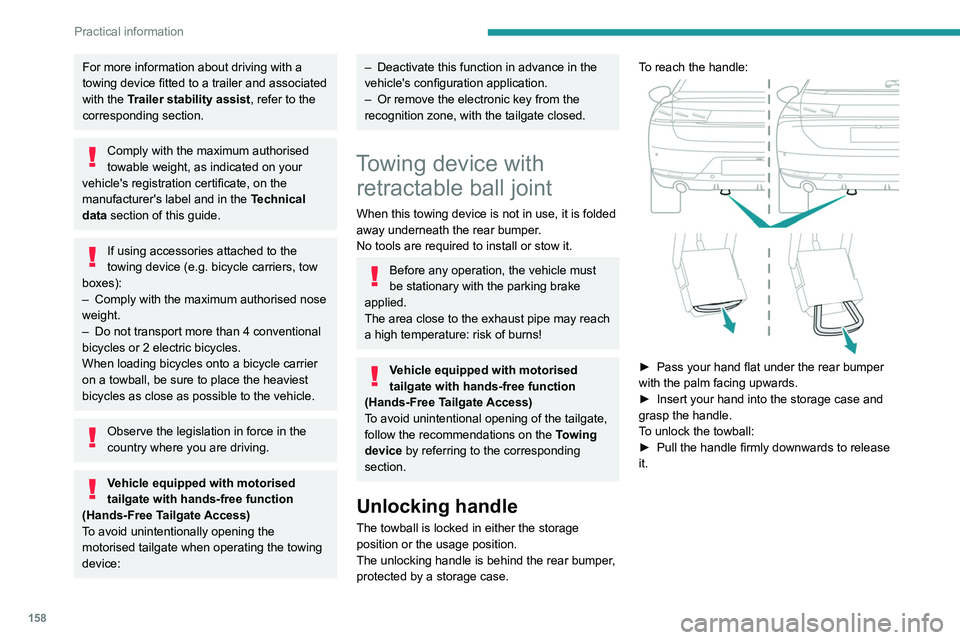
protected by a storage case. To reach the handle:
► Pass your hand flat under the rear bumper
with the palm facing upwards.
►
Insert your hand into the storage case and
grasp the handle.
T
o unlock the towball:
►
Pull the handle firmly downwards to release
it.
Page 171 of 244
169
Practical information
7Important: in the event of a top-up after
an AdBlue breakdown, you must wait
about 5
minutes before switching on the
ignition, without opening the driver's door,
unlocking the vehicle or bringing the
electronic key into the passenger
compartment.
Switch on the ignition, then wait for 10
seconds before starting the engine.
►
Press the "
START/STOP" button to switch off
the engine.
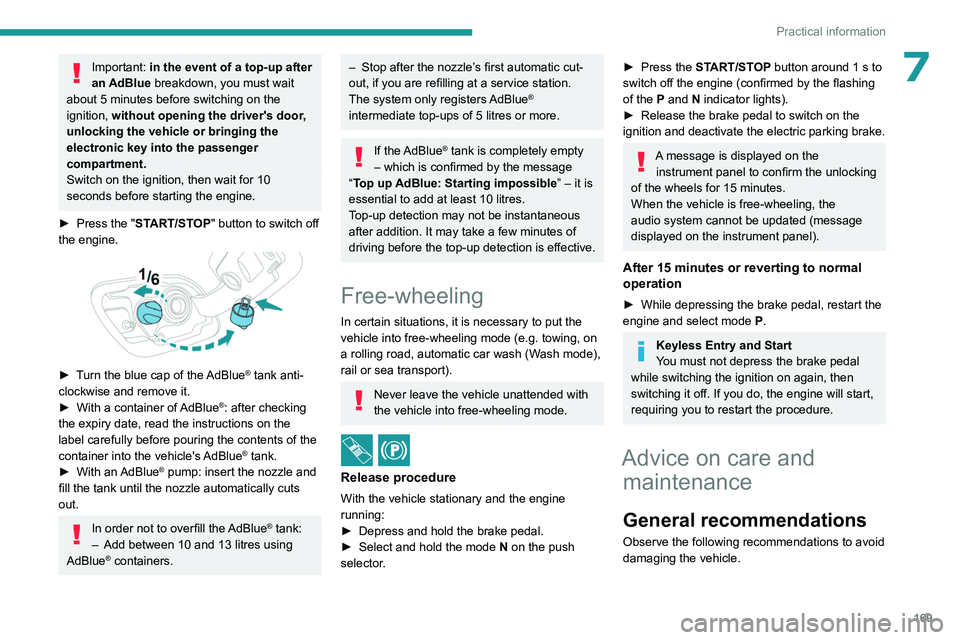
► Turn the blue cap of the AdBlue® tank anti-
clockwise and remove it.
►
With a container of
AdBlue
®: after checking
the expiry date, read the instructions on the
label carefully before pouring the contents of the
container into the vehicle's AdBlue
® tank.
►
With an
AdBlue® pump: insert the nozzle and
fill the tank until the nozzle automatically cuts
out.
In order not to overfill the AdBlue® tank:
–
Add between 10 and 13 litres using
AdBlue® containers.
– Stop after the nozzle’ s first automatic cut-
out, if you are refilling at a service station.
The system only registers AdBlue
®
intermediate top-ups of 5
litres or more.
If the AdBlue® tank is completely empty
– which is confirmed by the message
“Top up AdBlue: Starting impossible ” – it is
essential to add at least 10
litres.
Top-up detection may not be instantaneous
after addition. It may take a few minutes of
driving before the top-up detection is effective.
Free-wheeling
In certain situations, it is necessary to put the
vehicle into free-wheeling mode (e.g. towing, on
a rolling road, automatic car wash (Wash mode),
rail or sea transport).
Never leave the vehicle unattended with
the vehicle into free-wheeling mode.
/
Release procedure
With the vehicle stationary and the engine
running:
►
Depress and hold the brake pedal.
►
Select and hold the mode
N
on the push
selector.
► Press the START/STOP button around 1 s to
switch off the engine (confirmed by the flashing
of the P and N indicator lights).
►
Release the brake pedal to switch on the
ignition and deactivate the electric parking brake.
A message is displayed on the instrument panel to confirm the unlocking
of the wheels for 15
minutes.
When the vehicle is free-wheeling, the
audio system cannot be updated (message
displayed on the instrument panel).
After 15 minutes or reverting to normal
operation
► While depressing the brake pedal, restart the
engine and select mode P .
Keyless Entry and Start
You must not depress the brake pedal
while switching the ignition on again, then
switching it off. If you do, the engine will start,
requiring you to restart the procedure.
Advice on care and maintenance
General recommendations
Observe the following recommendations to avoid
damaging the vehicle.
Page 172 of 244

170
Practical information
Exterior
Never use a high-pressure jet wash in
the engine compartment - risk of
damaging the electrical components!
Do not wash the vehicle in bright sunshine or
extremely cold conditions.
When washing the vehicle in an
automatic roller-brush car wash, be sure
to lock the doors and, depending on version,
move the electronic key away and deactivate
the "hands-free" function (Hands-Free
Tailgate Access).
When using a pressure washer, keep the jet
nozzle at a minimum distance of 30 cm from
the vehicle (particularly when cleaning areas
containing chipped paint, sensors or seals).
Promptly clean up any stains containing
chemicals liable to damage the vehicle's
paintwork (including tree resin, bird
droppings, insect secretions, pollen and tar).
Depending on the environment, clean the
vehicle frequently to remove salty deposits
(in coastal areas), soot (in industrial areas)
and mud/salts (in wet or cold areas). These
substances can be highly corrosive.
Contact a PEUGEOT dealer or a qualified
workshop for advice on removing stubborn
stains requiring special products (such as tar
or insect removers).
Preferably, have paint touch-ups performed
by a PEUGEOT dealer or a qualified
workshop.
Interior
When washing the vehicle, never use a
water hose or high-pressure jet to clean
the interior.
Liquids carried in cups or other open
containers can spill, presenting a risk of
damage to the instruments and controls and
the controls located on the centre console. Be
vigilant!
To clean instrument panels, touch screens
or other displays, wipe gently with a soft,
dry cloth. Do not use products (e.g. alcohol,
disinfectant) or soapy water directly on these
surfaces - risk of damage!
Bodywork
High-gloss paint
Do not use abrasive products, solvents,
petrol or oil to clean the bodywork.
Never use an abrasive sponge to clean
stubborn stains - risk of scratching the
paintwork!
Do not apply polish in strong sunshine, or to
plastic or rubber parts.
Use a soft cloth and soapy water or a pH
neutral product.
Gently wipe the bodywork with a clean
microfibre cloth.
Apply polish with the vehicle clean and dry.
Comply with the instructions for use stated on
the product.
Decals
(Depending on version)
Do not use a high-pressure washer to
clean the vehicle - risk of damaging or
detaching the decals!
Use a high-flow hose (temperature
between 25°C and 40°C).
Place the jet of water perpendicular to the
surface to be cleaned.
Rinse the vehicle with demineralised water.
Textile
The dashboard, door panels and seats may
contain parts made of textile material.
Maintenance
Do not use aggressive cleaning products
(e.g. alcohol, solvent or ammonia).
Do not use steam-cleaning systems - risk of
affecting the adhesion of the fabrics!
Page 189 of 244
187
In the event of a breakdown
8accessory batteries - risk of irreversible
damage!
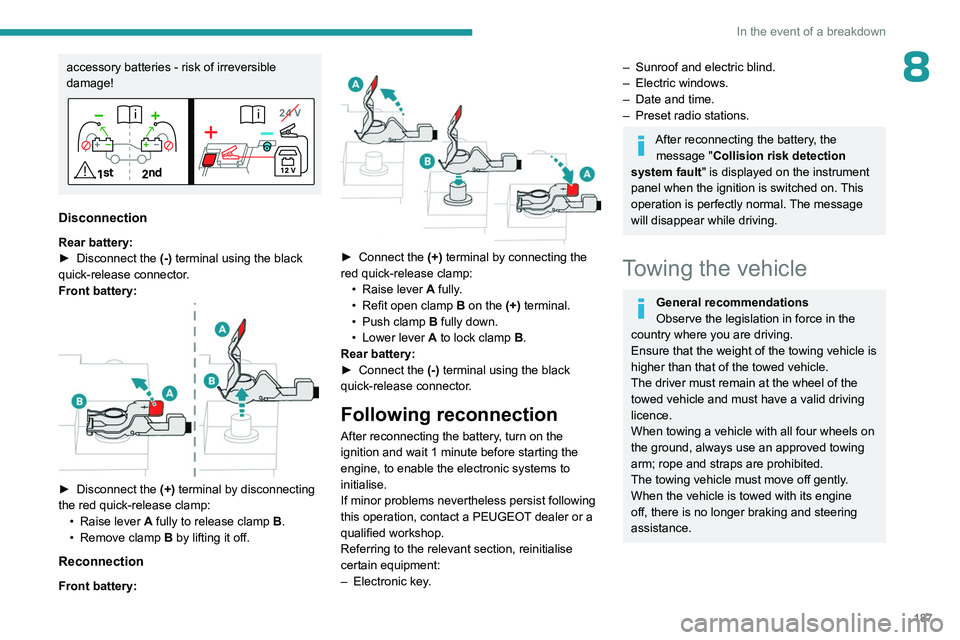
Disconnection
Rear battery:
► Disconnect the (-)
terminal using the black
quick-release connector.
Front battery:
► Disconnect the (+) terminal by disconnecting
the red quick-release clamp: •
Raise lever
A
fully to release clamp
B
.
•
Remove clamp
B
by lifting it off.
Reconnection
Front battery:
► Connect the (+) terminal by connecting the
red quick-release clamp: •
Raise lever
A
fully.
•
Refit open clamp
B
on the (+) terminal.
•
Push clamp
B fully down.
•
Lower lever
A
to lock clamp B.
Rear battery:
►
Connect the
(-) terminal using the black
quick-release connector.
Following reconnection
After reconnecting the battery, turn on the
ignition and wait 1 minute before starting the
engine, to enable the electronic systems to
initialise.
If minor problems nevertheless persist following
this operation, contact a PEUGEOT dealer or a
qualified workshop.
Referring to the relevant section, reinitialise
certain equipment:
–
Electronic key
.
– Sunroof and electric blind.
– Electric windows.
–
Date and time.
–
Preset radio stations.
After reconnecting the battery, the message "Collision risk detection
system fault" is displayed on the instrument
panel when the ignition is switched on. This
operation is perfectly normal. The message
will disappear while driving.
Towing the vehicle
General recommendations
Observe the legislation in force in the
country where you are driving.
Ensure that the weight of the towing vehicle is
higher than that of the towed vehicle.
The driver must remain at the wheel of the
towed vehicle and must have a valid driving
licence.
When towing a vehicle with all four wheels on
the ground, always use an approved towing
arm; rope and straps are prohibited.
The towing vehicle must move off gently.
When the vehicle is towed with its engine
off, there is no longer braking and steering
assistance.
Page 200 of 244
198
PEUGEOT i-Connect Advanced - PEUGEOT i-Connect
Some connected services may not
function without the vehicle location data.
This mode will not be applied to the emergency call function or to specific
services to which the user has consented
under the terms of commercial contracts
(e.g.
Connected alarm).
"Private Mode"
This mode does not allow the vehicle to
transmit personal data outside the vehicle.
Connected services will only perform
local processing inside the vehicle with
limited functions.
This mode will not be applied to the emergency call function or to specific
services to which the user has consented
under the terms of commercial contracts
(e.g.
Connected alarm).
Professional purposes
If the vehicle is used for professional
purposes or under the terms of specific
contracts (e.g.
corporate fleet, government
assignment), some privacy modes will not
be available for the user on the screen,
depending on the data sharing needs of the
services. To change mode, swipe down from the upper
edge of the touch screen to display all of the
quick settings.
Press this button and select the chosen
mode. The mode is highlighted.
OR
Press the "Settings" application.
In the list, select the "Connectivity" tab.
Select "Privacy Settings".
Choose the mode.
Internet portal
During the first use, upon acquisition of the
vehicle, the user is invited to select the country
of residence for the use of the Internet portal.
If the country is not selected, the notification is
stored in the notification centre and disappears
once the country is selected. Slide a finger on
the touch screen from top to bottom to display all
the notifications.
The selection of a country is necessary to use
the available internet applications.
Press the "Settings" application.
In the list, select the "Connected Services".
Choose the country.
The first time you use it, via a connected mobile device, the system links to your
profile. The connected mobile device serves as
an access key to saved personal information.
First activate the mobile device’s Bluetooth®
function.
Select the desired application, authentication will
be requested if necessary. This authentication
will be saved for future uses via the mobile
device connected to the current profile.
An authentication will be requested at each use if
the mobile device is not connected to the current
profile or if the Guest profile is used.
With the use of the “Guest” profile, an
identification will be requested for each
use.
Updating the system
Managing devices remotely and
remote updating of software and
firmware.
Being an integral part of the
service used to
provide connected services contract(s), the
required management of devices as well as
the required updating of the software and
firmware associated with the aforementioned
connected service will be carried out remotely,
in particular using "Over the Air" technology.
To do this, a secure connection via radio
network is established between the vehicle
and the Manufacturer's device management
server each time the ignition is switched on,
when a mobile telephone network is available.
Depending on the vehicle's equipment,
the connection
configuration must be set
Page 208 of 244
206
PEUGEOT i-Connect Advanced - PEUGEOT i-Connect
smartphone too close to other Wi-Fi networks
to which it can connect automatically.
The cable connection requires that you
deactivate the Android Auto wireless function,
in the Settings menu of the "Android Auto"
application of your smartphone.
Connect the smartphone to the system
using the USB socket compatible with
Mirror Screen
®.
Android Auto is automatically launched a few
seconds after the USB connection has been
established. A validation procedure on the
smartphone has to be followed for the first
connection, with the vehicle stationary.
The smartphone charges when connected by the
USB cable.
The cable connection allows you to avoid
disconnections, especially when passing through
toll booths.
Only one USB socket enables the Mirror
Screen® connection (Android Auto); refer
to the "Ease of use and comfort - Fittings"
section.
It is recommended that you use the device's
original USB cables, preferably with a short
cable to ensure optimum performance.
The wireless connection of an Android Auto
smartphone can be initiated from the " My
Devices " menu. First activate the smartphone’s Android Auto
®
wireless function, in the Settings menu of the
"Android Auto" application of your smartphone.
Press the "Settings" application.
In the list, select the "Connectivity" tab.
Select "My Devices " to display the device
to be connected to Android Auto.
If the device has never been connected to the
system before, it will have to be paired (refer to
the "Bluetooth
® connection" section).
The system detects if the smartphone is
compatible with Android Auto and offers to
connect to it following the pairing process.
If the device has already been connected to the
system via Bluetooth
®, select the device settings
from the list of known devices and choose
Android Auto as the wireless connection mode.
The subsequent automatic connection of the
smartphone requires activation of Bluetooth
® on
your device.
As soon as the connection is established, press this button to display the " Android
Auto" interface.
To initiate the smartphone voice commands, press and hold the steering-
mounted control button.
Media
Changing source
Press the "Media" application.
Press this button to change source (radio,
audio streaming via a USB socket,
Bluetooth
® or Mirror Screen®).Using the steering-mounted controls,
press this button to change source.
Selecting a radio station
Press the "Media" application.
In the list, select the "Player" tab.
Press one of the buttons to
perform an automatic search for
radio stations.
Or
Move the slider to manually search for
frequencies up or down.
Or
Press this button.
Enter the frequency values using the
virtual keypad.
Press this button to confirm.
A list of stations is available by pressing the
“Stations” tab.
Press “Mute” to activate/deactivate the
sound.
Page 210 of 244
208
PEUGEOT i-Connect Advanced - PEUGEOT i-Connect
If several devices are connected, press
this button to select one.
Once the device is connected, browsing through
the files is possible by pressing the
"Playlist" or
"Library"
button.
Short press: go to the previous/
next track.
Long press: fast-forward/rewind in a track.
Repeat the current title or the list of
selected titles.
Random track playback.
Sound deactivation/reactivation.
Configuring audio and radio
settings
Audio settings can be accessed in 2 different
ways.
Via the Media application
Press the "Media" application.
In the list, select the "Settings" tab.
Or
Via the Settings application
Press the "Settings" application.
In the list, select the "Audio and Radio " tab.
It is possible to configure:
–
Sound Settings.
–
Radio Settings.
–
V
olume Settings.
Information and advice
The system supports USB Mass Storage devices
or Apple® devices via the USB sockets. The
adapter cable is not supplied.
Devices are managed using the audio system
controls.
The system will only play audio files with ".wma,
.aac,
.flac, .ogg, .mp3" file extensions, at bit rates
between 32 Kbps and 320 Kbps.
It also supports VBR (Variable Bit Rate) mode.
No other file types (".mp4", etc.) can be read.
".wma" files must be of the WMA 9 standard.
The supported sampling rates are 32, 44 and
48 KHz.
To avoid reading and display problems, we
recommend choosing file names less than 20
characters long that do not contain any special
characters (e.g. “ ? .
; ù).
Use only USB memory sticks in FAT32 format
(File Allocation Table).
We recommend using the original USB
cable for the portable device.
Phone
Receiving a call
An incoming call is announced by a ring and a
display overlaid on the screen.
Accepting the call:
briefly press the telephone button on the
steering-mounted controls to accept an
incoming call.
Or
Press this touch screen button.
Ending the call:
press and hold...
...the telephone button on the steering-
mounted controls to refuse the call.
Or
Press this touch screen button.
Press this button on the touch screen to
send an automatic message indicating
that you are driving.
Making a call
Using the telephone is strongly
discouraged while driving.
Park the vehicle.
Making a call using the numeric
keypad
Press the "Phone" application.
In the list, select the “Keypad” tab then dial the
number.
Press this button to make the call.