2023 PEUGEOT 5008 gearbox
[x] Cancel search: gearboxPage 143 of 292
141
Driving
6press button 4 or the accelerator pedal to move
off.
If the driver takes no action after the vehicle
has been stopped, the electric parking brake is
applied automatically after about 5 minutes.
Cruise control remains active after
changing gear, regardless of the gearbox
type.
When the driver attempts to reactivate
cruise control, after the function has been
paused, the message "Activation not possible,
unsuitable conditions" is briefly displayed if
reactivation is not possible (safety conditions
not met).
Changing the programmed speed setting
with the Road signs recognition function
► Press 5 to accept the speed suggested by
the function on the instrument panel, then press
again to confirm.
To prevent sudden acceleration or deceleration of the vehicle, select a
speed setting relatively close to the vehicle's
current speed.
Changing the inter-vehicle distance
► Press 6 to display the distance setting
thresholds ("Distant", "Normal" or "Close"), then
press again to select a threshold. After a few seconds, the option is accepted and
will be memorised when the ignition is switched
off.
Temporarily exceeding the speed setting
► Press the accelerator pedal fully
. Distance
monitoring and cruise control are deactivated
while acceleration is maintained. "Cruise control
suspended" is displayed.
Deactivating the system
► Turn the thumbwheel 1 upwards to the OFF
position.
Information displayed on
the instrument panel
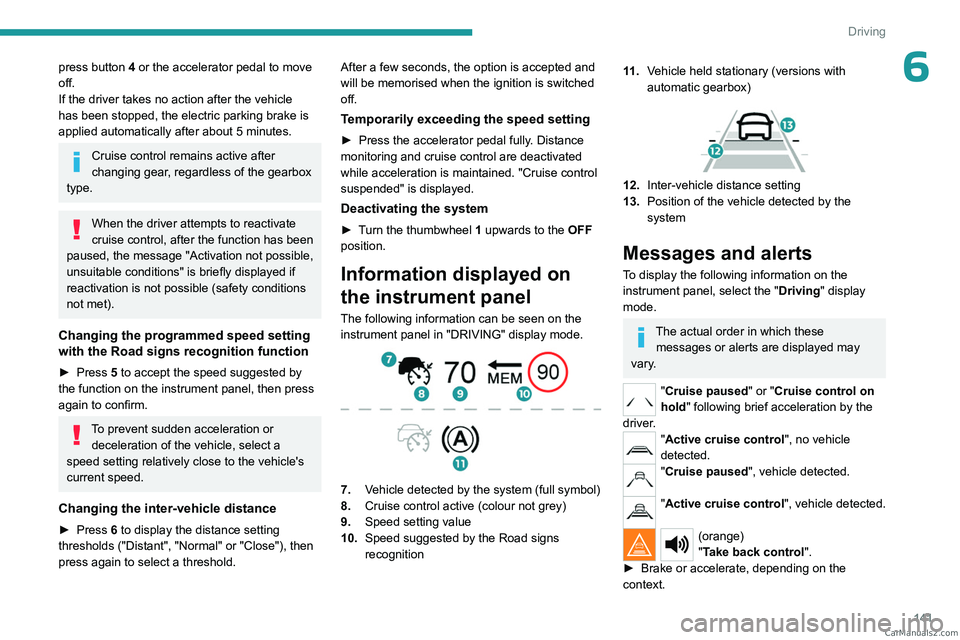
The following information can be seen on the
instrument panel in "DRIVING" display mode.
7. Vehicle detected by the system (full symbol)
8. Cruise control active (colour not grey)
9. Speed setting value
10. Speed suggested by the Road signs
recognition
11 .Vehicle held stationary (versions with
automatic gearbox)
12.Inter-vehicle distance setting
13. Position of the vehicle detected by the
system
Messages and alerts
To display the following information on the
instrument panel, select the " Driving" display
mode.
The actual order in which these messages or alerts are displayed may
vary.
"Cruise paused" or "Cruise control on
hold " following brief acceleration by the
driver.
"Active cruise control", no vehicle
detected.
"Cruise paused", vehicle detected.
"Active cruise control", vehicle detected.
(orange)
"Take back control".
►
Brake or accelerate, depending on the
context. CarM an uals 2 .c o m
Page 154 of 292
152
Driving
(orange)
Level 1: visual alert only, warning that the
preceding vehicle is very close.
The message "Vehicle close" is displayed.
(red)
Level 2: visual and audible alert, warning
that a collision is imminent.
The message "Brake! " is displayed.
While approaching a vehicle too quickly,
the level 2 alert may be displayed
directly.
Important: the level 1 alert depends on the
trigger threshold selected. It reacts only on
moving vehicles. It is disabled automatically
at lower speed.
It is possible that collision warnings are
not given, are given too late or seem
unjustified.
The driver must always stay in control of the
vehicle and be prepared to react at any time
to avoid an accident.
Intelligent emergency
braking assistance (iEBA)
This function increases vehicle deceleration
if the driver does not brake enough to avoid a
collision.
This assistance is only provided if the driver
presses the brake pedal.
Active Safety Brake
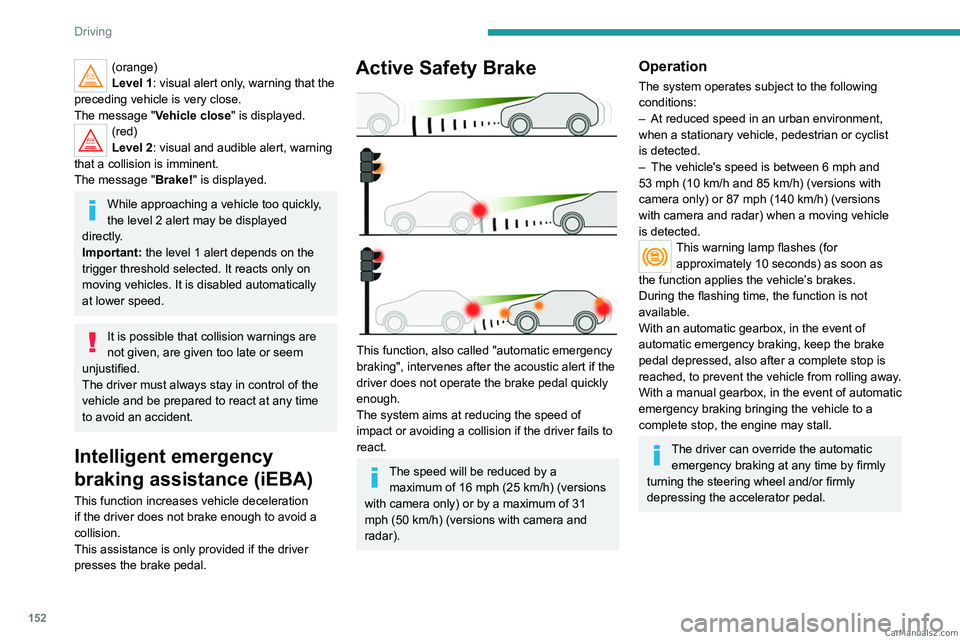
This function, also called "automatic emergency
braking", intervenes after the acoustic alert if the
driver does not operate the brake pedal quickly
enough.
The system aims at reducing the speed of
impact or avoiding a collision if the driver fails to
react.
The speed will be reduced by a maximum of 16 mph (25 km/h) (versions
with camera only) or by a maximum of 31
mph (50
km/h) (versions with camera and
radar).
Operation
The system operates subject to the following
conditions:
–
At reduced speed in an urban environment,
when a stationary vehicle, pedestrian or cyclist
is detected.
–
The vehicle's speed is between 6 mph and
53 mph (10
km/h and 85 km/h) (versions with
camera only) or 87 mph (140 km/h) (versions
with camera and radar) when a moving vehicle
is detected.
This warning lamp flashes (for approximately 10 seconds) as soon as
the function applies the vehicle’s brakes.
During the flashing time, the function is not
available.
With an automatic gearbox, in the event of
automatic emergency braking, keep the brake
pedal depressed, also after a complete stop is
reached, to prevent the vehicle from rolling away.
With a manual gearbox, in the event of automatic
emergency braking bringing the vehicle to a
complete stop, the engine may stall.
The driver can override the automatic emergency braking at any time by firmly
turning the steering wheel and/or firmly
depressing the accelerator pedal. CarM an uals 2 .c o m
Page 161 of 292
159
Driving
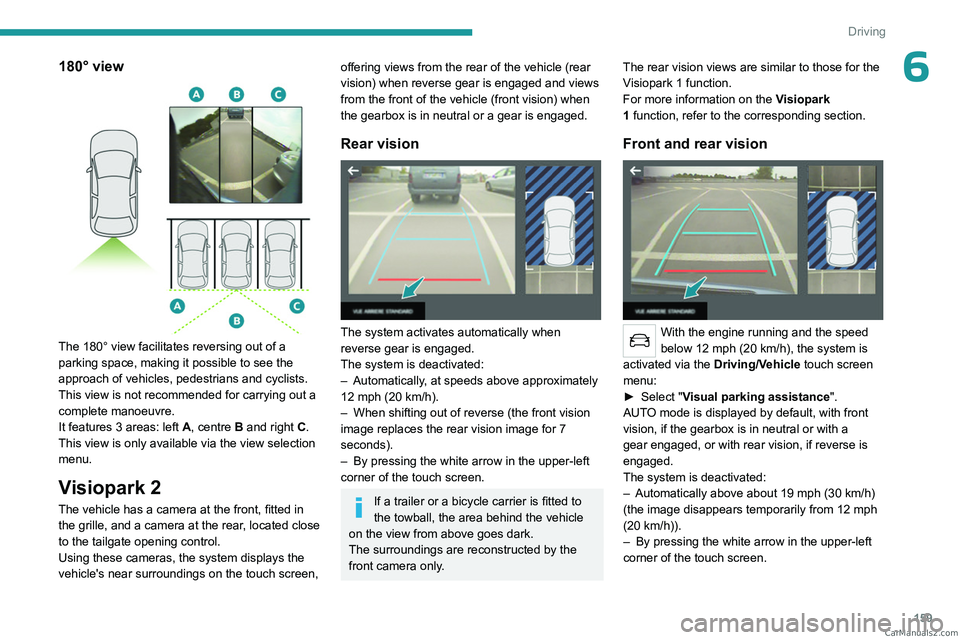
6180° view
The 180° view facilitates reversing out of a
parking space, making it possible to see the
approach of vehicles, pedestrians and cyclists.
This view is not recommended for carrying out a
complete manoeuvre.
It features 3 areas: left A, centre B and right C.
This view is only available via the view selection
menu.
Visiopark 2
The vehicle has a camera at the front, fitted in the grille, and a camera at the rear, located close
to the tailgate opening control.
Using these cameras, the system displays the
vehicle's near surroundings on the touch screen,
offering views from the rear of the vehicle (rear
vision) when reverse gear is engaged and views
from the front of the vehicle (front vision) when
the gearbox is in neutral or a gear is engaged.
Rear vision
The system activates automatically when
reverse gear is engaged.
The system is deactivated:
–
Automatically
, at speeds above approximately
12 mph (20
km/h).
–
When shifting out of reverse (the front vision
image replaces the rear vision image for 7
seconds).
–
By pressing the white arrow in the upper-left
corner of the touch screen.
If a trailer or a bicycle carrier is fitted to
the towball, the area behind the vehicle
on the view from above goes dark.
The surroundings are reconstructed by the
front camera only. The rear vision views are similar to those for the
Visiopark 1 function.
For more information on the
Visiopark
1 function, refer to the corresponding section.
Front and rear vision
With the engine running and the speed
below 12 mph (20 km/h), the system is
activated via the Driving/Vehicle touch screen
menu:
►
Select "
Visual parking assistance".
AUTO mode is displayed by default, with front
vision, if the gearbox is in neutral or with a
gear engaged, or with rear vision, if reverse is
engaged.
The system is deactivated:
–
Automatically above about 19 mph (30
km/h)
(the image disappears temporarily from 12 mph
(20
km/h)).
–
By pressing the white arrow in the upper-left
corner of the touch screen. CarM an uals 2 .c o m
Page 163 of 292

161
Driving
6Park Assist
For more information, refer to the
General recommendations on the use
of driving and manoeuvring aids .
This system provides active parking assistance:
it detects a parking space then operates the
steering system to park in this space.
With a manual gearbox, the driver manages the
accelerator, brakes, gears and clutch.
With an automatic gearbox (EAT6/EAT8), the
driver manages the accelerator, brakes and
gears.
During phases of entry into and exit from a
parking space, the system provides visual and
audible information to the driver in order to make
the manoeuvres safe. Several forward and
reverse manoeuvres may be required.
At any time, the driver can take back control by
holding the steering wheel.
The Park Assist system provides assistance for
the following manoeuvres:
A. Entry into a "parallel" parking space
B.Exit from a "parallel" parking space
C. Entry into a "bay" parking space
The Park Assist system cannot operate
with the engine switched off.
When Park Assist is activated, it prevents
Stop & Start from going into STOP mode. In
STOP mode, activation of Park Assist restarts
the engine.
The Park Assist system takes control of the steering for a maximum of 4
manoeuvring cycles. It is deactivated after
these 4 cycles. If the vehicle is not positioned
correctly, take back control to complete the
manoeuvre.
The sequence of manoeuvres and the driving instructions are displayed in the
instrument panel.
The assistance is activated: the display of this symbol and a speed limit
indicate that the steering manoeuvres are
controlled by the system: do not touch the
steering wheel.
The assistance is deactivated: the display of this symbol indicates that the
steering manoeuvres are no longer controlled
by the system: take over the steering.
Activation of Park Assist deactivates the Blind spot monitoring.
The Parking sensors function is not available during parking space
measurement. It intervenes later when
manoeuvring to warn that the vehicle is
approaching an obstacle: the audible signal
becomes continuous when the obstacle is
less than 30 centimetres away.
If the Parking sensors function has
been deactivated, it will be automatically
reactivated during the assisted manoeuvring
phases.
During parking and exit from parking
manoeuvres, the Visiopark 1 - Visiopark
2 functions may come into operation. They
allow better monitoring of the surroundings of
the vehicle, by displaying additional
information in the touch screen.
For more information on the Visiopark
1 - Visiopark 2
functions, refer to the
corresponding section.
In some circumstances, the sensors may
not detect small obstacles located in their
blind spots.
Any object exceeding the size of the vehicle
(e.g.
roof ladder, towball) is not taken
into account by the Park Assist during a
manoeuvre. CarM an uals 2 .c o m
Page 190 of 292
188
Practical information
If the warning lamp stays on, this
indicates a low Diesel additive level.
For more information on Checking levels,
refer to the corresponding section.
Following prolonged operation of the
vehicle at very low speed or at idle, you
may, in exceptional circumstances, notice
water vapour coming from the exhaust while
accelerating. These emissions have no
impact on the vehicle’s behaviour and the
environment.
New vehicle
During the first few particle filter
regeneration operations, you may notice a
"burning" smell. This is perfectly normal.
Manual gearbox
The gearbox does not require any maintenance (no oil change).
Automatic gearbox
/ The gearbox does not require any maintenance (no oil
change).
Electric parking brake
This system does not require any routine servicing. However, in the event of a
problem, do not hesitate to have the system
checked by a PEUGEOT dealer or a qualified
workshop.
For more information on the Electric
parking brake, refer to the
corresponding section.
Brake pads
Brake wear depends on the style of
driving, particularly in the case of vehicles
used in town, over short distances. It may be
necessary to have the condition of the brakes
checked, even between vehicle services.
Unless there is a leak in the circuit, a drop in the
brake fluid level indicates that the brake pads
are worn.
After washing the vehicle, moisture, or in wintry conditions, ice can form on the
brake discs and pads: braking efficiency may
be reduced. Gently dab the brakes to dry and
defrost them.
Brake disc wear
For information on checking brake disc
wear, contact a PEUGEOT dealer or a
qualified workshop.
Wheels and tyres
The inflation pressure of all tyres, including the spare wheel, must be
checked on "cold” tyres.
The pressures indicated on the tyre pressure
label are valid for "cold" tyres. If you have driven
for more than 10 minutes or more than 6 miles
(10 kilometres) at over 31 mph (50
km/h), add
0.3 bar (30 kPa) to the values indicated on the
label.
Under-inflation increases energy
consumption. Non-compliant tyre
pressures cause tyres to wear prematurely
and have an adverse effect on the vehicle's
road holding - risk of accident!
Driving with worn or damaged tyres reduces the
braking and road holding performance of the
vehicle. Regularly check the condition of the
tyres (tread and sidewalls) and rims as well as
the presence of the valve caps.
When the wear indicators no longer appear set
back from the tread, the depth of the grooves is
less than 1.6 mm; replace the tyres as soon as
possible.
Using different size wheels and tyres from those
specified can affect the lifetime of tyres, wheel
rotation, ground clearance, the speedometer
reading and have an adverse effect on road
holding.
Fitting different tyres on the front and rear axles
can cause the ESC to mistime.
Always mark the direction of rotation on the tyres
that will be stored when fitting winter or summer
tyres. Store them in a cool, dry place and away
from direct exposure to the sun's rays. CarM an uals 2 .c o m
Page 193 of 292
191
Practical information
7In order not to overfill the AdBlue® tank:
–
Add between 10 and 13 litres using
AdBlue® containers.
–
Stop after the nozzle’ s first automatic cut-
out, if you are refilling at a service station.
The system only registers AdBlue
®
intermediate top-ups of 5
litres or more.
If the AdBlue® tank is completely empty
– which is confirmed by the message
“Top up AdBlue: Starting impossible ” – it is
essential to add at least 10
litres.
Top-up detection may not be instantaneous
after addition. It may take a few minutes of
driving before the top-up detection is effective.
Free-wheeling
In certain situations, it is necessary to put the
vehicle into free-wheeling mode (e.g. towing, on
a rolling road, automatic car wash (Wash mode),
rail or sea transport).
The procedure varies according to the type of
gearbox and parking brake.
Never leave the vehicle unattended with
the vehicle into free-wheeling mode.
With a manual gearbox and
electric parking brake
/
To release them
► With the engine running and while depressing
the brake pedal, move the gear selector to the
neutral position.
►
While depressing the brake pedal, switch off
the engine.
►
Release the brake pedal, then switch on the
ignition.
►
While depressing the brake pedal, press the
control to release the parking brake.
►
Release the brake pedal, then switch off the
ignition.
Reverting to normal operation
► While depressing the brake pedal, restart the
engine and apply the parking brake.
With an automatic gearbox
(type 1) and electric parking
brake
/
Release procedure
► With the vehicle stationary and the engine
running, depress the brake pedal and select
mode
N.
Within 5 seconds:
► Depress and hold the brake pedal, then
observe this order: switch off the engine and
move the push selector forwards or backwards.
►
Release the brake pedal, then switch on the
ignition.
►
Place your foot on the brake and press the
electric parking brake control to release it.
►
Release the brake pedal, then switch off the
ignition.
A message is displayed on the instrument panel to confirm the unlocking
of the wheels for 15
minutes.
When the vehicle is free-wheeling, the
audio system cannot be updated (message
displayed on the instrument panel).
After 15 minutes or reverting to normal
operation
► While depressing the brake pedal, restart the
engine and select mode P .
With an automatic gearbox
(type 2) and electric parking
brake
/ CarM an uals 2 .c o m
Page 194 of 292

192
Practical information
Release procedure
► With the vehicle stationary and the engine
running, select mode N and switch off the
ignition.
Within 5
seconds:
►
Switch on the ignition again.
►
While depressing the brake pedal, move the
push selector forwards or backwards to confirm
mode
N.
►
While depressing the brake pedal, press the
control lever to release the parking brake.
►
Release the brake pedal, switch off the
ignition.
If the 5-second time limit is exceeded, the
gearbox engages mode P
; it is then necessary to
restart the procedure.
Reverting to normal operation
► While depressing the brake pedal, restart the
engine.
Keyless Entry and Start
You must not depress the brake pedal
while switching the ignition on again, then
switching it off. If you do, the engine will start,
requiring you to restart the procedure.
Advice on care and maintenance
General recommendations
Observe the following recommendations to avoid
damaging the vehicle.
Exterior
Never use a high-pressure jet wash in
the engine compartment - risk of
damaging the electrical components!
Do not wash the vehicle in bright sunshine or
extremely cold conditions.
When washing the vehicle in an
automatic roller-brush car wash, be sure
to lock the doors and, depending on version,
move the electronic key away and deactivate
the "hands-free" function (Hands-Free
Tailgate Access).
When using a pressure washer, keep the jet
nozzle at a minimum distance of 30 cm from
the vehicle (particularly when cleaning areas
containing chipped paint, sensors or seals).
Promptly clean up any stains containing
chemicals liable to damage the vehicle's
paintwork (including tree resin, bird
droppings, insect secretions, pollen and tar).
Depending on the environment, clean the
vehicle frequently to remove salty deposits
(in coastal areas), soot (in industrial areas)
and mud/salts (in wet or cold areas). These
substances can be highly corrosive.
Contact a PEUGEOT dealer or a qualified
workshop for advice on removing stubborn
stains requiring special products (such as tar
or insect removers).
Preferably, have paint touch-ups performed
by a PEUGEOT dealer or a qualified
workshop.
Interior
When washing the vehicle, never use a
water hose or high-pressure jet to clean
the interior.
Liquids carried in cups or other open
containers can spill, presenting a risk of
damage to the instruments and controls and
the controls located on the centre console. Be
vigilant!
To clean instrument panels, touch screens
or other displays, wipe gently with a soft,
dry cloth. Do not use products (e.g. alcohol,
disinfectant) or soapy water directly on these
surfaces - risk of damage! CarM an uals 2 .c o m
Page 206 of 292

204
In the event of a breakdown
Parking the vehicle
Immobilise the vehicle where it does
not obstruct traffic: the ground must be level,
stable and non-slippery.
With a manual gearbox, engage first gear
to lock the wheels, apply the parking brake,
unless it is set to automatic mode, and switch
off the ignition.
With an automatic gearbox, select mode
P
to lock the wheels, apply the parking brake,
unless it is set to automatic mode, and switch
off the ignition.
Check that the parking brake indicator lamps
on the instrument panel are on fixed.
The occupants must get out of the vehicle
and wait where they are safe.
If necessary, place a chock under the wheel
diagonally opposite the wheel to be changed.
Never go underneath a vehicle raised using a
jack; use an axle stand.
► To remove the wheel bolt cover on each of
the bolts, use tool 7 (alloy wheels).
►
Fit security socket
2 on wheelbrace
5
to
slacken the security bolt.
►
Slacken the other bolts using the
wheelbrace
5
only.
Never use an impact wrench on the
security bolt socket.
► Place the foot of jack 6 on the ground and
ensure that it is directly below the front A or
rear
B jacking point on the underbody, whichever
is closest to the wheel to be changed.
► Extend jack 6 until its head comes into
contact with jacking point A or B; contact area A
or B on the vehicle must be properly inserted
into the central part of the head of the jack.
►
Raise the vehicle until there is sufficient
space between the wheel and the ground to
easily admit the spare (not punctured) wheel.
Ensure that the jack is stable. If the
ground is slippery or loose, the jack may
slip or collapse - risk of injury!
Take care to position the jack strictly at
one of the jacking points
A
or B under the
vehicle, ensuring that the head of the jack is
centred under the contact area on the vehicle.
Otherwise, there is a risk of damage to the
vehicle and/or of the jack collapsing - risk of
injury!
CarM an uals 2 .c o m