2023 PEUGEOT 5008 remove seats
[x] Cancel search: remove seatsPage 9 of 292
7
Eco-driving
Eco-driving
Eco-driving refers to a range of everyday
practices that allow the motorist to optimise
the vehicle's energy consumption (fuel and/or
electricity) and CO
2 emissions.
Optimise your use of the gearbox
With a manual gearbox, move off gently and
change up promptly. While accelerating, change
up early.
With an automatic gearbox, favour automatic
mode. Do not depress the accelerator pedal
heavily or suddenly.
The gear shift indicator prompts you to engage
the most suitable gear. Whenever this indication
is displayed on the instrument panel, follow it
straight away.
With an automatic gearbox, this indicator
appears only in manual mode.
Drive smoothly
Maintain a safe distance between vehicles, use
engine braking rather than the brake pedal and
press the accelerator gradually. These practices
help to save on energy consumption, reduce
CO
2 emissions and decrease general traffic
noise.
When the traffic is flowing smoothly, select the
cruise control.
Control the use of electrical equipment
Before moving off, if the passenger compartment
is too warm, ventilate it by opening the windows
and air vents before using the air conditioning.
At speeds above 31
mph (50 km/h), close the
windows and leave the air vents open.
Consider using equipment that can help keep
the temperature in the passenger compartment
down (e.g.
sunroof blind, window blinds).
Unless automatically regulated, switch off the air
conditioning as soon as the desired temperature
has been reached.
Switch off the demisting and defrosting functions,
if they are not managed automatically.
Switch off the heated seat as soon as possible.
Adapt your use of the headlamps and/or
foglamps to the level of visibility, in accordance
with current legislation in the country in which
you are driving.
Avoid running the engine before moving off,
particularly in winter (other than in severe wintry
conditions: temperature below -23°C). The
vehicle will warm up much faster while driving.
As a passenger, avoid connecting your
multimedia devices (e.g.
film, music, video
game) to help reduce the consumption of energy.
Disconnect all portable devices before leaving
the vehicle.
Limit the causes of excess consumption
Spread loads throughout the vehicle. Place the
heaviest items in the boot as close as possible to
the rear seats. Limit the loads carried in the vehicle and
minimise wind resistance (e.g.
roof bars, roof
rack, bicycle carrier, trailer). Preferably, use a
roof box.
Remove roof bars and roof racks after use.
At the end of winter, remove snow tyres and refit
summer tyres.
Avoid using the Dynamic Pack for too long, in
order to limit your energy consumption.
Comply with the servicing instructions
Check tyre pressures regularly, with the tyres
cold, referring to the label in the door aperture on
the driver's side.
Carry out this check in particular:
–
before a long journey
.
–
at each change of season.
–
after a long period out of use.
Do not forget the spare wheel and, where
applicable, the tyres on your trailer or caravan.
Have your vehicle serviced regularly (e.g.
engine
oil, oil filter, air filter, passenger compartment
filter, etc.). Observe the schedule of operations in
the manufacturer's service schedule.
With a BlueHDi Diesel engine, if the SCR system
has a fault, your vehicle will emit pollution. Visit
a PEUGEOT dealer or a qualified workshop
as soon as possible to restore your vehicle's
nitrogen oxide emissions to legal levels.
When filling the fuel tank, do not continue after
the third cut-out of the nozzle, to avoid overflow. CarM an uals 2 .c o m
Page 51 of 292
49
Ease of use and comfort
3The rear head restraints can be removed.
Removing a head restraint
► Pull the head restraint fully up.
► Press the lugs A to release the head restraint
and remove it completely.
►
Store the head restraint.
Refitting a head restraint
► Insert the head restraint rods into the guides
in the corresponding seat backrest.
►
Push the head restraint down as far as it will
go.
►
Press the lugs
A to release the head restraint
and push it down.
Never drive with passengers seated at
the rear when the head restraints are
removed; the head restraints should be in
place and in the high position.
The head restraint for the central seat and those for the side seats
are not interchangeable.
Rear bench seat
Bench seat with fixed cushions and split folding
backrests (2/3-1/3) to adapt the boot load space.
Folding the backrests
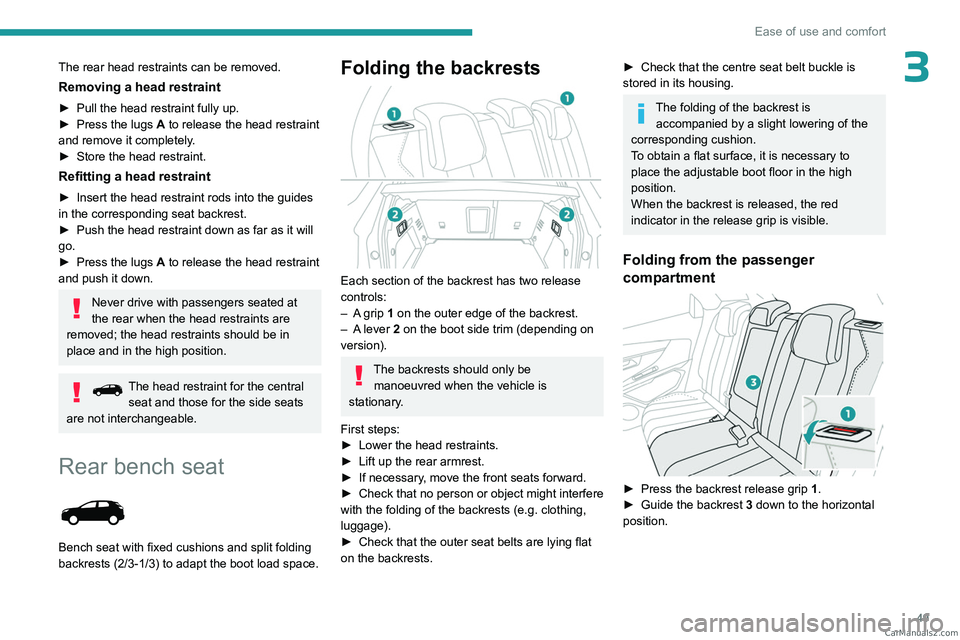
Each section of the backrest has two release
controls:
–
A
grip 1 on the outer edge of the backrest.
–
A
lever 2 on the boot side trim (depending on
version).
The backrests should only be manoeuvred when the vehicle is
stationary.
First steps:
►
Lower the head restraints.
►
Lift up the rear armrest.
►
If necessary
, move the front seats forward.
►
Check
that no person or object might interfere
with the folding of the backrests (e.g.
clothing,
luggage).
►
Check that the outer seat belts are lying flat
on the backrests.
► Check that the centre seat belt buckle is
stored in its housing.
The folding of the backrest is accompanied by a slight lowering of the
corresponding cushion.
To obtain a flat surface, it is necessary to
place the adjustable boot floor in the high
position.
When the backrest is released, the red
indicator in the release grip is visible.
Folding from the passenger
compartment
► Press the backrest release grip 1 .
► Guide the backrest 3 down to the horizontal
position. CarM an uals 2 .c o m
Page 55 of 292
53
Ease of use and comfort
3If this system fails (paddle D), the third
row passengers can also get out after
having folded the backrest of the second row
seats using strap C.
Do not let children operate the seats
unsupervised.
Third row seats
The two third row seats are stored in a retracted
position in the bottom of the boot. Each one is
covered with rigid concertina panels, secured to
the vehicle.
Do not let children operate the seats
unsupervised.
Each concertina panel can support a
maximum load of 100
kg with the third
row seats folded away.
With the third row seats removed and the
removable concertina panels supports
installed, the maximum load is limited to
50
kg.
When there is a seat at the back of the boot, the
removable support is fixed against the front wall
of its housing.
If the seat is removed from the back of the boot
for extra storage space, the removable support
must be installed on the two lugs on the central
wall.
Folding the concertina
panels
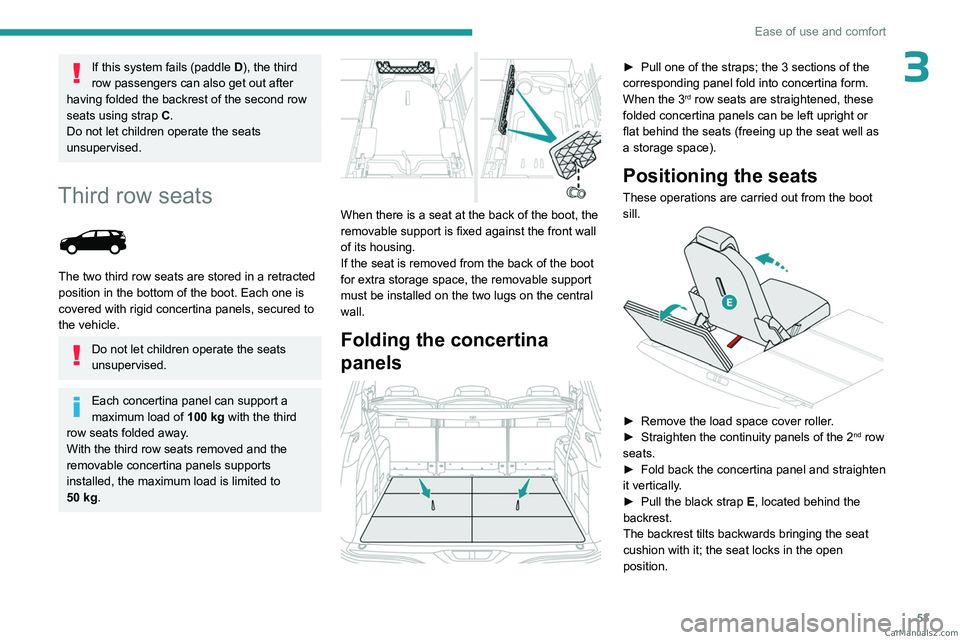
► Pull one of the straps; the 3 sections of the
corresponding panel fold into concertina form.
When the 3
rd row seats are straightened, these
folded concertina panels can be left upright or
flat behind the seats (freeing up the seat well as
a storage space).
Positioning the seats
These operations are carried out from the boot
sill.
► Remove the load space cover roller .
► Straighten the continuity panels of the 2nd row
seats.
►
Fold back the concertina panel and straighten
it vertically
.
►
Pull the black strap E
, located behind the
backrest.
The backrest tilts backwards bringing the seat
cushion with it; the seat locks in the open
position. CarM an uals 2 .c o m
Page 57 of 292
55
Ease of use and comfort
3
► Once the rear part of the seat has been
raised, take hold of each side of the seat
cushion, at the plastic covers, then bring the seat
towards you, keeping it at the same angle.
Repositioning the seats
These operations must be performed from the
boot sill.
As long as the seat is not in the correct position, it must be held with both hands
by the sides, keeping it folded.
►
Check in advance that the seat storage well
is empty and that the removable support is
properly secured against the front wall.
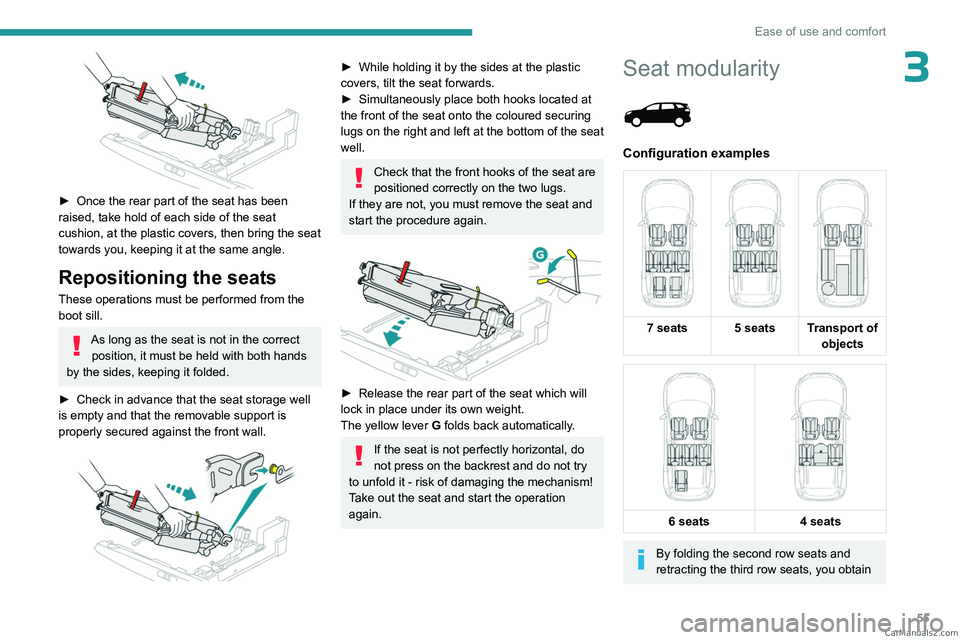
► While holding it by the sides at the plastic
covers, tilt the seat forwards.
►
Simultaneously place both hooks located at
the front of the seat onto the coloured securing
lugs on the right and left
at the bottom of the seat
well.
Check that the front hooks of the seat are
positioned correctly on the two lugs.
If they are not, you must remove the seat and
start the procedure again.
► Release the rear part of the seat which will
lock in place under its own weight.
The yellow lever G
folds back automatically.
If the seat is not perfectly horizontal, do
not press on the backrest and do not try
to unfold it - risk of damaging the mechanism!
Take out the seat and start the operation
again.
Seat modularity
Configuration examples
7 seats 5 seats Transport of
objects
6 seats
4 seats
By folding the second row seats and
retracting the third row seats, you obtain CarM an uals 2 .c o m
Page 71 of 292
69
Ease of use and comfort
3For information on installing the High load
retaining net , refer to the corresponding
section.
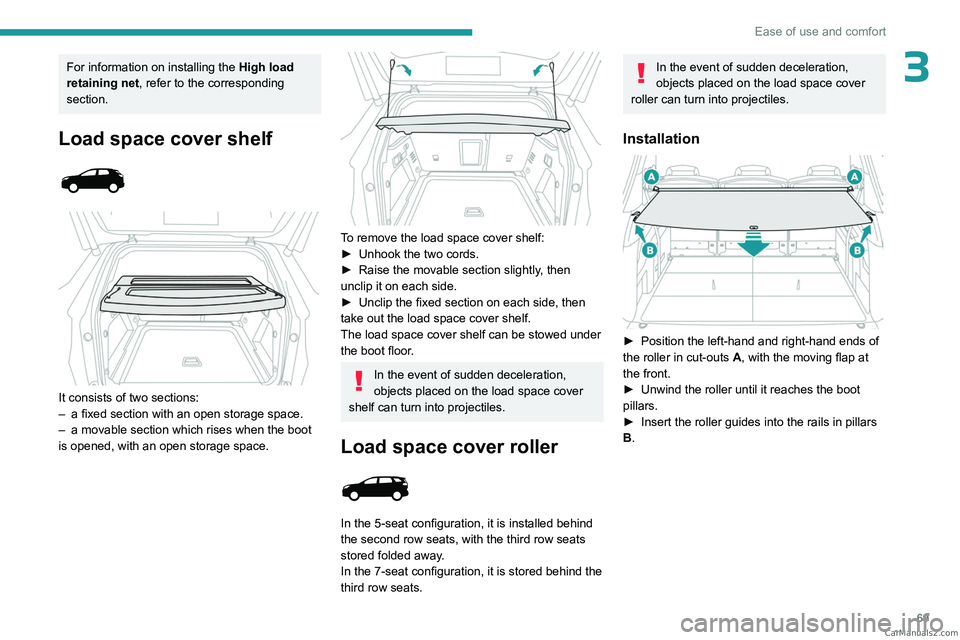
Load space cover shelf
It consists of two sections:
– a fixed section with an open storage space.
–
a movable section
which rises when the boot
is opened, with an open storage space.
To remove the load space cover shelf:
► Unhook the two cords.
►
Raise the movable section slightly
, then
unclip it on each side.
►
Unclip the fixed section on each side, then
take out the load space cover shelf.
The load space cover shelf can be stowed under
the boot floor
.
In the event of sudden deceleration,
objects placed on the load space cover
shelf can turn into projectiles.
Load space cover roller
In the 5-seat configuration, it is installed behind
the second row seats, with the third row seats
stored folded away.
In the 7-seat configuration, it is stored behind the
third row seats.
In the event of sudden deceleration,
objects placed on the load space cover
roller can turn into projectiles.
Installation
► Position the left-hand and right-hand ends of
the roller in cut-outs A , with the moving flap at
the front.
►
Unwind the roller until it reaches the boot
pillars.
►
Insert the roller guides into the rails in pillars
B
. CarM an uals 2 .c o m
Page 72 of 292
70
Ease of use and comfort
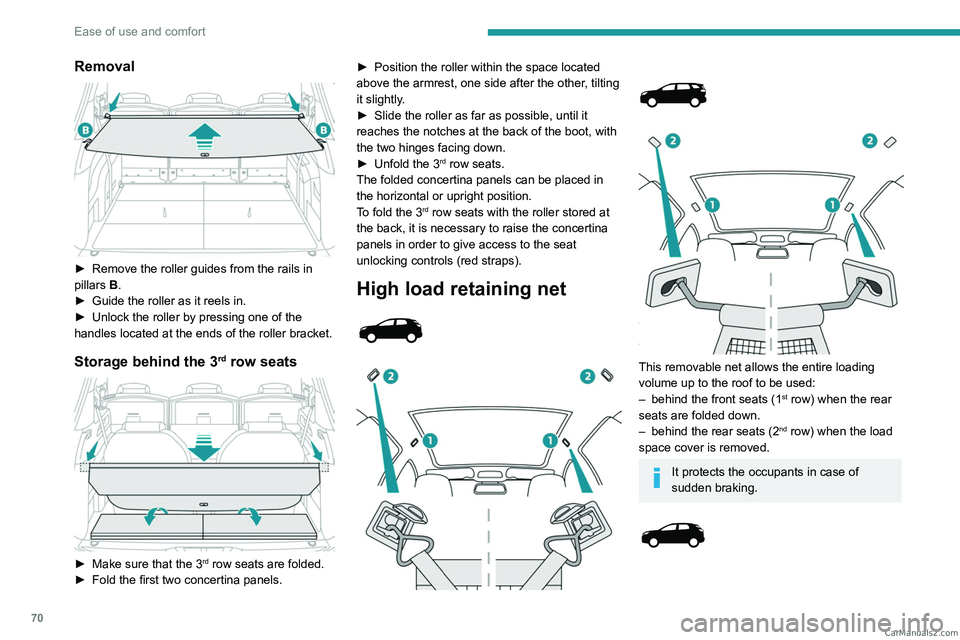
Removal
► Remove the roller guides from the rails in
pillars B
.
►
Guide the roller as it reels in.
►
Unlock the roller by pressing one of the
handles located at the ends of the roller bracket.
Storage behind the 3rd row seats
► Make sure that the 3rd row seats are folded.
►
Fold the first two concertina panels. ►
Position the roller within the space located
above the armrest, one side after the other
, tilting
it slightly.
►
Slide the roller as far as possible, until it
reaches the notches at the back of the boot, with
the two hinges facing down.
►
Unfold the 3rd row seats.
The folded concertina panels can be placed in
the horizontal or upright position.
To fold the 3
rd row seats with the roller stored at
the back, it is necessary to raise the concertina
panels in order to give access to the seat
unlocking controls (red straps).
High load retaining net
This removable net allows the entire loading
volume up to the roof to be used:
–
behind the front seats (1st row) when the rear
seats are folded down.
–
behind the rear seats (2nd row) when the load
space cover is removed.
It protects the occupants in case of
sudden braking.
CarM an uals 2 .c o m
Page 73 of 292
71
Ease of use and comfort
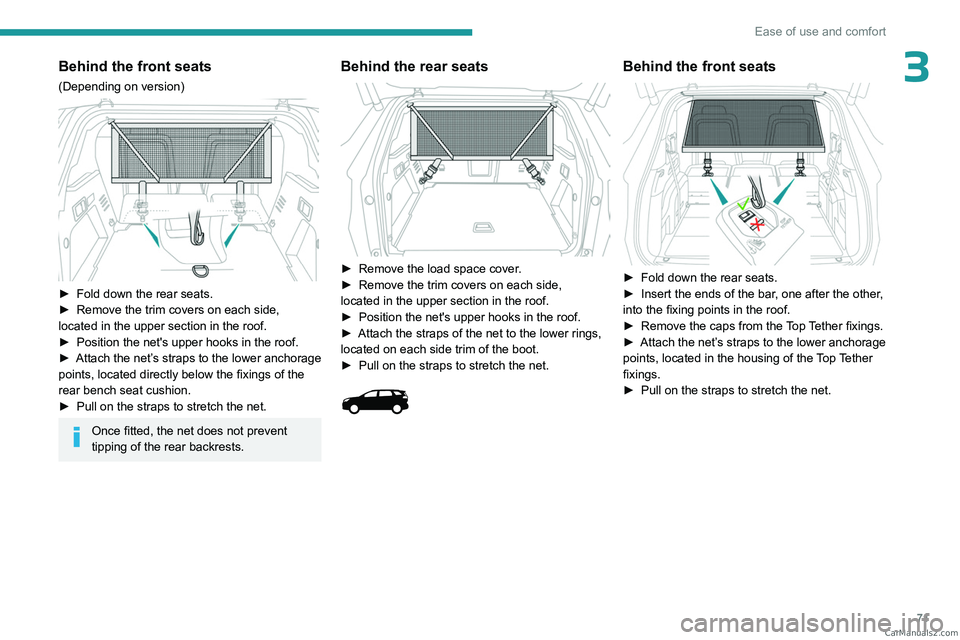
3Behind the front seats
(Depending on version)
► Fold down the rear seats.
► Remove the trim covers on each side,
located in the upper section in the roof.
►
Position the net's upper hooks in the roof.
►
Attach
the net’s straps to the lower anchorage
points, located directly below the fixings of the
rear bench seat cushion.
►
Pull on the straps to stretch the net.
Once fitted, the net does not prevent
tipping of the rear backrests.
Behind the rear seats
► Remove the load space cover .
► Remove the trim covers on each side,
located in the upper section in the roof.
►
Position the net's upper hooks in the roof.
►
Attach the straps of the net to the lower rings,
located on each side trim of the boot.
►
Pull on the straps to stretch the net.
Behind the front seats
► Fold down the rear seats.
► Insert the ends of the bar , one after the other,
into the fixing points in the roof.
►
Remove the caps from the
Top Tether fixings.
►
Attach
the net’s straps to the lower anchorage
points, located in the housing of the Top Tether
fixings.
►
Pull on the straps to stretch the net. CarM an uals 2 .c o m
Page 74 of 292
72
Ease of use and comfort
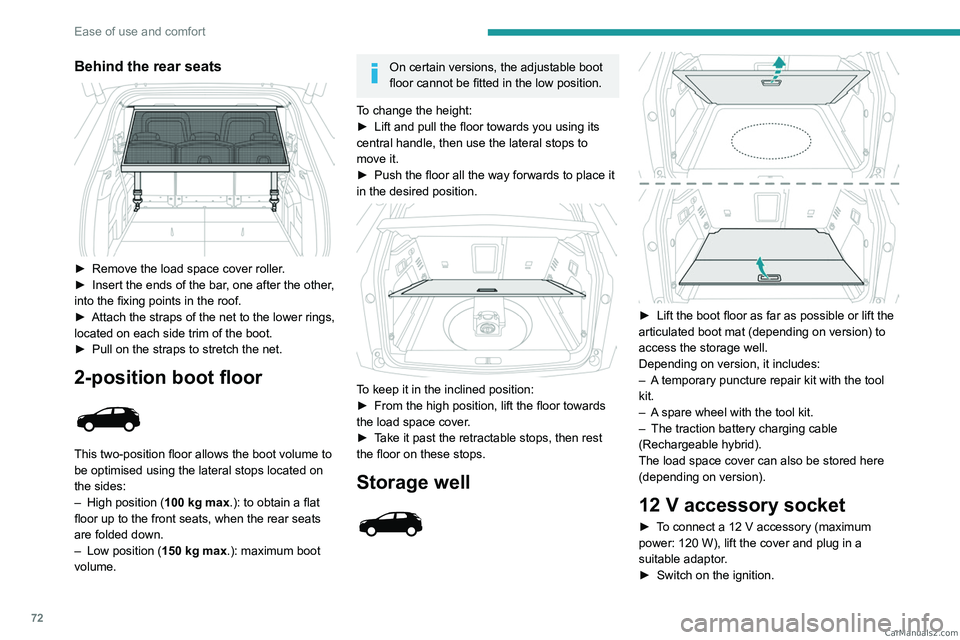
Behind the rear seats
► Remove the load space cover roller.
► Insert the ends of the bar , one after the other,
into the fixing points in the roof.
►
Attach the straps of the net to the lower rings,
located on each side trim of the boot.
►
Pull on the straps to stretch the net.
2-position boot floor
This two-position floor allows the boot volume to
be optimised using the lateral stops located on
the sides:
–
High position ( 100
kg max.): to obtain a flat
floor up to the front seats, when the rear seats
are folded down.
–
Low position ( 150
kg max.): maximum boot
volume.
On certain versions, the adjustable boot
floor cannot be fitted in the low position.
To change the height:
►
Lift and pull the floor towards you using its
central handle, then use the lateral stops to
move it.
►
Push the floor all the way forwards to place it
in the desired position.
To keep it in the inclined position:
► From the high position, lift the floor towards
the load space cover
.
►
T
ake it past the retractable stops, then rest
the floor on these stops.
Storage well
► Lift the boot floor as far as possible or lift the
articulated boot mat (depending on version) to
access the storage well.
Depending on version, it includes:
–
A
temporary puncture repair kit with the tool
kit.
–
A
spare wheel with the tool kit.
–
The traction battery charging cable
(Rechargeable hybrid).
The load space cover can also be stored here
(depending on version).
12 V accessory socket
► To connect a 12 V accessory (maximum
power: 120 W), lift the cover and plug in a
suitable adaptor.
►
Switch on the ignition. CarM an uals 2 .c o m