2023 PEUGEOT 408 parking brake
[x] Cancel search: parking brakePage 101 of 244

99
Driving
6Automatic gearbox
Never try to start the engine by pushing
the vehicle.
Switching the vehicle off
Regardless of the current gearbox mode, mode
P is immediately engaged automatically when
the ignition is switched off.
However, in mode N, mode P will be engaged
after a delay of 5
seconds (time to enable free-
wheeling mode).
Check that mode
P has been engaged and
that the electric parking brake was applied
automatically; if not, apply it manually.
The corresponding indicator lamps on the gear selector and the electric parking
brake control must be on, as well as the indicator
lamps on the instrument panel.
Gearbox malfunction
This warning lamp comes on, accompanied by an audible signal and
the display of a message.
Go to a PEUGEOT dealer or a qualified
workshop.
Do not drive faster than 62
mph (100 km/h),
keeping to the speed limit.
Switching of the gearbox to back-up mode
Mode D locks in third gear.
The paddles on the steering wheel do not work
and mode M is no longer accessible.
You may feel a significant jolt on engaging
reverse gear. This will not damage the gearbox.
Selector malfunction
Minor malfunction
This warning lamp comes on,
accompanied by the display of a message
and an audible signal.
Drive carefully.
Go to a PEUGEOT dealer or a qualified
workshop.
In some cases, the selector indicator lamps may
no longer come on, but the gearbox state is still
displayed on the instrument panel.
Major malfunction
This warning lamp comes on, accompanied by the display of a
message.
You must stop the vehicle.
Stop as soon as it is safe to do so and
switch off the ignition.
Contact a PEUGEOT dealer or a qualified
workshop.
Driving modes
The driving modes available depend on the engine and equipment of the vehicle.
Driving modes are selected using the following
control:
► Press the control to display the modes on the
instrument panel.
►
Press the control again to change mode.
When the message disappears, the selected
mode is activated and remains indicated on the
instrument panel (except Normal
mode).
With petrol engines
Whenever the ignition is switched on, Normal
driving mode is selected by default.
Normal
To restore the default settings.
Eco
To reduce energy consumption by reducing the
performance of the heating and air conditioning,
without deactivating them.
Sport
With an automatic gearbox: to obtain more
dynamic driving with action on the power
steering, accelerator, gear changes, displaying CarM an uals 2 .c o m
Page 103 of 244
101
Driving
6Do not leave the vehicle while it is being
held temporarily by hill start assist.
If someone needs to get out of the vehicle
with the engine running, apply the parking
brake manually. Then check that the parking
brake indicator lamp and the P indicator lamp
in the electric parking brake control are on
fixed.
The hill start assist function cannot be deactivated. However, using the parking
brake to immobilise the vehicle interrupts its
operation.
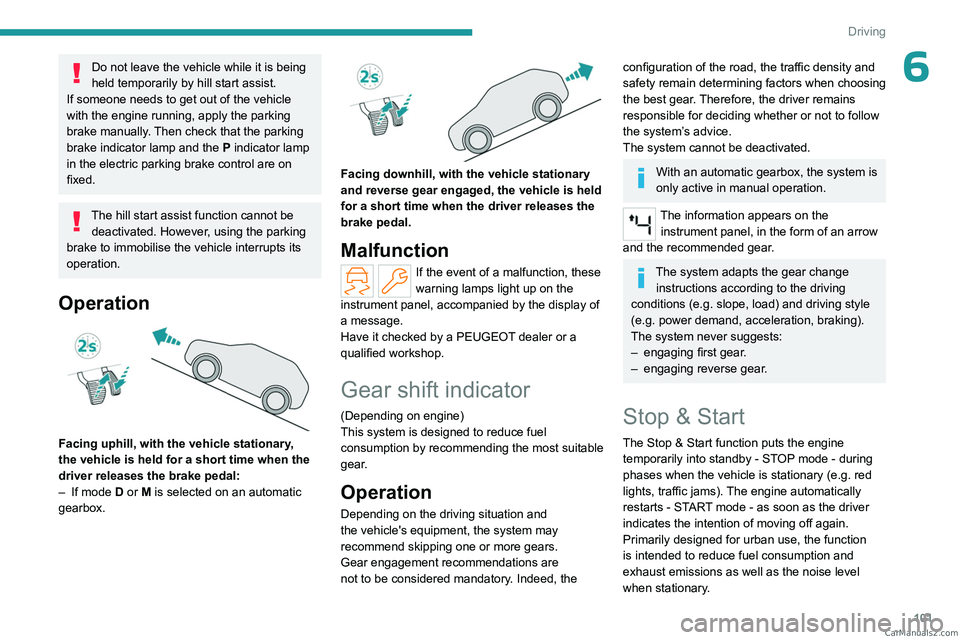
Operation
Facing uphill, with the vehicle stationary,
the vehicle is held for a short time when the
driver releases the brake pedal:
–
If mode
D or M is selected on an automatic
gearbox.
Facing downhill, with the vehicle stationary
and reverse gear engaged, the vehicle is held
for a short time when the driver releases the
brake pedal.
Malfunction
If the event of a malfunction, these
warning lamps light up on the
instrument panel, accompanied by the display of
a message.
Have it checked by a PEUGEOT dealer or a
qualified workshop.
Gear shift indicator
(Depending on engine)
This system is designed to reduce fuel
consumption by recommending the most suitable
gear.
Operation
Depending on the driving situation and
the vehicle's equipment, the system may
recommend skipping one or more gears.
Gear engagement recommendations are
not to be considered mandatory. Indeed, the
configuration of the road, the traffic density and
safety remain determining factors when choosing
the best gear. Therefore, the driver remains
responsible for deciding whether or not to follow
the system’s advice.
The system cannot be deactivated.
With an automatic gearbox, the system is
only active in manual operation.
The information appears on the instrument panel, in the form of an arrow
and the recommended gear.
The system adapts the gear change instructions according to the driving
conditions (e.g.
slope, load) and driving style
(e.g.
power demand, acceleration, braking).
The system never suggests:
–
engaging first gear
.
–
engaging reverse gear
.
Stop & Start
The Stop & Start function puts the engine temporarily into standby - STOP mode - during
phases when the vehicle is stationary (e.g.
red
lights, traffic jams). The engine automatically
restarts - START mode - as soon as the driver
indicates the intention of moving off again.
Primarily designed for urban use, the function
is intended to reduce fuel consumption and
exhaust emissions as well as the noise level
when stationary. CarM an uals 2 .c o m
Page 104 of 244

102
Driving
The function does not affect the functionalities of
the vehicle, in particular the braking.
Deactivation/Reactivation
By default, the function is activated when the
ignition is switched on.
It is configured in the ADAS touch screen
application.
or
Direct access to the Shortcuts for driving aids .
The display of a message on the instrument
panel confirms the change of state.
If the function is deactivated while the engine is
in STOP mode, it will restart immediately.
Associated indicator lamps
Function activated: engine on standby
(STOP mode)
Function deactivated or malfunction
Opening the bonnet
Before doing anything under the bonnet,
deactivate the Stop & Start system to avoid
any risk of injury caused by the engine
restarting automatically.
Driving on flooded roads
Before entering into a flooded area, it is
strongly recommended that you deactivate
the Stop & Start system.
For more information on Driving
recommendations, particularly on flooded
roads, refer to the corresponding section.
Operation
Main conditions for operation
– The driver ’s door must be closed.
– The driver's seat belt must be fastened.
–
The level of charge in the battery must be
sufficient.
–
The temperature of the engine must be within
its nominal operating range.
–
The outside temperature must be between
0°C and 35°C.
Putting the engine into standby
(STOP mode)
The engine automatically enters standby mode
as soon as the driver indicates their intention to
stop:
–
With the gear selector in mode D
or M, with
the brake pedal depressed until the vehicle
stops.
–
With the gear selector in mode N
, with the
vehicle stationary.
Time counter
A time counter adds up the time spent in standby
during the journey. It is reset to zero every time
the ignition is switched on.
Special cases
The engine will not go into standby if the
conditions for operation are not met and in the
following cases:
–
Steep slope (ascending or descending).
–
Sport mode selected (depending on
equipment).
–
Needed
to maintain a comfortable temperature
in the passenger compartment.
–
Demisting active.
In these cases, this indicator lamp flashes
for a few seconds, then goes off.
After the engine has restarted, STOP mode is not available until the vehicle
has reached a speed of 5 mph (8
km/h).
During parking manoeuvres, STOP mode
is not available for a few seconds after
coming out of reverse gear or turning the
steering wheel.
Restarting the engine (START mode)
The engine automatically restarts as soon as the
driver indicates the intention of moving off again:
–
With the selector in mode
D or M: with the
brake pedal released. CarM an uals 2 .c o m
Page 116 of 244
11 4
Driving
8.Speed suggested by the Road signs
recognition function (depending on version)
Switching on/pausing
► Press button 1 to select the cruise control
mode; the function is paused (grey).
►
Press
3 upwards/downwards, or press 4-OK
to activate the cruise control and save a speed
setting as soon as the vehicle speed reaches the
desired level (green).
►
Pressing button 2-I I>
temporarily pauses the
function.
►
Pressing
2-I I>, 3 or 4-OK again will
reactivate cruise control (green).
Cruise control operation is also
temporarily interrupted (pause):
–
by pressing the brake pedal.
–
automatically
, if the electronic stability
control (ESC) system is triggered.
–
by shifting to neutral or engaging reverse
gear
.
–
by using the electric parking brake.
Modifying the speed setting
The cruise control must be active.
To change the speed setting using the vehicle’s
current speed:
►
For steps of +/- 1 mph (1 km/h),
make successive short presses upwards/
downwards
on 3 to increase/decrease.
► For steps of +/- 5 mph (5 km/h), press and
hold upwards/downwards on 3 to increase/
decrease.
Prolonged pressing and holding
upwards/downwards on 3 causes a very
rapid change in vehicle speed.
As a precaution, we recommend setting a cruise speed fairly close to the current
speed of your vehicle, to avoid any sudden
acceleration or deceleration of the vehicle.
When the function is activated, the speed
setting value can be changed using the speed
suggested by the Road signs recognition
function displayed on the instrument panel:
–
When passing the sign:
►
Press
4-OK to save the suggested speed.
This value is then immediately shown as the new
speed setting on the instrument panel.
–
After passing the sign:
►
Press
4-OK. The message "OK?" is
displayed to confirm the request to save.
►
Press
4-OK again to save the suggested
speed. The new speed setting value is displayed
on the instrument panel.
Off
► Press 1: the cruise control information display
disappears.
Malfunction
In the event of a malfunction, dashes are
displayed flashing and then fixed (orange)
instead of the speed setting.
Have it checked by a PEUGEOT dealer or a
qualified workshop.
Drive Assist Plus
This system automatically adjusts the speed and corrects the trajectory of the vehicle, using
Adaptive cruise control with Stop&Go function in
conjunction with Lane positioning assist.
These two functions must be activated and in
operation.
For more information on Adaptive cruise
control and Lane positioning assist , refer to
the corresponding sections.
The system assists the driver by acting on the steering, acceleration and braking
within the physical limits and capacities of the
vehicle. Certain road infrastructure elements
or vehicles in the surroundings may not be
properly seen or may be poorly interpreted by
the camera and radar, resulting in an
unexpected change in direction, a lack of
steering correction and/or inappropriate
management of acceleration or braking.
Primarily designed for driving on main
roads and motorways, this system only CarM an uals 2 .c o m
Page 118 of 244
11 6
Driving
Primarily designed for driving on main
roads and motorways, this system only
works with moving vehicles driving in the
same direction as your vehicle.
If the driver activates the direction
indicator to overtake a slower vehicle,
cruise control may temporarily reduce the
distance to the target vehicle to facilitate
overtaking, without exceeding the speed
setting.
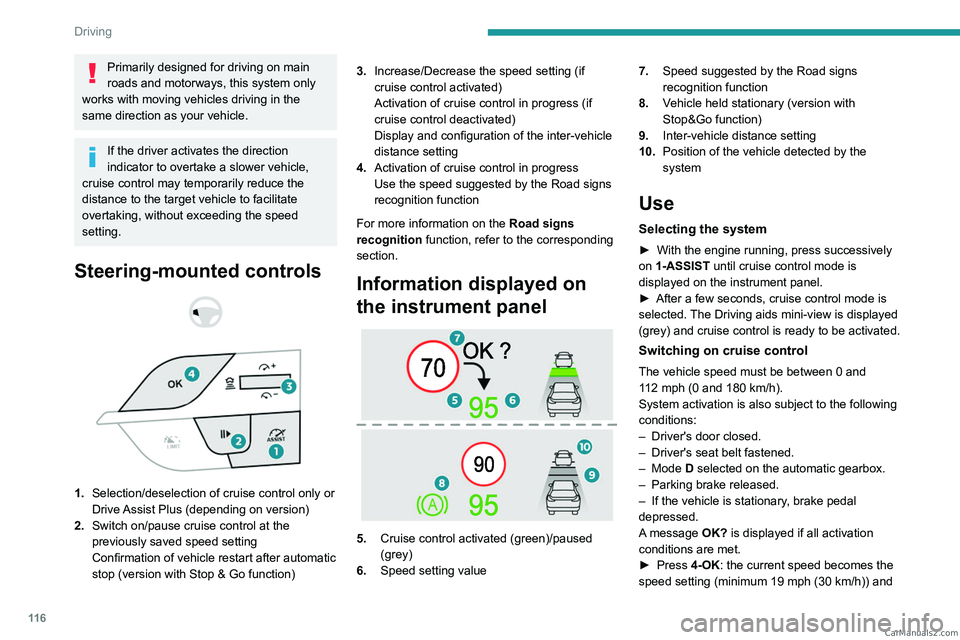
Steering-mounted controls
1. Selection/deselection of cruise control only or
Drive Assist Plus (depending on version)
2. Switch on/pause cruise control at the
previously saved speed setting
Confirmation of vehicle restart after automatic
stop (version with Stop & Go function) 3.
Increase/Decrease the speed setting (if
cruise control activated)
Activation of cruise control in progress (if
cruise control deactivated)
Display and configuration of the inter-vehicle
distance setting
4. Activation of cruise control in progress
Use the speed suggested by the Road signs
recognition function
For more information on the Road signs
recognition
function, refer to the corresponding
section.
Information displayed on
the instrument panel
5. Cruise control activated (green)/paused
(grey)
6. Speed setting value 7.
Speed suggested by the Road signs
recognition function
8. Vehicle held stationary (version with
Stop&Go function)
9. Inter-vehicle distance setting
10. Position of the vehicle detected by the
system
Use
Selecting the system
► With the engine running, press successively
on 1-ASSIST until cruise control mode is
displayed on the instrument panel.
►
After a few seconds, cruise control mode is
selected.
The Driving aids mini-view is displayed
(grey) and cruise control is ready to be activated.
Switching on cruise control
The vehicle speed must be between 0 and
112 mph (0 and 180 km/h).
System activation is also subject to the following
conditions:
–
Driver's door closed.
–
Driver's seat belt fastened.
–
Mode D selected on the automatic gearbox.
–
Parking brake released.
–
If the vehicle is stationary
, brake pedal
depressed.
A message OK? is displayed if all activation
conditions are met.
►
Press
4-OK: the current speed becomes the
speed setting (minimum 19 mph (30
km/h)) and CarM an uals 2 .c o m
Page 119 of 244

11 7
Driving
6cruise control is immediately activated (green
display).
Modifying the speed setting
To change the speed setting using the vehicle’s
current speed:
►
For steps of +/- 1 mph (1 km/h), make
successive short presses upwards/downwards
on
3 to increase/decrease.
►
For steps of +/- 5 mph (5
km/h), press and
hold upwards/downwards on 3 to increase/
decrease.
Prolonged pressing and holding
upwards/downwards on 3 causes a rapid
change in vehicle speed.
When the function is activated, the speed
setting value can be changed using the speed
suggested by the Road signs recognition
function displayed on the instrument panel:
–
When passing the sign:
►
Press
4-OK to save the suggested speed.
This value is then immediately shown as the new
speed setting on the instrument panel.
–
After passing the sign:
►
Press
4-OK. The message "OK?" is
displayed to confirm the request to save.
►
Press
4-OK again to save the suggested
speed. The new speed setting value is displayed
on the instrument panel.
Pausing/Resumption of cruise control
► Press 2-II> or depress the brake pedal.
The symbol "II>" is displayed if all activation
conditions are met.
Cruise control may also have been paused:
–
automatically
, if the electronic stability control
(ESC) system is triggered.
–
by shifting to neutral or engaging reverse gear
.
–
by using the electric parking brake.
–
by unfastening the seat belt.
–
by opening the driver's door
.
►
Press
2-II> or 4-OK to reactivate cruise
control.
Following braking that has brought the vehicle
to a complete stop, if the traffic conditions do
not allow the vehicle to begin moving again
within 3
seconds of stopping, press
2-II>
or the
accelerator pedal to move off.
Cruise control remains active following a
gear change.
When cruise control is paused and the
driver tries to reactivate it, the message
"Activation not possible, conditions not
met" is temporarily displayed if reactivation is
impossible (required conditions not met).
Changing the programmed speed setting
with the Road signs recognition function
► Press 4-OK to accept the speed suggested
by the function on the instrument panel, then
press again to confirm.
If the selected speed is far from the
current vehicle speed, a strong
acceleration or deceleration is felt.
Changing the inter-vehicle distance
► Press 3 to display the distance setting
thresholds (" Distant", "Normal" or "Close"),
then make successive short presses upwards/
downwards to select a threshold.
After a few seconds, the option is accepted and
will be memorised when the ignition is switched
off.
The driver must keep a sufficient safety distance
from the vehicle in front.
Temporarily exceeding the speed setting
► Depress the accelerator pedal. The system
is suspended as long as the acceleration is
maintained. When the accelerator pedal is
released, the speed setting flashes while the
current vehicle speed is above the speed setting.
Deselecting the system
► Press successively on 1-ASSIST until OFF
mode is displayed on the instrument panel.
►
After a few seconds, cruise control mode
is deselected.
The Driving aids mini-view
disappears.
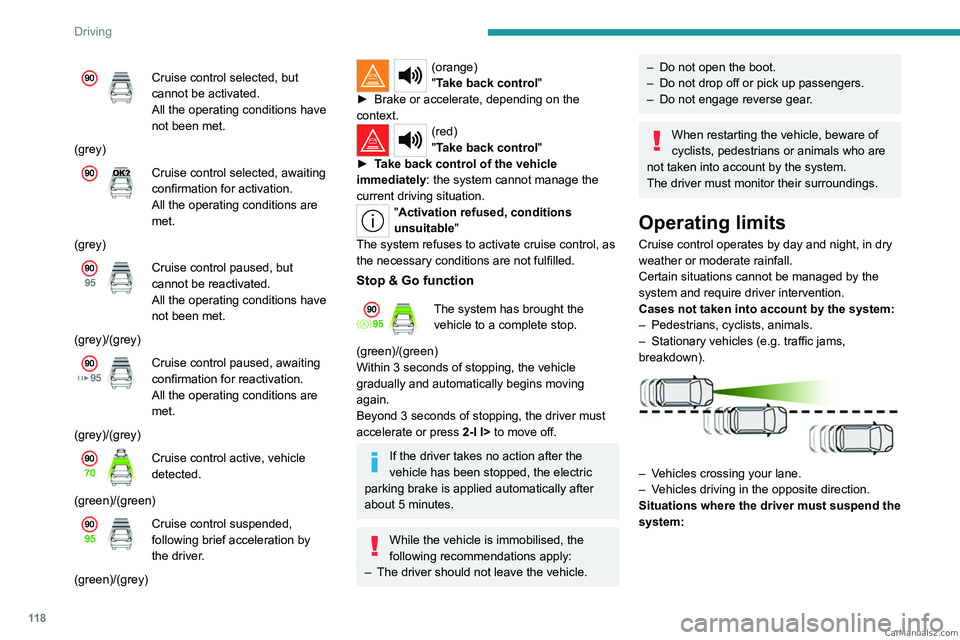
Messages and alerts
The actual order of display of the messages or alerts may be different. CarM an uals 2 .c o m
Page 120 of 244
11 8
Driving
Cruise control selected, but
cannot be activated.
All the operating conditions have
not been met.
(grey)
Cruise control selected, awaiting
confirmation for activation.
All the operating conditions are
met.
(grey)
Cruise control paused, but
cannot be reactivated.
All the operating conditions have
not been met.
(grey)/(grey)
Cruise control paused, awaiting
confirmation for reactivation.
All the operating conditions are
met.
(grey)/(grey)
Cruise control active, vehicle
detected.
(green)/(green)
Cruise control suspended,
following brief acceleration by
the driver.
(green)/(grey)
(orange)
"Take back control"
►
Brake or accelerate, depending on the
context.
(red)
"Take back control"
►
T
ake back control of the vehicle
immediately: the system cannot manage the
current driving situation.
"Activation refused, conditions
unsuitable "
The system refuses to activate cruise control, as
the necessary conditions are not fulfilled.
Stop & Go function
The system has brought the
vehicle to a complete stop.
(green)/(green)
Within 3 seconds of stopping, the vehicle
gradually and automatically begins moving
again.
Beyond 3 seconds of stopping, the driver must
accelerate or press 2-I I> to move off.
If the driver takes no action after the
vehicle has been stopped, the electric
parking brake is applied automatically after
about 5 minutes.
While the vehicle is immobilised, the
following recommendations apply:
–
The driver should not leave the vehicle.
– Do not open the boot.
– Do not drop off or pick up passengers.
–
Do not engage reverse gear
.
When restarting the vehicle, beware of
cyclists, pedestrians or animals who are
not taken into account by the system.
The driver must monitor their surroundings.
Operating limits
Cruise control operates by day and night, in dry
weather or moderate rainfall.
Certain situations cannot be managed by the
system and require driver intervention.
Cases not taken into account by the system:
–
Pedestrians, cyclists, animals.
–
Stationary vehicles (e.g.
traffic jams,
breakdown).
– Vehicles crossing your lane.
– V ehicles driving in the opposite direction.
Situations where the driver must suspend the
system:
CarM an uals 2 .c o m
Page 161 of 244
159
Practical information
7► Place the 7 central fixing brackets (upper:
1 ; lower: 2) and pre-engage them in the front
bumper grille.
►
Press on the upper middle part to clip.
►
Repeat the same steps for the left and right
side parts with the 5 side fixing brackets (upper:
3
; lower: 4).
►
Check that the unit is firmly held by pressing
its edge.
T
o remove the screen, press down on the upper
fixing brackets 1 and 3, then tilt the screen down.
Snow chains
In wintry conditions, snow chains improve
traction as well as the behaviour of the vehicle
when braking.
Snow chains must be fitted only to the
front wheels. They must never be fitted to
"space-saver" type spare wheels.
Observe the legislation in force in your
country relating to the use of snow
chains and maximum authorised speeds.
Only use chains that have been designed for the
type of wheel fitted to your vehicle:
Original tyre size Maximum link size 215/65 R17 9 mm
225/55 R18 9 mm
Original tyre size Maximum link size
205/55 R19 9 mm
245/40 R20 -
For more information, contact a PEUGEOT
dealer or a qualified workshop.
Installation tips
► To fit the snow chains during a journey, stop
the vehicle on a flat surface at the side of the
road.
►
Apply the parking brake and position any
wheel chocks under the wheels to prevent
movement of the vehicle.
►
Fit the snow chains following the instructions
provided by the manufacturer
.
►
Move off gently and drive for a few moments,
without exceeding 31
mph (50 km/h).
►
Stop the vehicle and check that the snow
chains are correctly tightened.
It is strongly recommended that you
practise fitting the snow chains on a level
and dry surface before setting off.
Avoid driving with snow chains on roads that have been cleared of snow to avoid
damaging the vehicle's tyres and the road
surface. If the vehicle is fitted with alloy
wheels, check that no part of the chain or its
fixings is in contact with the wheel rim.
Energy economy mode
This system manages the duration of use of
certain functions, in order to conserve a sufficient
level of charge in the battery with the ignition off.
After switching off the engine and for a maximum
cumulative period of around 30 minutes, you can
continue to use functions such as the audio and
telematics system, dipped beam headlamps or
courtesy lamps.
Selecting the mode
A confirmation message is displayed when
energy economy mode is entered, and the active
functions are placed on standby.
If a telephone call is in progress at the
time, it will be maintained for around 10
minutes via the audio system’s hands-free
system.
Exiting the mode
These functions are automatically reactivated the
next time the vehicle is used.
To restore the use of these functions
immediately, start the engine and let it run:
–
For less than 10 minutes, to use the
equipment for approximately 5 minutes.
–
For more than 10 minutes, to use the
equipment for approximately 30 minutes.
Let the engine run for the specified duration to
ensure that the battery charge is sufficient. CarM an uals 2 .c o m