2023 PEUGEOT 408 roof
[x] Cancel search: roofPage 41 of 244
39
Access
2► Pressing the button again stops the
movement in progress.
►
By keeping the button pressed (without going
beyond the point of resistance), the movement of
the glass stops when this button is released.
►
When the sunroof is closed: pressing once
without passing the point of resistance moves it
to the partially open position.
The sunroof and windows can be closed by holding down the remote control
locking button.
Press again to stop the manoeuvre.
Opening/Closing the blind
► To open the blind, pull its handle backwards
until the desired position is reached.
►
T
o close the blind, push its handle forwards
until the desired position is reached.
Reinitialisation
Reinitialisation is required after reconnecting the
battery, or if the sunroof malfunctions or moves
in a jerky manner.
►
Check that nothing is affecting the movement
of the sunroof and that the seals are clean.
Automatic sunroof closing is no longer available, only manual closing is
possible.
Remote sunroof closing with the electronic
key is also no longer available in this case.
► With the ignition on, press and hold
the front part of the button to close the
sunroof.
The sunroof closes step by step. When fully
closed, it performs a slight opening/closing
movement.
►
Release the button 1
second after the end of
the movement. CarM an uals 2 .c o m
Page 42 of 244
40
Ease of use and comfort
Driving position
Correct seating position
Adopting a good driving position contributes to
improving driver comfort and protection.
It also optimises interior and exterior visibility as
well as access to controls.
Certain seat adjustments described in this
section depend on the trim level and the country
in which the vehicle is sold.
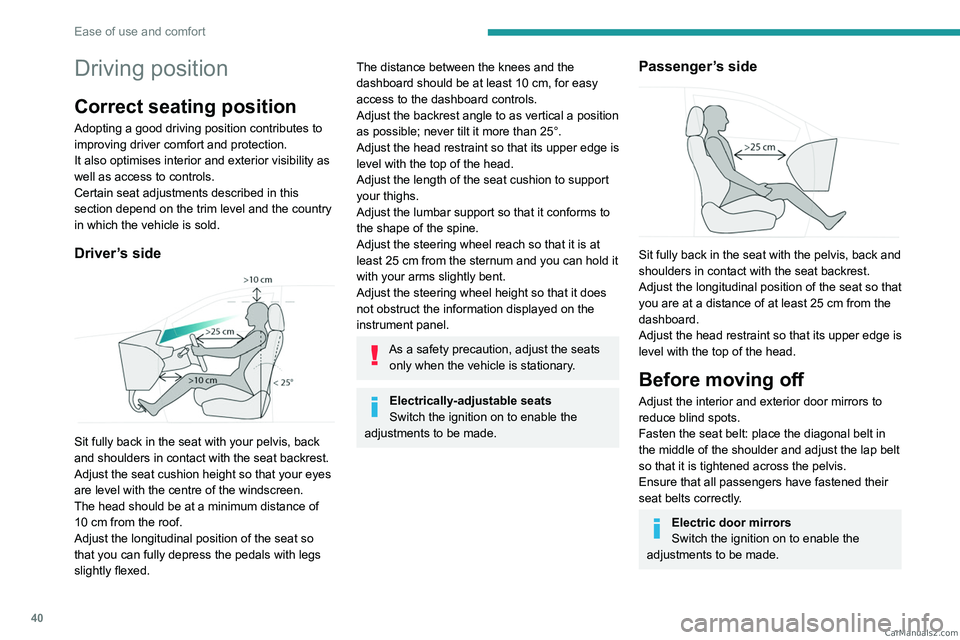
Driver’s side
Sit fully back in the seat with your pelvis, back
and shoulders in contact with the seat backrest.
Adjust the seat cushion height so that your eyes
are level with the centre of the windscreen.
The head should be at a minimum distance of
10 cm from the roof.
Adjust the longitudinal position of the seat so
that you can fully depress the pedals with legs
slightly flexed.
The distance between the knees and the
dashboard should be at least 10 cm, for easy
access to the dashboard controls.
Adjust the backrest angle to as vertical a position
as possible; never tilt it more than 25°.
Adjust the head restraint so that its upper edge is
level with the top of the head.
Adjust the length of the seat cushion to support
your thighs.
Adjust the lumbar support so that it conforms to
the shape of the spine.
Adjust the steering wheel reach so that it is at
least 25
cm from the sternum and you can hold it
with your arms slightly bent.
Adjust the steering wheel height so that it does
not obstruct the information displayed on the
instrument panel.
As a safety precaution, adjust the seats only when the vehicle is stationary.
Electrically-adjustable seats
Switch the ignition on to enable the
adjustments to be made.
Passenger’s side
Sit fully back in the seat with the pelvis, back and
shoulders in contact with the seat backrest.
Adjust the longitudinal position of the seat so that
you are at a distance of at least 25
cm from the
dashboard.
Adjust the head restraint so that its upper edge is
level with the top of the head.
Before moving off
Adjust the interior and exterior door mirrors to
reduce blind spots.
Fasten the seat belt: place the diagonal belt in
the middle of the shoulder and adjust the lap belt
so that it is tightened across the pelvis.
Ensure that all passengers have fastened their
seat belts correctly.
Electric door mirrors
Switch the ignition on to enable the
adjustments to be made. CarM an uals 2 .c o m
Page 61 of 244
59
Ease of use and comfort
3The cup holders have a removable reducer to
be used depending on the diameter of the cans
and cups.
The pen holder can also hold a smartphone.
Ski flap
Device for storing and transporting long objects.
Opening
► With the rear armrest lowered, open the flap
by pulling its handle downwards.
► Load the objects from inside the boot.
Shark fin antenna
A ventilation grille is present at the rear of the
roof for cooling the shark fin antenna.
Any ventilation noise produced, with the ignition
on or the engine running, is completely normal.
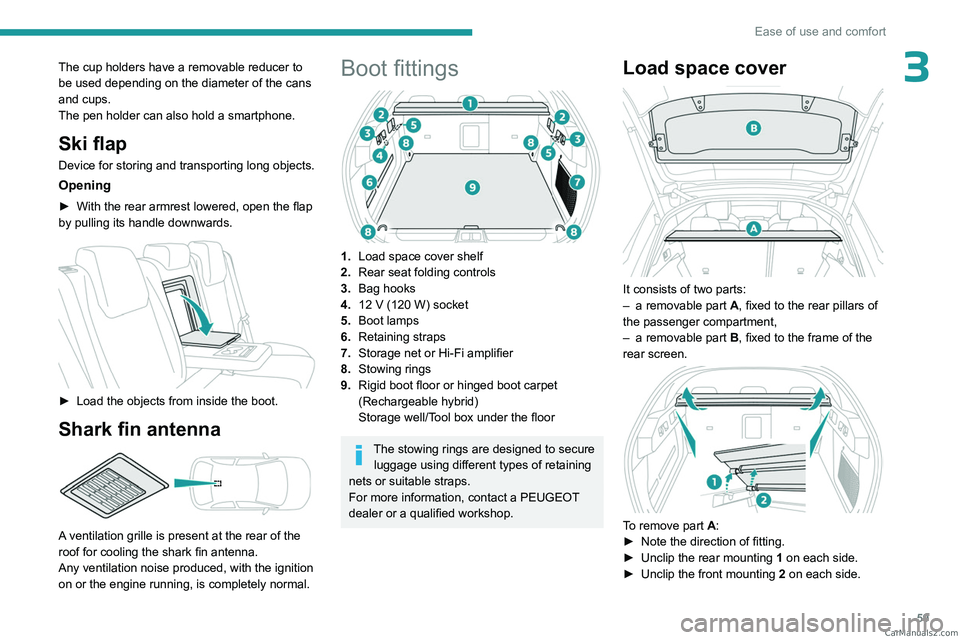
Boot fittings
1. Load space cover shelf
2. Rear seat folding controls
3. Bag hooks
4. 12
V (120 W) socket
5. Boot lamps
6. Retaining straps
7. Storage net or Hi-Fi amplifier
8. Stowing rings
9. Rigid boot floor or hinged boot carpet
(Rechargeable hybrid)
Storage well/Tool box under the floor
The stowing rings are designed to secure
luggage using different types of retaining
nets or suitable straps.
For more information, contact a PEUGEOT
dealer or a qualified workshop.
Load space cover
It consists of two parts:
– a removable part A
, fixed to the rear pillars of
the passenger compartment,
–
a removable part B
, fixed to the frame of the
rear screen.
To remove part A:
► Note the direction of fitting.
►
Unclip the rear mounting 1
on each side.
►
Unclip the front mounting 2
on each side. CarM an uals 2 .c o m
Page 66 of 244
64
Lighting and visibility
► With the ignition off, pull the lighting control
stalk toward you ("headlamp flash") to activate/
deactivate the function.
Manual guide-me-home lighting goes off
automatically after a period of time.
Welcome lighting
When the vehicle is unlocked in low light
conditions and the "Automatic illumination of
headlamps" function is activated, this system
automatically switches on:
–
On the outside, sidelamps, dipped beam
headlamps and door mirror spotlamps.
–
Inside, courtesy lamps and footwell lighting.
Door mirror spotlamps
These spotlamps facilitate access to the vehicle
by lighting the ground near the front doors.
The spotlamps come on automatically:
–
when the vehicle is unlocked.
–
when a door is opened.
–
when a request to locate the vehicle is
received from the remote control.
They also come on with the welcome lighting
and guide-me-home lighting functions.
They go off automatically after 30 seconds.
Automatic lighting systems - General
recommendations
The automatic lighting systems use a detection
camera, located at the top of the windscreen.
Operating limits
The system may be disrupted or not work
correctly:
–
When visibility conditions are poor
(e.g.
snowfall, heavy rain).
–
If the windscreen is dirty
, misted-up or
masked (e.g.
sticker) in front of the camera.
–
If the vehicle is facing highly reflective signs
or safety barrier reflectors.
The system is not able to detect:
–
Road users that do not have their own
lighting, such as pedestrians.
–
V
ehicles with hidden lighting (e.g. travelling
behind a safety barrier on the motorway).
–
V
ehicles at the top or bottom of a steep
slope, on winding roads, on crossroads.
Maintenance
Clean the windscreen regularly,
particularly the area in front of the camera.
The internal surface of the windscreen can
also become misted around the camera.
In humid and cold weather, demist the
windscreen regularly.
Do not allow snow to accumulate on the
bonnet or roof of the vehicle as this could
obstruct the camera.
Automatic headlamp dipping
For more information, refer to the
General recommendations for
automatic lighting systems.
With the ring of the lighting control stalk in the
"AUTO" position and the function activated on
the touch screen, this system automatically
switches between dipped and main beam
headlamps, according to lighting and traffic
conditions, using a camera located at the top of
the windscreen.
CarM an uals 2 .c o m
Page 84 of 244

82
Safety
Passengers must not place their feet on the
dashboard.
Do not smoke as deployment of the airbags
can cause burns or the risk of injury from a
cigarette or pipe.
Never remove or pierce the steering wheel or
hit it violently.
Do not fix or attach anything to the steering
wheel or dashboard, as this could cause
injuries when the airbags are deployed.
Lateral airbags
Use only approved seat covers
compatible with the deployment of these
airbags. For information on the range of seat
covers suitable for your vehicle, contact a
PEUGEOT dealer.
Do not fix or attach anything to the seat
backrests (e.g.
clothing) as this could cause
injuries to the chest or arm when the airbag is
deployed.
Do not sit with the upper part of the body any
nearer to the door than necessary.
The vehicle's front door panels include side
impact sensors.
A damaged door or any unauthorised or
incorrectly executed work (modification or
repair) on the front doors or their interior trim
could compromise the operation of these
sensors - risk of malfunction of the lateral
airbags!
All work must be carried out only by a
PEUGEOT dealer or a qualified workshop
Curtain airbags
Do not fix or attach anything to the roof,
as this could cause head injuries when the
curtain airbag is deployed.
Do not remove the grab handles installed on
the roof.
Active bonnet
The active bonnet has been designed to
optimise the safety of pedestrians in the event of
collision with the front of the vehicle.
The pyrotechnic system is triggered at the
hinges of the bonnet to lift it, when the sensors
located at the front of the vehicle detect a
collision.
Deployment of the active bonnet is
accompanied by a slight discharge of
harmless smoke and a noise, due to the
activation of the pyrotechnic cartridge
incorporated in the system. The airbag
warning lamp comes on.
After triggering, do not try to open or close
the bonnet. Call a towing company or go to
the nearest PEUGEOT dealer or qualified
workshop, driving at a speed below 19 mph
(30
km/h).
Make sure that you adjust the height of the
driver's seat - risk of hindrance to visibility!
This equipment will only trigger once. If a second impact occurs (during the same
or a subsequent accident), the active bonnet
will not trigger.
After an accident or if the vehicle has been
stolen, have the system checked.
Do not tamper with the pyrotechnic systems
under the bonnet, close to the struts - risk of
explosion!
All work must be carried out only by a
PEUGEOT dealer or a qualified workshop
Malfunction
In the event of a malfunction, this warning
lamp lights up on the instrument panel,
accompanied by the display of a message and
an audible signal. You must contact a PEUGEOT
dealer or a qualified workshop to have the
system checked.
The active bonnet may not deploy in the event of
an impact. CarM an uals 2 .c o m
Page 121 of 244
11 9
Driving
6
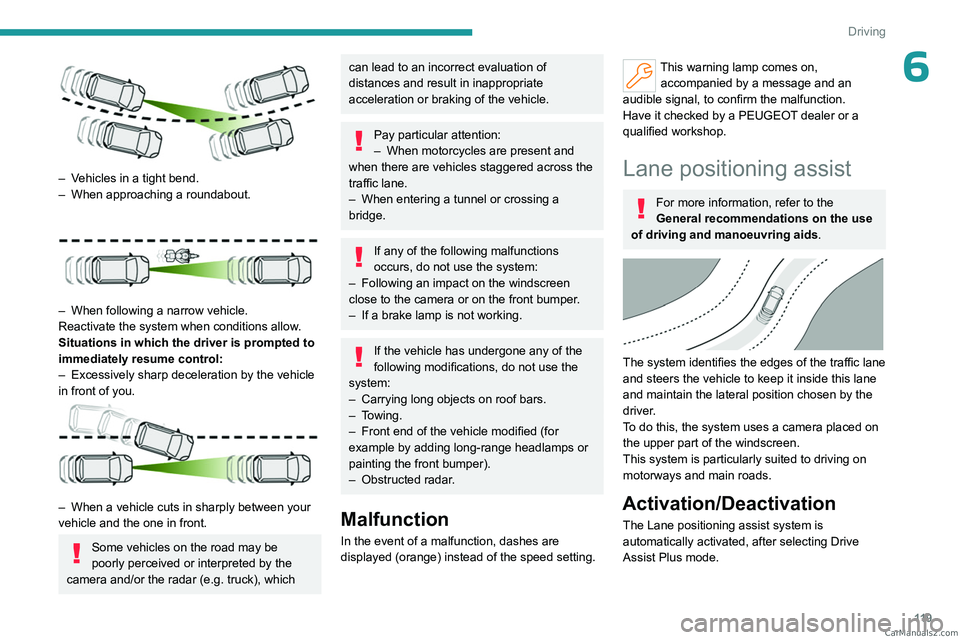
– Vehicles in a tight bend.
– When approaching a roundabout.
– When following a narrow vehicle.
Reactivate the system when conditions allow .
Situations in which the driver is prompted to
immediately resume control:
–
Excessively sharp deceleration by the vehicle
in front of you.
– When a vehicle cuts in sharply between your
vehicle and the one in front.
Some vehicles on the road may be
poorly perceived or interpreted by the
camera and/or the radar (e.g.
truck), which
can lead to an incorrect evaluation of
distances and result in inappropriate
acceleration or braking of the vehicle.
Pay particular attention:
– When motorcycles are present and
when there are vehicles staggered across the
traffic lane.
–
When entering a tunnel or crossing a
bridge.
If any of the following malfunctions
occurs, do not use the system:
–
Following an impact on the windscreen
close to the camera or on the front bumper
.
–
If a brake lamp is not working.
If the vehicle has undergone any of the
following modifications, do not use the
system:
–
Carrying long objects on roof bars.
–
Towing.
–
Front end of the vehicle modified (for
example by adding long-range headlamps or
painting the front bumper).
–
Obstructed radar
.
Malfunction
In the event of a malfunction, dashes are
displayed (orange) instead of the speed setting.
This warning lamp comes on, accompanied by a message and an
audible signal, to confirm the malfunction.
Have it checked by a PEUGEOT dealer or a
qualified workshop.
Lane positioning assist
For more information, refer to the
General recommendations on the use
of driving and manoeuvring aids .
The system identifies the edges of the traffic lane
and steers the vehicle to keep it inside this lane
and maintain the lateral position chosen by the
driver.
To do this, the system uses a camera placed on
the upper part of the windscreen.
This system is particularly suited to driving on
motorways and main roads.
Activation/Deactivation
The Lane positioning assist system is
automatically activated, after selecting Drive
Assist Plus mode. CarM an uals 2 .c o m
Page 129 of 244

127
Driving
6(50 km/h), if both sensors are able to detect
the thread.
The system also takes motorcyclists into account.
It may also react on animals. Animals
(especially animals smaller than 0.5
m)
and objects on the road are not necessarily
detected.
This system includes three functions:
–
Collision
Risk Alert.
–
Intelligent emergency braking assistance
(iEBA).
–
Active Safety Brake (automatic emergency
braking).
The vehicle has a multifunction camera located
at the top of the windscreen and, depending on
version, a radar located in the front bumper.
This system does not replace the need for driver vigilance.
This system is designed to assist the driver
and improve road safety.
It is the driver's responsibility to continuously
monitor traffic conditions in accordance with
applicable driving regulations.
As soon as the system detects a potential collision, it prepares the braking
circuit. This may cause a slight noise and a
slight sensation of deceleration.
Deactivation/Activation
By default, the system is automatically activated
at every engine start.
It is configured in the ADAS touch screen
application.
or
Direct access to the Shortcuts for driving aids .
Deactivation of the system is signalled by
the illumination of this warning lamp,
accompanied by the display of a message.
Operating conditions and
limits
Vehicle moving forward without trailer.
Brake system operational.
ASR system activated.
Seat belts fastened for all passengers.
Stabilised speed on roads with no or low
curvature.
This warning lamp lights up on the instrument panel without any additional
message, to indicate that the automatic braking
system is not available.
This is a normal behavior indicating that a
condition is not fulfilled and which does not
request the support of a workshop.
In any situations with ignition on where automatic
braking presents a risk, deactivating the system
via the driving aids touch screen application is
recommended, for instance:
–
Carrying long objects on roof bars.
–
Using an automatic car wash.
–
Performing any maintenance (e.g.
changing a
wheel, working inside the engine compartment).
–
Placing the vehicle on a rolling bench in a
workshop.
–
T
owing the vehicle.
–
Following a damage of the windscreen close
to the detection camera.
The system is automatically deactivated if:
–
A
spare wheel with a too small diameter is
detected.
–
A
fault with the brake pedal switch or with
the right or left brake lamp is detected.
–
A
fault in the sensors, in the electronic or in
the brake system is detected.
–
A
trailer is detected by the equipped vehicle
hitch (with an electrical connection plug).
–
A
severe crash (e.g. with airbag
deployment) is detected. CarM an uals 2 .c o m
Page 130 of 244
128
Driving
In case the detection is degraded or
temporarily unavailable by environment
conditions, then a driver indication is not
displayed (because a driver action is not
requested).
It can be dangerous to drive if the brake
lamps are not in perfect working order.
The driver must not overload the vehicle (keep within the GVW and GTW limits
and load height limits for roof bars).
Collision Risk Alert
This function warns the driver if there is a risk
of collision with the preceding vehicle, or with a
pedestrian or cyclist.
Modifying the alert trigger threshold
The trigger threshold determines the sensitivity
with which the function warns of the risk of
collision.
► In the ADAS touch screen application,
select Functions>Automatic Braking
System .
►
Select one of the 3 preset
thresholds:
"Far", "Medium" or "Near".
The selected threshold is memorised when the
ignition is switched off.
Operation
Depending on the collision risk detected by the
system and the alert trigger threshold chosen
by the driver, different levels of alert may be
triggered and displayed on the instrument panel.
The system takes into account the vehicle
dynamics, the difference speed of the own
vehicle and the object identified for the
collision risk, and the operation of the vehicle
(e.g.
actions on the pedals, steering wheel) to
trigger the alert at the most relevant moment.
(orange)
Level 1: visual alert only, warning that the
preceding vehicle is very close.
The message "Vehicle close" is displayed.
(red)
Level 2: visual and audible alert, warning
that a collision is imminent.
The message "Brake! " is displayed.
Level 3: a micro-braking may be given,
confirming the risk of collision (optional).
While approaching a vehicle too quickly,
the level 2 alert may be displayed
directly.
Important: the level 1 alert depends on the
trigger threshold selected. It reacts only on
moving vehicles. It is disabled automatically
at lower speed.
It is possible that collision warnings are
not given, are given too late or seem
unjustified.
The driver must always stay in control of the
vehicle and be prepared to react at any time
to avoid an accident.
If you select "Far" in the touch screen,
then the system warns sooner. This
increases the safety but increases also the
amount of alerts, if the legal safety distance is
not kept.
To reduce the alert occurrence, you can
change the setting to either of the other two.
Intelligent emergency
braking assistance (iEBA)
This function increases vehicle deceleration
if the driver does not brake enough to avoid a
collision.
This assistance is only provided if the driver
presses the brake pedal. CarM an uals 2 .c o m