2023 PEUGEOT 408 park assist
[x] Cancel search: park assistPage 103 of 244
101
Driving
6Do not leave the vehicle while it is being
held temporarily by hill start assist.
If someone needs to get out of the vehicle
with the engine running, apply the parking
brake manually. Then check that the parking
brake indicator lamp and the P indicator lamp
in the electric parking brake control are on
fixed.
The hill start assist function cannot be deactivated. However, using the parking
brake to immobilise the vehicle interrupts its
operation.
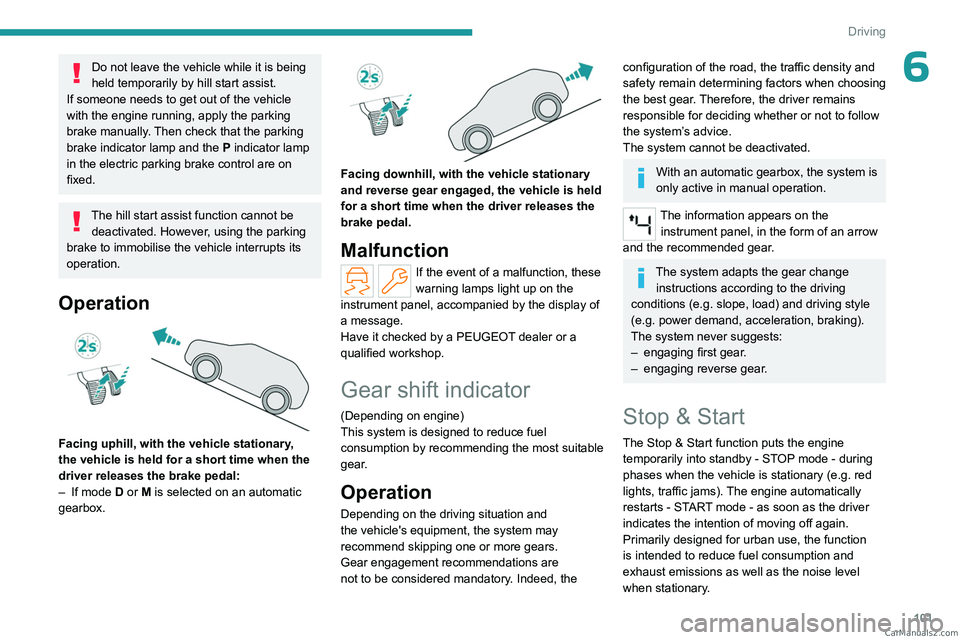
Operation
Facing uphill, with the vehicle stationary,
the vehicle is held for a short time when the
driver releases the brake pedal:
–
If mode
D or M is selected on an automatic
gearbox.
Facing downhill, with the vehicle stationary
and reverse gear engaged, the vehicle is held
for a short time when the driver releases the
brake pedal.
Malfunction
If the event of a malfunction, these
warning lamps light up on the
instrument panel, accompanied by the display of
a message.
Have it checked by a PEUGEOT dealer or a
qualified workshop.
Gear shift indicator
(Depending on engine)
This system is designed to reduce fuel
consumption by recommending the most suitable
gear.
Operation
Depending on the driving situation and
the vehicle's equipment, the system may
recommend skipping one or more gears.
Gear engagement recommendations are
not to be considered mandatory. Indeed, the
configuration of the road, the traffic density and
safety remain determining factors when choosing
the best gear. Therefore, the driver remains
responsible for deciding whether or not to follow
the system’s advice.
The system cannot be deactivated.
With an automatic gearbox, the system is
only active in manual operation.
The information appears on the instrument panel, in the form of an arrow
and the recommended gear.
The system adapts the gear change instructions according to the driving
conditions (e.g.
slope, load) and driving style
(e.g.
power demand, acceleration, braking).
The system never suggests:
–
engaging first gear
.
–
engaging reverse gear
.
Stop & Start
The Stop & Start function puts the engine temporarily into standby - STOP mode - during
phases when the vehicle is stationary (e.g.
red
lights, traffic jams). The engine automatically
restarts - START mode - as soon as the driver
indicates the intention of moving off again.
Primarily designed for urban use, the function
is intended to reduce fuel consumption and
exhaust emissions as well as the noise level
when stationary. CarM an uals 2 .c o m
Page 116 of 244
11 4
Driving
8.Speed suggested by the Road signs
recognition function (depending on version)
Switching on/pausing
► Press button 1 to select the cruise control
mode; the function is paused (grey).
►
Press
3 upwards/downwards, or press 4-OK
to activate the cruise control and save a speed
setting as soon as the vehicle speed reaches the
desired level (green).
►
Pressing button 2-I I>
temporarily pauses the
function.
►
Pressing
2-I I>, 3 or 4-OK again will
reactivate cruise control (green).
Cruise control operation is also
temporarily interrupted (pause):
–
by pressing the brake pedal.
–
automatically
, if the electronic stability
control (ESC) system is triggered.
–
by shifting to neutral or engaging reverse
gear
.
–
by using the electric parking brake.
Modifying the speed setting
The cruise control must be active.
To change the speed setting using the vehicle’s
current speed:
►
For steps of +/- 1 mph (1 km/h),
make successive short presses upwards/
downwards
on 3 to increase/decrease.
► For steps of +/- 5 mph (5 km/h), press and
hold upwards/downwards on 3 to increase/
decrease.
Prolonged pressing and holding
upwards/downwards on 3 causes a very
rapid change in vehicle speed.
As a precaution, we recommend setting a cruise speed fairly close to the current
speed of your vehicle, to avoid any sudden
acceleration or deceleration of the vehicle.
When the function is activated, the speed
setting value can be changed using the speed
suggested by the Road signs recognition
function displayed on the instrument panel:
–
When passing the sign:
►
Press
4-OK to save the suggested speed.
This value is then immediately shown as the new
speed setting on the instrument panel.
–
After passing the sign:
►
Press
4-OK. The message "OK?" is
displayed to confirm the request to save.
►
Press
4-OK again to save the suggested
speed. The new speed setting value is displayed
on the instrument panel.
Off
► Press 1: the cruise control information display
disappears.
Malfunction
In the event of a malfunction, dashes are
displayed flashing and then fixed (orange)
instead of the speed setting.
Have it checked by a PEUGEOT dealer or a
qualified workshop.
Drive Assist Plus
This system automatically adjusts the speed and corrects the trajectory of the vehicle, using
Adaptive cruise control with Stop&Go function in
conjunction with Lane positioning assist.
These two functions must be activated and in
operation.
For more information on Adaptive cruise
control and Lane positioning assist , refer to
the corresponding sections.
The system assists the driver by acting on the steering, acceleration and braking
within the physical limits and capacities of the
vehicle. Certain road infrastructure elements
or vehicles in the surroundings may not be
properly seen or may be poorly interpreted by
the camera and radar, resulting in an
unexpected change in direction, a lack of
steering correction and/or inappropriate
management of acceleration or braking.
Primarily designed for driving on main
roads and motorways, this system only CarM an uals 2 .c o m
Page 118 of 244
11 6
Driving
Primarily designed for driving on main
roads and motorways, this system only
works with moving vehicles driving in the
same direction as your vehicle.
If the driver activates the direction
indicator to overtake a slower vehicle,
cruise control may temporarily reduce the
distance to the target vehicle to facilitate
overtaking, without exceeding the speed
setting.
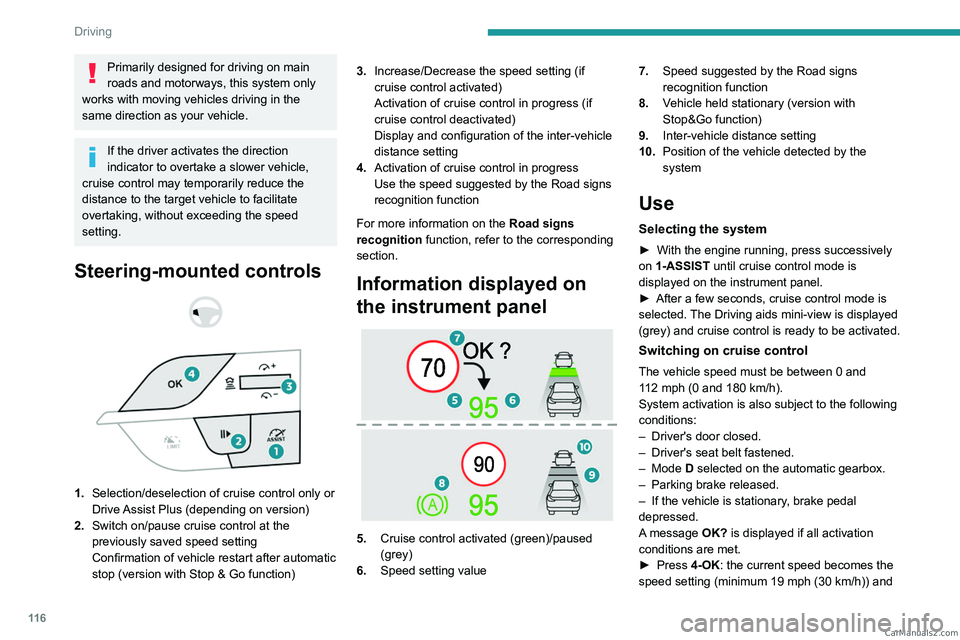
Steering-mounted controls
1. Selection/deselection of cruise control only or
Drive Assist Plus (depending on version)
2. Switch on/pause cruise control at the
previously saved speed setting
Confirmation of vehicle restart after automatic
stop (version with Stop & Go function) 3.
Increase/Decrease the speed setting (if
cruise control activated)
Activation of cruise control in progress (if
cruise control deactivated)
Display and configuration of the inter-vehicle
distance setting
4. Activation of cruise control in progress
Use the speed suggested by the Road signs
recognition function
For more information on the Road signs
recognition
function, refer to the corresponding
section.
Information displayed on
the instrument panel
5. Cruise control activated (green)/paused
(grey)
6. Speed setting value 7.
Speed suggested by the Road signs
recognition function
8. Vehicle held stationary (version with
Stop&Go function)
9. Inter-vehicle distance setting
10. Position of the vehicle detected by the
system
Use
Selecting the system
► With the engine running, press successively
on 1-ASSIST until cruise control mode is
displayed on the instrument panel.
►
After a few seconds, cruise control mode is
selected.
The Driving aids mini-view is displayed
(grey) and cruise control is ready to be activated.
Switching on cruise control
The vehicle speed must be between 0 and
112 mph (0 and 180 km/h).
System activation is also subject to the following
conditions:
–
Driver's door closed.
–
Driver's seat belt fastened.
–
Mode D selected on the automatic gearbox.
–
Parking brake released.
–
If the vehicle is stationary
, brake pedal
depressed.
A message OK? is displayed if all activation
conditions are met.
►
Press
4-OK: the current speed becomes the
speed setting (minimum 19 mph (30
km/h)) and CarM an uals 2 .c o m
Page 119 of 244

11 7
Driving
6cruise control is immediately activated (green
display).
Modifying the speed setting
To change the speed setting using the vehicle’s
current speed:
►
For steps of +/- 1 mph (1 km/h), make
successive short presses upwards/downwards
on
3 to increase/decrease.
►
For steps of +/- 5 mph (5
km/h), press and
hold upwards/downwards on 3 to increase/
decrease.
Prolonged pressing and holding
upwards/downwards on 3 causes a rapid
change in vehicle speed.
When the function is activated, the speed
setting value can be changed using the speed
suggested by the Road signs recognition
function displayed on the instrument panel:
–
When passing the sign:
►
Press
4-OK to save the suggested speed.
This value is then immediately shown as the new
speed setting on the instrument panel.
–
After passing the sign:
►
Press
4-OK. The message "OK?" is
displayed to confirm the request to save.
►
Press
4-OK again to save the suggested
speed. The new speed setting value is displayed
on the instrument panel.
Pausing/Resumption of cruise control
► Press 2-II> or depress the brake pedal.
The symbol "II>" is displayed if all activation
conditions are met.
Cruise control may also have been paused:
–
automatically
, if the electronic stability control
(ESC) system is triggered.
–
by shifting to neutral or engaging reverse gear
.
–
by using the electric parking brake.
–
by unfastening the seat belt.
–
by opening the driver's door
.
►
Press
2-II> or 4-OK to reactivate cruise
control.
Following braking that has brought the vehicle
to a complete stop, if the traffic conditions do
not allow the vehicle to begin moving again
within 3
seconds of stopping, press
2-II>
or the
accelerator pedal to move off.
Cruise control remains active following a
gear change.
When cruise control is paused and the
driver tries to reactivate it, the message
"Activation not possible, conditions not
met" is temporarily displayed if reactivation is
impossible (required conditions not met).
Changing the programmed speed setting
with the Road signs recognition function
► Press 4-OK to accept the speed suggested
by the function on the instrument panel, then
press again to confirm.
If the selected speed is far from the
current vehicle speed, a strong
acceleration or deceleration is felt.
Changing the inter-vehicle distance
► Press 3 to display the distance setting
thresholds (" Distant", "Normal" or "Close"),
then make successive short presses upwards/
downwards to select a threshold.
After a few seconds, the option is accepted and
will be memorised when the ignition is switched
off.
The driver must keep a sufficient safety distance
from the vehicle in front.
Temporarily exceeding the speed setting
► Depress the accelerator pedal. The system
is suspended as long as the acceleration is
maintained. When the accelerator pedal is
released, the speed setting flashes while the
current vehicle speed is above the speed setting.
Deselecting the system
► Press successively on 1-ASSIST until OFF
mode is displayed on the instrument panel.
►
After a few seconds, cruise control mode
is deselected.
The Driving aids mini-view
disappears.
Messages and alerts
The actual order of display of the messages or alerts may be different. CarM an uals 2 .c o m
Page 137 of 244

135
Driving
6The system may be temporarily disturbed by certain weather conditions (e.g. heavy
rain, hail or extreme temperature changes).
In particular, driving on a wet road or going
from a dry to a wet area can cause false
alerts (e.g.
presence of a cloud of water
droplets in the blind spot interpreted as a
vehicle).
In bad or wintry weather, ensure that
the
radars are not covered by mud, ice or
snow.
Take care not to cover the warning zone in
the door mirrors, or the detection zones on
the rear bumper, with adhesive labels or
other objects; they may hamper the correct
operation of the system.
Parking sensors
For more information, refer to the
General recommendations on the use
of driving and manoeuvring aids .
This system detects and signals the proximity of
obstacles (e.g.
pedestrian, vehicle, tree, barrier)
using sensors located in the bumper.
Rear parking sensors
► Engage reverse gear to start the system
(confirmed by an audible signal).
The system is switched off when reverse gear is
disengaged.
Audible assistance
The system signals the presence of obstacles
which are both within the sensors’ detection zone
and in the vehicle path defined by the direction of
the steering wheel.
Depending on version, in the example shown,
only the obstacles present in the shaded area
will be signalled by the audible assistance.
The proximity information is given by an
intermittent audible signal, the frequency of
which increases as the vehicle approaches the
obstacle.
When the distance between the vehicle and
the obstacle becomes less than about thirty
centimetres, the audible signal becomes
continuous.
The sound emitted by the speaker (right or
left) indicates the side on which the obstacle is
located.
Adjusting the audible signalPressing this button opens the
window for adjusting the volume
of the audible signal.
Visual assistance
This supplements the audible signal, without
taking account of the vehicle's trajectory, by
displaying bars on the screen whose location
represents the distance between the obstacle
and the vehicle (white: more distant, orange:
close, red: very close). CarM an uals 2 .c o m
Page 140 of 244

138
Driving
Parking sensors also provide additional
information about the area around the vehicle.
Standard view
The area behind the vehicle is displayed on the
screen.
The blue lines 1 represent the width of your
vehicle, with the mirrors unfolded; their direction
changes according to the position of the steering
wheel.
The red line 2 represents a distance of 30
cm
from the rear bumper; the two blue lines 3 and 4
represent 1
m and 2 m, respectively.
This view is available automatically or by
selection in the side menu.
Panoramic view
The panoramic view allows you to leave, in
reverse, a parking space by anticipating the
arrival of vehicles, pedestrians or cyclists.
This view is not recommended for carrying out a
complete manoeuvre.
This view is only available by selection in the
side menu.
Visiopark 3
For more information, refer to the
General recommendations on the use
of driving and manoeuvring aids .
This system allows you to view your vehicle's
close surroundings
on the touch screen using
cameras, located at the front and rear of the
vehicle, as well as under the door mirrors.
The screen is divided into 4 parts with two side
menus, a contextual view and a view from above
the vehicle in its close surroundings.
The parking sensors supplement the information
in the view from above the vehicle. Depending on the view angle chosen in the
left-hand side menu, the system provides
specific visual assistance in particular driving
conditions, such as entering a blind intersection
or manoeuvring in areas with reduced visibility.
Different contextual views are available for the
rear or for the front:
–
Automatic zoom view
.
–
Standard view
.
–
Panoramic view
.
Depending on the context, the system chooses
the best view to display (standard or automatic
zoom).
The view type can be changed at any time
during the manoeuvre.
The system status is not saved when the ignition
is switched off.
Operating principle
Reconstructed view
The cameras are activated and a reconstruction
of a view from above your vehicle in its close
surroundings is displayed on the touch screen.
Live view
CarM an uals 2 .c o m
Page 184 of 244
182
In the event of a breakdown
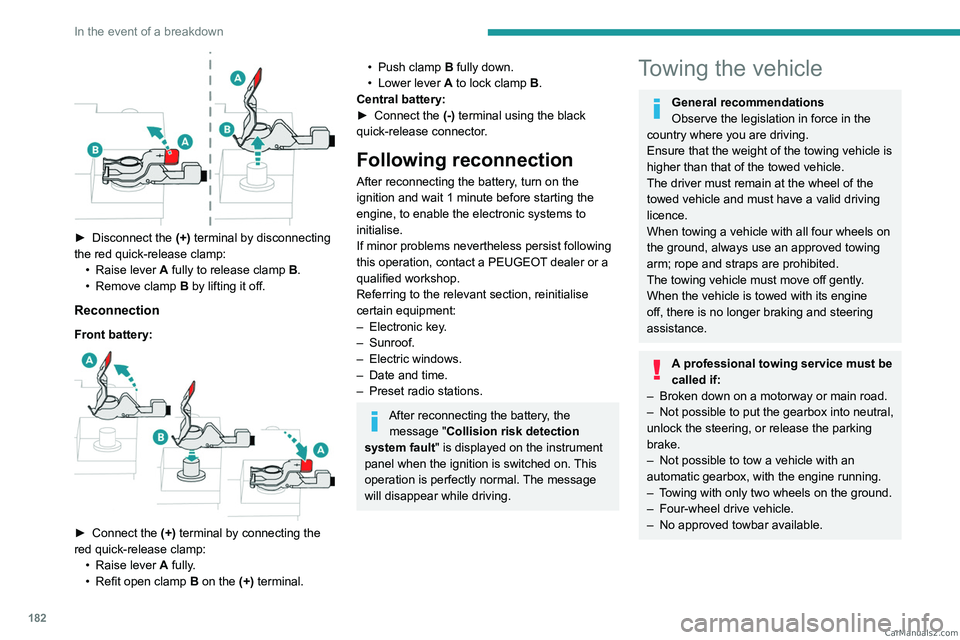
► Disconnect the (+) terminal by disconnecting
the red quick-release clamp: •
Raise lever
A
fully to release clamp
B
.
•
Remove clamp
B
by lifting it off.
Reconnection
Front battery:
► Connect the (+) terminal by connecting the
red quick-release clamp: •
Raise lever
A
fully.
•
Refit open clamp
B
on the (+) terminal.
• Push clamp B fully down.
• Lower lever A to lock clamp B.
Central battery:
►
Connect the
(-) terminal using the black
quick-release connector.
Following reconnection
After reconnecting the battery, turn on the
ignition and wait 1 minute before starting the
engine, to enable the electronic systems to
initialise.
If minor problems nevertheless persist following
this operation, contact a PEUGEOT dealer or a
qualified workshop.
Referring to the relevant section, reinitialise
certain equipment:
–
Electronic key
.
–
Sunroof.
–
Electric windows.
–
Date and time.
–
Preset radio stations.
After reconnecting the battery, the message "Collision risk detection
system fault" is displayed on the instrument
panel when the ignition is switched on. This
operation is perfectly normal. The message
will disappear while driving.
Towing the vehicle
General recommendations
Observe the legislation in force in the
country where you are driving.
Ensure that the weight of the towing vehicle is
higher than that of the towed vehicle.
The driver must remain at the wheel of the
towed vehicle and must have a valid driving
licence.
When towing a vehicle with all four wheels on
the ground, always use an approved towing
arm; rope and straps are prohibited.
The towing vehicle must move off gently.
When the vehicle is towed with its engine
off, there is no longer braking and steering
assistance.
A professional towing service must be
called if:
–
Broken down on a motorway or main road.
–
Not possible to put
the gearbox into neutral,
unlock the steering, or release the parking
brake.
–
Not possible to tow a vehicle with an
automatic gearbox, with the engine running.
–
T
owing with only two wheels on the ground.
–
Four-wheel drive vehicle.
–
No approved towbar available. CarM an uals 2 .c o m
Page 185 of 244
183
In the event of a breakdown
8Rechargeable hybrid vehicles
Before any intervention, with the ignition
on, depress the brake pedal and select mode N, then switch off the hybrid system (READY
indicator lamp off).
Always call on professionals for recovery of
the vehicle on a flatbed lorry or trailer.Use the towing eye only to free the vehicle
if it is stuck, or to secure it for recovery on a
flatbed lorry or trailer.
Towing constraints
Type of vehicle
(engine/gearbox) Front wheels on the
ground Rear wheels on the
ground Flatbed
4 wheels on the ground
with towbar
Internal combustion/Automatic
Hybrid 2WD
2WD: 2-wheel drive.
In case of battery or electric parking brake failure, it is essential to call a p
rofessional using flatbed recovery vehicles.
Accessing the tools
For more information on accessing the Tool kit,
refer to the corresponding section.
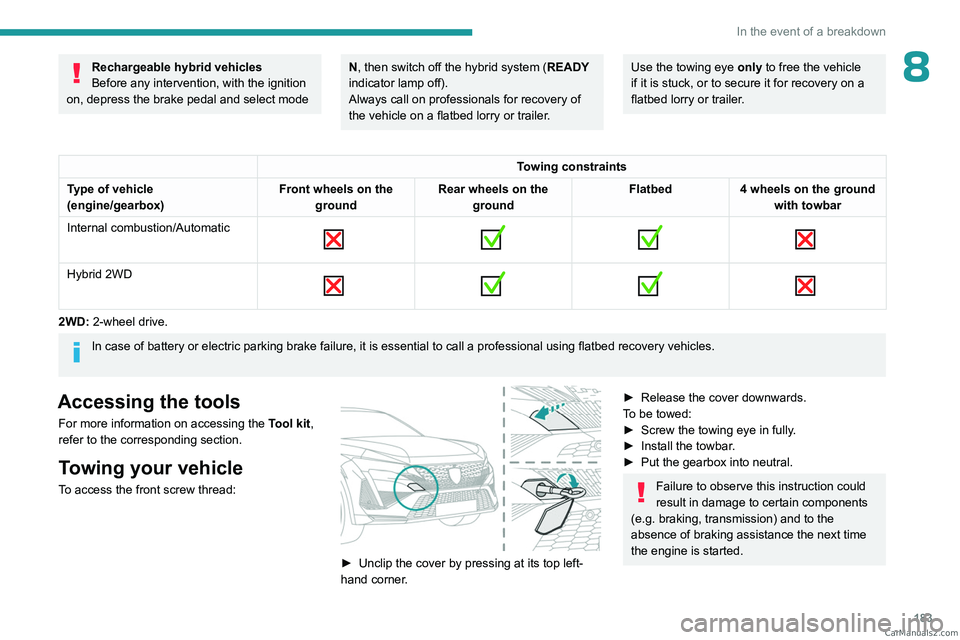
Towing your vehicle
To access the front screw thread:
► Unclip the cover by pressing at its top left-
hand corner .
► Release the cover downwards.
T o be towed:
►
Screw the towing eye in fully
.
►
Install the towbar
.
►
Put the gearbox into neutral.
Failure to observe this instruction could
result in damage to certain components
(e.g. braking, transmission) and to the
absence of braking assistance the next time
the engine is started. CarM an uals 2 .c o m