2023 PEUGEOT 408 mirror
[x] Cancel search: mirrorPage 42 of 244
40
Ease of use and comfort
Driving position
Correct seating position
Adopting a good driving position contributes to
improving driver comfort and protection.
It also optimises interior and exterior visibility as
well as access to controls.
Certain seat adjustments described in this
section depend on the trim level and the country
in which the vehicle is sold.
Driver’s side
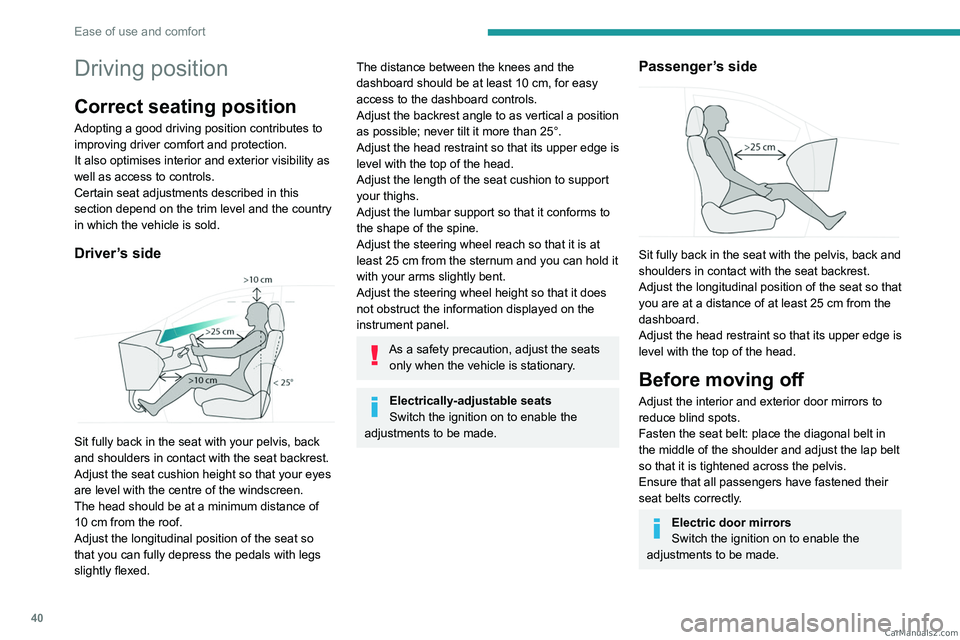
Sit fully back in the seat with your pelvis, back
and shoulders in contact with the seat backrest.
Adjust the seat cushion height so that your eyes
are level with the centre of the windscreen.
The head should be at a minimum distance of
10 cm from the roof.
Adjust the longitudinal position of the seat so
that you can fully depress the pedals with legs
slightly flexed.
The distance between the knees and the
dashboard should be at least 10 cm, for easy
access to the dashboard controls.
Adjust the backrest angle to as vertical a position
as possible; never tilt it more than 25°.
Adjust the head restraint so that its upper edge is
level with the top of the head.
Adjust the length of the seat cushion to support
your thighs.
Adjust the lumbar support so that it conforms to
the shape of the spine.
Adjust the steering wheel reach so that it is at
least 25
cm from the sternum and you can hold it
with your arms slightly bent.
Adjust the steering wheel height so that it does
not obstruct the information displayed on the
instrument panel.
As a safety precaution, adjust the seats only when the vehicle is stationary.
Electrically-adjustable seats
Switch the ignition on to enable the
adjustments to be made.
Passenger’s side
Sit fully back in the seat with the pelvis, back and
shoulders in contact with the seat backrest.
Adjust the longitudinal position of the seat so that
you are at a distance of at least 25
cm from the
dashboard.
Adjust the head restraint so that its upper edge is
level with the top of the head.
Before moving off
Adjust the interior and exterior door mirrors to
reduce blind spots.
Fasten the seat belt: place the diagonal belt in
the middle of the shoulder and adjust the lap belt
so that it is tightened across the pelvis.
Ensure that all passengers have fastened their
seat belts correctly.
Electric door mirrors
Switch the ignition on to enable the
adjustments to be made. CarM an uals 2 .c o m
Page 45 of 244
43
Ease of use and comfort
3Lumbar
The control allows independent adjustment of
the depth and vertical position of the lumbar
support.
► Press and hold the front or rear of the
control to increase or reduce the lumbar
support.
►
Press and hold the top or bottom of the
control to raise or lower the lumbar support area.
Seat cushion angle
This electric adjustment control is present on
‘AGR’ certified manually-adjustable seats.
► Press and hold the front or rear of the button
to raise or lower the front of the seat cushion.
Memorising driving
positions
Associated with the electrically-adjusted driver’s
seat, this function allows two driving positions
to be memorised, to make these adjustments
easier if there are frequent driver changes.
It records the electric adjustments made to the
seat and door mirrors.
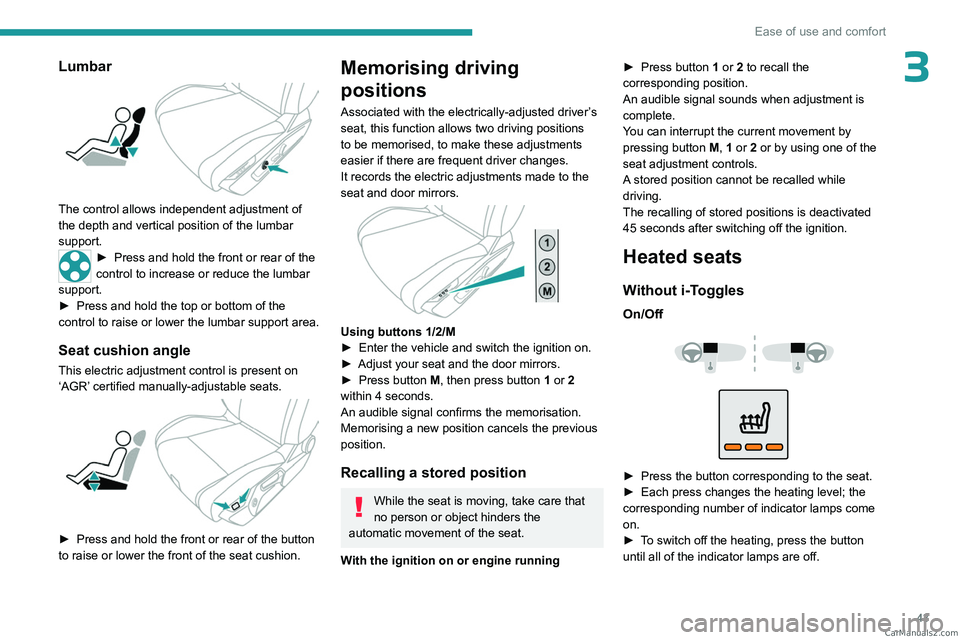
Using buttons 1/2/M
► Enter the vehicle and switch the ignition on.
►
Adjust your seat and the door mirrors.
►
Press button
M, then press button 1 or 2
within 4 seconds.
An audible signal confirms the memorisation.
Memorising a new position cancels the previous
position.
Recalling a stored position
While the seat is moving, take care that
no person or object hinders the
automatic movement of the seat.
With the ignition on or engine running ►
Press button
1 or 2 to recall the
corresponding position.
An audible signal sounds when adjustment is
complete.
You can interrupt the current movement by
pressing button M, 1 or 2 or by using one of the
seat adjustment controls.
A stored position cannot be recalled while
driving.
The recalling of stored positions is deactivated
45 seconds after switching off the ignition.
Heated seats
Without i-Toggles
On/Off
► Press the button corresponding to the seat.
► Each press changes the heating level; the
corresponding number of indicator lamps come
on.
►
T
o switch off the heating, press the button
until all of the indicator lamps are off. CarM an uals 2 .c o m
Page 47 of 244
45
Ease of use and comfort
3Steering wheel
adjustment
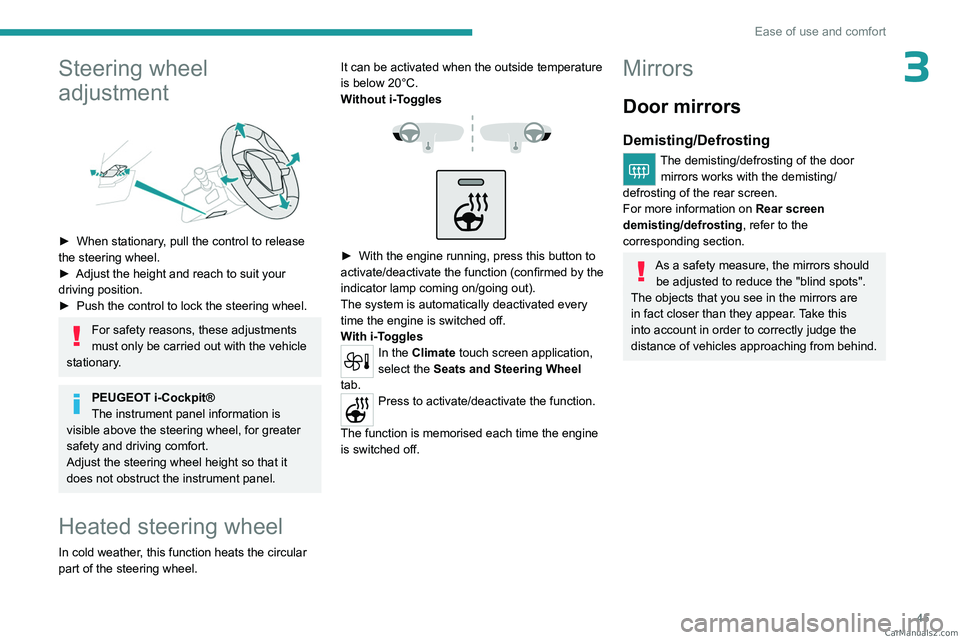
► When stationary, pull the control to release
the steering wheel.
►
Adjust the height and reach to suit your
driving position.
►
Push the control to lock the steering wheel.
For safety reasons, these adjustments
must only be carried out with the vehicle
stationary.
PEUGEOT i-Cockpit®
The instrument panel information is
visible above the steering wheel, for greater
safety and driving comfort.
Adjust the steering wheel height so that it
does not obstruct the instrument panel.
Heated steering wheel
In cold weather, this function heats the circular
part of the steering wheel. It can be activated when the outside temperature
is below 20°C.
Without
i-Toggles
► With the engine running, press this button to
activate/deactivate the function (confirmed by the
indicator lamp coming on/going out).
The system is automatically deactivated every
time the engine is switched off.
W
ith i-Toggles
In the Climate touch screen application,
select the Seats and Steering Wheel
tab.
Press to activate/deactivate the function.
The function is memorised each time the engine
is switched off.
Mirrors
Door mirrors
Demisting/Defrosting
The demisting/defrosting of the door mirrors works with the demisting/
defrosting of the rear screen.
For more information on Rear screen
demisting/defrosting , refer to the
corresponding section.
As a safety measure, the mirrors should be adjusted to reduce the "blind spots".
The objects that you see in the mirrors are
in fact closer than they appear. Take this
into account in order to correctly judge the
distance of vehicles approaching from behind. CarM an uals 2 .c o m
Page 48 of 244

46
Ease of use and comfort
Adjustment
► Move control A to the right or to the left to
select the corresponding mirror.
►
Move control
B in any of the four directions
to adjust.
►
Return control A
to its central position.
Manual folding
The mirrors can be folded manually (parking
obstruction, narrow garage, etc.).
►
T
urn the mirror towards the vehicle.
Electric folding
Depending on equipment, the door mirrors can
be folded electrically.
► From the inside, with the
ignition on, place control A
in the
central position.
►
Pull control A
backwards.
►
Lock the vehicle from the outside.
If the mirrors are folded using control A,
they will not unfold when the vehicle is
unlocked.
Electric unfolding
► From outside: unlock the vehicle.
► From inside: with the ignition on, place
control
A in the central position and then pull it
rearwards.
The automatic folding/unfolding of the door mirrors is configured in the
Settings
> Vehicle touch screen application.
Before using an automatic car wash, fold the
mirrors.
Automatic tilting in reverse gear
Depending on version, this function allows you to
automatically tilt the mirrors downwards to assist
with parking manoeuvres in reverse gear.
With the engine running, on engaging reverse
gear, the mirror glasses tilt downwards.
They each return to their original positions:
–
A
few seconds after coming out of reverse
gear.
– Once the vehicle speed exceeds 6 mph
(10 km/h).
–
When the engine is switched off.
It can be activated/deactivated in the
Settings > Vehicle touch screen
application.
Electrochrome interior rear
view mirror
The electrochrome system uses a sensor that
detects the level of exterior brightness and that
coming from the rear of the vehicle, in order to
automatically and gradually switch between day
and night usage.
To ensure optimum visibility while manoeuvring, the mirror automatically
brightens when reverse gear is engaged.
The system is deactivated if the load in the
boot exceeds the height of the load space CarM an uals 2 .c o m
Page 54 of 244
52
Ease of use and comfort
– It increase the effectiveness of the demisting,
in winter , above 3°C.
►
Press button
4-A/C to switch the air
conditioning on/off.
When the system is switched on, the indicator
lamp in the button comes on or “ A/C” changes
colour (depending on version).
Air conditioning does not operate when the air flow is deactivated.
To obtain cool air more quickly, enable interior
air recirculation for a brief period. Then return
to the intake of exterior air.
Switching off the air conditioning may result in
some discomfort (humidity or misting).
Maximum air conditioning
This function automatically adjusts the
temperature setting to the lowest possible, the
air distribution towards the central and side air
vents, the air flow to maximum and, if necessary,
activates interior air recirculation.
► Press this button to activate/deactivate
the function (confirmed by the
illumination/extinction of the indicator lamp).
Once the function is deactivated, the system
returns to the previous settings.
Switching off the air
conditioning system
► Press button 12-OFF.
Its indicator lamp lights up and all the other
indicator lamps of the air conditioning system
go off.
This action deactivates all of the functions of the
air conditioning system.
The temperature is no longer regulated. A slight
flow of air can still be felt, due to the forward
movement of the vehicle.
Interior air recirculation
The intake of exterior air prevents the formation
of mist on the windscreen and side windows.
Recirculating the interior air isolates the
passenger compartment from outside odours
and fumes and allows the desired passenger
compartment temperature to be achieved more
rapidly.
► Press this button to activate/deactivate
the function (confirmed by the
illumination/extinction of the indicator lamp).
This function is activated automatically when the front screenwash is used or
reverse gear is engaged.
Front demisting/defrosting
This mode allows the windscreen and side windows to be demisted or defrosted as quickly
as possible.
► Press this button to activate/deactivate
the mode (confirmed by the illumination/
extinction of the
indicator lamp).
The mode automatically manages the air
conditioning, air flow, air intake and distributes
ventilation optimally to the windscreen and side
windows.
The air flow can be changed manually without
deactivating this mode.
With Stop & Start, when demisting has
been activated, STOP mode is not
available.
In wintry conditions, before moving off, it
is essential to remove any snow or ice
from the windscreen around the camera.
Otherwise, the operation of the equipment
using the camera may be affected.
Rear screen demisting/
defrosting
This demisting/de-icing only works with the engine running.
Depending on version, it also demists/de-ices
the door mirrors.
► Press this button to activate/deactivate
the function (confirmed by the indicator
lamp coming on/switching off).
The function can be activated whatever the outside temperature may be. CarM an uals 2 .c o m
Page 56 of 244
54
Ease of use and comfort
The programming can also be carried out from a smartphone via the MYPEUGEOT
APP application.
For more information on Remotely operable
additional functions , refer to the corresponding
section.
The fan noise that occurs during temperature pre-conditioning is perfectly
normal.
Vehicles equipped with an alarm
system
Depending on version, interior volumetric
and anti-tilt monitoring may be reduced or
even suspended during temperature pre-
conditioning sequences.
Operating conditions
– The function is only activated when the
ignition is switched off and the
vehicle
locked.
–
When the vehicle is not connected, the
function is only activated if the battery charge
level is greater than 20%.
–
When the vehicle is not connected and a
recurring programme is active (e.g. from Monday
to Friday), if two temperature pre-conditioning
sequences are run without the vehicle being
used, the programme will be deactivated.
Front fittings
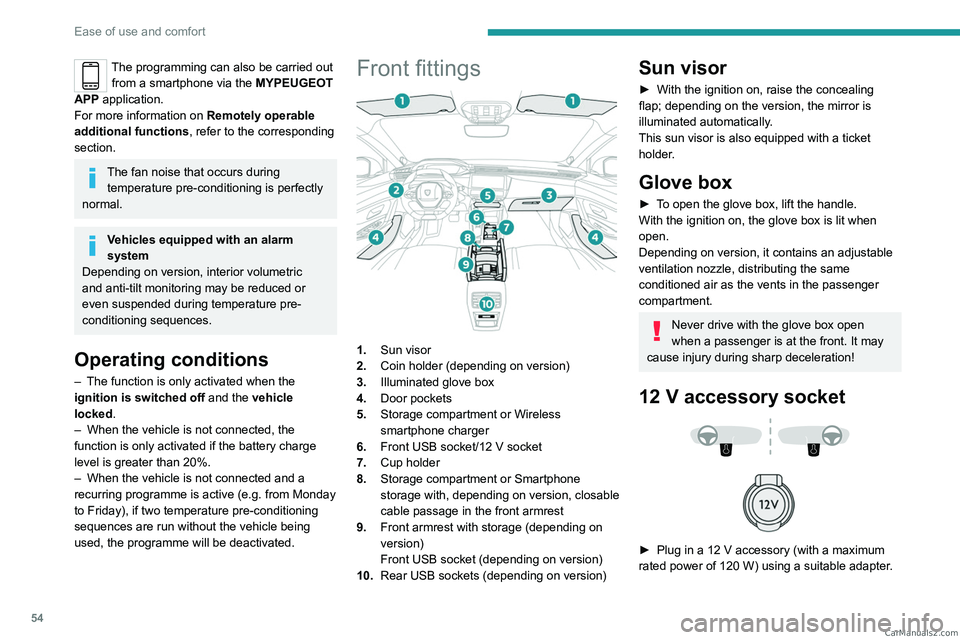
1. Sun visor
2. Coin holder (depending on version)
3. Illuminated glove box
4. Door pockets
5. Storage compartment or Wireless
smartphone charger
6. Front USB socket/12 V socket
7. Cup holder
8. Storage compartment or Smartphone
storage with, depending on version,
closable
cable passage in the front armrest
9. Front armrest with storage (depending on
version)
Front USB socket (depending on version)
10. Rear USB sockets (depending on version)
Sun visor
► With the ignition on, raise the concealing
flap; depending on the version, the mirror is
illuminated automatically.
This sun visor is also equipped with a ticket
holder.
Glove box
► To open the glove box, lift the handle.
With the ignition on, the glove box is lit when
open.
Depending on version, it contains an adjustable
ventilation nozzle, distributing the same
conditioned air as the vents in the passenger
compartment.
Never drive with the glove box open
when a passenger is at the front. It may
cause injury during sharp deceleration!
12 V accessory socket
► Plug in a 12 V accessory (with a maximum
rated power of 120 W) using a suitable adapter. CarM an uals 2 .c o m
Page 65 of 244

63
Lighting and visibility
40 (Initial setting)Driver only or driver + front passenger
1 5 people
2 5 people + load in the boot
3 Driver only + load in the boot
4 5 6 Not used
Automatic Peugeot Matrix
LED Technology 2.0
headlamp adjustment
This system automatically adjusts the height of
the headlamp beams according to the load in the
vehicle.
In the event of a malfunction, this warning
lamp lights up on the instrument panel,
accompanied by the display of a message and
an audible signal.
The system places the headlamp beams in the
lowest position.
Have it checked by a PEUGEOT dealer or a
qualified workshop.
Do not touch the Peugeot Matrix LED
Technology 2.0 headlamps - risk of
electrocution!
Automatic illumination of lamps
With the lighting control stalk in the “ AUTO”
position and if a low level of exterior brightness
is detected by the rain/sunshine sensor, the
sidelamps and dipped beam headlamps are
switched on automatically, without any action on
the part of the driver. They may also come on if
rain is detected, at the same time as automatic
operation of the windscreen wipers.
As soon as the brightness returns to a sufficient
level or after the windscreen wipers are switched
off, the lamps are switched off automatically.
Malfunction
In the event of a malfunction of the rain/
sunshine sensor, the vehicle’s lamps
come on and this warning lamp is displayed on
the instrument panel, accompanied by an
audible signal and/or the display of a message.
Have it checked by a PEUGEOT dealer or a
qualified workshop.
Do not cover the rain/sunshine sensor
located at the top centre of the
windscreen behind the interior rear view
mirror; the associated functions would no
longer be controlled.
In fog or snow, the rain/sunshine sensor
may detect sufficient light. For this
reason, the lighting will not come on
automatically.
The inner surface of the windscreen may become misted up and affect the proper
operation of the rain/sunshine sensor.
In humid and cold weather, demist the
windscreen regularly.
Guide-me-home and
welcome lighting
Guide-me-home lighting
Automatic
With the ring of the lighting control stalk in the
"AUTO” position and when the light is poor, the
dipped beam headlamps come on automatically
when the ignition is switched off.
You can activate/deactivate and adjust the duration of the guide-me-home
lighting in the Settings
> Vehicle touch screen
application.
Manual
CarM an uals 2 .c o m
Page 66 of 244
64
Lighting and visibility
► With the ignition off, pull the lighting control
stalk toward you ("headlamp flash") to activate/
deactivate the function.
Manual guide-me-home lighting goes off
automatically after a period of time.
Welcome lighting
When the vehicle is unlocked in low light
conditions and the "Automatic illumination of
headlamps" function is activated, this system
automatically switches on:
–
On the outside, sidelamps, dipped beam
headlamps and door mirror spotlamps.
–
Inside, courtesy lamps and footwell lighting.
Door mirror spotlamps
These spotlamps facilitate access to the vehicle
by lighting the ground near the front doors.
The spotlamps come on automatically:
–
when the vehicle is unlocked.
–
when a door is opened.
–
when a request to locate the vehicle is
received from the remote control.
They also come on with the welcome lighting
and guide-me-home lighting functions.
They go off automatically after 30 seconds.
Automatic lighting systems - General
recommendations
The automatic lighting systems use a detection
camera, located at the top of the windscreen.
Operating limits
The system may be disrupted or not work
correctly:
–
When visibility conditions are poor
(e.g.
snowfall, heavy rain).
–
If the windscreen is dirty
, misted-up or
masked (e.g.
sticker) in front of the camera.
–
If the vehicle is facing highly reflective signs
or safety barrier reflectors.
The system is not able to detect:
–
Road users that do not have their own
lighting, such as pedestrians.
–
V
ehicles with hidden lighting (e.g. travelling
behind a safety barrier on the motorway).
–
V
ehicles at the top or bottom of a steep
slope, on winding roads, on crossroads.
Maintenance
Clean the windscreen regularly,
particularly the area in front of the camera.
The internal surface of the windscreen can
also become misted around the camera.
In humid and cold weather, demist the
windscreen regularly.
Do not allow snow to accumulate on the
bonnet or roof of the vehicle as this could
obstruct the camera.
Automatic headlamp dipping
For more information, refer to the
General recommendations for
automatic lighting systems.
With the ring of the lighting control stalk in the
"AUTO" position and the function activated on
the touch screen, this system automatically
switches between dipped and main beam
headlamps, according to lighting and traffic
conditions, using a camera located at the top of
the windscreen.
CarM an uals 2 .c o m