2023 PEUGEOT 308 charging
[x] Cancel search: chargingPage 189 of 260
187
In the event of a breakdown
8Frozen battery
Never try to charge a frozen battery - risk
of explosion!
If the battery has frozen, have it checked by a
PEUGEOT dealer or by a qualified workshop,
who will verify that the internal components
have not been damaged and that the case
has not cracked, which could lead to a risk of
leakage of toxic and corrosive acid.
Automatic gearbox
Never try to start the engine by pushing
the vehicle.
Symbols
No sparks or naked flames, no smoking.
Always protect your eyes. Explosive gases can cause blindness and injury.
Keep the vehicle's battery out of the reach
of children.
The vehicle's battery contains sulphuric acid which can make you go blind or
cause severe burns.
For more information, refer to the
handbook.
Explosive gases can be present close to
the battery.
With petrol/Diesel engines
Procedure for starting the engine using another
battery or for charging a discharged battery.
Accessing the battery
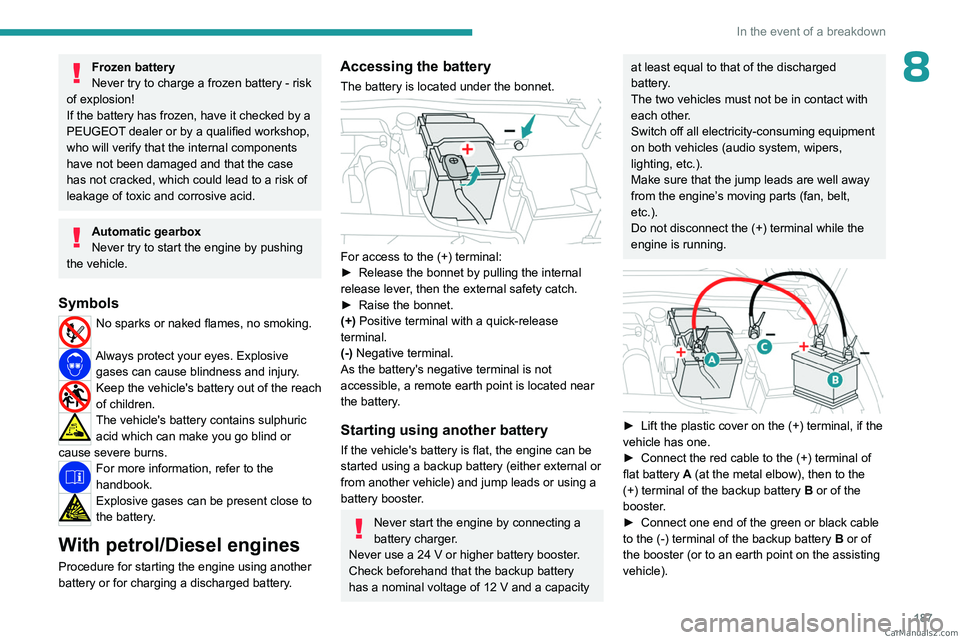
The battery is located under the bonnet.
For access to the (+) terminal:
► Release the bonnet by pulling the internal
release lever
, then the external safety catch.
►
Raise the bonnet.
(+)
Positive terminal with a quick-release
terminal.
(-) Negative terminal.
As the battery's negative terminal is not
accessible, a remote earth point is located near
the battery.
Starting using another battery
If the vehicle's battery is flat, the engine can be
started using a backup battery (either external or
from another vehicle) and jump leads or using a
battery booster.
Never start the engine by connecting a
battery charger.
Never use a 24
V or higher battery booster.
Check beforehand that the backup battery
has a nominal voltage of 12
V and a capacity
at least equal to that of the discharged
battery.
The two vehicles must not be in contact with
each other.
Switch off all electricity-consuming equipment
on both vehicles (audio system, wipers,
lighting, etc.).
Make sure that the jump leads are well away
from the engine’s moving parts (fan, belt,
etc.).
Do not disconnect the (+) terminal while the
engine is running.
► Lift the plastic cover on the (+) terminal, if the
vehicle has one.
►
Connect the red cable to the (+) terminal of
flat battery
A (at the metal elbow), then to the
(+) terminal of the backup battery
B or of the
booster.
►
Connect one end of the green or black cable
to the (-) terminal of the backup battery
B or of
the booster (or to an earth point on the assisting
vehicle). CarM an uals 2 .c o m
Page 190 of 260
188
In the event of a breakdown
► Connect the other end of the green or black
cable to the earth point C .
►
Start the engine on the assisting vehicle and
leave it running for a few minutes.
►
Operate the starter on the broken down
vehicle and let the engine run.
If the engine does not start immediately
, switch
off the ignition and wait a few moments before
trying again.
►
W
ait for it to return to idle.
►
Disconnect the jump leads in reverse order.
►
Refit the plastic cover to the (+) terminal, if
the vehicle has one.
►
Allow the engine to run for at least
30
minutes, with the vehicle stationary, so that
the battery reaches an adequate state of charge.
Driving immediately without having
reached a sufficient level of charge may
affect some of the vehicle's functions (e.g.
Stop & Start).
Charging the battery using a battery
charger
For optimum service life of the battery, it is
essential to maintain an adequate state of
charge.
In some circumstances, it may be necessary to
charge the battery:
–
When using the vehicle mainly for short
journeys.
–
If the vehicle is to be taken off the road for
several weeks.
Consult a PEUGEOT dealer or a qualified
workshop.
To charge the vehicle's battery yourself, use only a charger compatible with
lead-acid batteries with a nominal voltage of
12
V.
Follow the instructions provided by the
manufacturer of the charger.
Never reverse polarities.
It is not necessary to disconnect the
battery.
►
Switch the ignition off.
►
Switch off all electrical consumers (audio
system, lighting, wipers, etc.).
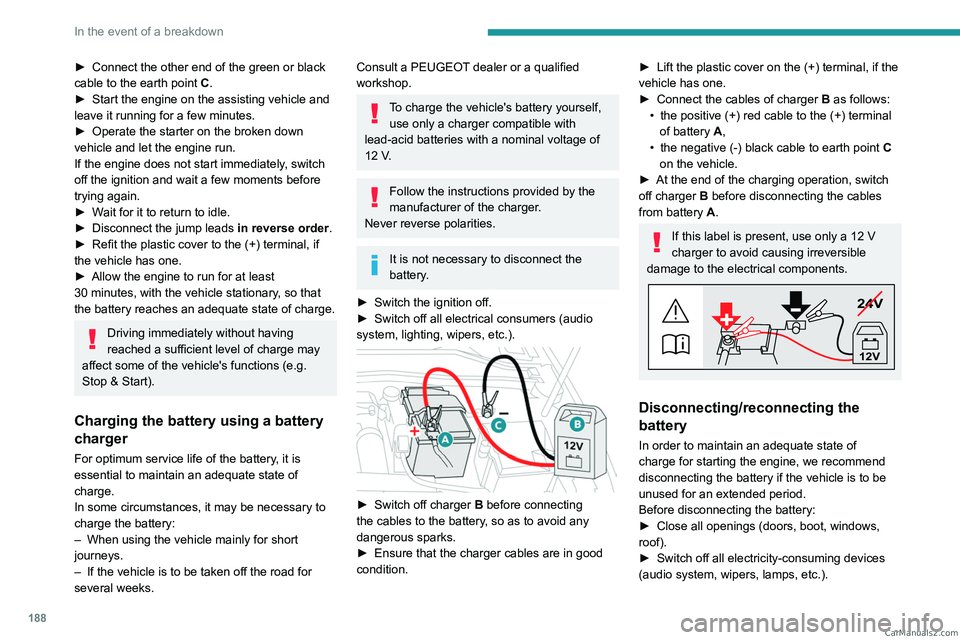
► Switch off charger B before connecting
the cables to the battery, so as to avoid any
dangerous sparks.
►
Ensure that the charger cables are in good
condition.
► Lift the plastic cover on the (+) terminal, if the
vehicle has one.
►
Connect the cables of charger B
as follows:
•
the positive (+) red cable to the (+) terminal
of battery
A,
•
the negative (-) black cable to earth point C
on the vehicle.
►
At the end of the charging operation, switch
off charger B
before disconnecting the cables
from battery A.
If this label is present, use only a 12 V
charger to avoid causing irreversible
damage to the electrical components.
24V
12V
Disconnecting/reconnecting the
battery
In order to maintain an adequate state of
charge for starting the engine, we recommend
disconnecting the battery if the vehicle is to be
unused for an extended period.
Before disconnecting the battery:
►
Close all openings (doors, boot, windows,
roof).
►
Switch off all electricity-consuming devices
(audio system, wipers, lamps, etc.). CarM an uals 2 .c o m
Page 192 of 260
190
In the event of a breakdown
► Release the bonnet by pulling the internal
release lever , then the external safety catch.
►
Raise the bonnet.
(+)
Positive terminal with a quick-release
terminal.
(-) Negative terminal.
As the battery's negative terminal is not
accessible, a remote earth point is located near
the battery.
Central
The central battery is located in the front armrest
storage compartment.
To reach the battery:
► Open the front armrest.
► Unclip the compartment's floor .
(+) Positive terminal, protected by a red plastic
cover (not accessible).
(-) Negative terminal with a black quick-release
connector.
Charging the front battery using a
battery charger
For optimum service life of the front battery, it
is essential to maintain an adequate state of
charge.
In some circumstances, it may be necessary to
charge the front battery:
–
When using the vehicle mainly for short
journeys.
–
If the vehicle is to be taken off the road for
several weeks.
Consult a PEUGEOT
dealer or a qualified
workshop.
To charge the vehicle's front battery yourself, use only a charger compatible
with lead-acid batteries with a nominal voltage
of 12
V.
Follow the instructions provided by the
manufacturer of the charger.
Never reverse polarities.
It is not necessary to disconnect the
battery.
►
Switch the ignition off. ►
Switch off all electrical consumers (audio
system, lighting, wipers, etc.).
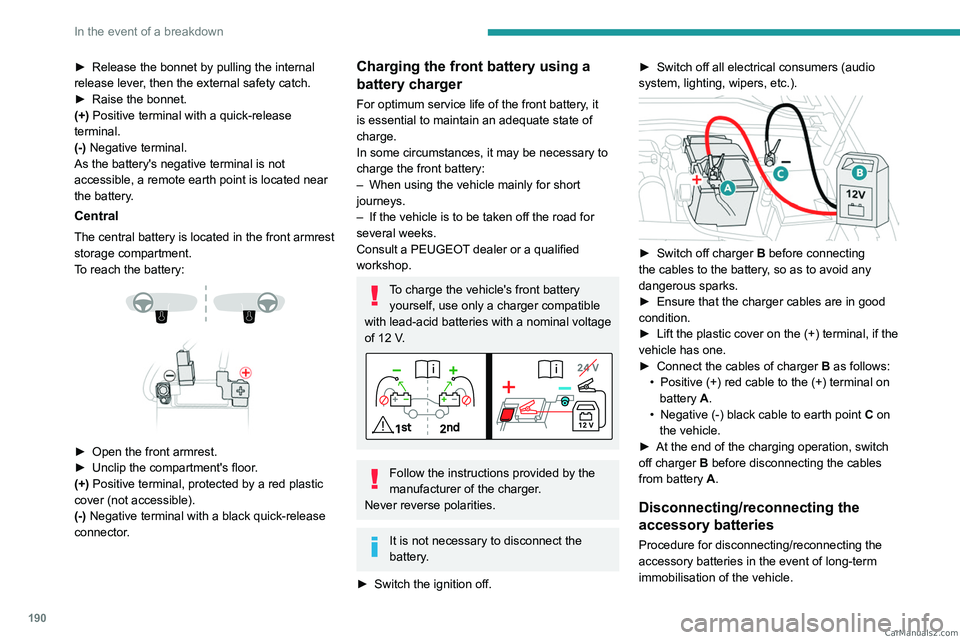
► Switch off charger B before connecting
the cables to the battery, so as to avoid any
dangerous sparks.
►
Ensure that the charger cables are in good
condition.
►
Lift the plastic cover on the (+) terminal, if the
vehicle has one.
►
Connect the cables of charger B
as follows:
•
Positive (+) red cable to the (+) terminal on
battery
A.
•
Negative (-) black cable to earth point C
on
the vehicle.
►
At the end of the charging operation, switch
off charger B
before disconnecting the cables
from battery A.
Disconnecting/reconnecting the
accessory batteries
Procedure for disconnecting/reconnecting the
accessory batteries in the event of long-term
immobilisation of the vehicle. CarM an uals 2 .c o m
Page 206 of 260
204
PEUGEOT i-Connect Advanced - PEUGEOT i-Connect
to "Connected vehicle" to enable to the
connection to the radio network.
Irrespective of a valid subscription to a
connected service, the remote management
of devices relating to or connected with
the security of devices, and the updating
of software and firmware, will be carried
out when necessary in order to comply
with a legal requirement applicable to the
Manufacturer (e.g. the applicable law in terms
of product liability, the regulations governing
e-call) or when necessary to protect the
respective vital interests of the vehicle's users
and passengers.
The establishment of a secure connection via
radio network and the corresponding remote
updates are not affected by the privacy
settings and are intended to be carried out
after being initialised by the user in response
to a related notification.
The system can notify the receipt of an update
when it is connected to an exterior Wi-Fi network
or a mobile telephone network.
Large updates are downloaded only via the Wi-Fi
network.
The availability of an update is notified on the
screen at the end of the journey with an option
of immediate installation or postponement of
installation.
The installation time is variable and can take
several minutes with a maximum of about 30 minutes. A notification will give an estimate of the
duration and a description of the update.
Update information is available through the
"Settings" application.
Press the "Settings" application.
In the list, select the "Updates" tab.
This button allows you to change the authorisation for automatic downloading
of updates via an exterior Wi-Fi network.
For safety reasons and because it
requires sustained attention on the part
of the driver, the installation must be carried
out with the ignition on but without starting the
engine.
The installation cannot be carried out in the
following cases:
–
engine running.
–
emergency call in progress.
–
insufficient battery level.
–
when charging for electric vehicles.
If an update has failed or has expired, contact a
dealer or a qualified workshop.
The Manufacturer does not charge for the use of this service.
However, the use of Wi-Fi and/or mobile
telephone networks by your smartphone may
incur extra charges if you exceed the data
allowance included in your contract.
Any associated costs will be billed to you by
your mobile telephone operator.
Personalisation
Press and hold the screen from one of the
system's home pages.
Or
Press the "Settings" application.
In the list, select the "Customization" tab.
Press the "Displays" field.
A page divided into 2 parts is displayed.
Press the HOME button at any time to leave this
page.
Personalising the screen
Press the pencil in the "Customize
Touchscreen" part.
A representation of the organisation of the
different home page ( HOME) Widgets
is
displayed.
A Widget is a reduced window of an application or service.
Adding a Widget
To add a Widget, press "Widget" on the left of the screen.
Or
Press one of these buttons on the screen.
Select the desired Widget.
Press the back arrow to return to the
previous page. CarM an uals 2 .c o m
Page 210 of 260
208
PEUGEOT i-Connect Advanced - PEUGEOT i-Connect
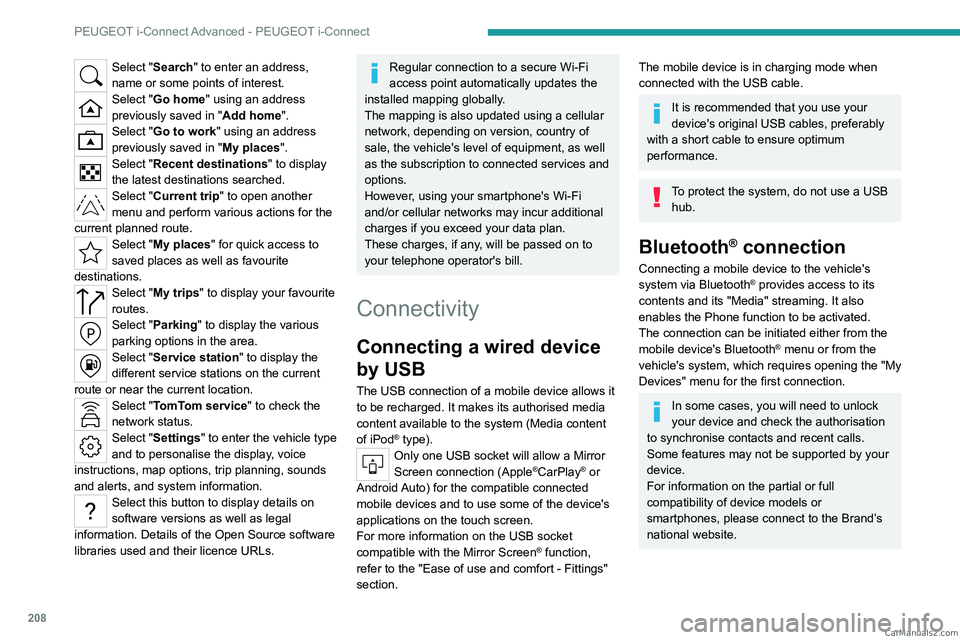
Select "Search" to enter an address,
name or some points of interest.
Select "Go home" using an address
previously saved in "Add home".
Select "Go to work" using an address
previously saved in "My places".
Select "Recent destinations" to display
the latest destinations searched.
Select "Current trip" to open another
menu and perform various actions for the
current planned route.
Select "My places" for quick access to
saved places as well as favourite
destinations.
Select "My trips" to display your favourite
routes.
Select "Parking" to display the various
parking options in the area.
Select "Service station" to display the
different service stations on the current
route or near the current location.
Select "TomTom service" to check the
network status.
Select "Settings" to enter the vehicle type
and to personalise the display, voice
instructions, map options, trip planning, sounds
and alerts, and system information.
Select this button to display details on
software versions as well as legal
information. Details of the Open Source software
libraries used and their licence URLs.
Regular connection to a secure Wi-Fi
access point automatically updates the
installed mapping globally.
The mapping is also updated using a cellular
network, depending on version, country of
sale, the vehicle's level of equipment, as well
as the subscription to connected services and
options.
However, using your smartphone's Wi-Fi
and/or cellular networks may incur additional
charges if you exceed your data plan.
These charges, if any, will be passed on to
your telephone operator's bill.
Connectivity
Connecting a wired device
by USB
The USB connection of a mobile device allows it
to be recharged. It makes its authorised media
content available to the system (Media content
of iPod
® type).Only one USB socket will allow a Mirror
Screen connection (Apple®CarPlay® or
Android Auto) for the compatible connected
mobile devices and to use some of the device's
applications on the touch screen.
For more information on the USB socket
compatible with the Mirror Screen
® function,
refer to the "Ease of use and comfort - Fittings"
section.
The mobile device is in charging mode when
connected with the USB cable.
It is recommended that you use your
device's original USB cables, preferably
with a short cable to ensure optimum
performance.
To protect the system, do not use a USB hub.
Bluetooth® connection
Connecting a mobile device to the vehicle's
system via Bluetooth® provides access to its
contents and its "Media" streaming. It also
enables the Phone function to be activated.
The connection can be initiated either from the
mobile device's Bluetooth
® menu or from the
vehicle's system, which requires opening the "My
Devices" menu for the first connection.
In some cases, you will need to unlock
your device and check the authorisation
to synchronise contacts and recent calls.
Some features may not be supported by your
device.
For information on the partial or full
compatibility of device models or
smartphones, please connect to the Brand’s
national website. CarM an uals 2 .c o m
Page 222 of 260

220
Alphabetical index
A
ABS 79
Accelerated charging unit (Wallbox)
151–152
Accessories
76
Active LED Vision
67, 69
Active Safety Brake
130–131, 133
AdBlue®
18, 170
AdBlue® tank
172
Additive, Diesel
168–169
Adjusting headlamps
66
Adjusting head restraints
43
Adjusting seat
43–44
Adjusting the air distribution
52–53
Adjusting the air flow
52–53
Adjusting the headlamp beam height
66
Adjusting the height and reach
of the steering wheel
47
Adjusting the lumbar support
44
Adjusting the seat angle
44
Adjusting the temperature
52
Adjusting the time
215
Advice on care and maintenance
149, 173
Advice on driving
8, 94–95
Airbags
84–87
Airbags, curtain
85–86
Airbags, front
84–85, 88
Airbags, lateral
85–86
Air conditioning
51–52, 54
Air conditioning, automatic
55
Air conditioning, dual-zone automatic
52
Air intake
54
Air vents 51
Alarm
37–38
Amplifier, audio
59
Anti-lock braking system (ABS)
79
Antitheft / Immobiliser
27
Applications
23–24
Armrest, front
58–59
Armrest, rear
60
Assistance call
77–78
Assistance, emergency braking
80, 132
Audio streaming (Bluetooth)
212
B
Battery, 12 V 165, 169, 186–190
Battery, ancillaries
186
Battery, charging
187–188, 190
Battery, remote control
31–32
Blanking screen (snow shield)
163
Blind
40
BlueHDi
18, 168, 176
Bluetooth (hands-free)
209
Bluetooth (telephone)
209–210
Bodywork
174
Bonnet
165–166
Boot
33, 36, 64
Brake discs
170
Brake lamps
185
Brakes
169–170
Braking
102
Braking assistance system
79–80
Braking, automatic emergency 130–131, 133
Braking, dynamic emergency
98–100
Bulbs (changing)
184–185
C
Capacity, fuel tank 147
Care of the bodywork
174
Central locking
29–30
Changing a bulb
184–185
Changing a fuse
186
Changing a wheel
177, 181
Changing a wiper blade
74
Changing the remote control battery
31
Changing to free-wheeling
172
Charge level indicator
(Rechargeable hybrid)
20
Charger, induction
57
Charger, wireless
57
Charging cable
153
Charging cable
(Rechargeable hybrid)
151–152, 157
Charging connector
(Rechargeable hybrid)
150, 155, 157
Charging flap
(Rechargeable hybrid)
150, 155, 157
Charging the traction battery
(Rechargeable hybrid)
20, 149, 155, 157
CHECK
20
Checking the engine oil level
18
Checking the levels
167–168 CarM an uals 2 .c o m
Page 223 of 260
221
Alphabetical index
Checking tyre pressures
(using the kit)
178, 180
Checks
167, 168–170
Checks, routine
168–170
Child lock
93
Children
83, 89–90
Children (safety)
93
Child seats
83, 86–88
Child seats, conventional
88, 91–92
Child seats, i-Size
90–92
Child seats, ISOFIX
89–92
Cleaning (advice)
149, 173–175
Closing the boot
29, 33
Closing the doors
29, 33
Collision Risk Alert
130–132
Configuration, vehicle
10, 23
Connection, Bluetooth
209–210
Connectivity
214
Consumptions
23
Container, AdBlue®
171
Control, emergency boot release
33
Control, emergency door
31
Control, heated seats
45–46
Controls, steering mounted
101–102
Control stalk, lighting
65–66
Control stalk, wipers
71–73
Control unit
151–153, 157
Courtesy lamps
60–61
Cruise control
113–114, 116–117
Cruise control, adaptive
113–114, 118–119
Cruise control by
speed limit recognition
113–114Cup holder 56
D
Date (setting) 215
Daytime running lamps
66
Deactivating the passenger airbag
84, 88–89
Deadlocking
27, 29
Deferred charging
24, 158
Deferred charging
(Rechargeable hybrid)
23–24, 150, 155
Defrosting
47, 55
Defrosting, front
55
Defrosting, rear screen
55
Demisting
47, 55
Demisting, front
55
Demisting, rear
55
Diagnosis, vehicle
20
Dials and gauges
10
Digital instrument panel
10
Dimensions
199
Dipstick
18, 167
Direction indicators (turn signals)
66, 185
Display screen, instrument panel
10
Domestic charging
153
Domestic charging (Rechargeable hybrid)
157
Door pockets
56
Doors
33
Drive Assist Plus
11 8
Driver’s attention warning
134–135
Driving
42–43, 94–95, 110
Driving abroad 70
Driving aids camera (warnings)
109
Driving aid shortcuts
11 0
Driving aids (recommendations)
108
Driving economically
8
Driving modes
103
Driving positions (storing)
45
Dynamic stability control (DSC)
80
E
EBFD 79
Eco-driving (advice)
8
ECO mode
103
Electric automatic gearbox
(Rechargeable hybrid)
100
Electronic brake force distribution (EBFD)
79
Emergency braking assistance (EBA)
80
Emergency call
77–78
Emergency switching off
97
Emergency warning lamps
76, 176
Emissions control system, SCR
19, 170
Energy economy (mode)
165
Energy economy mode
165
Energy flows
23
Energy recovery
20, 102
Engine
170
Engine compartment
165–166
Engine, Diesel
147, 167, 176, 197
Engine, petrol
104, 166, 195
Engines
194–195, 197 CarM an uals 2 .c o m
Page 224 of 260

222
Alphabetical index
Environment 8, 32
e-Save function (energy reserve)
24
ESC (electronic stability control)
79
Expanded traffic sign recognition
11 4
Exterior lighting
68
F
Fatigue detection 134–135
Favourite driving functions
11 0
Filling the AdBlue® tank
168, 172
Filling the fuel tank
147–148
Filter, air
169
Filter, oil
169
Filter, particle
168–169
Filter, passenger compartment
51, 169
Fitting a wheel
182–183
Fitting roof bars
162–163
Fittings, boot
61
Fittings, front
56
Fittings, interior
57
Fittings, rear
60
Flap, charging
158
Flap, fuel filler
147–148
Flap, ski
60
Flashing indicators
66
Flat bed (towing)
192
Floor, boot, adjustable
63
Fluid, brake
168
Fluid, engine coolant
168
Foglamps, rear
65, 186
Folding the rear seats 49–50
Frequency (radio)
212
Fuel
8, 147
Fuel consumption
8, 20
Fuel level, low
147
Fuel (tank)
147–148
Fuses
186
G
Gauge, fuel 147
Gearbox, automatic
100–103, 105, 169, 187
Gearbox, manual
100, 105, 169
Gear lever
100
Gear lever, manual gearbox
100
Gear shift indicator
105
Glove box
57
H
Hands-free access 35–36
Hands-free tailgate
35–36
Hazard warning lamps
76, 176
Headlamps (adjustment)
66
Headlamps, automatic dipping
68–69
Headlamps, automatic operation
67
Headlamps, halogen
66
Headlamps, main beam
68
Head restraints, front
43
Head restraints, rear
49–50
Heated steering wheel 47
Heating
51
Heating, programmable
24, 55
Hi-Fi system
59
High voltage
149
Hill start assist
104–105
Histogramme, fuel consumption
23–24
Horn
77
I
Ignition 97, 214
Ignition on
97
Immobiliser, electronic
95
Indicator, AdBlue® range
18
Indicator, coolant temperature
18
Indicator, engine oil level
18
Indicators, direction
66
Indicator, service
17
Inflating tyres
170, 200
Inflating tyres and accessories
(using the kit)
178, 180
Information, vehicle
10, 217
Infrared camera
109
Instrument panel
10, 21, 110
Instrument panels
10
ISOFIX mountings
89, 91–92 CarM an uals 2 .c o m