2023 PEUGEOT 308 lumbar support
[x] Cancel search: lumbar supportPage 44 of 260

42
Ease of use and comfort
Driving position
Correct seating position
Adopting a good driving position contributes to
improving driver comfort and protection.
It also optimises interior and exterior visibility as
well as access to controls.
Certain seat adjustments described in this
section depend on the trim level and the country
in which the vehicle is sold.
Driver’s side
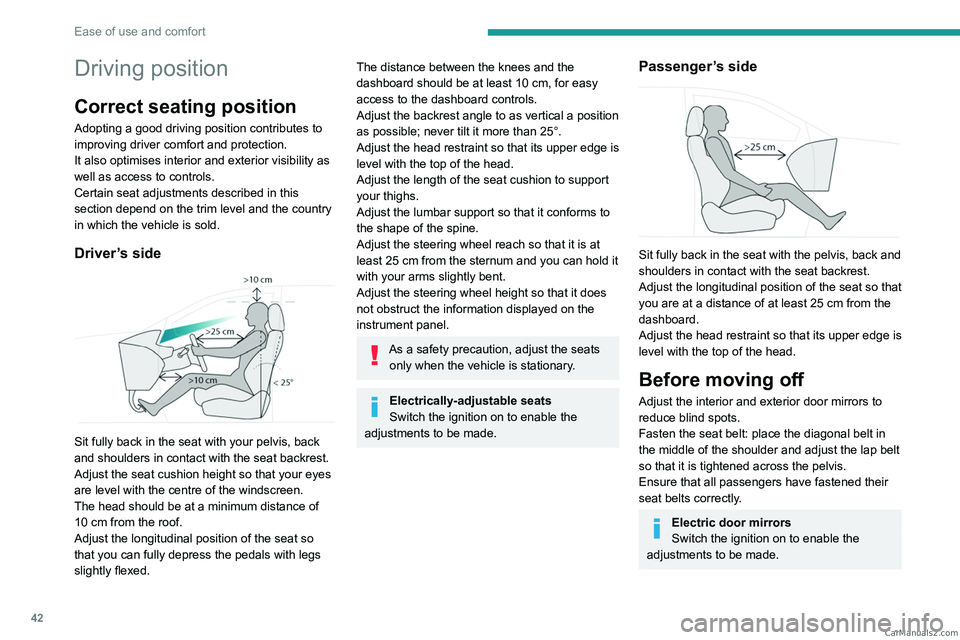
Sit fully back in the seat with your pelvis, back
and shoulders in contact with the seat backrest.
Adjust the seat cushion height so that your eyes
are level with the centre of the windscreen.
The head should be at a minimum distance of
10 cm from the roof.
Adjust the longitudinal position of the seat so
that you can fully depress the pedals with legs
slightly flexed.
The distance between the knees and the
dashboard should be at least 10 cm, for easy
access to the dashboard controls.
Adjust the backrest angle to as vertical a position
as possible; never tilt it more than 25°.
Adjust the head restraint so that its upper edge is
level with the top of the head.
Adjust the length of the seat cushion to support
your thighs.
Adjust the lumbar support so that it conforms to
the shape of the spine.
Adjust the steering wheel reach so that it is at
least 25
cm from the sternum and you can hold it
with your arms slightly bent.
Adjust the steering wheel height so that it does
not obstruct the information displayed on the
instrument panel.
As a safety precaution, adjust the seats only when the vehicle is stationary.
Electrically-adjustable seats
Switch the ignition on to enable the
adjustments to be made.
Passenger’s side
Sit fully back in the seat with the pelvis, back and
shoulders in contact with the seat backrest.
Adjust the longitudinal position of the seat so that
you are at a distance of at least 25
cm from the
dashboard.
Adjust the head restraint so that its upper edge is
level with the top of the head.
Before moving off
Adjust the interior and exterior door mirrors to
reduce blind spots.
Fasten the seat belt: place the diagonal belt in
the middle of the shoulder and adjust the lap belt
so that it is tightened across the pelvis.
Ensure that all passengers have fastened their
seat belts correctly.
Electric door mirrors
Switch the ignition on to enable the
adjustments to be made. CarM an uals 2 .c o m
Page 46 of 260

44
Ease of use and comfort
Height
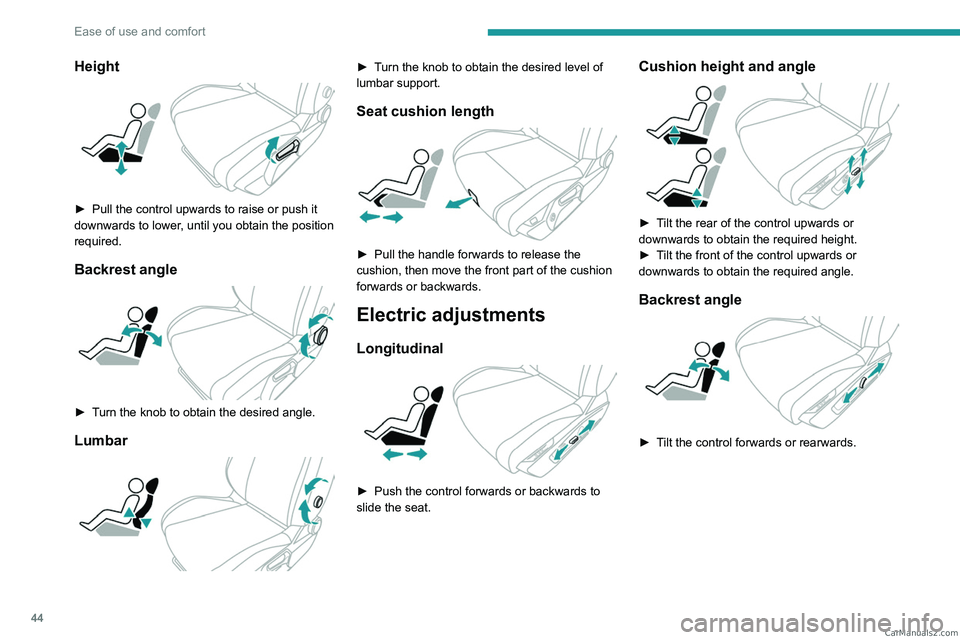
► Pull the control upwards to raise or push it
downwards to lower , until you obtain the position
required.
Backrest angle
► Turn the knob to obtain the desired angle.
Lumbar
► Turn the knob to obtain the desired level of
lumbar support.
Seat cushion length
► Pull the handle forwards to release the
cushion, then move the front part of the cushion
forwards or backwards.
Electric adjustments
Longitudinal
► Push the control forwards or backwards to
slide the seat.
Cushion height and angle
► Tilt the rear of the control upwards or
downwards to obtain the required height.
►
T
ilt the front of the control upwards or
downwards to obtain the required angle.
Backrest angle
► Tilt the control forwards or rearwards. CarM an uals 2 .c o m
Page 47 of 260

45
Ease of use and comfort
3Lumbar
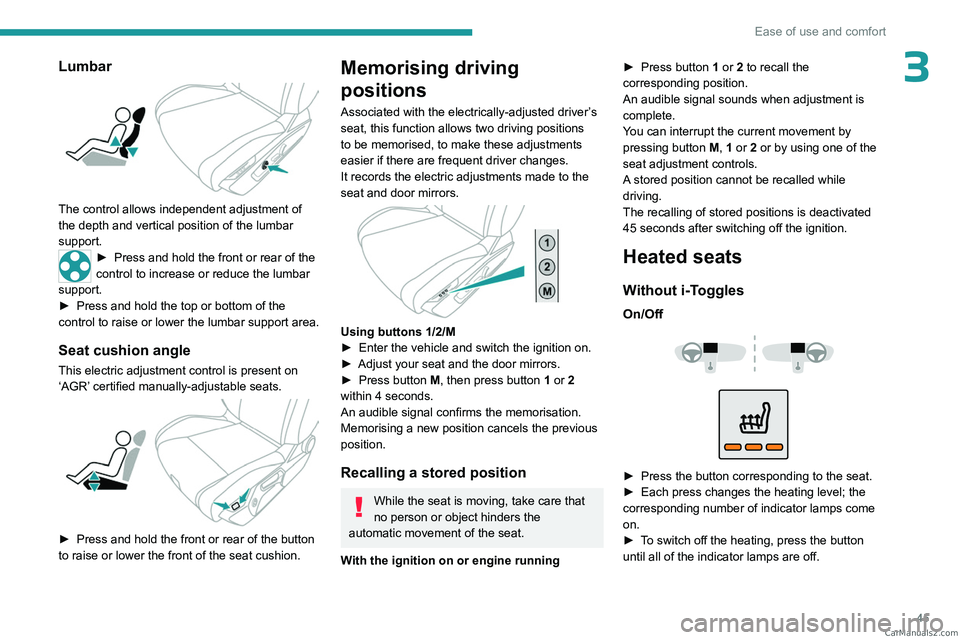
The control allows independent adjustment of
the depth and vertical position of the lumbar
support.
► Press and hold the front or rear of the
control to increase or reduce the lumbar
support.
►
Press and hold the top or bottom of the
control to raise or lower the lumbar support area.
Seat cushion angle
This electric adjustment control is present on
‘AGR’ certified manually-adjustable seats.
► Press and hold the front or rear of the button
to raise or lower the front of the seat cushion.
Memorising driving
positions
Associated with the electrically-adjusted driver’s
seat, this function allows two driving positions
to be memorised, to make these adjustments
easier if there are frequent driver changes.
It records the electric adjustments made to the
seat and door mirrors.
Using buttons 1/2/M
► Enter the vehicle and switch the ignition on.
►
Adjust your seat and the door mirrors.
►
Press button
M, then press button 1 or 2
within 4 seconds.
An audible signal confirms the memorisation.
Memorising a new position cancels the previous
position.
Recalling a stored position
While the seat is moving, take care that
no person or object hinders the
automatic movement of the seat.
With the ignition on or engine running ►
Press button
1 or 2 to recall the
corresponding position.
An audible signal sounds when adjustment is
complete.
You can interrupt the current movement by
pressing button M, 1 or 2 or by using one of the
seat adjustment controls.
A stored position cannot be recalled while
driving.
The recalling of stored positions is deactivated
45 seconds after switching off the ignition.
Heated seats
Without i-Toggles
On/Off
► Press the button corresponding to the seat.
► Each press changes the heating level; the
corresponding number of indicator lamps come
on.
►
T
o switch off the heating, press the button
until all of the indicator lamps are off. CarM an uals 2 .c o m
Page 222 of 260

220
Alphabetical index
A
ABS 79
Accelerated charging unit (Wallbox)
151–152
Accessories
76
Active LED Vision
67, 69
Active Safety Brake
130–131, 133
AdBlue®
18, 170
AdBlue® tank
172
Additive, Diesel
168–169
Adjusting headlamps
66
Adjusting head restraints
43
Adjusting seat
43–44
Adjusting the air distribution
52–53
Adjusting the air flow
52–53
Adjusting the headlamp beam height
66
Adjusting the height and reach
of the steering wheel
47
Adjusting the lumbar support
44
Adjusting the seat angle
44
Adjusting the temperature
52
Adjusting the time
215
Advice on care and maintenance
149, 173
Advice on driving
8, 94–95
Airbags
84–87
Airbags, curtain
85–86
Airbags, front
84–85, 88
Airbags, lateral
85–86
Air conditioning
51–52, 54
Air conditioning, automatic
55
Air conditioning, dual-zone automatic
52
Air intake
54
Air vents 51
Alarm
37–38
Amplifier, audio
59
Anti-lock braking system (ABS)
79
Antitheft / Immobiliser
27
Applications
23–24
Armrest, front
58–59
Armrest, rear
60
Assistance call
77–78
Assistance, emergency braking
80, 132
Audio streaming (Bluetooth)
212
B
Battery, 12 V 165, 169, 186–190
Battery, ancillaries
186
Battery, charging
187–188, 190
Battery, remote control
31–32
Blanking screen (snow shield)
163
Blind
40
BlueHDi
18, 168, 176
Bluetooth (hands-free)
209
Bluetooth (telephone)
209–210
Bodywork
174
Bonnet
165–166
Boot
33, 36, 64
Brake discs
170
Brake lamps
185
Brakes
169–170
Braking
102
Braking assistance system
79–80
Braking, automatic emergency 130–131, 133
Braking, dynamic emergency
98–100
Bulbs (changing)
184–185
C
Capacity, fuel tank 147
Care of the bodywork
174
Central locking
29–30
Changing a bulb
184–185
Changing a fuse
186
Changing a wheel
177, 181
Changing a wiper blade
74
Changing the remote control battery
31
Changing to free-wheeling
172
Charge level indicator
(Rechargeable hybrid)
20
Charger, induction
57
Charger, wireless
57
Charging cable
153
Charging cable
(Rechargeable hybrid)
151–152, 157
Charging connector
(Rechargeable hybrid)
150, 155, 157
Charging flap
(Rechargeable hybrid)
150, 155, 157
Charging the traction battery
(Rechargeable hybrid)
20, 149, 155, 157
CHECK
20
Checking the engine oil level
18
Checking the levels
167–168 CarM an uals 2 .c o m