2023 PEUGEOT 308 trailer
[x] Cancel search: trailerPage 133 of 260

131
Driving
6(50 km/h), if both sensors are able to detect
the thread.
The system also takes motorcyclists into account.
It may also react on animals. Animals
(especially animals smaller than 0.5
m)
and objects on the road are not necessarily
detected.
This system includes three functions:
–
Collision
Risk Alert.
–
Intelligent emergency braking assistance
(iEBA).
–
Active Safety Brake (automatic emergency
braking).
The vehicle has a multifunction camera located
at the top of the windscreen and, depending on
version, a radar located in the front bumper.
This system does not replace the need for driver vigilance.
This system is designed to assist the driver
and improve road safety.
It is the driver's responsibility to continuously
monitor traffic conditions in accordance with
applicable driving regulations.
As soon as the system detects a potential collision, it prepares the braking
circuit. This may cause a slight noise and a
slight sensation of deceleration.
Deactivation/Activation
By default, the system is automatically activated
at every engine start.
It is configured in the ADAS touch screen
application.
Deactivation of the system is signalled by
the illumination of this warning lamp,
accompanied by the display of a message.
Operating conditions and
limits
Vehicle moving forward without trailer.
Brake system operational.
ASR system activated.
Seat belts fastened for all passengers.
Stabilised speed on roads with no or low
curvature.
This warning lamp lights up on the instrument panel without any additional
message, to indicate that the automatic braking
system is not available.
This is a normal behavior indicating that a
condition is not fulfilled and which does not
request the support of a workshop.
In any situations with ignition on where automatic
braking presents a risk, deactivating the system
via the driving aids touch screen application is
recommended, for instance:
–
Carrying long objects on roof bars.
–
Using an automatic car wash.
–
Performing any maintenance (e.g.
changing a
wheel, working inside the engine compartment).
–
Placing the vehicle on a rolling bench in a
workshop.
–
T
owing the vehicle.
–
Following a damage of the windscreen close
to the detection camera.
The system is automatically deactivated if:
–
A
spare wheel with a too small diameter is
detected.
–
A
fault with the brake pedal switch or with
the right or left brake lamp is detected.
–
A
fault in the sensors, in the electronic or in
the brake system is detected.
–
A
trailer is detected by the equipped vehicle
hitch (with an electrical connection plug).
–
A
severe crash (e.g. with airbag
deployment) is detected.
In case the detection is degraded or
temporarily unavailable by environment
conditions, then a driver indication is not CarM an uals 2 .c o m
Page 138 of 260
136
Driving
the central dividing line marking on the road
surface disappears).
Operation
As soon as the system identifies a risk of
involuntarily crossing one of the lane markings
detected on the ground or a lane boundary
(e.g. grass verge), it performs the trajectory correction necessary to restore the vehicle to its
original lane.
The driver will notice a turning movement of the
steering wheel.This warning lamp flashes during
trajectory correction.
The driver can prevent the correction by firmly holding the steering wheel
(e.g.
during an emergency manoeuvre).
The correction is interrupted immediately if
the direction indicators are operated.
While the direction indicators are activated and
for a few seconds after switching them off, the
system considers that a change of trajectory is
intentional and no correction is triggered during
this period.
Driving situations and related alerts
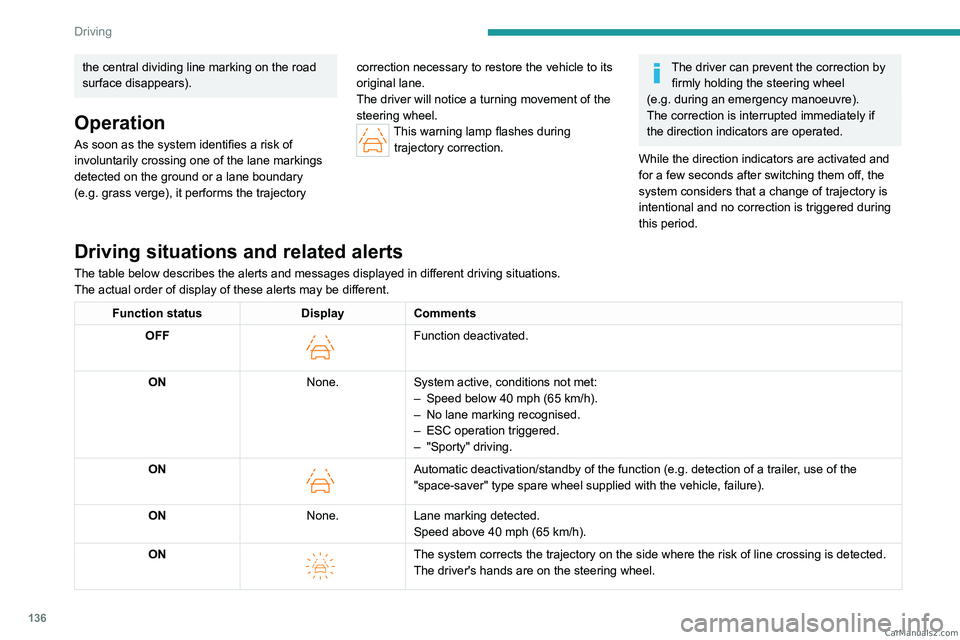
The table below describes the alerts and messages displayed in different driving situations.
The actual order of display of these alerts may be different.
Function status DisplayComments
OFF
Function deactivated.
ON None.System active, conditions not met:
–
Speed below 40 mph (65
km/h).
–
No lane marking recognised.
–
ESC operation triggered.
–
"Sporty" driving.
ON
Automatic deactivation/standby of the function (e.g. detection of a trailer, use of the
"space-saver" type spare wheel supplied with the vehicle, failure).
ON None.Lane marking detected.
Speed above 40 mph (65
km/h).
ON
The system corrects the trajectory on the side where the risk of line cr\
ossing is detected.
The driver's hands are on the steering wheel. CarM an uals 2 .c o m
Page 139 of 260
137
Driving
6Function statusDisplayComments
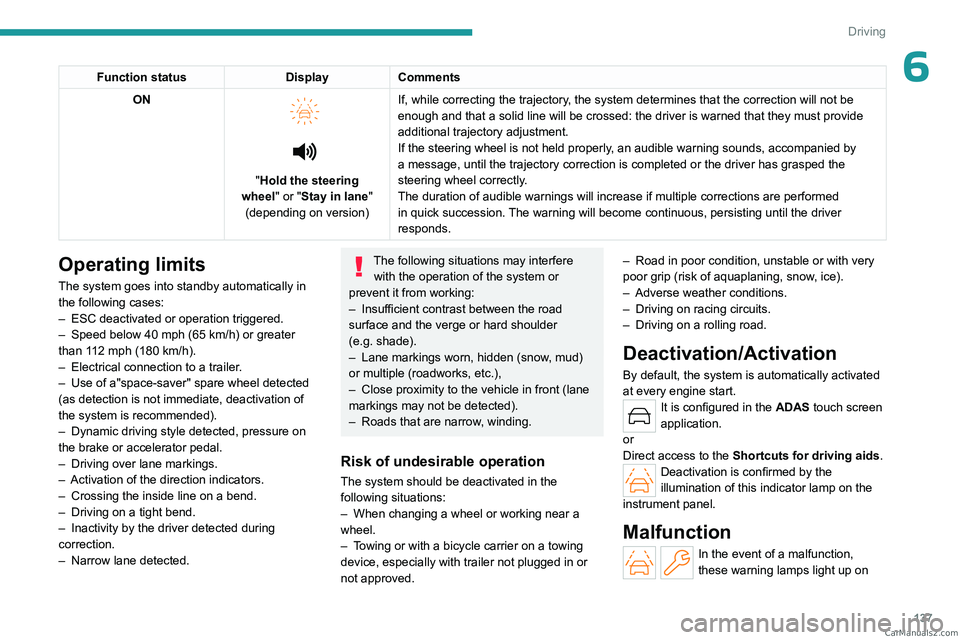
ON
"Hold the steering
wheel" or "Stay in lane" (depending on version) If, while correcting the trajectory, the system determines that the correction will not be
enough and that a solid line will be crossed: the driver is warned that \
they must provide
additional trajectory adjustment.
If the steering wheel is not held properly, an audible warning sounds, accompanied by
a message, until the trajectory correction is completed or the driver ha\
s grasped the
steering wheel correctly.
The duration of audible warnings will increase if multiple corrections a\
re performed
in quick succession. The warning will become continuous, persisting until the driver
responds.
Operating limits
The system goes into standby automatically in
the following cases:
–
ESC deactivated or operation triggered.
–
Speed below 40 mph (65
km/h) or greater
than 112 mph (180
km/h).
–
Electrical connection to a trailer
.
–
Use of a"space-saver" spare wheel detected
(as detection is not immediate, deactivation of
the system is recommended).
–
Dynamic driving style detected, pressure on
the brake or accelerator pedal.
–
Driving over lane markings.
–
Activation
of the direction indicators.
–
Crossing the inside line on a bend.
–
Driving on a tight bend.
–
Inactivity by the driver detected during
correction.
–
Narrow lane detected.
The following situations may interfere with the operation of the system or
prevent it from working:
–
Insufficient contrast between the road
surface and the verge or hard shoulder
(e.g.
shade).
–
Lane markings worn, hidden (snow
, mud)
or multiple (roadworks, etc.),
–
Close proximity to the vehicle in front (lane
markings may not be detected).
–
Roads that are narrow
, winding.
Risk of undesirable operation
The system should be deactivated in the
following situations:
–
When changing a wheel or working near a
wheel.
–
T
owing or with a bicycle carrier on a towing
device, especially with trailer not plugged in or
not approved. –
Road in poor condition, unstable or with very
poor grip (risk of aquaplaning, snow
, ice).
–
Adverse weather conditions.
–
Driving on racing circuits.
–
Driving on a rolling road.
Deactivation/Activation
By default, the system is automatically activated
at every engine start.
It is configured in the ADAS touch screen
application.
or
Direct access to the Shortcuts for driving aids .
Deactivation is confirmed by the
illumination of this indicator lamp on the
instrument panel.
Malfunction
In the event of a malfunction,
these warning lamps light up on CarM an uals 2 .c o m
Page 142 of 260

140
Driving
When the obstacle is very close, the "Danger"
symbol is displayed on the screen.
Front parking sensors
Supplementing the rear parking sensors, the
front parking sensors are triggered when an
obstacle is detected in front and the speed of the
vehicle is below 6 mph (10 km/h).
Front parking sensor operation is suspended if
the vehicle stops for more than three seconds in
forward gear, if an obstacle is no longer detected
or the vehicle speed exceeds 6
mph (10 km/h).
The sound emitted by the speaker (front or rear) locates the obstacle relative to
the vehicle, whether in front of or behind it on
its path.
Deactivation/Activation
(Depending on country of sale)
Depending on version, using the centre console
button and/or in the ADAS application on the
touch screen.
► Press this button to activate or deactivate the
function.
The indicator lamp is lit when the function is
deactivated.
It is configured in the ADAS touch screen
application.
If the function is deactivated, this indicator
lamp lights up on the instrument panel.
The system status is saved when the ignition is
switched off.
The rear parking sensors are deactivated automatically if a trailer or bicycle carrier
is connected to a towing device installed in
accordance with the Manufacturer's
recommendations.
In this case, the outline of a trailer is displayed
at the rear of the image of the vehicle.
When starting the vehicle, the graphic
and audible aids are only available after
the touch screen has started up.
Operating limits
If the boot is heavily loaded, the vehicle may tilt,
affecting distance measurements.
Malfunction
In the event of a malfunction when
changing into reverse gear, these
warning lamps light up on the instrument panel,
accompanied by the display of a message and
an audible signal (short beep).
In the event of a malfunction, this
indicator lamp flashes for approximately
10 seconds when reverse gear is engaged.
Have it checked by a PEUGEOT dealer or a
qualified workshop.
Visiopark 1
For more information, refer to the
General recommendations on the use
of driving and manoeuvring aids .
When reverse gear is engaged, with the engine
running, this system displays views of the
vehicle's close surroundings
on the touch screen
using a camera located at the rear of the vehicle. CarM an uals 2 .c o m
Page 147 of 260
145
Driving
6Activation/Deactivation
It is configured in the ADAS touch screen
application.
The system's status is saved when the ignition is
switched off.
Operating limits
The system may not work in the following cases:
– T owing a trailer.
–
Using a bicycle carrier on a towing device.
–
Extreme temperature changes.
–
Damaged rear bumper
.
–
Accumulation or projection of external
elements (e.g.
mud, frost, snow), stickers
application.
It is possible that warnings are not given,
are given too late or seem unjustified.
Consequently, always stay in control of your
vehicle and be prepared to react at any time
to avoid an accident.
In the event of repainting the rear
bumper, consult the PEUGEOT dealer or
a qualified workshop; certain types of paint
could interfere with the operation of the
radars.
Malfunction
In the event of a malfunction when
engaging reverse gear, during reversing
or when the driver attempts to activate the system, this warning lamp lights up on the
instrument panel, accompanied by the display of
a message and an audible signal.
Have it checked by a PEUGEOT dealer or a
qualified workshop. CarM an uals 2 .c o m
Page 160 of 260
158
Practical information
► Disconnect the control unit's charging cable
from the domestic socket.
Accelerated charging (mode 3)
The end of charging is confirmed by the
accelerated charging unit (Wallbox) and when
the green light guides in the flap come on fixed.
►
After disconnection, replace the nozzle on to
the charging unit and close the charging flap.
Deferred charging
By default, the deferred charging start time is set
to be around midnight.
Depending on equipment, this time can be
changed.
Settings
► In the Energy touch screen
application, select the Charging tab.
►
Set the charging start time.
►
Press
OK.
The setting is saved in the system.
You can also programme the deferred charging function using a smartphone, via
the MYPEUGEOT APP application.
For more information on Remotely operable
additional functions , refer to the corresponding
section.
Activation
► After programming the deferred charging,
connect the vehicle to the desired charging
equipment.
► Press this button in the flap within one
minute to activate the deferred charging
(confirmed by the light guides coming on in
blue).
Towing device
Load distribution
► Distribute the load in the trailer so that the
heaviest items are as close as possible to the
axle, and the nose weight approaches the
maximum permitted without exceeding it.
Air density decreases with altitude, thus reducing
engine performance.
The maximum towable load
must be reduced by 10% per 1,000
metres of
altitude.
Use genuine towing devices and wiring
harnesses approved by PEUGEOT. We
recommend having them fitted by a
PEUGEOT dealer or a qualified workshop.
If not fitted by a PEUGEOT dealer, they must
still be fitted in accordance with the vehicle
manufacturer's instructions.
Important: if the vehicle has a motorised
tailgate and Hands-Free Tailgate Access
function, and a towing device has been fitted
outside the PEUGEOT dealer network, it
is essential to visit a PEUGEOT dealer or
a qualified workshop to have the detection
system recalibrated
- risk of malfunction of the
Hands-Free Tailgate Access function.
Certain driving or manoeuvring aid functions
are automatically deactivated while an
approved towing system is in use.
For more information about driving with a
towing device fitted to a trailer and associated
with the Trailer stability assist, refer to the
corresponding section.
Comply with the maximum authorised
towable weight, as indicated on your
vehicle's registration certificate, on the
manufacturer's label and in the Technical
data section of this guide.
If using accessories attached to the
towing device (e.g. bicycle carriers, tow
boxes):
–
Comply with the maximum authorised nose
weight.
–
Do not transport more than 4 conventional
bicycles or 2 electric bicycles.
When loading bicycles onto a bicycle carrier
on a towball, be sure to place the heaviest
bicycles as close as possible to the vehicle.
Observe the legislation in force in the
country where you are driving. CarM an uals 2 .c o m
Page 161 of 260
159
Practical information
7Vehicle equipped with motorised
tailgate with hands-free function
(Hands-Free Tailgate Access)
To avoid unintentionally opening the
motorised tailgate when operating the towing
device:
–
Deactivate this function in advance in the
vehicle's configuration application.
–
Or remove the electronic key from the
recognition zone, with the tailgate closed.
Towing device with quickly detachable towball
Presentation
No tools are required to install or remove this
genuine towing device.
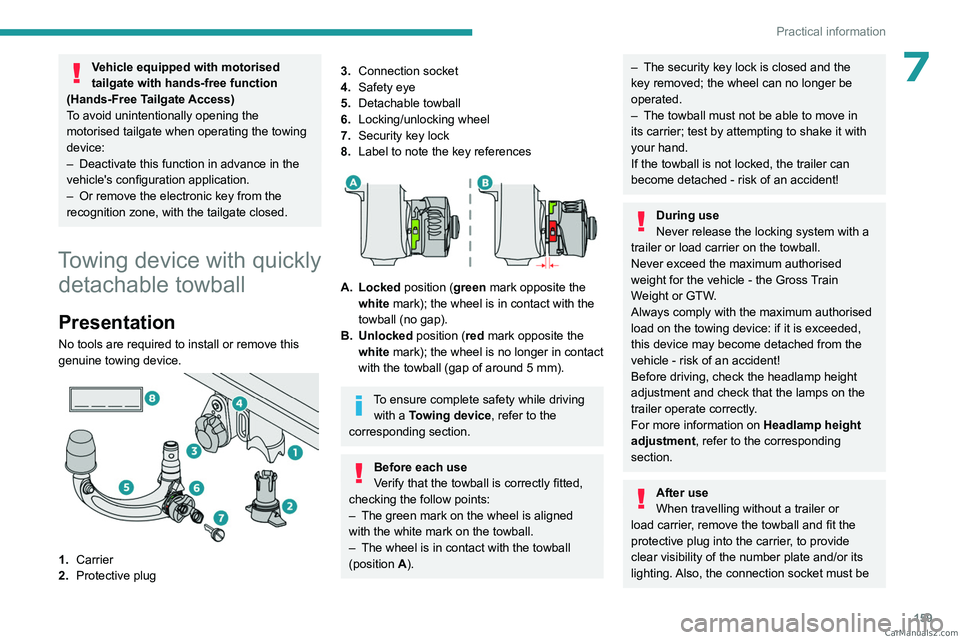
1. Carrier
2. Protective plug
3.Connection socket
4. Safety eye
5. Detachable towball
6. Locking/unlocking wheel
7. Security key lock
8. Label to note the key references
A. Locked position (green mark opposite the
white mark); the wheel is in contact with the
towball (no gap).
B. Unlocked position (red mark opposite the white mark); the wheel is no longer in contact
with the towball (gap of around 5
mm).
To ensure complete safety while driving with a Towing device , refer to the
corresponding section.
Before each use
Verify that the towball is correctly fitted,
checking the follow points:
–
The green mark on the wheel is aligned
with the white mark on the towball.
–
The wheel is in contact with the towball
(position A
).
– The security key lock is closed and the
key removed; the wheel can no longer be
operated.
–
The towball must not be able to move in
its carrier; test by attempting to shake it with
your hand.
If the towball is not locked, the trailer can
become detached - risk of an accident!
During use
Never release the locking system with a
trailer or load carrier on the towball.
Never exceed the maximum authorised
weight for the vehicle - the Gross Train
Weight or GTW.
Always comply with the maximum authorised
load on the towing device: if it is exceeded,
this device may become detached from the
vehicle - risk of an accident!
Before driving, check the headlamp height
adjustment and check that the lamps on the
trailer operate correctly.
For more information on Headlamp height
adjustment, refer to the corresponding
section.
After use
When travelling without a trailer or
load carrier, remove the towball and fit the
protective plug into the carrier, to provide
clear visibility of the number plate and/or its
lighting. Also, the connection socket must be CarM an uals 2 .c o m
Page 162 of 260
160
Practical information
tilted to the top position to avoid damaging the
equipment while driving.
Fitting the towball
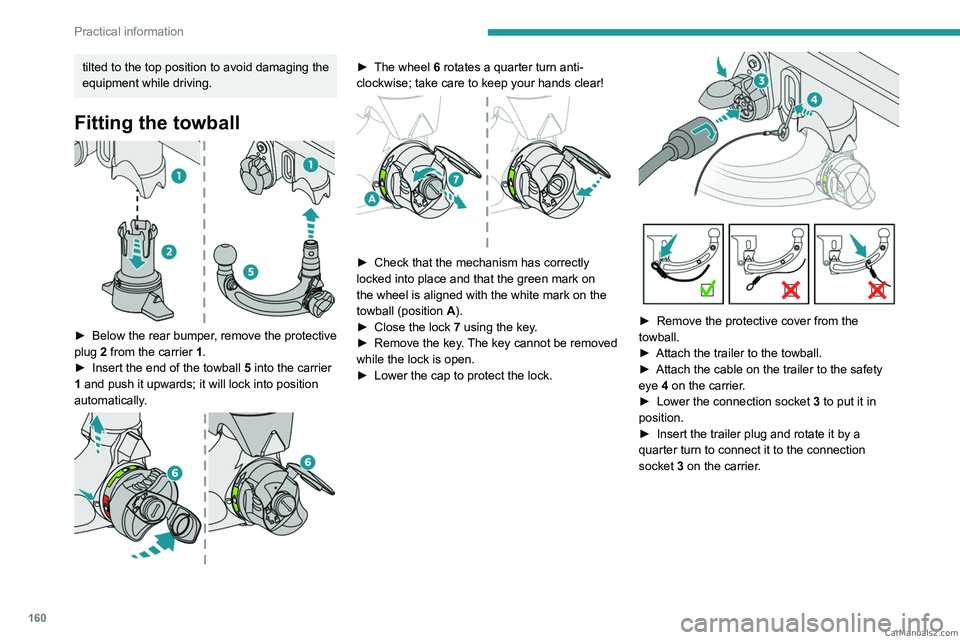
► Below the rear bumper, remove the protective
plug 2 from the carrier 1.
►
Insert the end of the towball
5 into the carrier
1 and push it upwards; it will lock into position
automatically.
► The wheel 6 rotates a quarter turn anti-
clockwise; take care to keep your hands clear!
► Check that the mechanism has correctly
locked into place and that the green mark on
the wheel is aligned with the white mark on the
towball (position A
).
►
Close the lock 7
using the key.
►
Remove the key
. The key cannot be removed
while the lock is open.
►
Lower the cap to protect the lock.
► Remove the protective cover from the
towball.
►
Attach the trailer to the towball.
►
Attach the cable on the trailer to the safety
eye
4 on the carrier.
►
Lower the connection socket 3
to put it in
position.
►
Insert the trailer plug and rotate it by a
quarter turn to connect it to the connection
socket
3 on the carrier. CarM an uals 2 .c o m