2023 PEUGEOT 308 spare wheel
[x] Cancel search: spare wheelPage 118 of 260
11 6
Driving
Cruise control - Specific
recommendations
The cruise control function does not guarantee compliance with the maximum
authorised speed and the safety distance
between vehicles, the driver remains
responsible for their driving.
In the interest of public safety, only use cruise
control if the traffic conditions enable vehicles
to drive at a steady speed and maintain an
adequate safety distance.
Remain vigilant while cruise control is
activated. If you press and hold one of the
speed setting modification buttons, your
vehicle may change speed very abruptly.
When descending a steep hill , the cruise
control system cannot prevent the vehicle
from exceeding the set speed. Brake if
necessary to control the vehicle speed.
On steep climbs or when towing, the set
speed may not be reached or maintained.
Exceeding the programmed speed
setting
You can temporarily exceed the speed
setting by pressing the accelerator pedal (the
programmed speed flashes).
To return to the speed setting, release the
accelerator pedal (when the set speed is
reached again, the displayed speed stops
flashing).
Operating limits
Never use the system in the following
situations:
–
In an urban area with the risk of
pedestrians crossing the road.
–
In heavy traffic (except versions with the
Stop
& Go function).
–
On winding or steep roads.
–
On slippery or flooded roads.
–
In poor weather conditions.
–
In the event of restricted visibility for the
driver
.
–
Driving on a speed circuit.
–
Driving on a rolling road.
–
When using a ‘space-saver
’ type spare
wheel.
–
When using snow chains or non-slip
covers.
Cruise control
For more information, refer to the
General recommendations on the use
of driving and manoeuvring aids and the
Specific recommendations on cruise
control.
This system automatically maintains the vehicle’s speed at the value programmed
by the driver (speed setting), without the use of
the accelerator pedal.
Cruise control is switched on manually.
It requires a minimum vehicle speed of 25 mph
(40 km/h).
With a manual gearbox, whichever gear is
engaged.
With an automatic gearbox, mode
D
or second
gear or higher in mode
M
must be engaged.
Cruise control remains active after
changing gear, regardless of the gearbox
type, on engines fitted with the Stop & Start
function.
Switching off the ignition cancels any
speed setting.
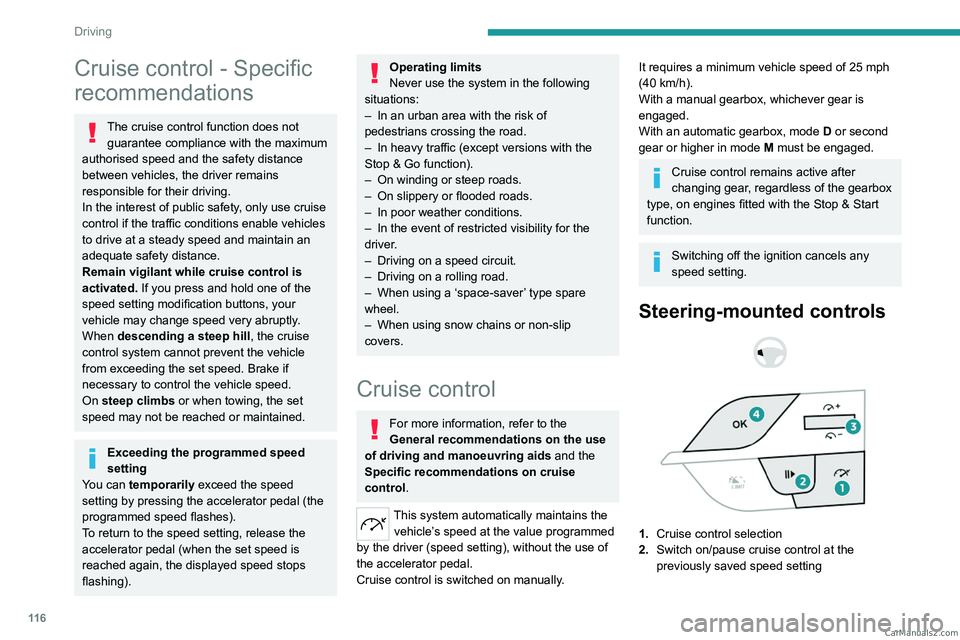
Steering-mounted controls
1. Cruise control selection
2. Switch on/pause cruise control at the
previously saved speed setting CarM an uals 2 .c o m
Page 125 of 260
123
Driving
6can lead to an incorrect evaluation of
distances and result in inappropriate
acceleration or braking of the vehicle.
Pay particular attention:
– When motorcycles are present and
when there are vehicles staggered across the
traffic lane.
–
When entering a tunnel or crossing a
bridge.
If any of the following malfunctions
occurs, do not use the system:
–
Following an impact on the windscreen
close to the camera or on the front bumper
.
–
If a brake lamp is not working.
If the vehicle has undergone any of the
following modifications, do not use the
system:
–
Carrying long objects on roof bars.
–
Towing.
–
Front end of the vehicle modified (for
example by adding long-range headlamps or
painting the front bumper).
–
Obstructed radar
.
Malfunction
In the event of a malfunction, dashes are
displayed (orange) instead of the speed setting.
This warning lamp comes on, accompanied by a message and an
audible signal, to confirm the malfunction.
Have it checked by a PEUGEOT dealer or a
qualified workshop.
Lane positioning assist
For more information, refer to the
General recommendations on the use
of driving and manoeuvring aids .
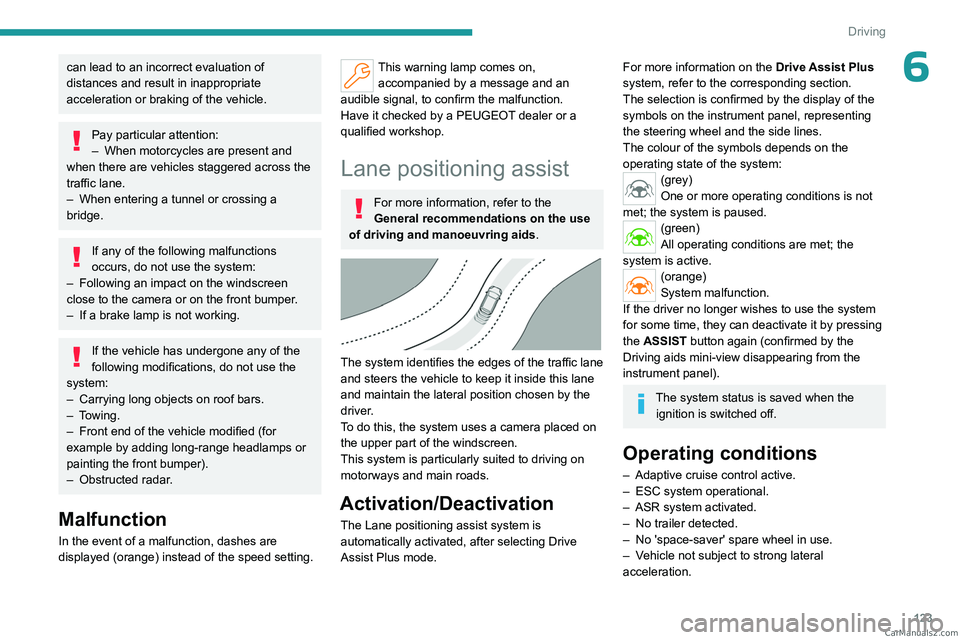
The system identifies the edges of the traffic lane
and steers the vehicle to keep it inside this lane
and maintain the lateral position chosen by the
driver.
To do this, the system uses a camera placed on
the upper part of the windscreen.
This system is particularly suited to driving on
motorways and main roads.
Activation/Deactivation
The Lane positioning assist system is
automatically activated, after selecting Drive
Assist Plus mode.
For more information on the Drive Assist Plus
system, refer to the corresponding section.
The selection is confirmed by the display of the
symbols on the instrument panel, representing
the steering wheel and the side lines.
The colour of the symbols depends on the
operating state of the system:
(grey)
One or more operating conditions is not
met; the system is paused.
(green)
All operating conditions are met; the
system is active.
(orange)
System malfunction.
If the driver no longer wishes to use the system
for some time, they can deactivate it by pressing
the ASSIST button again (confirmed by the
Driving aids mini-view disappearing from the
instrument panel).
The system status is saved when the ignition is switched off.
Operating conditions
– Adaptive cruise control active.
– ESC system operational.
–
ASR system activated.
–
No trailer detected.
–
No 'space-saver' spare wheel in use.
–
V
ehicle not subject to strong lateral
acceleration. CarM an uals 2 .c o m
Page 133 of 260

131
Driving
6(50 km/h), if both sensors are able to detect
the thread.
The system also takes motorcyclists into account.
It may also react on animals. Animals
(especially animals smaller than 0.5
m)
and objects on the road are not necessarily
detected.
This system includes three functions:
–
Collision
Risk Alert.
–
Intelligent emergency braking assistance
(iEBA).
–
Active Safety Brake (automatic emergency
braking).
The vehicle has a multifunction camera located
at the top of the windscreen and, depending on
version, a radar located in the front bumper.
This system does not replace the need for driver vigilance.
This system is designed to assist the driver
and improve road safety.
It is the driver's responsibility to continuously
monitor traffic conditions in accordance with
applicable driving regulations.
As soon as the system detects a potential collision, it prepares the braking
circuit. This may cause a slight noise and a
slight sensation of deceleration.
Deactivation/Activation
By default, the system is automatically activated
at every engine start.
It is configured in the ADAS touch screen
application.
Deactivation of the system is signalled by
the illumination of this warning lamp,
accompanied by the display of a message.
Operating conditions and
limits
Vehicle moving forward without trailer.
Brake system operational.
ASR system activated.
Seat belts fastened for all passengers.
Stabilised speed on roads with no or low
curvature.
This warning lamp lights up on the instrument panel without any additional
message, to indicate that the automatic braking
system is not available.
This is a normal behavior indicating that a
condition is not fulfilled and which does not
request the support of a workshop.
In any situations with ignition on where automatic
braking presents a risk, deactivating the system
via the driving aids touch screen application is
recommended, for instance:
–
Carrying long objects on roof bars.
–
Using an automatic car wash.
–
Performing any maintenance (e.g.
changing a
wheel, working inside the engine compartment).
–
Placing the vehicle on a rolling bench in a
workshop.
–
T
owing the vehicle.
–
Following a damage of the windscreen close
to the detection camera.
The system is automatically deactivated if:
–
A
spare wheel with a too small diameter is
detected.
–
A
fault with the brake pedal switch or with
the right or left brake lamp is detected.
–
A
fault in the sensors, in the electronic or in
the brake system is detected.
–
A
trailer is detected by the equipped vehicle
hitch (with an electrical connection plug).
–
A
severe crash (e.g. with airbag
deployment) is detected.
In case the detection is degraded or
temporarily unavailable by environment
conditions, then a driver indication is not CarM an uals 2 .c o m
Page 138 of 260
136
Driving
the central dividing line marking on the road
surface disappears).
Operation
As soon as the system identifies a risk of
involuntarily crossing one of the lane markings
detected on the ground or a lane boundary
(e.g. grass verge), it performs the trajectory correction necessary to restore the vehicle to its
original lane.
The driver will notice a turning movement of the
steering wheel.This warning lamp flashes during
trajectory correction.
The driver can prevent the correction by firmly holding the steering wheel
(e.g.
during an emergency manoeuvre).
The correction is interrupted immediately if
the direction indicators are operated.
While the direction indicators are activated and
for a few seconds after switching them off, the
system considers that a change of trajectory is
intentional and no correction is triggered during
this period.
Driving situations and related alerts
The table below describes the alerts and messages displayed in different driving situations.
The actual order of display of these alerts may be different.
Function status DisplayComments
OFF
Function deactivated.
ON None.System active, conditions not met:
–
Speed below 40 mph (65
km/h).
–
No lane marking recognised.
–
ESC operation triggered.
–
"Sporty" driving.
ON
Automatic deactivation/standby of the function (e.g. detection of a trailer, use of the
"space-saver" type spare wheel supplied with the vehicle, failure).
ON None.Lane marking detected.
Speed above 40 mph (65
km/h).
ON
The system corrects the trajectory on the side where the risk of line cr\
ossing is detected.
The driver's hands are on the steering wheel. CarM an uals 2 .c o m
Page 139 of 260
137
Driving
6Function statusDisplayComments
ON
"Hold the steering
wheel" or "Stay in lane" (depending on version) If, while correcting the trajectory, the system determines that the correction will not be
enough and that a solid line will be crossed: the driver is warned that \
they must provide
additional trajectory adjustment.
If the steering wheel is not held properly, an audible warning sounds, accompanied by
a message, until the trajectory correction is completed or the driver ha\
s grasped the
steering wheel correctly.
The duration of audible warnings will increase if multiple corrections a\
re performed
in quick succession. The warning will become continuous, persisting until the driver
responds.
Operating limits
The system goes into standby automatically in
the following cases:
–
ESC deactivated or operation triggered.
–
Speed below 40 mph (65
km/h) or greater
than 112 mph (180
km/h).
–
Electrical connection to a trailer
.
–
Use of a"space-saver" spare wheel detected
(as detection is not immediate, deactivation of
the system is recommended).
–
Dynamic driving style detected, pressure on
the brake or accelerator pedal.
–
Driving over lane markings.
–
Activation
of the direction indicators.
–
Crossing the inside line on a bend.
–
Driving on a tight bend.
–
Inactivity by the driver detected during
correction.
–
Narrow lane detected.
The following situations may interfere with the operation of the system or
prevent it from working:
–
Insufficient contrast between the road
surface and the verge or hard shoulder
(e.g.
shade).
–
Lane markings worn, hidden (snow
, mud)
or multiple (roadworks, etc.),
–
Close proximity to the vehicle in front (lane
markings may not be detected).
–
Roads that are narrow
, winding.
Risk of undesirable operation
The system should be deactivated in the
following situations:
–
When changing a wheel or working near a
wheel.
–
T
owing or with a bicycle carrier on a towing
device, especially with trailer not plugged in or
not approved. –
Road in poor condition, unstable or with very
poor grip (risk of aquaplaning, snow
, ice).
–
Adverse weather conditions.
–
Driving on racing circuits.
–
Driving on a rolling road.
Deactivation/Activation
By default, the system is automatically activated
at every engine start.
It is configured in the ADAS touch screen
application.
or
Direct access to the Shortcuts for driving aids .
Deactivation is confirmed by the
illumination of this indicator lamp on the
instrument panel.
Malfunction
In the event of a malfunction,
these warning lamps light up on CarM an uals 2 .c o m
Page 166 of 260
164
Practical information
Lower/upper screens
► Offer up one of the lower screens on the
corresponding side of the lower bumper grille,
aligning it around the number plate holder
.
►
Insert the fixing lugs into the bumper until
they are all properly seated.
►
Check that the unit is firmly held by pressing
around the edges.
Repeat the same steps for the other lower
screen, then for the upper screens in the upper
bumper grille, aligning them with the top of the
grille.
Centre screen
► Offer up the centre screen below the brand
badge.
►
Insert the fixing lugs into the bumper until
they are all properly seated.
►
Check that the unit is firmly held by pressing
around the edges.
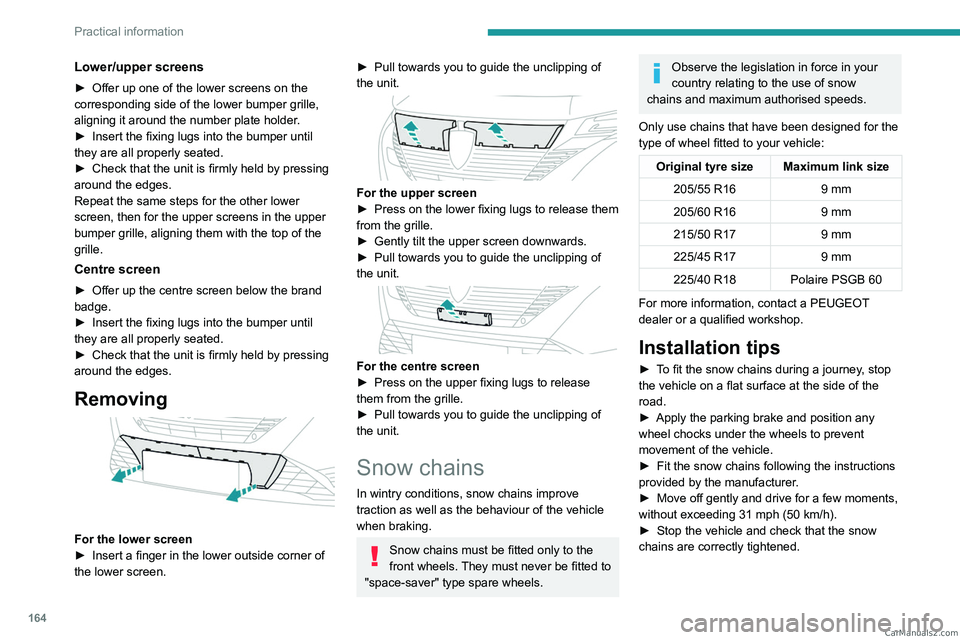
Removing
For the lower screen
► Insert a finger in the lower outside corner of
the lower screen.
► Pull towards you to guide the unclipping of
the unit.
For the upper screen
► Press on the lower fixing lugs to release them
from the grille.
►
Gently tilt the upper screen downwards.
►
Pull towards you to guide the unclipping of
the unit.
For the centre screen
► Press on the upper fixing lugs to release
them from the grille.
►
Pull towards you to guide the unclipping of
the unit.
Snow chains
In wintry conditions, snow chains improve
traction as well as the behaviour of the vehicle
when braking.
Snow chains must be fitted only to the
front wheels. They must never be fitted to
"space-saver" type spare wheels.
Observe the legislation in force in your
country relating to the use of snow
chains and maximum authorised speeds.
Only use chains that have been designed for the
type of wheel fitted to your vehicle:
Original tyre size Maximum link size 205/55 R16 9 mm
205/60 R16 9 mm
215/50 R17 9 mm
225/45 R17 9 mm
225/40 R18 Polaire PSGB 60
For more information, contact a PEUGEOT
dealer or a qualified workshop.
Installation tips
► To fit the snow chains during a journey, stop
the vehicle on a flat surface at the side of the
road.
►
Apply the parking brake and position any
wheel chocks under the wheels to prevent
movement of the vehicle.
►
Fit the snow chains following the instructions
provided by the manufacturer
.
►
Move off gently and drive for a few moments,
without exceeding 31
mph (50 km/h).
►
Stop the vehicle and check that the snow
chains are correctly tightened. CarM an uals 2 .c o m
Page 172 of 260
170
Practical information
necessary to have the condition of the brakes
checked, even between vehicle services.
Unless there is a leak in the circuit, a drop in the
brake fluid level indicates that the brake pads
are worn.
After washing the vehicle, moisture, or in wintry conditions, ice can form on the
brake discs and pads: braking efficiency may
be reduced. Gently dab the brakes to dry and
defrost them.
Brake disc wear
For information on checking brake disc
wear, contact a PEUGEOT dealer or a
qualified workshop.
Electric parking brake
This system does not require any routine servicing. However, in the event of a
problem, do not hesitate to have the system
checked by a PEUGEOT dealer or a qualified
workshop.
For more information on the Electric
parking brake, refer to the
corresponding section.
Wheels and tyres
The inflation pressure of all tyres, including the spare wheel, must be
checked on "cold” tyres.
The pressures indicated on the tyre pressure
label are valid for "cold" tyres. If you have driven
for more than 10 minutes or more than 6 miles
(10 kilometres) at over 31 mph (50
km/h), add
0.3 bar (30 kPa) to the values indicated on the
label.
Under-inflation increases energy
consumption. Non-compliant tyre
pressures cause tyres to wear prematurely
and have an adverse effect on the vehicle's
road holding - risk of accident!
Driving with worn or damaged tyres reduces the
braking and road holding performance of the
vehicle. Regularly check the condition of the
tyres (tread and sidewalls) and rims as well as
the presence of the valve caps.
When the wear indicators no longer appear set
back from the tread, the depth of the grooves is
less than 1.6 mm; replace the tyres as soon as
possible.
Using different size wheels and tyres from those
specified can affect the lifetime of tyres, wheel
rotation, ground clearance, the speedometer
reading and have an adverse effect on road
holding.
Fitting different tyres on the front and rear axles
can cause the ESC to mistime.
Always mark the direction of rotation on the tyres
that will be stored when fitting winter or summer
tyres. Store them in a cool, dry place and away
from direct exposure to the sun's rays.
Winter or 4-seasons tyres can be
identified by this symbol on their
sidewalls.
Shock absorbers
It is not easy for drivers to detect when
shock absorbers are worn. Nevertheless,
the shock absorbers have a major impact on
road holding and braking performance.
For your safety and driving comfort, it is
important to have them regularly checked by a
PEUGEOT dealer or a qualified workshop.
Timing and accessory kits
The timing and accessory kits are used
from the time the engine is started until it
is switched off. It is normal for them to wear over
time.
A
faulty timing or accessory kit can damage
the engine, rendering it unusable. Observe the
recommended replacement frequency, stated in
distance travelled or time elapsed, whichever is
reached first.
AdBlue® (BlueHDi)
To respect the environment and ensure compliance with the Euro 6 standard, without
adversely affecting the performance or fuel
consumption of its Diesel engines, PEUGEOT
has taken the decision to equip its vehicles with
a system that combines SCR (Selective Catalytic CarM an uals 2 .c o m
Page 178 of 260
176
In the event of a breakdown
Warning triangle
This reflective and dismantlable device is to be
installed on the side of the road when a vehicle
is broken down or damaged.
Before getting out of the vehicle
Turn on the hazard warning lamps, then
put on the safety vest to assemble and install
the triangle.
Storage
Hatchback
A compartment is provided in the storage box,
located under the boot carpet.
SW
A compartment is provided in the interior trim of
the tailgate.
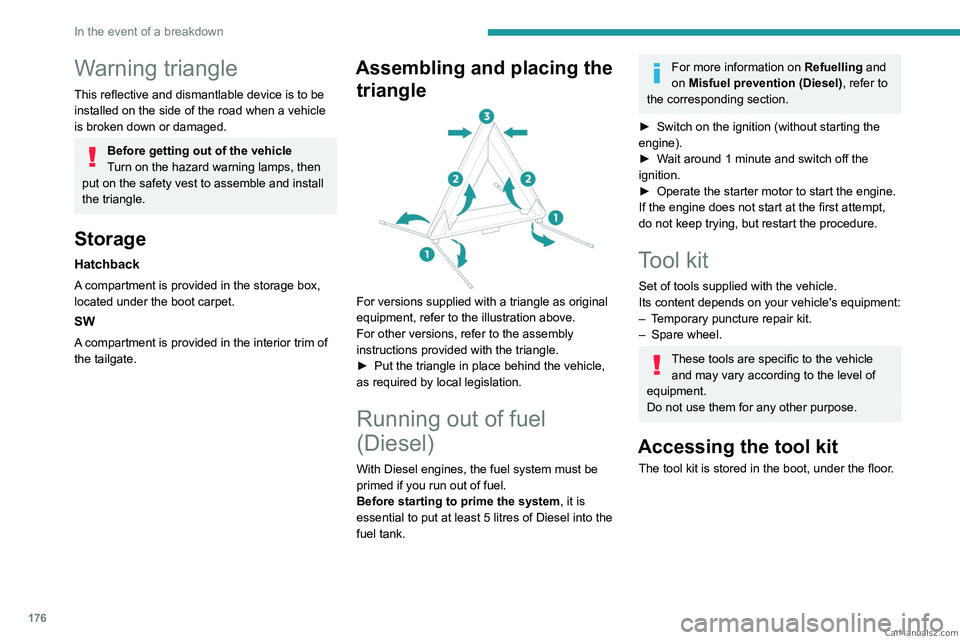
Assembling and placing the triangle
For versions supplied with a triangle as original
equipment, refer to the illustration above.
For other versions, refer to the assembly
instructions provided with the triangle.
►
Put the triangle in place behind the vehicle,
as required by local legislation.
Running out of fuel
(Diesel)
With Diesel engines, the fuel system must be
primed if you run out of fuel.
Before starting to prime the system, it is
essential to put at least 5 litres of Diesel into the
fuel tank.
For more information on Refuelling and
on Misfuel prevention (Diesel), refer to
the corresponding section.
►
Switch on the ignition (without starting the
engine).
►
W
ait around 1 minute and switch off the
ignition.
►
Operate the starter motor to start the engine.
If the engine does not start at the first attempt,
do not keep trying, but restart the procedure.
Tool kit
Set of tools supplied with the vehicle.
Its content depends on your vehicle's equipment:
–
T
emporary puncture repair kit.
–
Spare wheel.
These tools are specific to the vehicle and may vary according to the level of
equipment.
Do not use them for any other purpose.
Accessing the tool kit
The tool kit is stored in the boot, under the floor. CarM an uals 2 .c o m