2023 PEUGEOT 3008 lock
[x] Cancel search: lockPage 54 of 292
52
Ease of use and comfort
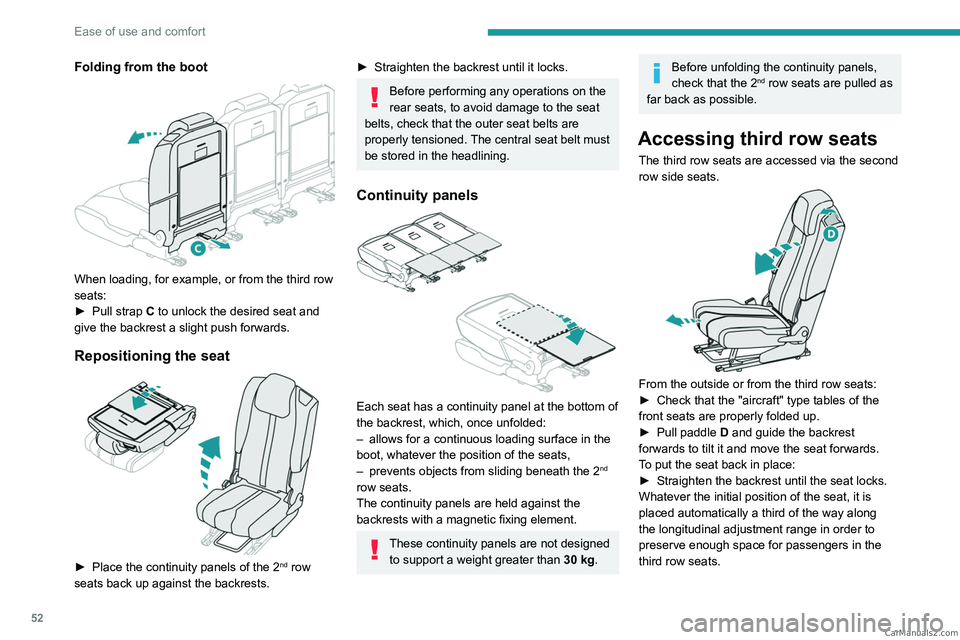
Folding from the boot
When loading, for example, or from the third row
seats:
►
Pull strap
C to unlock the desired seat and
give the backrest a slight push forwards.
Repositioning the seat
► Place the continuity panels of the 2nd row
seats back up against the backrests.
► Straighten the backrest until it locks.
Before performing any operations on the
rear seats, to avoid damage to the seat
belts, check that the outer seat belts are
properly tensioned. The central seat belt must
be stored in the headlining.
Continuity panels
Each seat has a continuity panel at the bottom of
the backrest, which, once unfolded:
–
allows for a continuous loading surface in the
boot, whatever the position of the seats,
–
prevents objects from sliding beneath the 2nd
row seats.
The continuity panels are held against the
backrests with a magnetic fixing element.
These continuity panels are not designed to support a weight greater than 30
kg.
Before unfolding the continuity panels,
check that the 2nd row seats are pulled as
far back as possible.
Accessing third row seats
The third row seats are accessed via the second
row side seats.
From the outside or from the third row seats:
► Check that the "aircraft" type tables of the
front seats are properly folded up.
►
Pull paddle D
and guide the backrest
forwards to tilt it and move the seat forwards.
To put the seat back in place:
►
Straighten the backrest until the seat locks.
Whatever the initial position of the seat, it is
placed automatically a third of the way along
the longitudinal adjustment range in order to
preserve enough space for passengers in the
third row seats. CarM an uals 2 .c o m
Page 55 of 292
53
Ease of use and comfort
3If this system fails (paddle D), the third
row passengers can also get out after
having folded the backrest of the second row
seats using strap C.
Do not let children operate the seats
unsupervised.
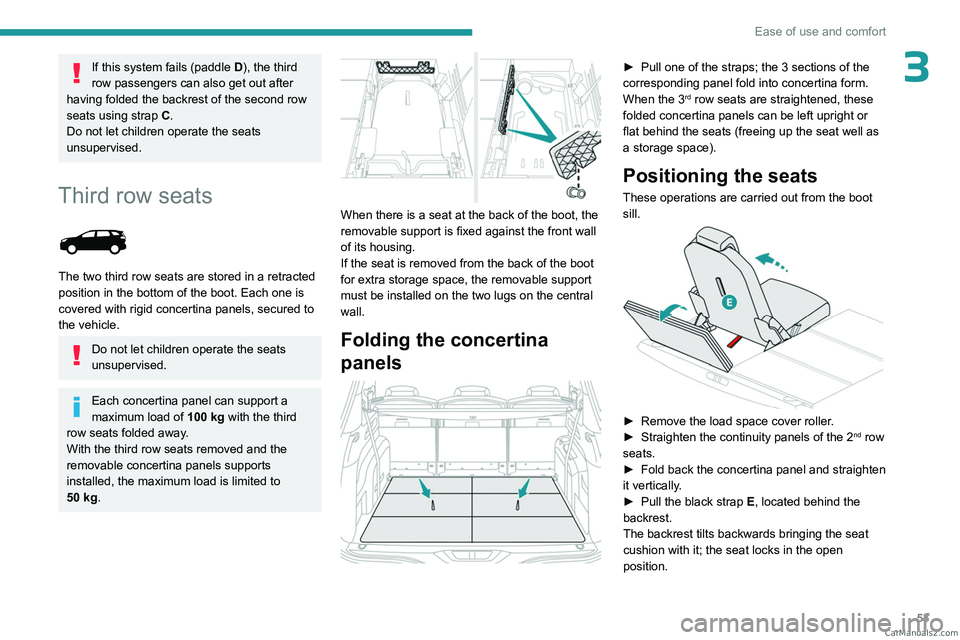
Third row seats
The two third row seats are stored in a retracted
position in the bottom of the boot. Each one is
covered with rigid concertina panels, secured to
the vehicle.
Do not let children operate the seats
unsupervised.
Each concertina panel can support a
maximum load of 100
kg with the third
row seats folded away.
With the third row seats removed and the
removable concertina panels supports
installed, the maximum load is limited to
50
kg.
When there is a seat at the back of the boot, the
removable support is fixed against the front wall
of its housing.
If the seat is removed from the back of the boot
for extra storage space, the removable support
must be installed on the two lugs on the central
wall.
Folding the concertina
panels
► Pull one of the straps; the 3 sections of the
corresponding panel fold into concertina form.
When the 3
rd row seats are straightened, these
folded concertina panels can be left upright or
flat behind the seats (freeing up the seat well as
a storage space).
Positioning the seats
These operations are carried out from the boot
sill.
► Remove the load space cover roller .
► Straighten the continuity panels of the 2nd row
seats.
►
Fold back the concertina panel and straighten
it vertically
.
►
Pull the black strap E
, located behind the
backrest.
The backrest tilts backwards bringing the seat
cushion with it; the seat locks in the open
position. CarM an uals 2 .c o m
Page 56 of 292
54
Ease of use and comfort
The load space cover roller can be stored behind
the backrests of the 3rd row seats.
For more information on the Boot fittings, and
in particular the load space cover roller, refer to
the corresponding section.
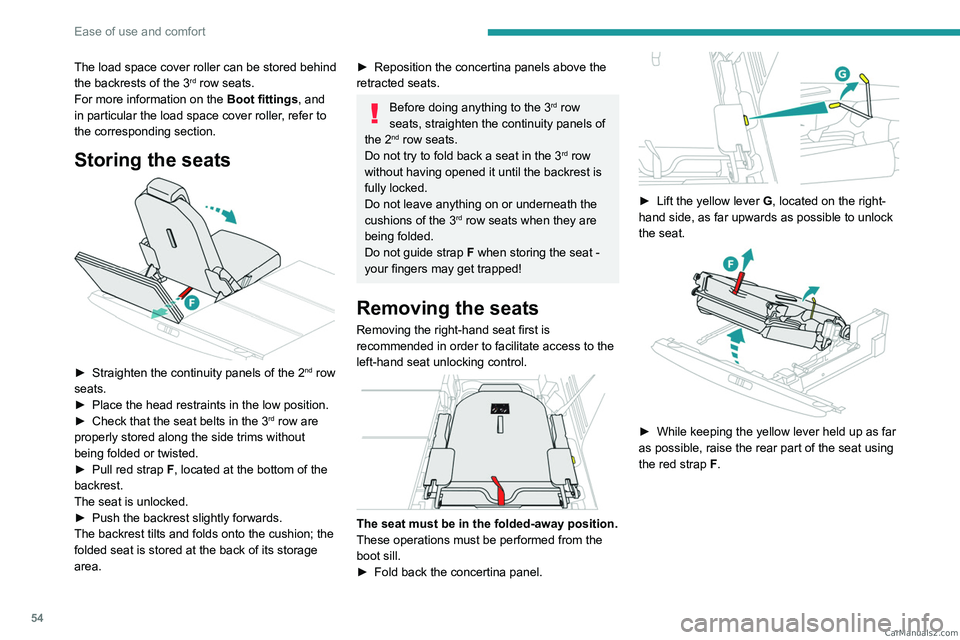
Storing the seats
► Straighten the continuity panels of the 2nd row
seats.
►
Place the head restraints in the low position.
►
Check that the seat belts in the 3rd row are
properly stored along the side trims without
being folded or twisted.
►
Pull red strap
F, located at the bottom of the
backrest.
The seat is unlocked.
►
Push the backrest slightly forwards.
The backrest tilts and folds onto the cushion; the
folded seat is stored at the back of its storage
area.
► Reposition the concertina panels above the
retracted seats.
Before doing anything to the 3rd row
seats, straighten the continuity panels of
the 2
nd row seats.
Do not try to fold back a seat in the 3rd row
without having opened it until the backrest is
fully locked.
Do not leave anything on or underneath the
cushions of the 3
rd row seats when they are
being folded.
Do not guide strap F when storing the seat -
your fingers may get trapped!
Removing the seats
Removing the right-hand seat first is
recommended in order to facilitate access to the
left-hand seat unlocking control.
The seat must be in the folded-away position.
These operations must be performed from the
boot sill.
►
Fold back the concertina panel.
► Lift the yellow lever G , located on the right-
hand side, as far upwards as possible to unlock
the seat.
► While keeping the yellow lever held up as far
as possible, raise the rear part of the seat using
the red strap
F.
CarM an uals 2 .c o m
Page 57 of 292
55
Ease of use and comfort
3
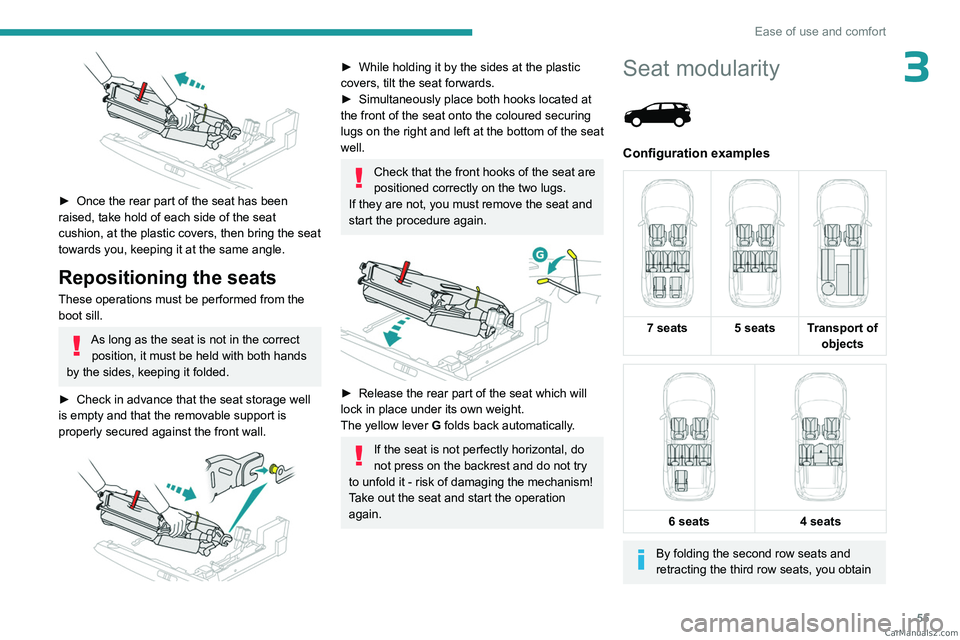
► Once the rear part of the seat has been
raised, take hold of each side of the seat
cushion, at the plastic covers, then bring the seat
towards you, keeping it at the same angle.
Repositioning the seats
These operations must be performed from the
boot sill.
As long as the seat is not in the correct position, it must be held with both hands
by the sides, keeping it folded.
►
Check in advance that the seat storage well
is empty and that the removable support is
properly secured against the front wall.
► While holding it by the sides at the plastic
covers, tilt the seat forwards.
►
Simultaneously place both hooks located at
the front of the seat onto the coloured securing
lugs on the right and left
at the bottom of the seat
well.
Check that the front hooks of the seat are
positioned correctly on the two lugs.
If they are not, you must remove the seat and
start the procedure again.
► Release the rear part of the seat which will
lock in place under its own weight.
The yellow lever G
folds back automatically.
If the seat is not perfectly horizontal, do
not press on the backrest and do not try
to unfold it - risk of damaging the mechanism!
Take out the seat and start the operation
again.
Seat modularity
Configuration examples
7 seats 5 seats Transport of
objects
6 seats
4 seats
By folding the second row seats and
retracting the third row seats, you obtain CarM an uals 2 .c o m
Page 64 of 292
62
Ease of use and comfort
For more information on Remote functions,
refer to the corresponding section.
The fan noise that occurs during temperature pre-conditioning is perfectly
normal.
Operating conditions
– The function is only activated when the
ignition is switched off and the
vehicle
locked.
–
When the vehicle is not connected, the
function is only activated if the battery charge
level is greater than 20%.
–
When the vehicle is not connected and a
recurring programme is active (e.g. from Monday
to Friday), if two temperature pre-conditioning
sequences are run without the vehicle being
used, the programme will be deactivated.
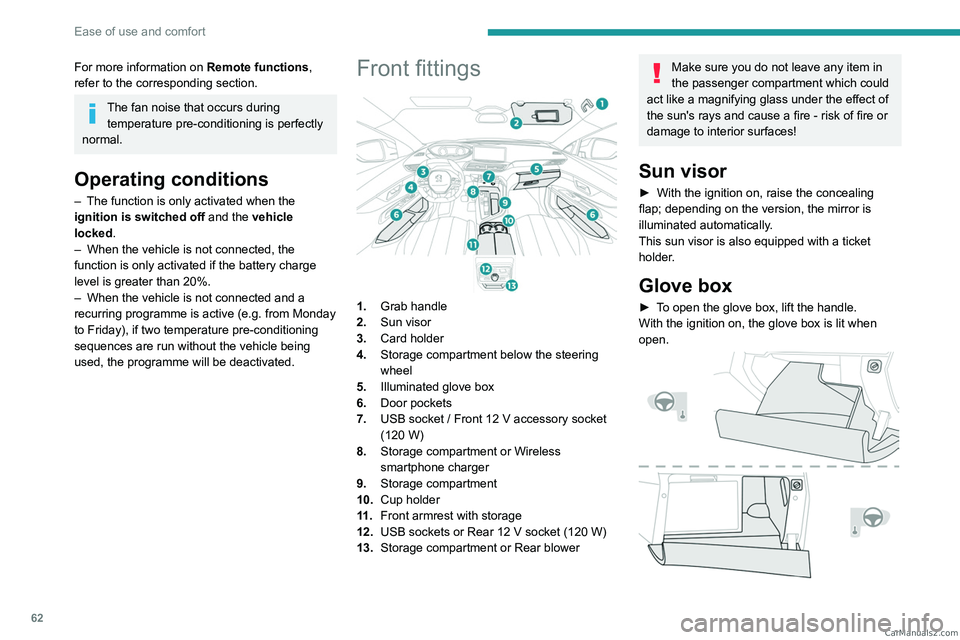
Front fittings
1. Grab handle
2. Sun visor
3. Card holder
4. Storage compartment below the steering
wheel
5. Illuminated glove box
6. Door pockets
7. USB socket
/ Front 12 V accessory socket
(120
W)
8. Storage compartment or Wireless
smartphone charger
9. Storage compartment
10. Cup holder
11 . Front armrest with storage
12. USB sockets or Rear 12
V socket (120 W)
13. Storage compartment or Rear blower
Make sure you do not leave any item in
the passenger compartment which could
act like a magnifying glass under the effect of
the sun's rays and cause a fire - risk of fire or
damage to interior surfaces!
Sun visor
► With the ignition on, raise the concealing
flap; depending on the version, the mirror is
illuminated automatically
.
This sun visor is also equipped with a ticket
holder.
Glove box
► To open the glove box, lift the handle.
With the ignition on, the glove box is lit when
open.
CarM an uals 2 .c o m
Page 67 of 292
65
Ease of use and comfort
3– remove the device and try again in a quarter
of an hour .
If the problem persists, have the system checked
by a PEUGEOT dealer or a qualified workshop.
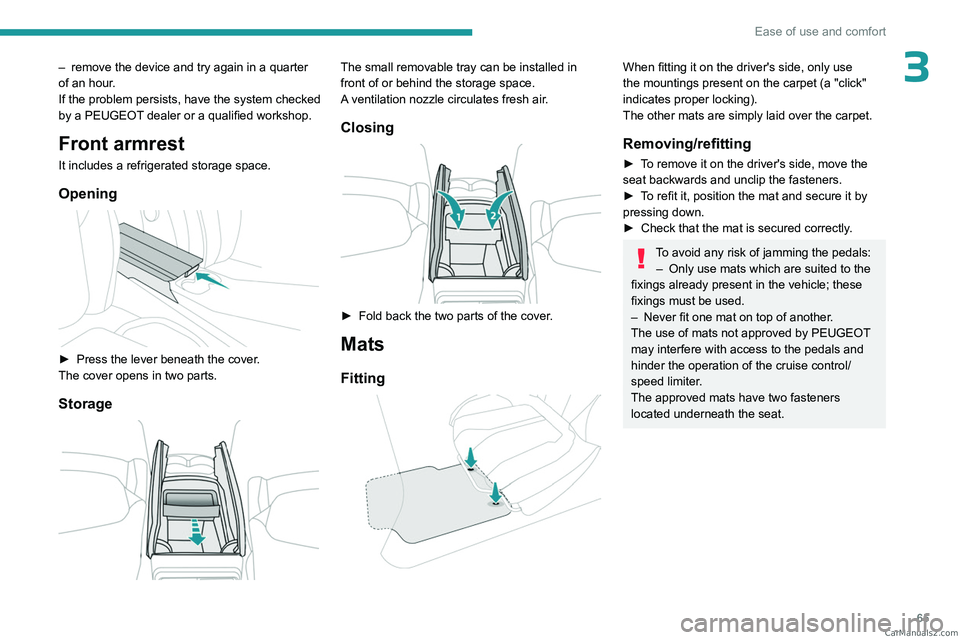
Front armrest
It includes a refrigerated storage space.
Opening
► Press the lever beneath the cover.
The cover opens in two parts.
Storage
The small removable tray can be installed in
front of or behind the storage space.
A ventilation nozzle circulates fresh air.
Closing
► Fold back the two parts of the cover .
Mats
Fitting
When fitting it on the driver's side, only use
the mountings present on the carpet (a "click"
indicates proper locking).
The other mats are simply laid over the carpet.
Removing/refitting
► To remove it on the driver's side, move the
seat backwards and unclip the fasteners.
►
T
o refit it, position the mat and secure it by
pressing down.
►
Check that the mat is secured correctly
.
To avoid any risk of jamming the pedals:– Only use mats which are suited to the
fixings already present in the vehicle; these
fixings must be used.
–
Never fit one mat on top of another
.
The use of mats not approved by PEUGEOT
may interfere with access to the pedals and
hinder the operation of the cruise control/
speed limiter.
The approved mats have two fasteners
located underneath the seat. CarM an uals 2 .c o m
Page 68 of 292
66
Ease of use and comfort
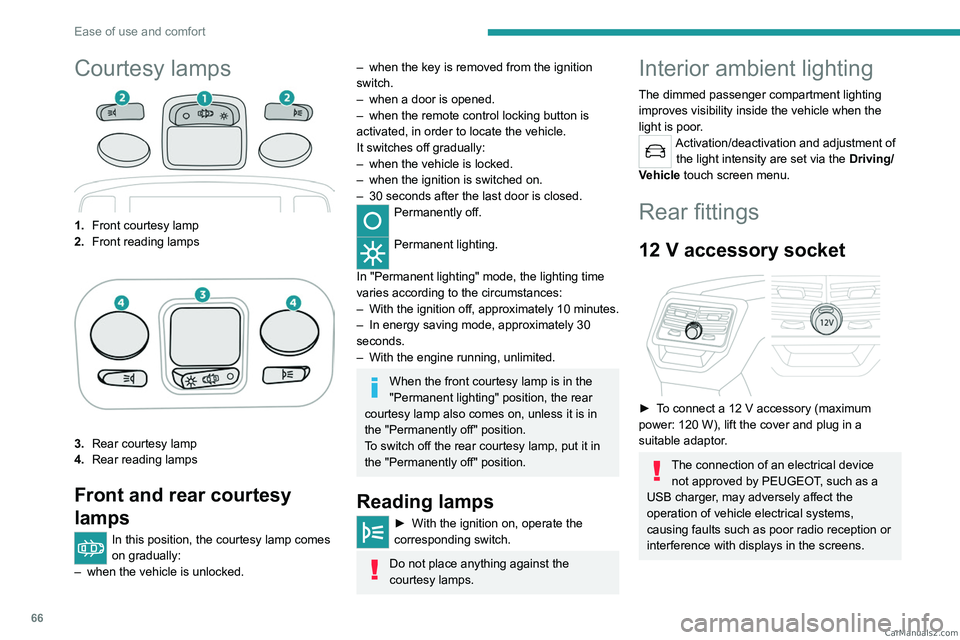
Courtesy lamps
1.Front courtesy lamp
2. Front reading lamps
3.Rear courtesy lamp
4. Rear reading lamps
Front and rear courtesy
lamps
In this position, the courtesy lamp comes
on gradually:
–
when the vehicle is unlocked.
– when the key is removed from the ignition
switch.
–
when a door is opened.
–
when the remote control locking button is
activated, in order to locate the vehicle.
It switches off gradually:
–
when the vehicle is locked.
–
when the ignition is switched on.
–
30 seconds after the last door is closed.
Permanently off.
Permanent lighting.
In "Permanent lighting" mode, the lighting time
varies according to the circumstances:
–
With
the ignition off, approximately 10 minutes.
–
In energy saving mode, approximately 30
seconds.
–
With the engine running, unlimited.
When the front courtesy lamp is in the
"Permanent lighting" position, the rear
courtesy lamp also comes on, unless it is in
the "Permanently off" position.
To switch off the rear courtesy lamp, put it in
the "Permanently off" position.
Reading lamps
► With the ignition on, operate the
corresponding switch.
Do not place anything against the
courtesy lamps.
Interior ambient lighting
The dimmed passenger compartment lighting
improves visibility inside the vehicle when the
light is poor.
Activation/deactivation and adjustment of the light intensity are set via the Driving/
Vehicle touch screen menu.
Rear fittings
12 V accessory socket
► To connect a 12 V accessory (maximum
power: 120 W), lift the cover and plug in a
suitable adaptor.
The connection of an electrical device not approved by PEUGEOT, such as a
USB charger, may adversely affect the
operation of vehicle electrical systems,
causing faults such as poor radio reception or
interference with displays in the screens. CarM an uals 2 .c o m
Page 69 of 292
67
Ease of use and comfort
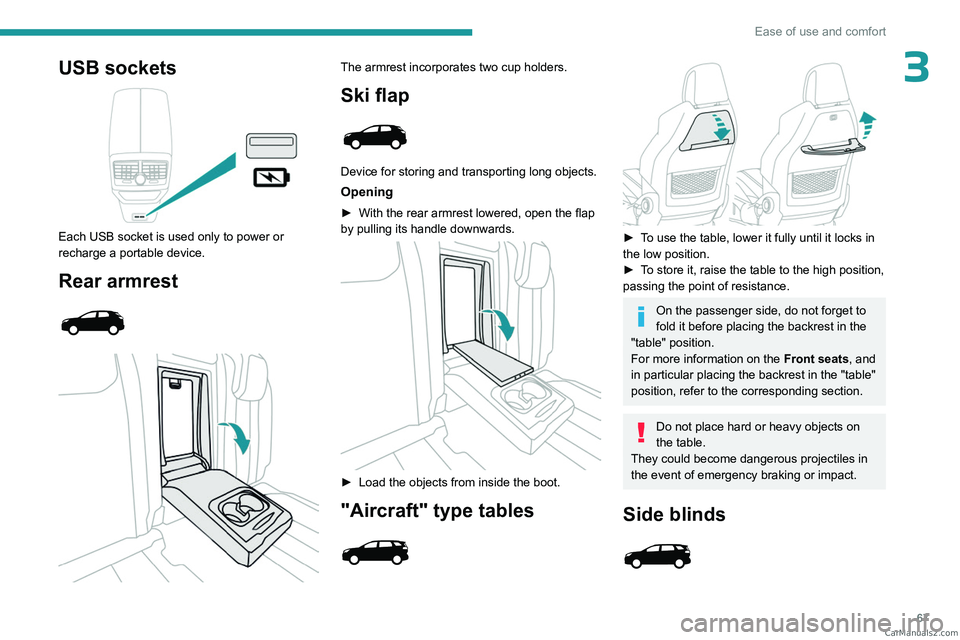
3USB sockets
Each USB socket is used only to power or
recharge a portable device.
Rear armrest
The armrest incorporates two cup holders.
Ski flap
Device for storing and transporting long objects.
Opening
► With the rear armrest lowered, open the flap
by pulling its handle downwards.
► Load the objects from inside the boot.
"Aircraft" type tables
► To use the table, lower it fully until it locks in
the low position.
►
T
o store it, raise the table to the high position,
passing the point of resistance.
On the passenger side, do not forget to
fold it before placing the backrest in the
"table" position.
For more information on the Front seats, and
in particular placing the backrest in the "table"
position, refer to the corresponding section.
Do not place hard or heavy objects on
the table.
They could become dangerous projectiles in
the event of emergency braking or impact.
Side blinds
CarM an uals 2 .c o m