2023 PEUGEOT 3008 Ready
[x] Cancel search: ReadyPage 142 of 292
140
Driving
Primarily designed for driving on main
roads and motorways, this system only
works with moving vehicles driving in the
same direction as your vehicle.
If the driver activates the direction
indicator to overtake a slower vehicle,
cruise control may temporarily reduce the
distance to the target vehicle to facilitate
overtaking, without exceeding the speed
setting.
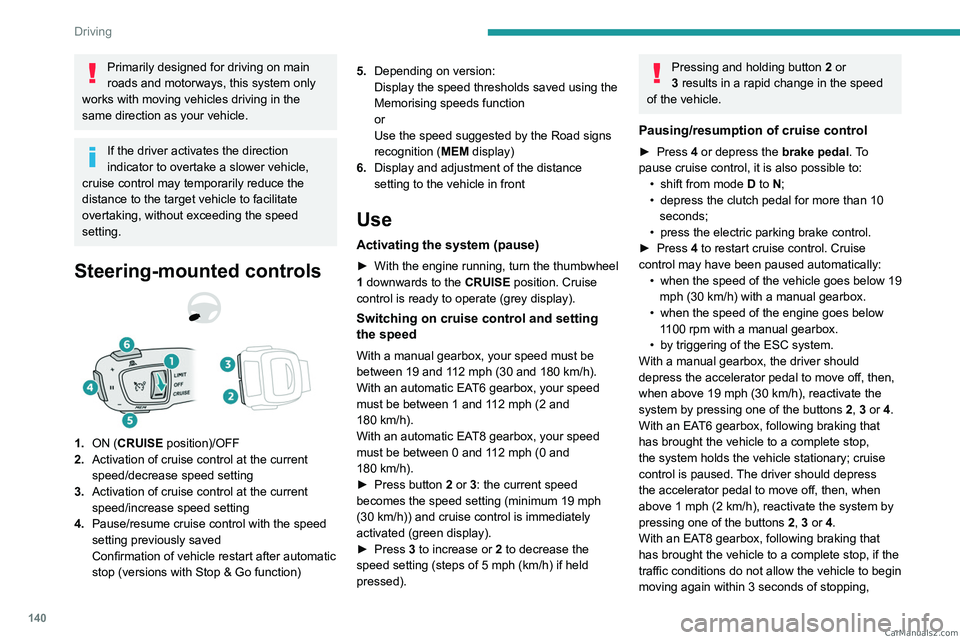
Steering-mounted controls
1. ON (CRUISE position)/OFF
2. Activation of cruise control at the current
speed/decrease speed setting
3. Activation of cruise control at the current
speed/increase speed setting
4. Pause/resume cruise control with the speed
setting previously saved
Confirmation of vehicle restart after automatic
stop (versions with Stop & Go function) 5.
Depending on version:
Display the speed thresholds saved using the
Memorising speeds function
or
Use the speed suggested by the Road signs
recognition ( MEM display)
6. Display and adjustment of the distance
setting to the vehicle in front
Use
Activating the system (pause)
► With the engine running, turn the thumbwheel
1 downwards to the CRUISE position. Cruise
control is ready to operate (grey display).
Switching on cruise control and setting
the speed
With a manual gearbox, your speed must be
between 19 and 112 mph (30 and 180 km/h).
With an automatic EAT6 gearbox, your speed
must be between 1 and 112
mph (2 and
180
km/h).
With an automatic EAT8 gearbox, your speed
must be between 0 and 112
mph (0 and
180
km/h).
►
Press button
2 or 3: the current speed
becomes the speed setting (minimum 19 mph
(30
km/h)) and cruise control is immediately
activated (green display).
►
Press
3 to increase or 2 to decrease the
speed setting (steps of 5
mph (km/h) if held
pressed).
Pressing and holding button 2 or
3 results in a rapid change in the speed
of the vehicle.
Pausing/resumption of cruise control
► Press 4 or depress the brake pedal. To
pause cruise control, it is also possible to: •
shift from mode
D to N;
•
depress the clutch pedal for more than 10
seconds;
•
press the electric parking brake control.
►
Press
4 to restart cruise control. Cruise
control may have been paused automatically: •
when
the speed of the vehicle goes below 19
mph (30
km/h) with a manual gearbox.
•
when the speed of the engine goes below
1
100 rpm with a manual gearbox.
•
by triggering of the ESC system.
With a manual gearbox, the driver should
depress the accelerator pedal to move off, then,
when above 19 mph (30
km/h), reactivate the
system by pressing one of the buttons 2, 3 or 4.
With an EAT6 gearbox, following braking that
has brought the vehicle to a complete stop,
the system holds the vehicle stationary; cruise
control is paused. The driver should depress
the accelerator pedal to move off, then, when
above 1 mph (2
km/h), reactivate the system by
pressing one of the buttons 2, 3 or 4.
With an EAT8 gearbox, following braking that
has brought the vehicle to a complete stop, if the
traffic conditions do not allow the vehicle to begin
moving again within 3
seconds of stopping, CarM an uals 2 .c o m
Page 160 of 292
158
Driving
the system is activated when the vehicle has
already moved, the view from above can be fully
displayed.
Visiopark 1
Rear view
To activate the camera located on the tailgate,
engage reverse gear and do not exceed a speed
of 6 mph (10 km/h).
The system is deactivated:
–
Automatically
, at speeds above approximately
6 mph (10
km/h),
–
Automatically
, if the tailgate is opened.
–
Upon changing out of reverse gear (the image
remains displayed for 7
seconds).
–
By pressing the white arrow in the upper-left
corner of the touch screen.
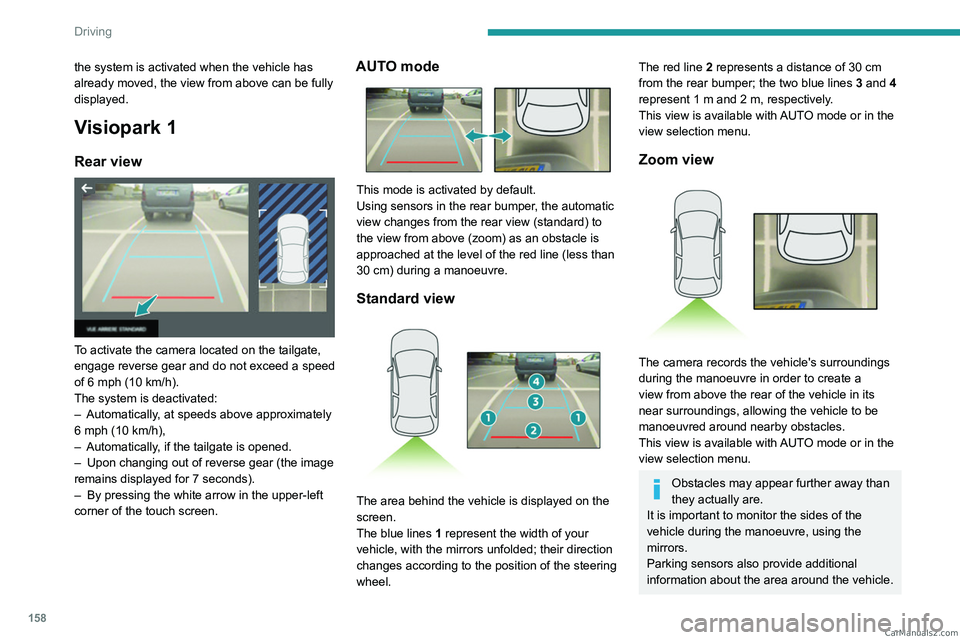
AUTO mode
This mode is activated by default.
Using sensors in the rear bumper, the automatic
view changes from the rear view (standard) to
the view from above (zoom) as an obstacle is
approached at the level of the red line (less than
30
cm) during a manoeuvre.
Standard view
The area behind the vehicle is displayed on the
screen.
The blue lines 1 represent the width of your
vehicle, with the mirrors unfolded; their direction
changes according to the position of the steering
wheel.
The red line 2 represents a distance of 30 cm
from the rear bumper; the two blue lines 3 and 4
represent 1
m and 2 m, respectively.
This view is available with AUTO mode or in the
view selection menu.
Zoom view
The camera records the vehicle's surroundings
during the manoeuvre in order to create a
view from above the rear of the vehicle in its
near surroundings, allowing the vehicle to be
manoeuvred around nearby obstacles.
This view is available with AUTO mode or in the
view selection menu.
Obstacles may appear further away than
they actually are.
It is important to monitor the sides of the
vehicle during the manoeuvre, using the
mirrors.
Parking sensors also provide additional
information about the area around the vehicle. CarM an uals 2 .c o m
Page 185 of 292
183
Practical information
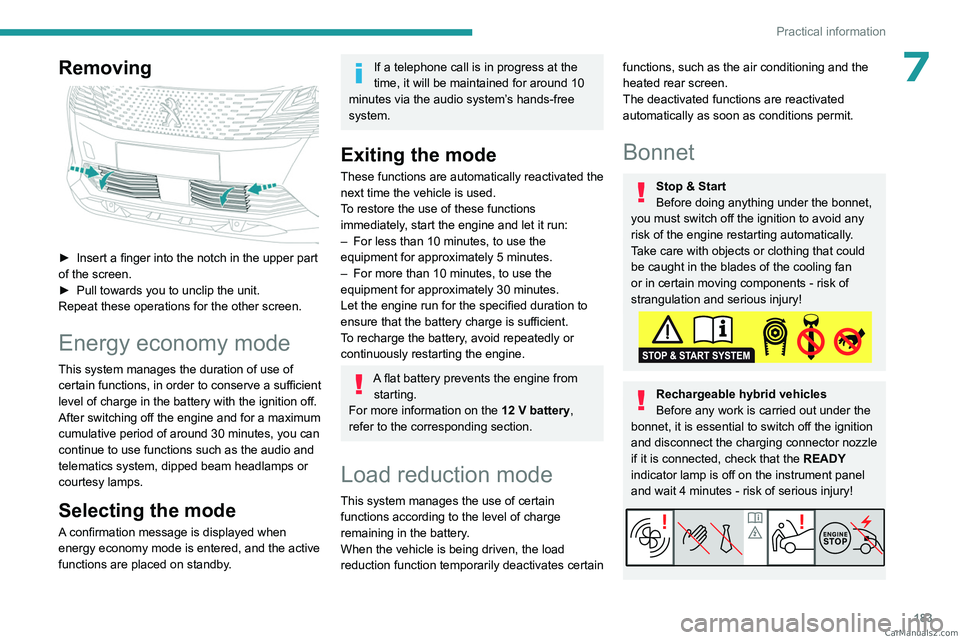
7Removing
► Insert a finger into the notch in the upper part
of the screen.
►
Pull towards you to unclip the unit.
Repeat these operations for the other screen.
Energy economy mode
This system manages the duration of use of
certain functions, in order to conserve a sufficient
level of charge in the battery with the ignition off.
After switching off the engine and for a maximum
cumulative period of around 30 minutes, you can
continue to use functions such as the audio and
telematics system, dipped beam headlamps or
courtesy lamps.
Selecting the mode
A confirmation message is displayed when
energy economy mode is entered, and the active
functions are placed on standby.
If a telephone call is in progress at the
time, it will be maintained for around 10
minutes via the audio system’s hands-free
system.
Exiting the mode
These functions are automatically reactivated the
next time the vehicle is used.
To restore the use of these functions
immediately, start the engine and let it run:
–
For less than 10 minutes, to use the
equipment for approximately 5 minutes.
–
For more than 10 minutes, to use the
equipment for approximately 30 minutes.
Let the engine run for the specified duration to
ensure that the battery charge is sufficient.
T
o recharge the battery, avoid repeatedly or
continuously restarting the engine.
A flat battery prevents the engine from starting.
For more information on the 12
V battery,
refer to the corresponding section.
Load reduction mode
This system manages the use of certain
functions according to the level of charge
remaining in the battery.
When the vehicle is being driven, the load
reduction function temporarily deactivates certain
functions, such as the air conditioning and the
heated rear screen.
The deactivated functions are reactivated
automatically as soon as conditions permit.
Bonnet
Stop & Start
Before doing anything under the bonnet,
you must switch off the ignition to avoid any
risk of the engine restarting automatically.
Take care with objects or clothing that could
be caught in the blades of the cooling fan
or in certain moving components - risk of
strangulation and serious injury!
Rechargeable hybrid vehicles
Before any work is carried out under the
bonnet, it is essential to switch off the ignition
and disconnect the charging connector nozzle
if it is connected, check that the READY
indicator lamp is off on the instrument panel
and wait 4 minutes - risk of serious injury! CarM an uals 2 .c o m
Page 214 of 292
212
In the event of a breakdown
(+) Positive terminal, protected by a red plastic
cover (not accessible).
(-) Negative terminal with a black quick-release
connector.
Charging the front battery using a
battery charger
For optimum service life of the front battery, it
is essential to maintain an adequate state of
charge.
In some circumstances, it may be necessary to
charge the front battery:
–
When using the vehicle mainly for short
journeys.
–
If the vehicle is to be taken off the road for
several weeks.
Consult a PEUGEOT
dealer or a qualified
workshop.
To charge the vehicle's front battery yourself, use only a charger compatible
with lead-acid batteries with a nominal voltage
of 12
V.
Follow the instructions provided by the
manufacturer of the charger.
Never reverse polarities.
It is not necessary to disconnect the
battery.
►
Switch the ignition off.
►
Switch off all electrical consumers (audio
system, lighting, wipers, etc.).
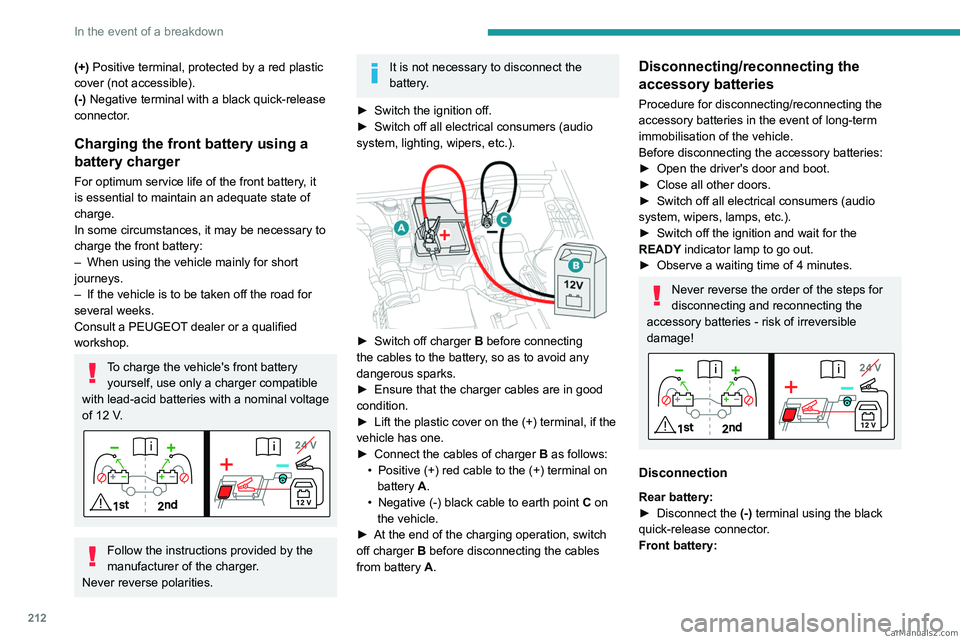
► Switch off charger B before connecting
the cables to the battery, so as to avoid any
dangerous sparks.
►
Ensure that the charger cables are in good
condition.
►
Lift the plastic cover on the (+) terminal, if the
vehicle has one.
►
Connect the cables of charger B
as follows:
•
Positive (+) red cable to the (+) terminal on
battery
A.
•
Negative (-) black cable to earth point C
on
the vehicle.
►
At the end of the charging operation, switch
off charger B
before disconnecting the cables
from battery A.
Disconnecting/reconnecting the
accessory batteries
Procedure for disconnecting/reconnecting the
accessory batteries in the event of long-term
immobilisation of the vehicle.
Before disconnecting the accessory batteries:
►
Open the driver's door and boot.
►
Close all other doors.
►
Switch off all electrical consumers (audio
system, wipers, lamps, etc.).
►
Switch off the ignition and wait for the
READY
indicator lamp to go out.
►
Observe a waiting time of 4 minutes.
Never reverse the order of the steps for
disconnecting and reconnecting the
accessory batteries - risk of irreversible
damage!
Disconnection
Rear battery:
► Disconnect the (-)
terminal using the black
quick-release connector.
Front battery:
CarM an uals 2 .c o m
Page 216 of 292
214
In the event of a breakdown
General recommendations
Observe the legislation in force in the country where you are driving.
Check that the towing vehicle is heavier than the towed vehicle.
The driver must remain at the wheel of the towed vehicle and must have a\
valid driving licence.
When towing a vehicle with all four wheels on the ground, always use an \
approved towbar; ropes and straps are prohibited.
The towing vehicle must move off gently.
When the vehicle is towed with its engine off, there is no longer braking and steering assistance.
A professional recovery service must be called in the following cases:
– broken down on a motorway or main road;
–
not possible to put the gearbox into neutral, unlock the steering, or re\
lease the parking brake;
–
not possible to tow a vehicle with an automatic gearbox, with the engine\
running;
–
towing with only two wheels on the ground;
–
four-wheel drive vehicle;
–
no approved towbar available.
Rechargeable hybrid vehicles
Before any intervention, with the ignition
on, depress the brake pedal and select mode N, then switch off the hybrid system (READY
indicator lamp off).
Always call on professionals for recovery of
the vehicle on a flatbed lorry or trailer.Use the towing eye only to free the vehicle
if it is stuck, or to secure it for recovery on a
flatbed lorry or trailer.
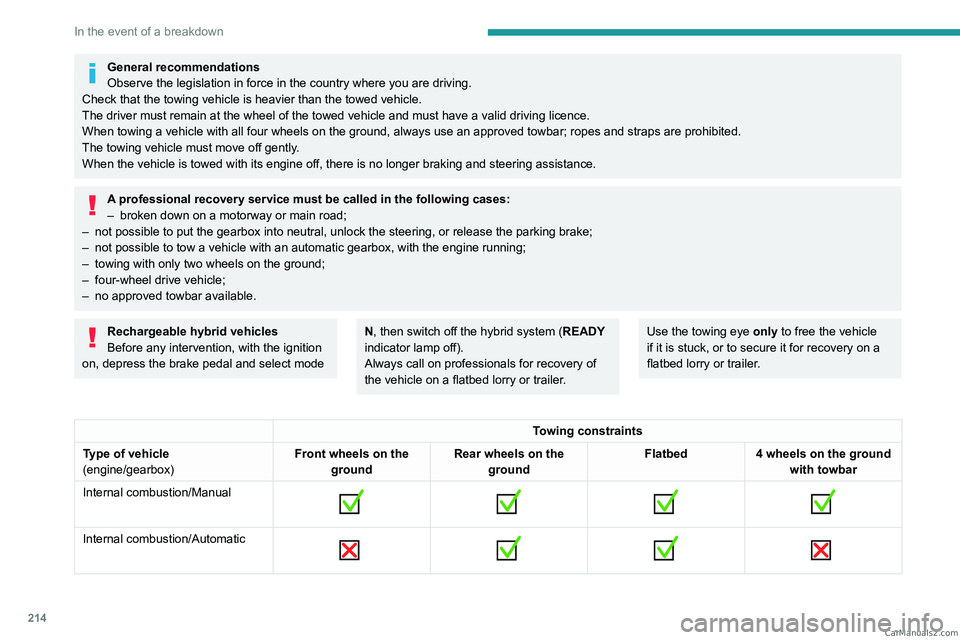
Towing constraints
Type of vehicle
(engine/gearbox) Front wheels on the
ground Rear wheels on the
ground Flatbed
4 wheels on the ground
with towbar
Internal combustion/Manual
Internal combustion/Automatic
CarM an uals 2 .c o m
Page 230 of 292
228
PEUGEOT Connect Radio
Enter the FM and AM waveband values
using the virtual keypad.
Press "OK" to confirm.
Radio reception may be affected by the
use of electrical equipment not approved
by the Brand, such as a USB charger
connected to the 12 V socket.
The exterior environment (hills, buildings,
tunnels, basement car parks, etc.) may
block reception, including in RDS mode.
This phenomenon is perfectly normal in the
context of radio wave transmission, and
in no way indicative of an audio system
malfunction.
Changing the waveband
Press Radio Media to display the main
page.
Press the "OPTIONS " button to access the
secondary page.
Press "Band" to change waveband.
Press in the shaded area to confirm.
Presetting a station
Select a radio station or frequency.Make a short press on the star outline. If
the star is solid, the radio station is
already preset.
Or
Select a radio station or frequency.
Press "Preset ".
Make a long press on one of the buttons
to preset the station.
Activating/Deactivating RDS
RDS, if activated, allows you to continue
listening to the same station by automatically
retuning to alternative frequencies.
Press Radio Media to display the main
page.
Press the "OPTIONS " button to access the
secondary page.
Activate/deactivate "RDS".
Press in the shaded area to confirm.
RDS station tracking may not be
available nationwide, as many radio
stations do not cover 100
% of the country.
This explains the loss of reception of the
station during a journey.
Displaying text information
The "Radio Text" function displays information
transmitted by the radio station relating to the
station or the currently playing song.
Press Radio Media to display the main
page. Press the "OPTIONS
" button to access the
secondary page.
Activate/deactivate "News".
Press in the shaded area to confirm.
Playing TA messages
The TA (Traffic Announcement) function gives
priority to TA alert messages. To operate, this
function needs good reception of a radio station
that transmits this type of message. While traffic
information is being broadcast, the current
media is automatically interrupted so that the
TA message can be heard. Normal play of the
previously playing media resumes at the end of
the message.
Press Radio Media to display the main
page.
Press the "OPTIONS " button to access the
secondary page.
Activate/deactivate "TA ".
Press in the shaded area to confirm.
Audio settings
Press Radio Media to display the main
page.
Press the "OPTIONS " button to access the
secondary page.
Press "Audio settings". CarM an uals 2 .c o m
Page 233 of 292
231
PEUGEOT Connect Radio
10Telephone
USB sockets
Depending on equipment, for more information
on the USB sockets compatible with CarPlay® or
Android Auto applications, refer to the "Ease of
use and comfort" section.
For the list of compatible smartphones,
visit the Manufacturer's website in your
country.
Synchronising a smartphone enables
users to display applications that support
the smartphone’s CarPlay
® or Android Auto
technology on the vehicle’s screen. For
CarPlay
® technology, the CarPlay® function
must first be activated on the smartphone.
Unlock the smartphone for the communication
process between the smartphone and the
system to work.
As principles and standards are constantly
changing, we recommend keeping the
smartphone's operating system up-to-
date, together with the date and time on
the smartphone and the system.
CarPlay® smartphone
connection
Depending on country.
On connecting the USB cable, the
CarPlay® function deactivates the
system's Bluetooth® mode.
The "CarPlay " function requires the use of
a compatible smartphone and compatible
applications.
Connect the USB cable. The smartphone
charges when connected by the USB
cable.
From the system, press Telephone to
display the CarPlay® interface.
Or
If the smartphone has already connected
by Bluetooth®.Connect the USB cable. The smartphone
charges when connected by the USB
cable.
From the system, press "Telephone" to
display the main page.
Press the "PHONE" button to go to the
secondary page.
Press "CarPlay" to display the CarPlay®
interface.
When the USB cable is disconnected
and the ignition is switched off then back
on, the system will not automatically switch to
Radio Media mode; the source must be
changed manually.
The CarPlay® navigation can be accessed
at any time by pressing the system's
Navigation button.
Android Auto smartphone connection
Depending on country.On the smartphone, download the
Android Auto application.
The "Android Auto" function requires the
use of a compatible smartphone and
applications.
Telephone not connected by
Bluetooth®
Connect a USB cable. The smartphone
charges when connected by a USB cable.
From the system, press "Telephone" to
display the main page.
Press "Android Auto" to start the
application in the system.
Depending on the smartphone, it may be
necessary to activate the "Android Auto"
function.
During the procedure, several screen
pages relating to certain features are
displayed.
Accept to start and complete the connection.
When connecting a smartphone to the
system, we recommend enabling
Bluetooth
® on the smartphone.
Telephone connected by Bluetooth®
From the system, press "Telephone" to
display the main page. CarM an uals 2 .c o m
Page 245 of 292
243
PEUGEOT Connect Nav
11David Miller, I'll be late". To display the list of
calls, say "display calls". For more information on
SMS, you can say "help with texting".
To choose a contact, say something like "select
line three". To move around the list say "next
page" or "previous page". You can undo your last
action and start over by saying "undo", or say
"cancel" to cancel the current action.
"Text message" voice
commands
If there is no telephone connected by
Bluetooth, a voice message announces:
"Please first connect a telephone", and the
voice session is closed.
The "Text messages" voice commands function allows you to dictate and send
an SMS.
Dictate the text, taking care to pause briefly
between each word.
When you have finished, the voice recognition
system will automatically generate an SMS.
Voice commands
Send quick message to Bill Carter, I'll be late
Help messages
* This function is av ailable only if the telephone connected to the system supports downloadi\
ng of contacts and recent calls and the corresponding
download has been performed. From the list of quick messages, say the name of
the one you'd like to send. To move around the
list you can say "go to start", "go to end", "next
page" or "previous page". You can undo your last
action and start over by saying "undo", or say
"cancel" to cancel the current action.
Voice commands
Send SMS to John Miller, I'm just arriving
Send SMS to David Miller at the office, don't
wait for me
Help messages
Please say "call" or "send quick message to",
and then select a line from the list. To move
around a list shown on the display, you can
say "go to start", "go to end", "next page" or
"previous page". You can undo your last action
and start over by saying "undo", or say "cancel"
to cancel the current action.
Voice commands
Listen to most recent message*
Help messages
To hear your last message, you can say "listen to
most recent message". When you want to send
a text, there's a set of quick messages ready for
you to use. Just use the quick message name
and say something like "send quick message to
Bill Carter, I'll be late". Check the phone menu
for the names of the supported messages.
The system only sends pre-recorded "Quick messages".
Navigation
Choice of a destination
To a new destination
Intuitive method:Press Navigation to display the main
page.
Press "Search…".
Enter an address or the key words for the
destination.
Press "OK" to select the "Guidance
criteria".
Or
Guided method:
In order to be able to use the navigation,
you must enter the "City", the "Street"
(suggestions are displayed automatically
when you begin typing), then enter the
"Number" using the virtual keypad, or select CarM an uals 2 .c o m