2023 NISSAN SENTRA ESP
[x] Cancel search: ESPPage 199 of 556
(brightness control) BUTTON
To change the display brightness, press thebutton. Pressing the button again will
change the display to the day or the night
display.
Press and hold the
button for more
than 2 seconds to turn the display off. Press
and hold the button again to turn the dis-
play on.
HOW TO USE THE VOL (volume)
KNOB / PUSH
(power)
BUTTON
Press the PUSH(power) button to turn
audio function on and off. Turn the VOL
(volume) knob to adjust audio volume.
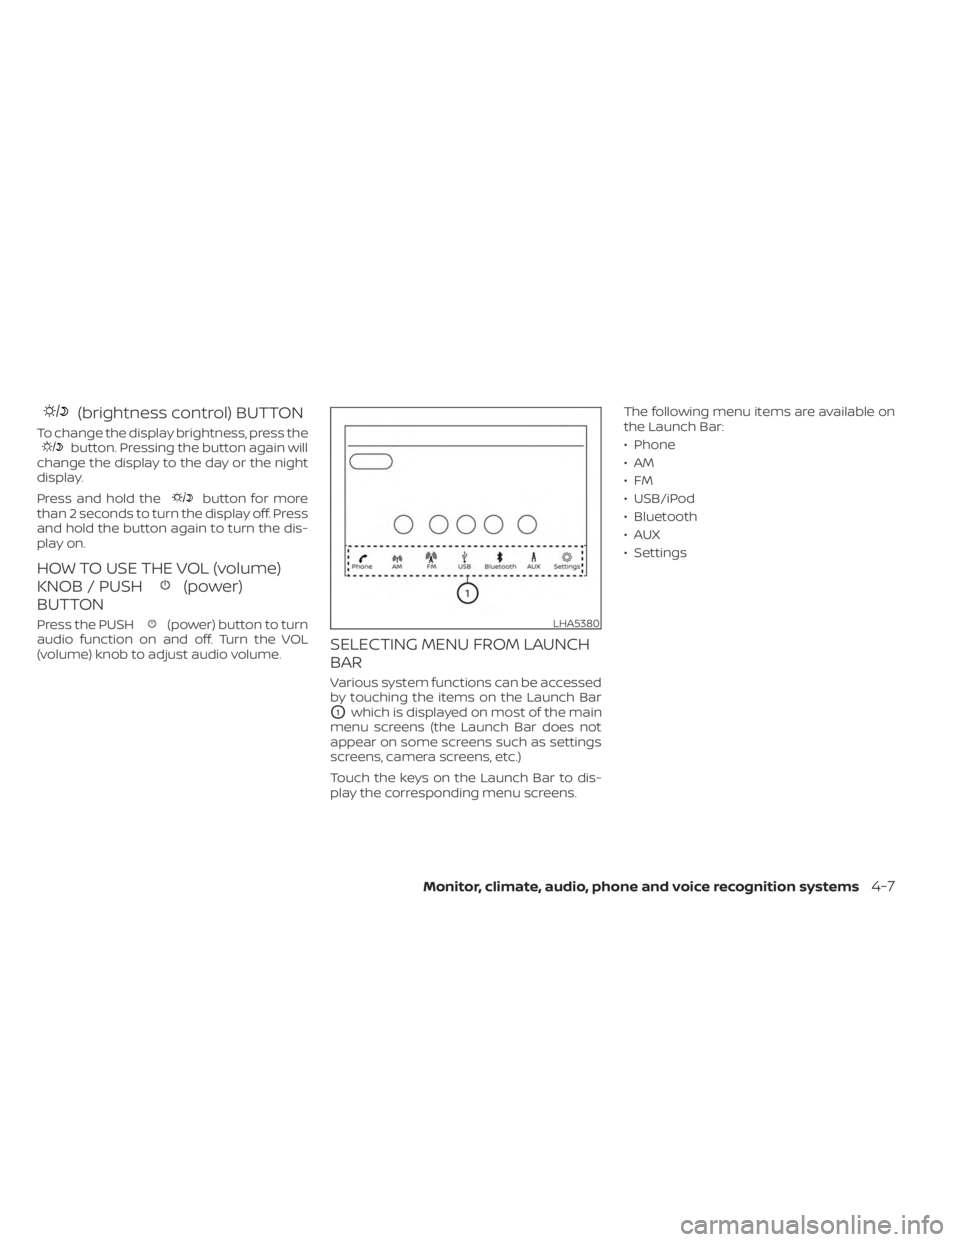
SELECTING MENU FROM LAUNCH
BAR
Various system functions can be accessed
by touching the items on the Launch Bar
O1which is displayed on most of the main
menu screens (the Launch Bar does not
appear on some screens such as settings
screens, camera screens, etc.)
Touch the keys on the Launch Bar to dis-
play the corresponding menu screens. The following menu items are available on
the Launch Bar:
• Phone
•AM
•FM
• USB/iPod
• Bluetooth
•AUX
• Settings
LHA5380
Monitor, climate, audio, phone and voice recognition systems4-7
Page 209 of 556
WARNING
Failure to follow the warnings and in-
structions for the proper use of the In-
telligent Around View® Monitor system
could result in serious injury or death
• The Intelligent Around View® Monitor
is a convenience feature and is not a
substitute for proper vehicle opera-
tion because it has areas where ob-
jects cannot be viewed. The four cor-
ners of the vehicle in particular, are
areas where objects do not always
appear in the bird’s-eye, front, or rear
views. Always check your surround-
ings to be sure that it is safe to move
before operating the vehicle. Always
operate the vehicle slowly.
• The driver is always responsible for
safety during parking and other
maneuvers.
CAUTION
Do not scratch the camera lens when
cleaning dirt or snow from the front of
the camera. The Intelligent Around View® Monitor sys-
tem is designed as an aid to the driver in
situations such as slot parking or parallel
parking.
The monitor displays various views of the
position of the vehicle in a split screen for-
mat. Not all views are available at all times.
Available views:
• Front View
An approximately 150–degree view of the
front of the vehicle.
• Rear View An approximately 150–degree view of the
rear of the vehicle.
• Bird's-Eye View The surrounding views of the vehicle
from above.
• Front-Side View The view around and ahead of the front
passenger's side wheel.
• Full Screen Rear View The view to the rear of the vehicle (which
is a little wider than the standard Rear
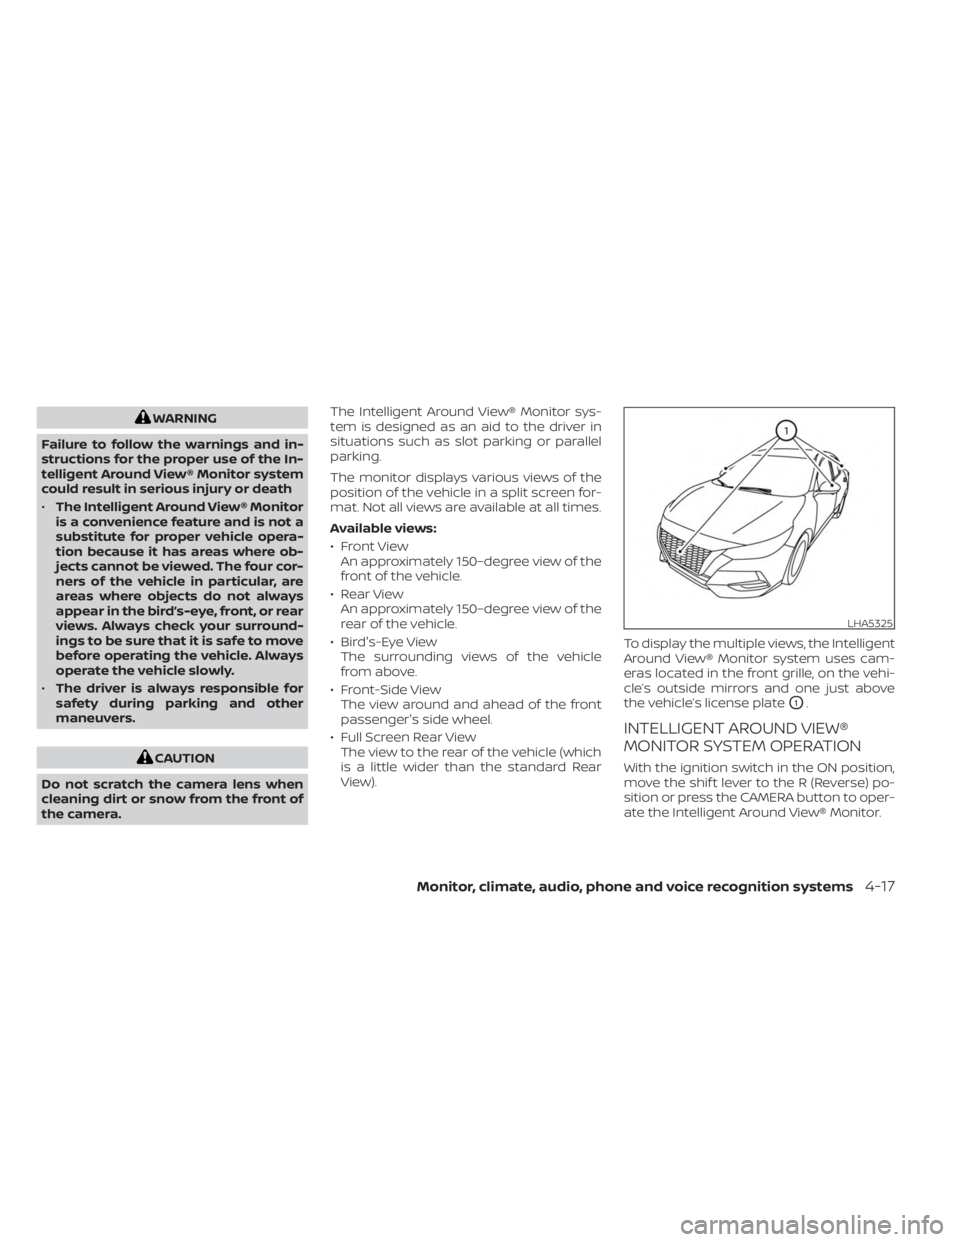
View). To display the multiple views, the Intelligent
Around View® Monitor system uses cam-
eras located in the front grille, on the vehi-
cle’s outside mirrors and one just above
the vehicle’s license plate
O1.
INTELLIGENT AROUND VIEW®
MONITOR SYSTEM OPERATION
With the ignition switch in the ON position,
move the shif t lever to the R (Reverse) po-
sition or press the CAMERA button to oper-
ate the Intelligent Around View® Monitor.
LHA5325
Monitor, climate, audio, phone and voice recognition systems4-17
Page 236 of 556
RADIO
Place the ignition switch in the ACC or ON
position and press the PUSHbutton
to turn the radio on. If you listen to the radio
with the engine not running, the ignition
switch should be placed in the ACC
position.
Radio reception is affected by station sig-
nal strength, distance from radio transmit-
ter, buildings, bridges, mountains and other
external influences. Intermittent changes
in reception quality normally are caused by
these external influences.
Using a cellular phone in or near the ve-
hicle may influence radio reception
quality.
Radio reception
Your NISSAN radio system is equipped with
state-of-the-art electronic circuits to en-
hance radio reception. These circuits are
designed to extend reception range, and to
enhance the quality of that reception.
However, there are some general charac-
teristics of both FM and AM radio signals
that can affect radio reception quality in a
moving vehicle, even when the finest
equipment is used. These characteristics
are completely normal in a given reception area and do not indicate any malfunction
in your NISSAN radio system.
Reception conditions will constantly
change because of vehicle movement.
Buildings, terrain, signal distance and inter-
ference from other vehicles can work
against ideal reception. Described below
are some of the factors that can affect your
radio reception.
Some cellular phones or other devices may
cause interference or a buzzing noise to
come from the audio system speakers.
Storing the device in a different location
may reduce or eliminate the noise.
FM RADIO RECEPTION
Range: FM range is normally limited to 25 –
30 mi (40 – 48 km), with monaural (single
channel) FM having slightly more range
than stereo FM. External influences may
sometimes interfere with FM station re-
ception even if the FM station is within 25
mi (40 km). The strength of the FM signal is
directly related to the distance between
the transmitter and receiver. FM signals fol-
low a line-of-sight path, exhibiting many of
the same characteristics as light. For ex-
ample, they will reflect off objects.
Fade and drif t: As your vehicle moves away
from a station transmitter, the signals will
tend to fade and/or drif t.
Static and flutter: During signal interfer-
ence from buildings, large hills or due to
antenna position (usually in conjunction
with increased distance from the station
transmitter), static or flutter can be heard.
This can be reduced by adjusting the treble
control to reduce treble response.
Multipath reception: Because of the reflec-
tive characteristics of FM signals, direct and
reflected signals reach the receiver at the
same time. The signals may cancel each
other, resulting in momentary flutter or loss
of sound.AM RADIO RECEPTION
AM signals, because of their low frequency,
can bend around objects and skip along
the ground. In addition, the signals can be
bounced off the ionosphere and bent back
to earth. Because of these characteristics,
AM signals are also subject to interference
as they travel from transmitter to receiver.
AUDIO SYSTEM
4-44Monitor, climate, audio, phone and voice recognition systems
Page 238 of 556
•Do not leave the USB cable in a place
where it can be pulled unintention-
ally. Pulling the cable may damage
the port.
The vehicle is not equipped with a USB de-
vice. USB devices should be purchased
separately as necessary.
This system cannot be used to format USB
devices. To format a USB device, use a per-
sonal computer.
In some jurisdictions, the USB device for the
front seats plays only sound without im-
ages for regulatory reasons, even when the
vehicle is parked.
This system supports various USB
memory devices, USB hard drives and
iPod® players. Some USB devices may not
be supported by this system.
• Partitioned USB devices may not play correctly.
• Some characters used in other lan- guages (Chinese, Japanese, etc.) may not
appear properly in the display. Using Eng-
lish language characters with a USB de-
vice is recommended. General notes for USB use:
• For additional information, refer to your
device manufacturer’s owner informa-
tion regarding the proper use and care of
the device.
Notes for iPod® use:
iPod® is a trademark of Apple Inc., regis-
tered in the U.S. and other countries.
• Improperly plugging in the iPod® may cause a checkmark to be displayed on
and off (flickering). Always make sure that
the iPod® is connected properly.
• Audiobooks may not play in the same order as they appear on an iPod®.
• Large video files cause slow responses in an iPod®. The vehicle center display may
momentarily black out, but will soon
recover.
• If an iPod® automatically selects large video files while in the shuffle mode, the
vehicle center display may momentarily
black out, but will soon recover.iPod®* player
• Some characters used in other lan-guages (Chinese, Japanese, etc.) are not
displayed properly on the vehicle center
screen. We recommend using English or
Spanish language characters with an
iPod®.
• Large video podcast files cause slow re- sponses in the iPod®. The vehicle center
display may momentarily black out, but it
will soon recover.
• If the iPod® automatically selects large video podcast files while in the shuffle
mode, the vehicle center display may
momentarily black out, but it will soon
recover.
• Improperly plugging in the iPod® may cause a checkmark to be displayed on
and off (flickering). Always make sure that
the iPod® is connected properly.
• Audiobooks may not play in the same order as they appear on the iPod®.
• Be careful not to do the following, or the cable could be damaged and a loss of
function may occur:– Bend the cable excessively (1.6 in (40 mm) radius maximum).
– Twist the cable excessively (more than 180 degrees).
– Pull or drop the cable.
4-46Monitor, climate, audio, phone and voice recognition systems
Page 242 of 556
Audio button
Press to display the audio screen. When
this button is pressed while the audio
screen is not displayed, the last audio
source played will play.
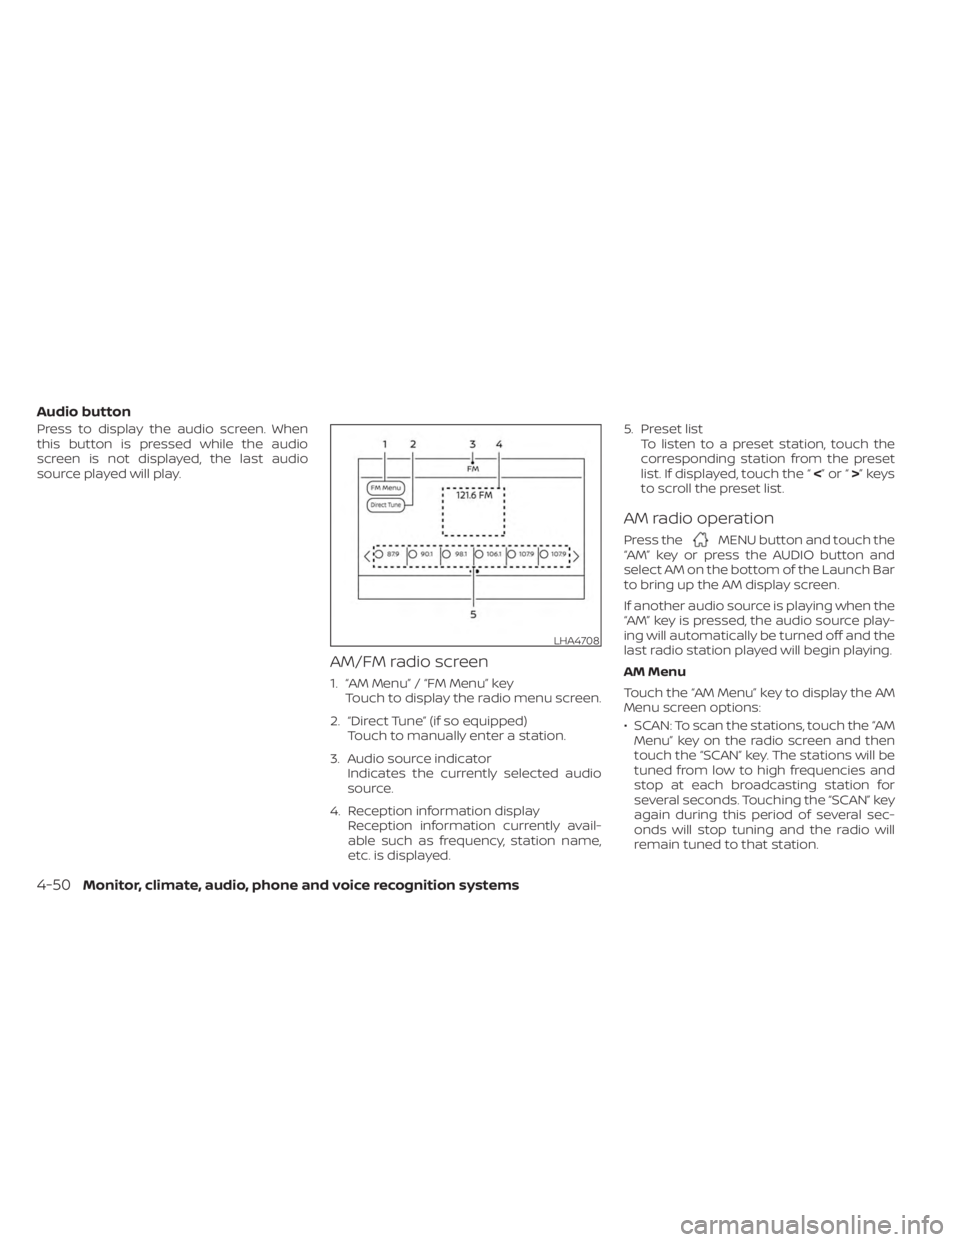
AM/FM radio screen
1. “AM Menu” / “FM Menu” keyTouch to display the radio menu screen.
2. “Direct Tune” (if so equipped) Touch to manually enter a station.
3. Audio source indicator Indicates the currently selected audio
source.
4. Reception information display Reception information currently avail-
able such as frequency, station name,
etc. is displayed. 5. Preset list
To listen to a preset station, touch the
corresponding station from the preset
list. If displayed, touch the “ <”or“>”keys
to scroll the preset list.
AM radio operation
Press theMENU button and touch the
“AM” key or press the AUDIO button and
select AM on the bottom of the Launch Bar
to bring up the AM display screen.
If another audio source is playing when the
“AM” key is pressed, the audio source play-
ing will automatically be turned off and the
last radio station played will begin playing.
AM Menu
Touch the “AM Menu” key to display the AM
Menu screen options:
• SCAN: To scan the stations, touch the “AM Menu” key on the radio screen and then
touch the “SCAN” key. The stations will be
tuned from low to high frequencies and
stop at each broadcasting station for
several seconds. Touching the “SCAN” key
again during this period of several sec-
onds will stop tuning and the radio will
remain tuned to that station.
LHA4708
4-50Monitor, climate, audio, phone and voice recognition systems
Page 261 of 556
Initialization
When the ignition switch is placed in the ON
position, NISSAN Voice Recognition is initial-
ized, which takes a few seconds. If the
button is pressed before the initialization
completes, the system will announce
“There is no phone connected” and will not
react to voice commands.
Operating tips
To get the best performance out of the
NISSAN Voice Recognition System, observe
the following:
• Keep the interior of the vehicle as quiet aspossible. Keep all vents pointed away
from the microphone and close the win-
dows to eliminate surrounding noises
(traffic noises, vibration sounds, etc.),
which may prevent the system from rec-
ognizing voice commands correctly.
• Wait until the tone sounds before speak- ing a command. Otherwise, the com-
mand will not be received properly.
• Start speaking a command within 5 sec- onds af ter the tone sounds.
• Speak in a natural voice without pausing between words. • For calling contacts by name, please say
both the first and last name of the con-
tact for better recognition.
Giving voice commands
To operate NISSAN Voice Recognition,
press thebutton located on the steer-
ing wheel for less than 1.5 seconds. Af ter
the tone sounds, speak a command.
The command given is picked up by the
microphone, and voice feedback is given
when the command is accepted.
• If a command is not recognized, the sys- tem announces, “Please say or select a
command from the displayed list.” Make
sure the command is said exactly as
prompted by the system and repeat the
command in a clear voice.
• If you want to go back to the previous command, you can say “Go back” or “Cor-
rection” any time the system is waiting for
a response. • You can cancel a command when the
system is waiting for a response by say-
ing, “Cancel” or “Quit.” The system an-
nounces “Exit” and ends the Voice Recog-
nition session. You can also press and
hold the
button on the steering
wheel for 1.5 seconds at any time to end
the Voice Recognition session. Whenever
the Voice Recognition session is can-
celed, a double beep is played to indicate
you have exited the system.
• If you want to adjust the volume of the voice feedback, push the (+ or -) volume
control switches on the steering wheel
while being provided with feedback. You
can also use the radio volume control
knob.
Voice Prompt Interrupt
In most cases you can interrupt the voice
feedback to speak the next command by
pressing the
button on the steering
wheel. Af ter interrupting the system, wait
for a beep before speaking your command.
Monitor, climate, audio, phone and voice recognition systems4-69
Page 271 of 556
The display will show a list of 20 messages
with the sender and delivery time. Touch
the “Next” key on the screen to view all mes-
sages. To view a text message press the
button on the steering wheel and
speak the number item list on the screen.
The following options will be available:
• Play Speak this command to have the system
say the message.
• Reply Speak this command to send a text mes-
sage response to the sender of the text
message.
• Call Speak this command to call the sender.
• Previous Speak this command to move to the pre-
vious text message (if available).
•Next Speak this command to move to the next
text message (if available).
Siri® Eyes Free (if so equipped)
If a connected phone is equipped with Siri®,
it can also be used to create custom mes-
sages that are sent through the phone. For
additional information, see “Siri® Eyes Free”
(P. 4-63).
NOTE:
Text messages are only displayed if the
vehicle speed is less than 5 mph (8
km/h).
NOTE:
For Apple iPhones®, text messages can
only be sent through Siri.
Text messaging using the control
panel
Display received message list
1. Press the
button on the control
panel.
2. Touch the “Text Message” key on the screen
3. Touch an item on the list to read or reply to the message.
Up to 100 messages can be stored in the
message list.
Received message screen
Touching the “Read” key on the incoming
message notification screen or selecting a
message from the message list will show
the details of the received message on the
display. Available actions:
•Prev.
Touch this key to read the previous
message.
•Next Touch this key to read the next message.
• Play/Stop Touch the “Play” key to have the hands-
free phone system read out the received
message. Touch the “Stop” key to stop
reading.
• Call If the sender of the message is registered
in the phonebook, touch the “Call” key to
make a call to the sender.
• Reply A reply message can be selected from
the predefined list.
Sending a text message (if so equipped)
This function may not be supported de-
pending on the cellular phone.
1. Press the
button on the control
panel.
2. Touch the “Text Message” key on the screen.
3. Touch the “Create Message” key on the screen.
Monitor, climate, audio, phone and voice recognition systems4-79
Page 276 of 556
VOLUME & BEEPS
There are several methods to customize
the volume settings.
Volume & Beeps
The Volume & Beeps screen can be found
by pressing the
MENU button on the
control panel, touching the “Settings” key
on the screen and selecting “Volume &
Beeps”. To adjust the volume of the follow-
ing options, touch the “–” and “+” keys on the
screen.
The available settings are:
• Ringtone Adjust the volume level of the ringtone of
incoming calls.
• Outgoing Call Adjust the volume level of the outgoing
calls.
• Voice Prompt Vol. Adjust the volume level of the system
voice.
• Text-to-speech Vol. Adjust the volume of the replay voice for
text messaging.
• Button Beeps Turns on/off the button beep sounds and
alarm for prohibited operations. Volume Settings
The Volume settings screen can be found
by pressing the
button on the control
panel then touching the “Volume” key on
the screen. To adjust the volume of the
following options, touch the “–” and “+” keys
on the screen.
The available settings are:
• Ringtone Adjust the volume level of the ringtone of
incoming calls.
• Outgoing Call Adjust the volume level of the outgoing
calls. “Made for iPod”, “Made for iPhone” and
“Made for iPad” mean that an electronic
accessory has been designed to connect
specifically to iPod, iPhone or iPad, respec-
tively, and has been certified by the devel-
oper to meet Apple performance stan-
dards. Apple is not responsible for the
operation of this device or its compliance
with safety and regulatory standards.
Please note that the use of this accessory
with iPod, iPhone or iPad may affect wire-
less performance.
iPad, iPhone, iPod classic, iPod nano, iPod
shuffle and iPod touch are trademarks of
Apple Inc., registered in the U.S. and other
countries. Lightning is a trademark of
Apple Inc.
iPod®/iPhone®
4-84Monitor, climate, audio, phone and voice recognition systems