Page 200 of 508
3-30Pre-driving checks and adjustments
JVP0503X
LOOSE FUEL CAP warning message
The LOOSE FUEL CAP warning messageis displayed on the vehicle information
display when the fuel-filler cap is not
tightened correctly after the vehicle has
been refueled. It may take a few driving
trips for the message to be displayed. To
turn off the warning message, do the
following procedure:
1. Remove and install the fuel-filler capas soon as possible. For additional
information, refer to “Fuel-filler cap”
(P.3-28).
2. Tighten the fuel-filler cap until it clicks. 3. Push the OK button
on the steering
wheel for about 1 second to turn off
the LOOSE FUEL CAP warning mes-
sage after tightening the fuel cap.
WARNING
Do not adjust the steering wheel
while driving. You could lose control
of your vehicle and cause an acci-
dent.
TILT/TELESCOPIC STEERING
Page 201 of 508
JVP0301X
TILT OR TELESCOPIC OPERATION
Pull the lock leverdown and adjust the
steering wheel up, down, forward or
rearward to the desired position. Push
the lock lever up securely to lock the
steering wheel in place.
SIC3739
1. To block glare from the front, swing down the main sun visor.
2. To block glare from the side, remove the main sun visor from the center
mount and swing it to the side
.
3. Slide the sun visor
in or out as
needed.
CAUTION
. Do not store the sun visor before
returning the extension to its
original position.
. Do not pull the extension sun
visor forcedly downward.
Pre-driving checks and adjustments3-31
SUN VISORS
Page 210 of 508
4-4Monitor, heater, air conditioner, audio and phone systems
JVH1585X
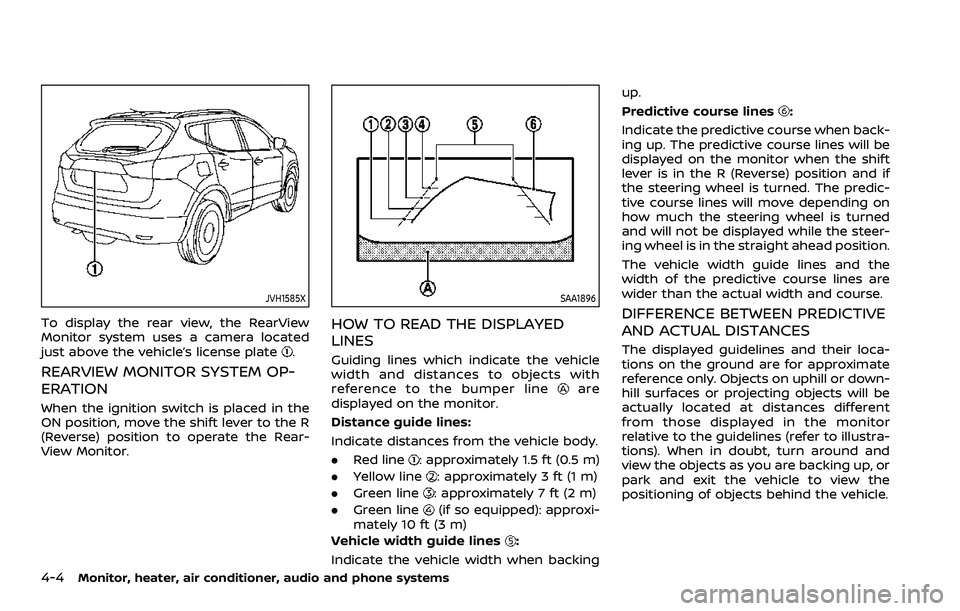
To display the rear view, the RearView
Monitor system uses a camera located
just above the vehicle’s license plate
.
REARVIEW MONITOR SYSTEM OP-
ERATION
When the ignition switch is placed in the
ON position, move the shift lever to the R
(Reverse) position to operate the Rear-
View Monitor.
SAA1896
HOW TO READ THE DISPLAYED
LINES
Guiding lines which indicate the vehicle
width and distances to objects with
reference to the bumper line
are
displayed on the monitor.
Distance guide lines:
Indicate distances from the vehicle body.
. Red line
: approximately 1.5 ft (0.5 m)
. Yellow line
: approximately 3 ft (1 m)
. Green line
: approximately 7 ft (2 m)
. Green line
(if so equipped): approxi-
mately 10 ft (3 m)
Vehicle width guide lines
:
Indicate the vehicle width when backing up.
Predictive course lines
:
Indicate the predictive course when back-
ing up. The predictive course lines will be
displayed on the monitor when the shift
lever is in the R (Reverse) position and if
the steering wheel is turned. The predic-
tive course lines will move depending on
how much the steering wheel is turned
and will not be displayed while the steer-
ing wheel is in the straight ahead position.
The vehicle width guide lines and the
width of the predictive course lines are
wider than the actual width and course.
DIFFERENCE BETWEEN PREDICTIVE
AND ACTUAL DISTANCES
The displayed guidelines and their loca-
tions on the ground are for approximate
reference only. Objects on uphill or down-
hill surfaces or projecting objects will be
actually located at distances different
from those displayed in the monitor
relative to the guidelines (refer to illustra-
tions). When in doubt, turn around and
view the objects as you are backing up, or
park and exit the vehicle to view the
positioning of objects behind the vehicle.
Page 212 of 508
4-6Monitor, heater, air conditioner, audio and phone systems
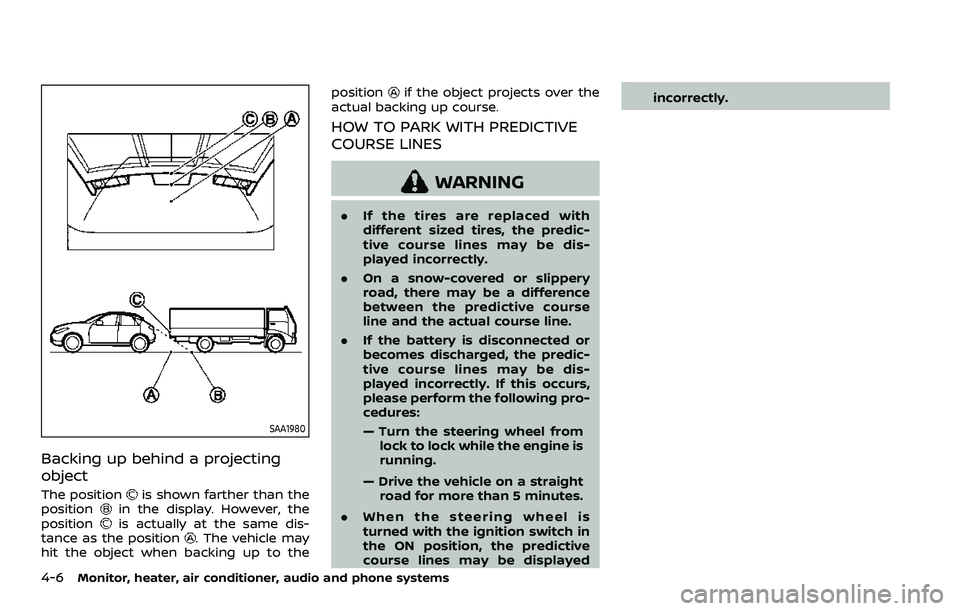
SAA1980
Backing up behind a projecting
object
The positionis shown farther than the
positionin the display. However, the
positionis actually at the same dis-
tance as the position. The vehicle may
hit the object when backing up to the position
if the object projects over the
actual backing up course.
HOW TO PARK WITH PREDICTIVE
COURSE LINES
WARNING
. If the tires are replaced with
different sized tires, the predic-
tive course lines may be dis-
played incorrectly.
. On a snow-covered or slippery
road, there may be a difference
between the predictive course
line and the actual course line.
. If the battery is disconnected or
becomes discharged, the predic-
tive course lines may be dis-
played incorrectly. If this occurs,
please perform the following pro-
cedures:
— Turn the steering wheel from
lock to lock while the engine is
running.
— Drive the vehicle on a straight road for more than 5 minutes.
. When the steering wheel is
turned with the ignition switch in
the ON position, the predictive
course lines may be displayed incorrectly.
Page 213 of 508
SAA1897
1. Visually check that the parking spaceis safe before parking your vehicle.
2. The rear view of the vehicle is dis- played on the screen
when the shift
lever is moved to the R (Reverse)
position.
WAE0465X
3. Slowly back up the vehicle adjusting the steering wheel so that the pre-
dictive course lines
enter the park-
ing space.
4. Maneuver the steering wheel to make the vehicle width guide lines
parallel
to the parking spacewhile referring
to the predictive course lines. 5. When the vehicle is parked in the
space completely, move the shift lever
to the P (Park) position and apply the
parking brake.
Monitor, heater, air conditioner, audio and phone systems4-7
Page 219 of 508
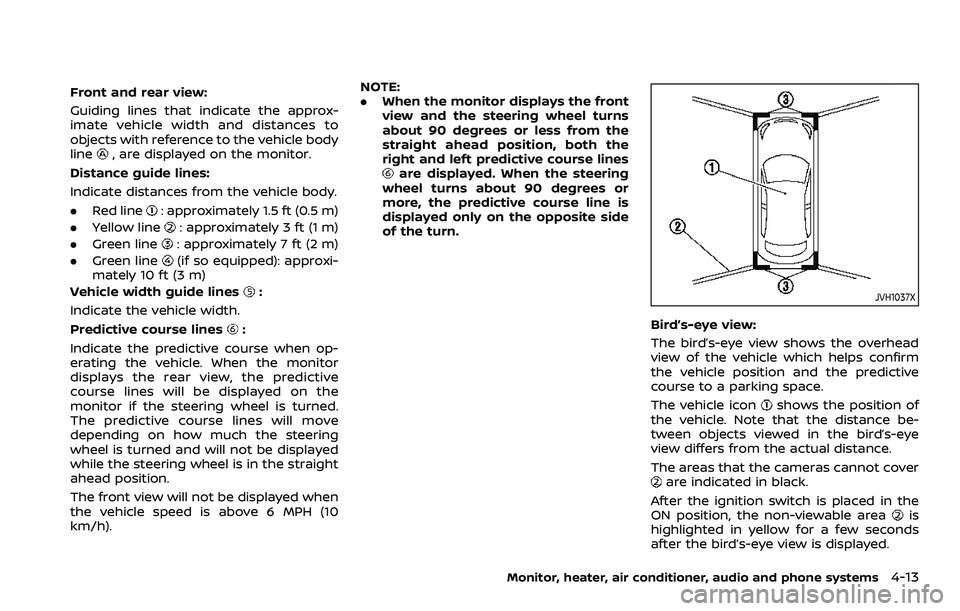
Front and rear view:
Guiding lines that indicate the approx-
imate vehicle width and distances to
objects with reference to the vehicle body
line
, are displayed on the monitor.
Distance guide lines:
Indicate distances from the vehicle body.
. Red line
: approximately 1.5 ft (0.5 m)
. Yellow line
: approximately 3 ft (1 m)
. Green line
: approximately 7 ft (2 m)
. Green line
(if so equipped): approxi-
mately 10 ft (3 m)
Vehicle width guide lines
:
Indicate the vehicle width.
Predictive course lines
:
Indicate the predictive course when op-
erating the vehicle. When the monitor
displays the rear view, the predictive
course lines will be displayed on the
monitor if the steering wheel is turned.
The predictive course lines will move
depending on how much the steering
wheel is turned and will not be displayed
while the steering wheel is in the straight
ahead position.
The front view will not be displayed when
the vehicle speed is above 6 MPH (10
km/h). NOTE:
.
When the monitor displays the front
view and the steering wheel turns
about 90 degrees or less from the
straight ahead position, both the
right and left predictive course lines
are displayed. When the steering
wheel turns about 90 degrees or
more, the predictive course line is
displayed only on the opposite side
of the turn.
JVH1037X
Bird’s-eye view:
The bird’s-eye view shows the overhead
view of the vehicle which helps confirm
the vehicle position and the predictive
course to a parking space.
The vehicle icon
shows the position of
the vehicle. Note that the distance be-
tween objects viewed in the bird’s-eye
view differs from the actual distance.
The areas that the cameras cannot cover
are indicated in black.
After the ignition switch is placed in the
ON position, the non-viewable area
is
highlighted in yellow for a few seconds
after the bird’s-eye view is displayed.
Monitor, heater, air conditioner, audio and phone systems4-13
Page 222 of 508
4-16Monitor, heater, air conditioner, audio and phone systems
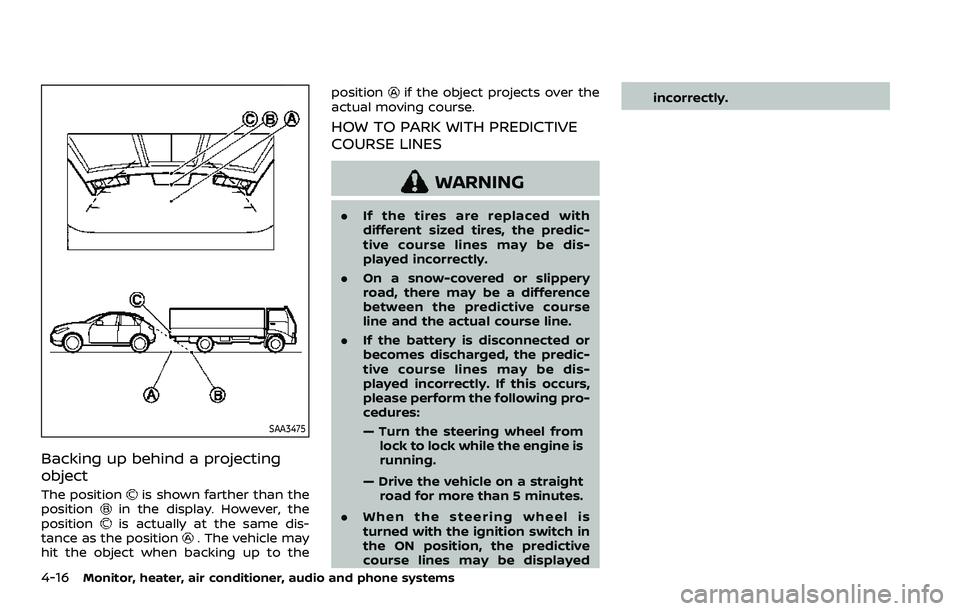
SAA3475
Backing up behind a projecting
object
The positionis shown farther than the
positionin the display. However, the
positionis actually at the same dis-
tance as the position. The vehicle may
hit the object when backing up to the position
if the object projects over the
actual moving course.
HOW TO PARK WITH PREDICTIVE
COURSE LINES
WARNING
. If the tires are replaced with
different sized tires, the predic-
tive course lines may be dis-
played incorrectly.
. On a snow-covered or slippery
road, there may be a difference
between the predictive course
line and the actual course line.
. If the battery is disconnected or
becomes discharged, the predic-
tive course lines may be dis-
played incorrectly. If this occurs,
please perform the following pro-
cedures:
— Turn the steering wheel from
lock to lock while the engine is
running.
— Drive the vehicle on a straight road for more than 5 minutes.
. When the steering wheel is
turned with the ignition switch in
the ON position, the predictive
course lines may be displayed incorrectly.
Page 223 of 508
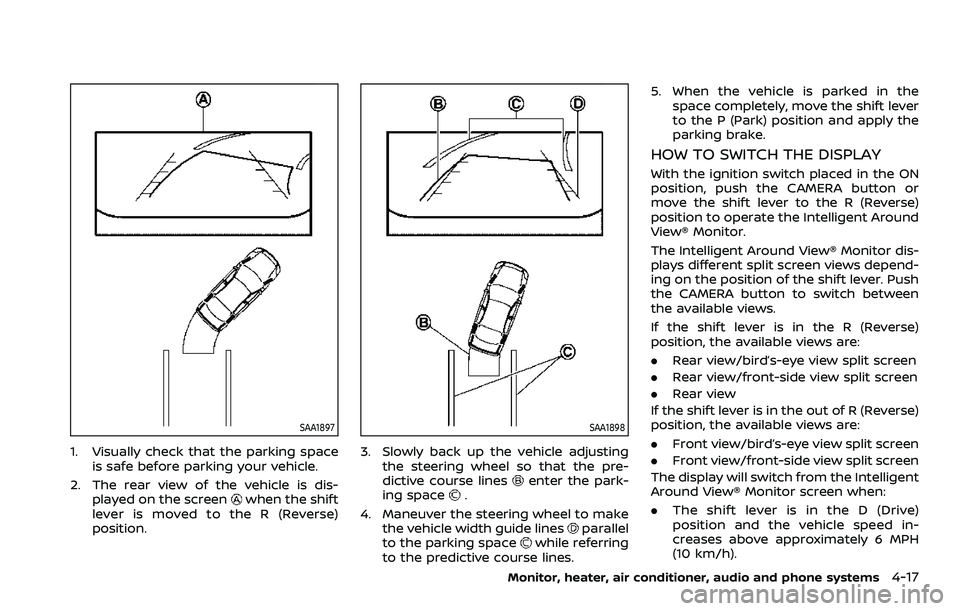
SAA1897
1. Visually check that the parking spaceis safe before parking your vehicle.
2. The rear view of the vehicle is dis- played on the screen
when the shift
lever is moved to the R (Reverse)
position.
SAA1898
3. Slowly back up the vehicle adjusting the steering wheel so that the pre-
dictive course lines
enter the park-
ing space.
4. Maneuver the steering wheel to make the vehicle width guide lines
parallel
to the parking spacewhile referring
to the predictive course lines. 5. When the vehicle is parked in the
space completely, move the shift lever
to the P (Park) position and apply the
parking brake.
HOW TO SWITCH THE DISPLAY
With the ignition switch placed in the ON
position, push the CAMERA button or
move the shift lever to the R (Reverse)
position to operate the Intelligent Around
View® Monitor.
The Intelligent Around View® Monitor dis-
plays different split screen views depend-
ing on the position of the shift lever. Push
the CAMERA button to switch between
the available views.
If the shift lever is in the R (Reverse)
position, the available views are:
.Rear view/bird’s-eye view split screen
. Rear view/front-side view split screen
. Rear view
If the shift lever is in the out of R (Reverse)
position, the available views are:
. Front view/bird’s-eye view split screen
. Front view/front-side view split screen
The display will switch from the Intelligent
Around View® Monitor screen when:
. The shift lever is in the D (Drive)
position and the vehicle speed in-
creases above approximately 6 MPH
(10 km/h).
Monitor, heater, air conditioner, audio and phone systems4-17