Page 158 of 508
2-76Instruments and controls
POWER WINDOWS
WARNING
.Make sure that all passengers
have their hands, etc. inside the
vehicle while it is in motion and
before closing the windows. Use
the window lock switch to pre-
vent unexpected use of the
power windows.
. To help avoid risk of injury or
death through unintended opera-
tion of the vehicle and or its
systems, including entrapment
in windows or inadvertent door
lock activation, do not leave chil-
dren, people who require the
assistance of others or pets un-
attended in your vehicle. Addi-
tionally, the temperature inside a
closed vehicle on a warm day can
quickly become high enough to
cause a significant risk of injury
or death to people and pets.
The power windows operate when the
ignition switch is in the ON position, or for
about 45 seconds after the ignition
switch is placed in the OFF position. If
the driver’s or front passenger’s door is
opened during this period of about 45 seconds, power to the windows is can-
celed.
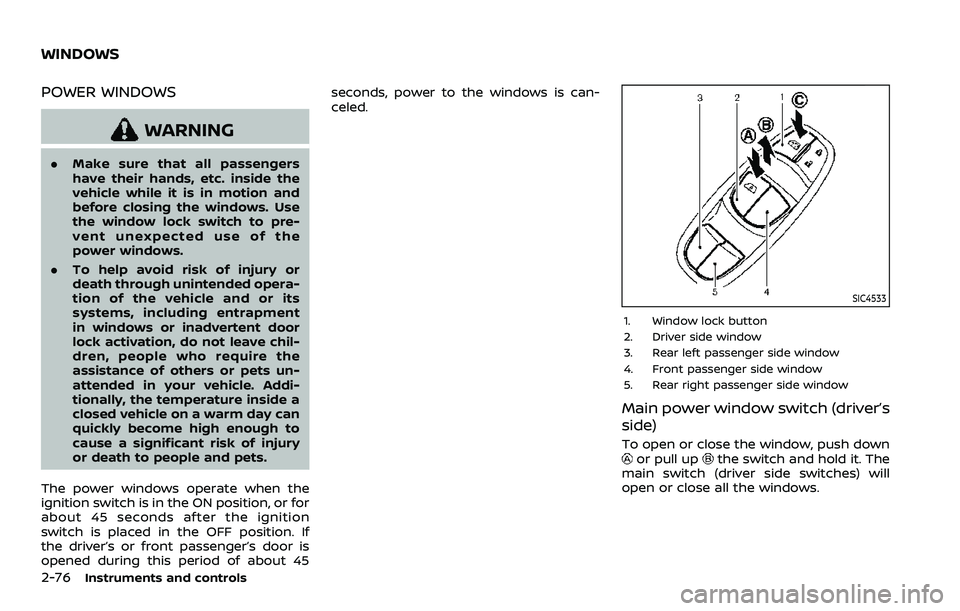
SIC4533
1. Window lock button
2. Driver side window
3. Rear left passenger side window
4. Front passenger side window
5. Rear right passenger side window
Main power window switch (driver’s
side)
To open or close the window, push downor pull upthe switch and hold it. The
main switch (driver side switches) will
open or close all the windows.
WINDOWS
Page 159 of 508
Locking passengers’ windows
When the lock buttonis pushed in, only
the driver side window can be opened or
closed. Push it in again to cancel.
SIC4523
Passenger side power window
switch
The passenger side switch will open or
close only the corresponding window. To
open or close the window, push down or
pull up the switch and hold it.
SIC4524
Automatic operation
The automatic operation is available for
the switch that has anmark on its
surface.
To fully open or close the window, com-
pletely push down or pull up the switch
and release it; the switch need not be
held. The window will automatically open
or close all the way. To stop the window,
just push or lift the switch in the opposite
direction.
A light push or pull on the switch will
cause the window to open or close until
the switch is released.
Instruments and controls2-77
Page 160 of 508
2-78Instruments and controls
Auto-reverse function
WARNING
There are some small distances im-
mediately before the closed position
which cannot be detected. Make sure
that all passengers have their hands,
etc., inside the vehicle before closing
the window.
If the control unit detects something
caught in the window as it is closing, the
window will be immediately lowered.
The auto reverse function can be acti-
vated when the window is closed by
automatic operation when the ignition
switch is in the ON position or for 45
seconds after the ignition switch is placed
in the OFF position.
Depending on the environment or driv-
ing conditions, the auto reverse func-
tion may be activated if an impact or
load similar to something being caught
in the window occurs.
If the windows do not close auto-
matically
If the power window automatic function
(closing only) does not operate properly,
perform the following procedure to initi-
alize the power window system.
1. Start the engine.
2. Close the door.
3. After starting the engine, open the window completely by operating the
power window switch.
4. Pull the power window switch and hold it to close the window, and then
hold the switch more than 3 seconds
after the window is closed completely.
5. Release the power window switch. Operate the window by the automatic
function to confirm the initialization is
complete.
If the power window automatic function
does not operate properly after perform-
ing the procedure above, it is recom-
mended you have your vehicle checked
by a NISSAN dealer.
WARNING
. In an accident you could be
thrown from the vehicle through
an open moonroof. Always use
seat belts and child restraints.
. Do not allow anyone to stand up
or extend any portion of their
body out of the moonroof open-
ing while the vehicle is in motion
or while the moonroof is closing.
CAUTION
.Remove water drops, snow, ice or
sand from the moonroof before
opening.
. Do not place any heavy object on
the moonroof or surrounding
area.
POWER MOONROOF
The moonroof only operates when the
ignition switch is in the ON position.
The moonroof is operational for about 45
seconds, even if the ignition switch is
pushed to the OFF position. If the driver’s
door or the passenger’s door is opened
MOONROOF (if so equipped)
Page 175 of 508
CAUTION
Always carry the mechanical key
installed in the Intelligent Key.
WARNING
.Always have the doors locked
while driving. Along with the use
of seat belts, this provides great-
er safety in the event of an
accident by helping to prevent
persons from being thrown from
the vehicle. This also helps keep
children and others from unin-
tentionally opening the doors,
and will help keep out intruders.
. Before opening any door, always
look for and avoid oncoming
traffic.
. To help avoid risk of injury or
death through unintended opera-
tion of the vehicle and or its
systems, including entrapment
in windows or inadvertent door
lock activation, do not leave chil-
dren, people who require the
assistance of others or pets un-
attended in your vehicle. Addi-
tionally, the temperature inside a
closed vehicle on a warm day can
quickly become high enough to
cause a significant risk of injury
or death to people and pets.
SPA2457
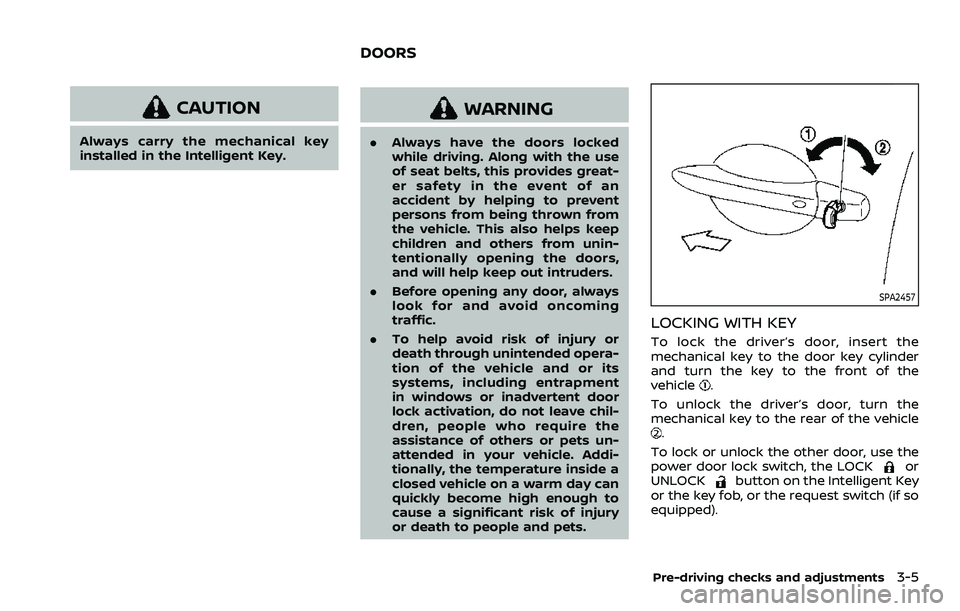
LOCKING WITH KEY
To lock the driver’s door, insert the
mechanical key to the door key cylinder
and turn the key to the front of the
vehicle
.
To unlock the driver’s door, turn the
mechanical key to the rear of the vehicle
.
To lock or unlock the other door, use the
power door lock switch, the LOCK
or
UNLOCKbutton on the Intelligent Key
or the key fob, or the request switch (if so
equipped).
Pre-driving checks and adjustments3-5
DOORS
Page 196 of 508
3-26Pre-driving checks and adjustments
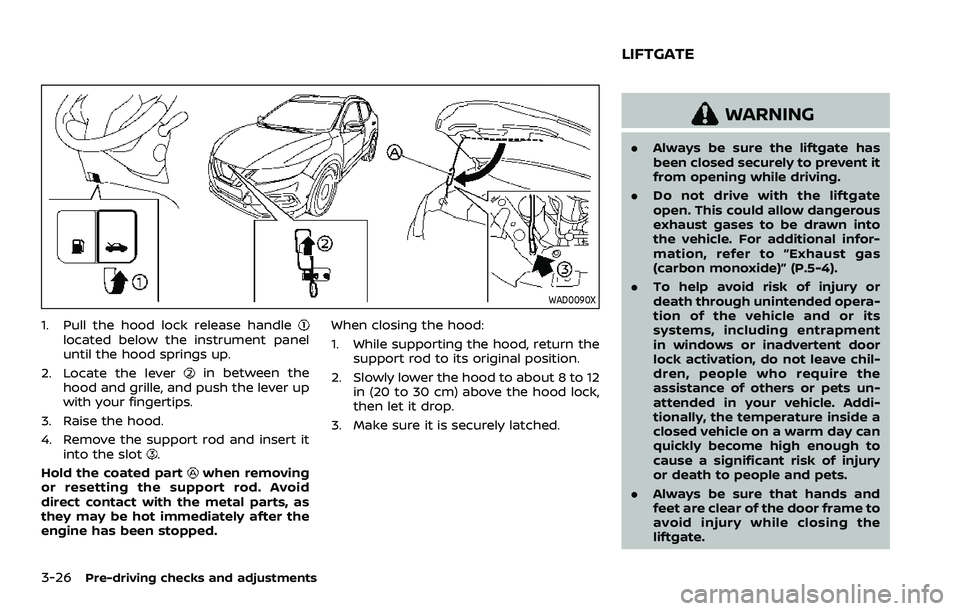
WAD0090X
1. Pull the hood lock release handlelocated below the instrument panel
until the hood springs up.
2. Locate the lever
in between the
hood and grille, and push the lever up
with your fingertips.
3. Raise the hood.
4. Remove the support rod and insert it into the slot
.
Hold the coated part
when removing
or resetting the support rod. Avoid
direct contact with the metal parts, as
they may be hot immediately after the
engine has been stopped. When closing the hood:
1. While supporting the hood, return the
support rod to its original position.
2. Slowly lower the hood to about 8 to 12 in (20 to 30 cm) above the hood lock,
then let it drop.
3. Make sure it is securely latched.
WARNING
. Always be sure the liftgate has
been closed securely to prevent it
from opening while driving.
. Do not drive with the liftgate
open. This could allow dangerous
exhaust gases to be drawn into
the vehicle. For additional infor-
mation, refer to “Exhaust gas
(carbon monoxide)” (P.5-4).
. To help avoid risk of injury or
death through unintended opera-
tion of the vehicle and or its
systems, including entrapment
in windows or inadvertent door
lock activation, do not leave chil-
dren, people who require the
assistance of others or pets un-
attended in your vehicle. Addi-
tionally, the temperature inside a
closed vehicle on a warm day can
quickly become high enough to
cause a significant risk of injury
or death to people and pets.
. Always be sure that hands and
feet are clear of the door frame to
avoid injury while closing the
liftgate.
LIFTGATE
Page 203 of 508
indicator light will turn off. Push the “I”
switchto turn the system on.
Do not allow any object to cover the
sensors
or apply glass cleaner on
them. Doing so will reduce the sensitiv-
ity of the sensor, resulting in improper
operation.
For the HomeLink® Universal Transceiver
operation, see “HomeLink® Universal
Transceiver” (P.2-83).
OUTSIDE MIRRORS
WARNING
Objects viewed in the outside mirror
on the passenger side are closer
than they appear. Be careful when
moving to the right. Using only this
mirror could cause an accident. Use
the inside mirror or glance over your
shoulder to properly judge distances
to other objects.
JVP0395X
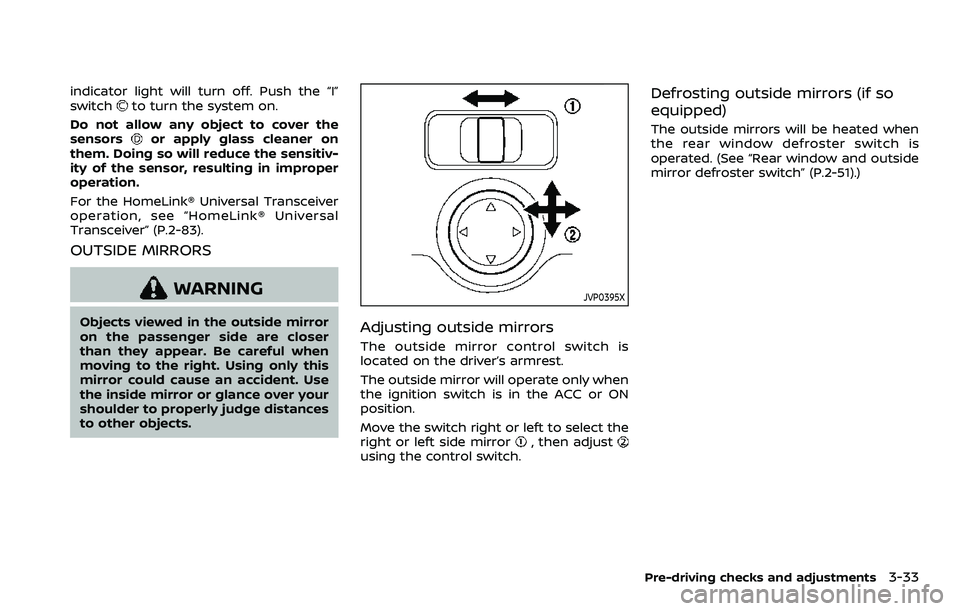
Adjusting outside mirrors
The outside mirror control switch is
located on the driver’s armrest.
The outside mirror will operate only when
the ignition switch is in the ACC or ON
position.
Move the switch right or left to select the
right or left side mirror
, then adjustusing the control switch.
Defrosting outside mirrors (if so
equipped)
The outside mirrors will be heated when
the rear window defroster switch is
operated. (See “Rear window and outside
mirror defroster switch” (P.2-51).)
Pre-driving checks and adjustments3-33
Page 209 of 508
WAE0016X
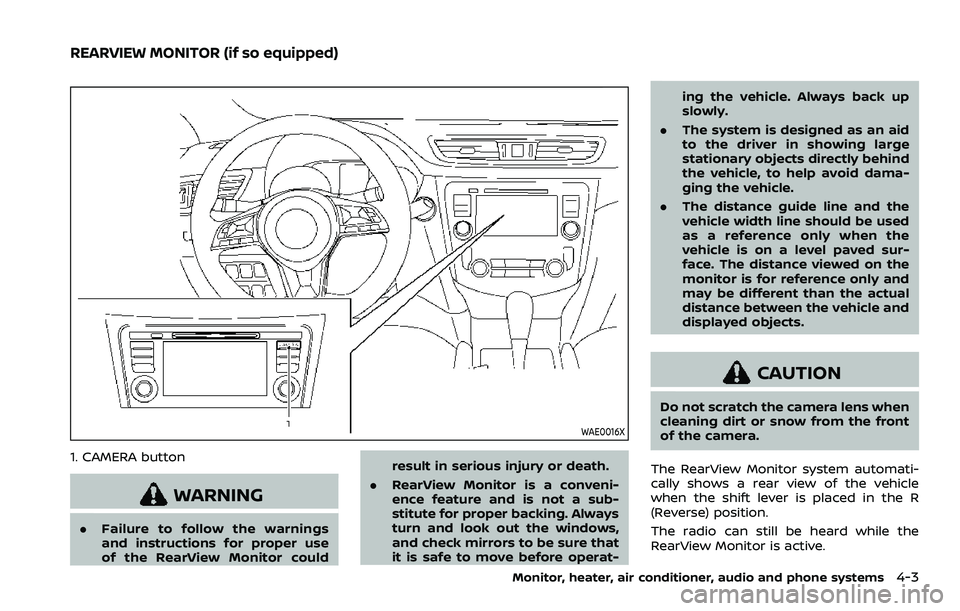
1. CAMERA button
WARNING
.Failure to follow the warnings
and instructions for proper use
of the RearView Monitor could result in serious injury or death.
. RearView Monitor is a conveni-
ence feature and is not a sub-
stitute for proper backing. Always
turn and look out the windows,
and check mirrors to be sure that
it is safe to move before operat- ing the vehicle. Always back up
slowly.
. The system is designed as an aid
to the driver in showing large
stationary objects directly behind
the vehicle, to help avoid dama-
ging the vehicle.
. The distance guide line and the
vehicle width line should be used
as a reference only when the
vehicle is on a level paved sur-
face. The distance viewed on the
monitor is for reference only and
may be different than the actual
distance between the vehicle and
displayed objects.
CAUTION
Do not scratch the camera lens when
cleaning dirt or snow from the front
of the camera.
The RearView Monitor system automati-
cally shows a rear view of the vehicle
when the shift lever is placed in the R
(Reverse) position.
The radio can still be heard while the
RearView Monitor is active.
Monitor, heater, air conditioner, audio and phone systems4-3
REARVIEW MONITOR (if so equipped)
Page 229 of 508
JVH1256X
Front and bird’s-eye views
JVH0873XRear and bird’s-eye views
JVH1257X
Rear and front-side views
WAE0067XRear view
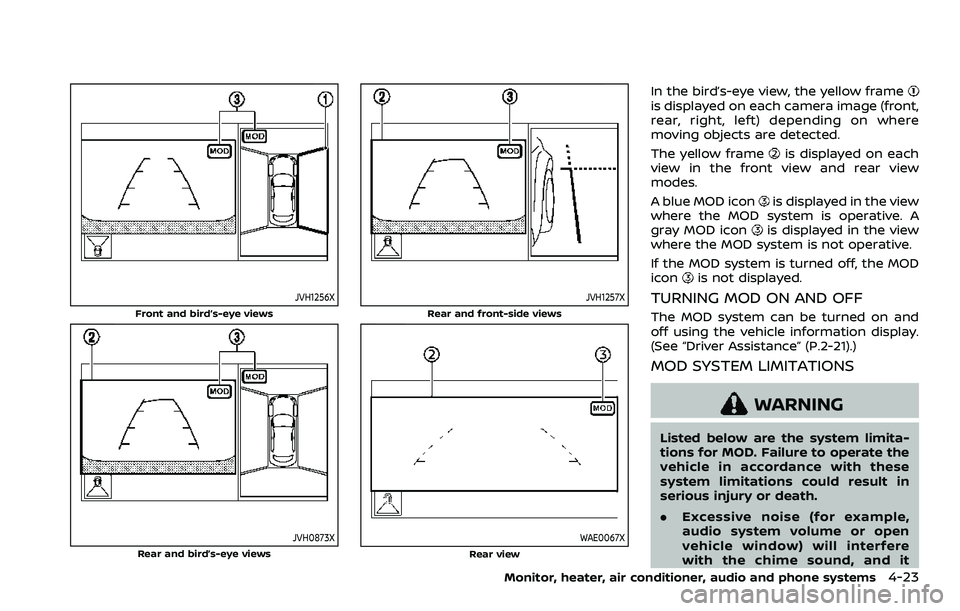
In the bird’s-eye view, the yellow frameis displayed on each camera image (front,
rear, right, left) depending on where
moving objects are detected.
The yellow frame
is displayed on each
view in the front view and rear view
modes.
A blue MOD icon
is displayed in the view
where the MOD system is operative. A
gray MOD icon
is displayed in the view
where the MOD system is not operative.
If the MOD system is turned off, the MOD
icon
is not displayed.
TURNING MOD ON AND OFF
The MOD system can be turned on and
off using the vehicle information display.
(See “Driver Assistance” (P.2-21).)
MOD SYSTEM LIMITATIONS
WARNING
Listed below are the system limita-
tions for MOD. Failure to operate the
vehicle in accordance with these
system limitations could result in
serious injury or death.
. Excessive noise (for example,
audio system volume or open
vehicle window) will interfere
with the chime sound, and it
Monitor, heater, air conditioner, audio and phone systems4-23