2023 NISSAN QASHQAI auto stop
[x] Cancel search: auto stopPage 161 of 508
during this period of about 45 seconds,
power to the moonroof is canceled.
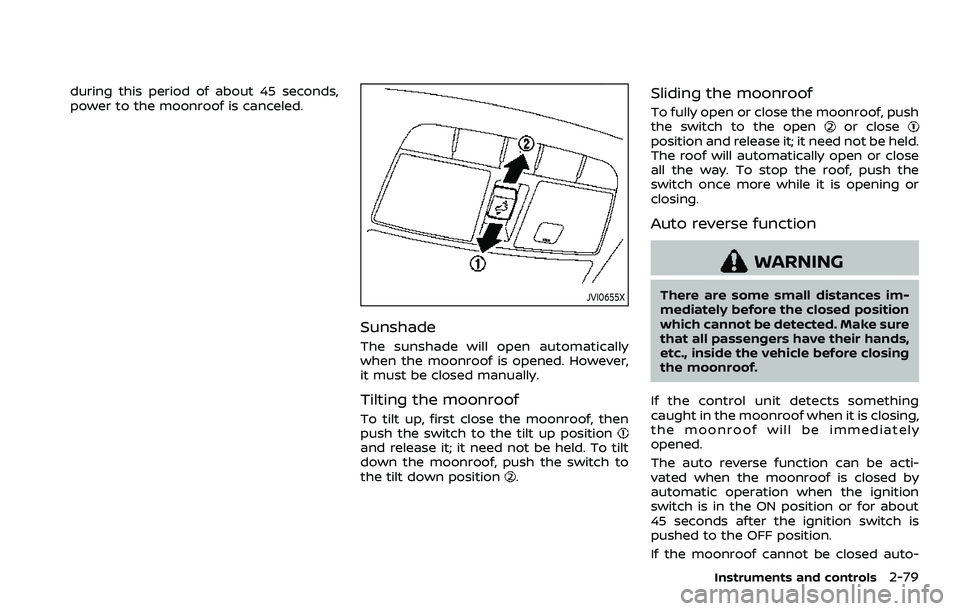
JVI0655X
Sunshade
The sunshade will open automatically
when the moonroof is opened. However,
it must be closed manually.
Tilting the moonroof
To tilt up, first close the moonroof, then
push the switch to the tilt up position
and release it; it need not be held. To tilt
down the moonroof, push the switch to
the tilt down position
.
Sliding the moonroof
To fully open or close the moonroof, push
the switch to the openor closeposition and release it; it need not be held.
The roof will automatically open or close
all the way. To stop the roof, push the
switch once more while it is opening or
closing.
Auto reverse function
WARNING
There are some small distances im-
mediately before the closed position
which cannot be detected. Make sure
that all passengers have their hands,
etc., inside the vehicle before closing
the moonroof.
If the control unit detects something
caught in the moonroof when it is closing,
the moonroof will be immediately
opened.
The auto reverse function can be acti-
vated when the moonroof is closed by
automatic operation when the ignition
switch is in the ON position or for about
45 seconds after the ignition switch is
pushed to the OFF position.
If the moonroof cannot be closed auto-
Instruments and controls2-79
Page 165 of 508

CARGO LIGHT
The cargo lights illuminate when the
liftgate is opened. When the liftgate is
closed, the lights will turn off.
The light will also turn off after a period
of time when the light remains illumi-
nated after the ignition switch has been
pushed to the OFF position to prevent
the battery from becoming discharged.
The HomeLink® Universal Transceiver
provides a convenient way to consolidate
the functions of up to three individual
hand-held transmitters into one built-in
device.
HomeLink® Universal Transceiver:
.Will operate most Radio Frequency
(RF) devices such as garage doors,
gates, home and office lighting, entry
door locks and security systems.
. Is powered by your vehicle’s battery.
No separate batteries are required. If
the vehicle’s battery is discharged or is
disconnected, HomeLink® will retain
all programming.
When the HomeLink® Universal Trans-
ceiver is programmed, retain the origi-
nal transmitter for future programming
procedures (Example: new vehicle pur-
chases). Upon sale of the vehicle, the
programmed HomeLink® Universal
Transceiver buttons should be erased
for security purposes. For additional
information, refer to “Programming
HomeLink®” (P.2-84).
WARNING
. Do not use the HomeLink® Uni-
versal Transceiver with any gar-
age door opener that lacks safety stop and reverse features as re-
quired by federal safety stan-
dards. (These standards became
effective for opener models man-
ufactured after April 1, 1982.) A
garage door opener which cannot
detect an object in the path of a
closing garage door and then
automatically stop and reverse,
does not meet current federal
safety standards. Using a garage
door opener without these fea-
tures increases the risk of serious
injury or death.
. During the programming proce-
dure your garage door or security
gate will open and close (if the
transmitter is within range). Make
sure that people or objects are
clear of the garage door, gate,
etc. that you are programming.
. Your vehicle’s engine should be
turned off while programming
the HomeLink® Universal Trans-
ceiver. Do not breathe exhaust
gases; they contain colorless
and odorless carbon monoxide.
Carbon monoxide is dangerous. It
can cause unconsciousness or
death.
Instruments and controls2-83
HomeLink® UNIVERSAL
TRANSCEIVER (if so equipped)
Page 167 of 508
4. At the receiver located on the garagedoor opener motor in the garage,
locate the “learn” or “smart” button
(the name and color of the button
may vary by manufacturer but it is
usually located near where the hang-
ing antenna wire is attached to the
unit). If there is difficulty locating the
button, reference the garage door
opener’s manual.
5. Press and release the “learn” or “smart” button.
NOTE:
Once the button is pressed, you have
approximately 30 seconds to initiate
the next step.
6. Return to the vehicle and firmly press and hold the programmed HomeLink®
button for two seconds and release.
Repeat the “press/hold/release” se-
quence up to 3 times to complete
the programming process. HomeLink®
should now activate your rolling code
equipped device.
7. If you have any questions or are having difficulty programming your
HomeLink® buttons, refer to the
HomeLink® web site at: www.
homelink.com/nissan or call 1-800-
355-3515.PROGRAMMING HomeLink® FOR
CANADIAN CUSTOMERS AND GATE
OPENERS
Canadian radio-frequency laws require
transmitter signals to “time-out” (or quit)
after several seconds of transmission –
which may not be long enough for
HomeLink® to pick up the signal during
programming. Similar to this Canadian
law, some U.S. gate operators are de-
signed to “time-out” in the same manner.
If you live in Canada or you are having
difficulties programming a gate operator
or garage door opener by using the
“Programming HomeLink®” procedures,
replace “Programming HomeLink®” Step
2 with the following:
NOTE:
When programming a garage door
opener, etc., unplug the device during
the “cycling” process to prevent possi-
ble damage to the garage door opener
components.
Step 2: Using both hands, simultaneously
press and hold the desired HomeLink®
button and the hand-held transmitter
button. During programming, your hand-
held transmitter may automatically stop
transmitting. Continue to press and hold
the desired HomeLink® button while you
press and re-press (“cycle”) your hand- held transmitter every two seconds until
the frequency signal has been learned.
The HomeLink® indicator light will flash
slowly and then rapidly after several
seconds upon successful programming.
DO NOT
release until the HomeLink®
indicator light flashes slowly and then
rapidly. When the indicator light flashes
rapidly, both buttons may be released.
The rapid flashing indicates successful
programming.
Proceed with “Programming HomeLink®”
step 3 to complete.
Remember to plug the device back in
when programming is completed.
OPERATING THE HomeLink® UNI-
VERSAL TRANSCEIVER
The HomeLink® Universal Transceiver,
after it is programmed, can be used to
activate the programmed device. To op-
erate, simply press and release the appro-
priate programmed HomeLink® Universal
Transceiver button. The amber indicator
light will illuminate while the signal is
being transmitted.
For convenience, the hand-held transmit-
ter of the device may also be used at any
time.
Instruments and controls2-85
Page 179 of 508

the welcome light and farewell light
function, see “Vehicle Settings” (P.2-23).
Locking doors
1. Remove the key from the ignitionswitch.
2. Close all the doors.
3. Push the LOCK
buttonon the
key fob.
4. All the doors will lock. All of the doors will lock when the
LOCK
button is pushed even
though a door remains open.
5. The hazard indicator flashes twice and the horn chirps once.
. When the LOCK
button is pushed
with all doors locked, the hazard
indicator flashes twice and the horn
chirps once as a reminder that the
doors are already locked.
. Operate the door handles to confirm
that the doors have been securely
locked.
Unlocking doors
1. Push the UNLOCKbuttonon
the key fob.
.The driver’s door unlocks..The hazard indicator flashes once if
all doors are completely closed. 2. Push the UNLOCK
button again
within 5 seconds.
.All the doors and the liftgate unlock..The hazard indicator flashes once if all doors are completely closed.
All doors will be locked automatically
unless one of the following operations is
performed within 1 minute of pushing the
UNLOCK
button.
. Any door or liftgate is opened.
. The ignition switch is placed in the ON
position.
NOTE:
The unlocking operation can be chan-
ged in selective unlock in the Vehicle
Settings of the vehicle information dis-
play. For additional information, refer to
“Vehicle Settings” (P.2-23).
Using panic alarm
If you are near your vehicle and feel
threatened, you may activate the alarm
to call attention as follows:
1. Push the PANIC
buttonon the
key fob for more than 0.5 seconds.
2. The theft warning alarm and head- lights will stay on for 25 seconds.
3. The panic alarm stops when:
.It has run for 25 seconds, or
.Any of the buttons on the key fob is pushed. (Note: the PANIC button
must be pushed for more than 1
second.)
Battery indicator light
The battery indicator lightilluminates
when you push any button. If the light
does not illuminate, the battery is weak or
needs replacement. For information re-
garding replacement of a battery, see
“Key fob battery replacement” (P.8-21).
Setting hazard indicator and horn
mode
This vehicle is set in hazard indicator and
horn mode when you first receive the
vehicle.
In hazard indicator and horn mode, when
the LOCK
buttonis pushed, the
hazard indicator flashes twice and the
horn chirps once. When the UNLOCK
buttonis pushed, the hazard indicator
flashes once.
If the horn chirp is not necessary, you can
switch to hazard indicator only mode by
following the switching procedure.
In hazard indicator only mode, when the
LOCK
button is pushed, the hazard
indicator flashes twice. When the UNLOCK
button is pushed, neither the hazard
indicator nor the horn operates.
Pre-driving checks and adjustments3-9
Page 199 of 508
WARNING
.Gasoline is extremely flammable
and highly explosive under cer-
tain conditions. You could be
burned or seriously injured if it is
misused or mishandled. Always
stop engine and do not smoke or
allow open flames or sparks near
the vehicle when refueling.
. Do not attempt to top off the fuel
tank after the fuel pump nozzle
shuts off automatically. Contin-
ued refueling may cause fuel
overflow, resulting in fuel spray
and possibly a fire.
. Use only an original equipment
type fuel-filler cap as a replace-
ment. It has a built-in safety valve
needed for proper operation of
the fuel system and emission
control system. An incorrect cap
can result in a serious malfunc-
tion and possible injury. It could
also cause the malfunction indi-
cator light to come on.
. Never pour fuel into the throttle
body to attempt to start your
vehicle. .
Do not fill a portable fuel contain-
er in the vehicle or trailer. Static
electricity can cause an explosion
of flammable liquid, vapor or gas
in any vehicle or trailer. To reduce
the risk of serious injury or death
when filling portable fuel contain-
ers:
— Always place the container on
the ground when filling.
— Do not use electronic devices when filling.
— Keep the pump nozzle in con- tact with the container while
you are filling it.
— Use only approved portable fuel containers for flammable
liquid.
CAUTION
. If fuel is spilled on the vehicle
body, flush it away with water to
avoid paint damage.
. Insert the cap straight into the
fuel-filler tube, then tighten until
the fuel-filler cap clicks. Failure to
tighten the fuel-filler cap properly
may cause the
malfunction indicator light (MIL) to illuminate.
If the
light illuminates be-
cause the fuel-filler cap is loose
or missing, tighten or install the
cap and continue to drive the
vehicle. The
light should turn
off after a few driving trips. If the
light does not turn off after a
few driving trips, have the vehicle
inspected. It is recommended you
visit a NISSAN dealer for this
service.
For additional information, see
“Malfunction Indicator Light
(MIL)” (P.2-16).
. The LOOSE FUEL CAP warning
message will be displayed if the
fuel-filler cap is not properly tigh-
tened. It may take a few driving
trips for the message to be dis-
played. Failure to tighten the fuel-
filler cap properly after the LOOSE
FUEL CAP warning message is
displayed may cause the
Malfunction Indicator Light (MIL)
to illuminate.
Pre-driving checks and adjustments3-29
Page 228 of 508
4-22Monitor, heater, air conditioner, audio and phone systems
always use the outside mirror
and rearview mirror and turn
and check the surroundings to
ensure it is safe to maneuver.
. The system is deactivated at
speeds above 5 MPH (8 km/h). It
is reactivated at lower speeds.
. The MOD system is not designed
to detect the surrounding sta-
tionary objects.
The MOD system can inform the driver of
moving objects near the vehicle when
driving out of garages, maneuvering in
parking lots and in other such instances.
The MOD system detects moving objects
by using image processing technology on
the image shown in the display.
MOD SYSTEM OPERATION
The MOD system will turn on automati-
cally under the following conditions:
. When the shift lever is in the R
(Reverse) position.
. When the CAMERA button is pushed
to activate the Intelligent Around
View® Monitor system on the display.
. When vehicle speed decreases below
approximately 5 MPH (8 km/h).
The MOD system operates in the follow-
ing conditions when the camera view is displayed:
.
When the shift lever is in the P (Park) or
N (Neutral) position and the vehicle is
stopped, the MOD system detects the
moving objects in the bird’s-eye view.
The MOD system will not operate if
either door is opened. If outside mir-
rors are folded, MOD may not operate
properly.
. When the shift lever is in the D (Drive)
position, and the vehicle speed is
below approximately 5 MPH (8 km/h),
the MOD system detects moving ob-
jects in the front view.
. When the shift lever is in the R
(Reverse) position and the vehicle
speed is below approximately 5 MPH
(8 km/h), the MOD system detects
moving objects in the rear view. The
MOD system will not operate if the
liftgate is open.
The MOD system does not detect moving
objects in the front-side view. The MOD
icon is not displayed on the screen when
in this view.
When the MOD system detects a moving
object near the vehicle, the yellow frame
will be displayed on the view where the
object is detected and a chime will sound
once. While the MOD system continues to
detect moving objects, the yellow frame
continues to be displayed. NOTE:
While the RCTA chime (if so equipped) is
beeping, the MOD system does not
chime.
Page 240 of 508
4-34Monitor, heater, air conditioner, audio and phone systems
— The vehicle is covered with acar cover.
. Be sure that antenna is removed
before the vehicle enters an auto-
matic car wash.
. Always properly tighten the an-
tenna rod during installation.
Otherwise, the antenna rod may
break during vehicle operation.
. A build up of ice on the antenna
can affect radio performance. Re-
move the ice to restore radio
reception.
. When removing snow from the
roof, do not apply strong force to
the antenna. That may cause
broken antenna and roof panel
dent.
. When using a high pressure car
wash, keep the high pressure
nozzle away from the antenna.
The seal may be deformed or
damaged.
. The radio performance may be
affected if cargo carried on the
roof blocks the radio signal. If
possible, do not put cargo near
the antenna.When installing a car phone or a CB radio
in your vehicle, be sure to observe the
following precautions, otherwise the new
equipment may adversely affect the elec-
tronic control modules and electronic
control system harness.
WARNING
.A cellular phone should not be
used for any purpose while driv-
ing so full attention may be given
to vehicle operation. Some juris-
dictions prohibit the use of cellu-
lar phones while driving.
. If you must make a call while your
vehicle is in motion, the hands-
free cellular phone operational
mode (if so equipped) is highly
recommended. Exercise extreme
caution at all times so full atten-
tion may be given to vehicle
operation.
. If a conversation in a moving
vehicle requires you to take
notes, pull off the road to a safe
location and stop your vehicle
before doing so.
CAUTION
.Keep the antenna as far away as
possible from the electronic con-
trol modules.
. Keep the antenna wire more than
8 in (20 cm) away from the
electronic control system har-
ness. Do not route the antenna
wire next to any harness.
. Adjust the antenna standing-
wave ratio as recommended by
the manufacturer.
. Connect the ground wire from the
CB radio chassis to the body.
. For details, it is recommended
you visit a NISSAN dealer.
CAR PHONE OR CB RADIO
Page 246 of 508

5-6Starting and driving
or wheels on your vehicle to ensure that
the replacement or alternate tires and
wheels allow the TPMS to continue to
function properly.
Additional information
.Since the spare tire (if so equipped) is
not equipped with the TPMS, the TPMS
does not monitor the tire pressure of
the spare tire.
. The TPMS will activate only when the
vehicle is driven at speeds above 16
MPH (25 km/h). Also, this system may
not detect a sudden drop in tire
pressure (for example a flat tire while
driving).
. The low tire pressure warning light
does not automatically turn off when
the tire pressure is adjusted. After the
tire is inflated to the recommended
pressure, the vehicle must be driven at
speeds above 16 MPH (25 km/h) to
activate the TPMS and turn off the low
tire pressure warning light. Use a tire
pressure gauge to check the tire
pressure.
. The “Tire Pressure Low - Add Air”
warning appears in the vehicle infor-
mation display when the low tire
pressure warning light is illuminated
and low tire pressure is detected. The
“Tire Pressure Low - Add Air” warning
turns off when the low tire pressure warning light turns off.
The “Tire Pressure Low - Add Air”
warning does not appear if the low
tire pressure warning light illuminates
to indicate a TPMS malfunction.
. Tire pressure rises and falls depending
on the heat caused by the vehicle’s
operation and the outside tempera-
ture. Do not reduce the tire pressure
after driving because the tire pressure
rises after driving. Low outside tem-
perature can lower the temperature
of the air inside the tire which can
cause a lower tire inflation pressure.
This may cause the low tire pressure
warning light to illuminate. If the
warning light illuminates in low ambi-
ent temperature, check the tire pres-
sure for all four tires.
For additional information, see “Low tire
pressure warning light” (P.2-14) and “Tire
Pressure Monitoring System (TPMS)” (P.6-
3).
WARNING
. If the low tire pressure warning
light illuminates while driving,
avoid sudden steering maneu-
vers or abrupt braking, reduce
vehicle speed, pull off the road
to a safe location and stop the vehicle as soon as possible. Driv-
ing with under-inflated tires may
permanently damage the tires
and increase the likelihood of tire
failure. Serious vehicle damage
could occur and may lead to an
accident and could result in ser-
ious personal injury. Check the
tire pressure for all four tires.
Adjust the tire pressure to the
recommended COLD tire pressure
shown on the Tire and Loading
Information label to turn the low
tire pressure warning light OFF. If
you have a flat tire, replace it with
a spare tire (if so equipped) or
repair it using the emergency tire
puncture repair kit (if so
equipped) as soon as possible.
(See “Flat tire” (P.6-3) for chan-
ging a flat tire.)
. Since the spare tire (if so
equipped) is not equipped with
the TPMS, when a spare tire is
mounted or a wheel is replaced,
the TPMS will not function and
the low tire pressure warning
light will flash for approximately
1 minute. The light will remain on
after 1 minute. Have your tires
replaced and/or TPMS system
reset as soon as possible. It is