2023 NISSAN PATHFINDER battery
[x] Cancel search: batteryPage 513 of 665

•When the front defroster switch is on.
• When the rear window defroster switch
is on.
• When the temperature inside the ve-
hicle is lower than approximately 20°C
(68°F), unless the Air Conditioning ECO
customize option is selected, and the
ECO driving mode is on.
• When the temperature inside the ve-
hicle is higher than approximately 30°C
(86°F), unless the Air Conditioning ECO
customize option is selected, and the
ECO driving mode is on. (When the air
conditioner is off, the Idling Stop Sys-
tem will operate.)
• When the fan speed of the air condi-
tioner is set to the maximum speed,
unless the Air Conditioning ECO cus-
tomize option is selected, and the ECO
driving mode is on.
• When the Idling Stop OFF switch is
turned on.
• When the power consumption is large.
• When the altitude is high.
• When the accelerator pedal is
depressed.
• When the shif t lever is in any range
other than D (Drive). •
When the brake pedal is not firmly
depressed.
• When stopping the vehicle on steep
sloping roads.
NOTE:
The Idling Stop System may not activate
when the Intelligent Key is not in the ve-
hicle and you open/close any door.
The engine will not restart even if the
brake pedal is released while the Idling
Stop System is activated under the fol-
lowing conditions: (The engine may re-
start under other conditions.)
• When the automatic brake hold system
is activated.
• When the engine hood is opened.
NOTE:
It may take some time until the Idling
Stop System activates under the follow-
ing conditions:
•When the battery is discharged.
• When the outside temperature is low or
high.
• When the battery is replaced or the
battery terminal is disconnected for
extended periods and then
reconnected.
NOTE:
When the Idling Stop System indicator
light illuminates, the engine starts run-
ning automatically under at least one of
the following conditions:
• The vacuum pressure for the brake sys-
tem is not enough as the brake pedal is
repeatedly depressed.
• The driver’s seat belt is unfastened, or
the driver’s door is open.
• The battery voltage becomes low (due
to electrical load from other vehicle
systems like headlights, heaters, etc.,
or auxiliary devices connected to the 12
volt socket inside the vehicle).
• The vehicle speed is above about 1 mph
(2 km/h).
• When the rear window defroster is
operated.
• When the temperature inside the ve-
hicle is lower than approximately 68°F
(20°C), unless the Air Conditioning ECO
customize option is selected, and the
ECO driving mode is on.
5-190Starting and driving
Page 514 of 665

•When the temperature inside the ve-
hicle is higher than approximately 86°F
(30°C), unless the Air Conditioning ECO
customize option is selected, and the
ECO driving mode is on. (When the air
conditioner is off, the Idling Stop Sys-
tem will operate.)
• When the front defroster is turned on.
• When more than 3 minutes have
elapsed since the Idling Stop System
was active.
• When the accelerator pedal is
depressed.
• When the steering wheel is operated.
(The steering wheel operation may be-
come heavy, but this is not a
malfunction.)
• When the battery capacity is low.
• When the power consumption is high.
• When the shif t lever is in any range
other than D (Drive).
• When the Idling Stop OFF switch is
pushed.
• When the negative pressure of the
brake system is not sufficiently applied
by depressing the brake pedal several
times.NOTE:
The Idling Stop System may not activate
when the Intelligent Key is not in the ve-
hicle and you open/close any door.
NOTE:
The following condition will prevent the
Idling Stop System from automatically
restarting the engine. Starting the en-
gine with the ignition switch operation is
then necessary:
• The hood is open.
Use this system while waiting at a stop
light, etc. When the vehicle is stopped for
long periods of time, turn off the engine.
When the engine is stopped by the Idling
Stop System, heating, cooling and dehu-
midif ying functions will be deactivated. To
avoid the air conditioning functions from
being deactivated, turn off the Idling Stop
System by pushing the Idling Stop OFF
switch.
RETROGRADE MOVEMENT
CONTROL FUNCTION
This system is designed to reduce the ret-
rograde movement that occurs while the
driver’s foot changes from depressing the
brake pedal to the accelerator pedal when
moving the vehicle while the Idling Stop
System is active on a hilly road.
IDLING STOP SYSTEM DISPLAY
The status of the Idling Stop System can be
checked in the vehicle information display.
Starting and driving5-191
Page 519 of 665

FREEING A FROZEN DOOR LOCK
To prevent a door lock from freezing, apply
de-icer through the key hole. If the lock
becomes frozen, heat the key before in-
serting it into the key hole, or use the
NISSAN Intelligent Key®.
ANTIFREEZE
In the winter when it is anticipated that the
temperature will drop below 32°F (0°C),
check the antifreeze to assure proper win-
ter protection. For additional information,
see “Engine cooling system” (P. 8-4).
BATTERY
If the battery is not fully charged during
extremely cold weather conditions, the
battery fluid may freeze and damage the
battery. To maintain maximum efficiency,
the battery should be checked regularly.
For additional information, see “Battery”
(P. 8-13).
DRAINING OF COOLANT WATER
If the vehicle is to be lef t outside without
antifreeze, drain the cooling system, includ-
ing the engine block. Refill before operating
the vehicle. For additional information, see
“Changing engine coolant” (P. 8-5).
TIRE EQUIPMENT
1. SUMMER tires have a tread designed toprovide superior performance on dry
pavement. However, the performance of
these tires will be substantially reduced
in snowy and icy conditions. If you oper-
ate your vehicle on snowy or icy roads,
NISSAN recommends the use of MUD &
SNOW or ALL SEASON TIRES on all four
wheels. It is recommended that you visit
a NISSAN dealer for the tire type, size,
speed rating and availability information.
2. For additional traction on icy roads, studded tires may be used. However,
some U.S. states and Canadian prov-
inces prohibit their use. Check local,
state and provincial laws before install-
ing studded tires.
Skid and traction capabilities of studded
snow tires on wet or dry surfaces may be
poorer than that of non-studded snow
tires.
3. Tire chains may be used. For additional information, see “Tire chains” (P. 8-38).
4-Wheel Drive (4WD) model
If you install snow tires, they must also be
the same size, brand, construction and
tread pattern on all four wheels.
SPECIAL WINTER EQUIPMENT
It is recommended that the following items
be carried in the vehicle during winter:
• A scraper and stiff-bristled brush to re-move ice and snow from the windows
and wiper blades.
• A sturdy, flat board to be placed under the jack to give it firm support.
• A shovel to dig the vehicle out of snowdrif ts.
• Extra washer fluid to refill the windshield- washer fluid reservoir.
DRIVING ON SNOW OR ICE
WARNING
• Wet ice (32°F, 0°C and freezing rain),
very cold snow or ice can be slick and
very hard to drive on. The vehicle will
have much less traction or “grip” un-
der these conditions. Try to avoid
driving on wet ice until the road is
salted or sanded.
COLD WEATHER DRIVING
5-196Starting and driving
Page 532 of 665

4. Lower the vehicle slowly until the tiretouches the ground. Then, with the
wheel nut wrench, tighten the wheel
nuts securely in the sequence illustrated
(
OA,OB,OC,OD,OE). Lower the vehicle
completely.
WARNING
• Incorrect wheel nuts or improperly
tightened wheel nuts can cause the
wheel to become loose or come off.
This could cause an accident.
• Do not use oil or grease on the wheel
studs or nuts. This could cause the
nuts to become loose.
• Retighten the wheel nuts when the
vehicle has been driven for 621 miles
(1,000 km) (also in cases of a flat tire,
etc.).
As soon as possible, tighten the wheel
nuts to the specified torque with a
torque wrench.
Wheel nut tightening torque: 83 f t-lb (113 N·m) The wheel nuts must be kept tightened
to specification at all times. It is recom-
mended that wheel nuts be tightened to
specifications at each lubrication
interval.
Adjust tire pressure to the COLD
pressure.
COLD pressure: Af ter vehicle has been
parked for 3 hours or more or driven less
than 1 mile (1.6 km).
COLD tire pressures are shown on the
Tire and Loading Information label af-
fixed to the driver side center pillar.
5. Securely store the flat tire, tools and
jacking equipment in the vehicle.
6. Close the lif tgate.
WARNING
• Always make sure that the spare tire
and jacking equipment are properly
secured af ter use. Such items can be-
come dangerous projectiles in an ac-
cident or sudden stop.
• The spare tire is designed for emer-
gency use. For additional informa-
tion, see “Wheels and tires” (P. 8-28). To start your engine with a booster battery,
the instructions and precautions below
must be followed.
WARNING
• If done incorrectly, jump starting can
lead to a battery explosion, resulting
in severe injury or death. It could also
damage your vehicle.
• Explosive hydrogen gas is always
present in the vicinity of the battery.
Keep all sparks and flames away
from the battery.
• Do not allow battery fluid to come
into contact with eyes, skin, clothing
or painted surfaces. Battery fluid is a
corrosive sulfuric acid solution which
can cause severe burns. If the fluid
should come into contact with any-
thing, immediately flush the con-
tacted area with water.
• Keep battery out of the reach of
children.
• The booster battery must be rated at
12 volts. Use of an improperly rated
battery can damage your vehicle.
JUMP STARTING
In case of emergency6-11
Page 533 of 665

•Whenever working on or near a bat-
tery, always wear suitable eye pro-
tectors (for example, goggles or in-
dustrial safety spectacles) and
remove rings, metal bands, or any
other jewelry. Do not lean over the
battery when jump starting.
• Do not attempt to jump start a frozen
battery. It could explode and cause
serious injury.
• Your vehicle has an automatic engine
cooling fan. It could come on at any
time. Keep hands and other objects
away from it.
WARNING
Always follow the instructions below.
Failure to do so could result in damage
to the charging system and cause per-
sonal injury.
1. If the booster battery is in another ve- hicle, position the two vehicles to bring
their batteries near each other.
Do not allow the two vehicles to touch.
2. Apply the parking brake. Push the park button to shif t to the P (Park) position.
Switch off all unnecessary electrical sys-
tems (lights, heater, air conditioner, etc.). 3. Place the ignition switch to the LOCK or
OFF position.
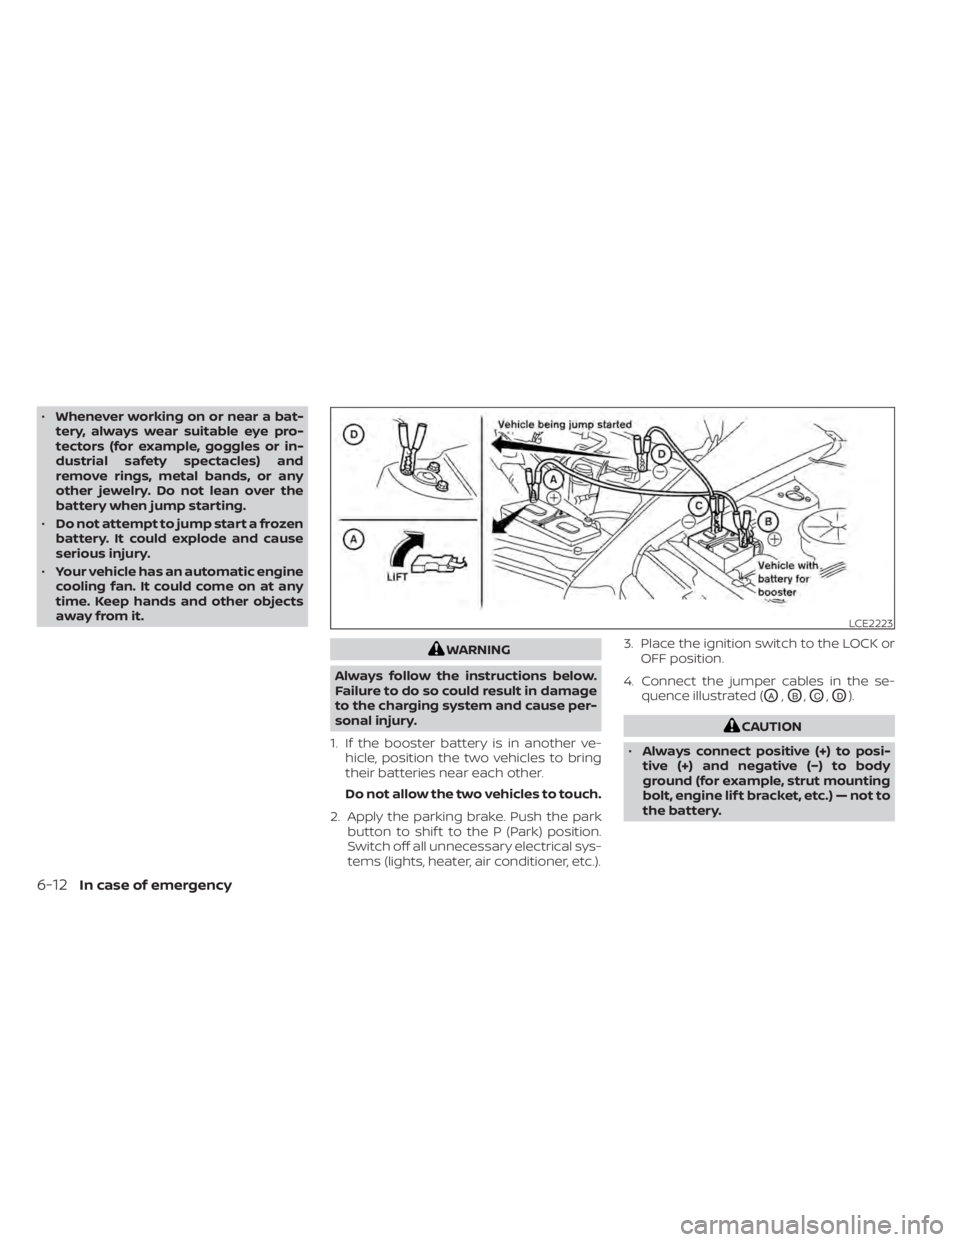
4. Connect the jumper cables in the se- quence illustrated (
OA,OB,OC,OD).
CAUTION
• Always connect positive (+) to posi-
tive (+) and negative (−) to body
ground (for example, strut mounting
bolt, engine lif t bracket, etc.) — not to
the battery.
LCE2223
6-12In case of emergency
Page 537 of 665

NOTE:
If the battery is completely drained the
transmission will not manually shif t to
other positions.
Two-Wheel Drive models with
automatic transmission
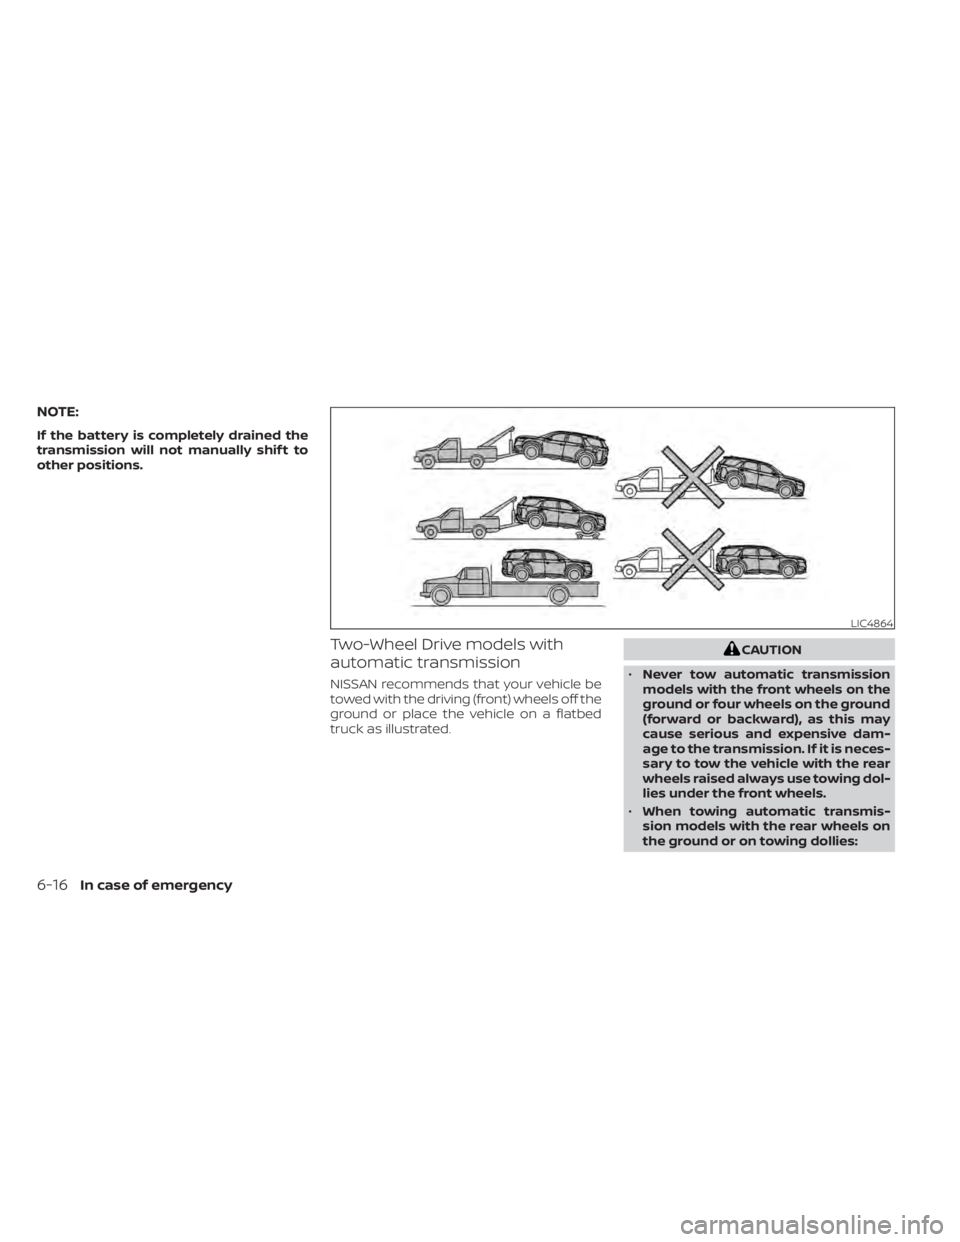
NISSAN recommends that your vehicle be
towed with the driving (front) wheels off the
ground or place the vehicle on a flatbed
truck as illustrated.
CAUTION
• Never tow automatic transmission
models with the front wheels on the
ground or four wheels on the ground
(forward or backward), as this may
cause serious and expensive dam-
age to the transmission. If it is neces-
sary to tow the vehicle with the rear
wheels raised always use towing dol-
lies under the front wheels.
• When towing automatic transmis-
sion models with the rear wheels on
the ground or on towing dollies:
LIC4864
6-16In case of emergency
Page 538 of 665

–Place the ignition switch in the
OFF position, and secure the
steering wheel in a straight-ahead
position with a rope or similar de-
vice. Never secure the steering
wheel by placing the ignition
switch in the LOCK position. This
may damage the steering lock
mechanism (for models with a
steering lock mechanism).
NOTE:
If the battery is completely drained the
transmission will not manually shif t to
other positions.
VEHICLE RECOVERY (freeing a
stuck vehicle)
WARNING
To avoid vehicle damage, serious per-
sonal injury or death when recovering a
stuck vehicle:
• Contact a professional towing ser-
vice to recover the vehicle if you have
any questions regarding the recov-
ery procedure. •
Tow chains or cables must be at-
tached only to main structural mem-
bers of the vehicle.
• Do not use the vehicle tie-downs to
tow or free a stuck vehicle.
• Only use devices specifically de-
signed for vehicle recovery and fol-
low the manufacturer's instructions.
• Always pull the recovery device
straight out from the front of the ve-
hicle. Never pull at an angle.
• Route recovery devices so they do
not touch any part of the vehicle ex-
cept the attachment point.
If your vehicle is stuck in sand, snow, mud,
etc., use a tow strap or other device de-
signed specifically for vehicle recovery. Al-
ways follow the manufacturer's instruc-
tions for the recovery device.
Rocking a stuck vehicle
WARNING
• Stand clear of a stuck vehicle.
•
Do not spin your tires at high speed. This
could cause them to explode and result
in serious injury. Parts of your vehicle
could also overheat and be damaged.
If your vehicle is stuck in sand, snow, mud,
etc., use the following procedure:
1. Turn off the Vehicle Dynamic Control (VDC) system or place the Drive Mode
Selector in MUD/RUT (4WD models) or
SAND (4WD models) mode.
2. Make sure the area in front and behind the vehicle is clear of obstructions.
3. Turn the steering wheel right and lef t to clear an area around the front tires.
4. Slowly rock the vehicle forward and backward.
• Shif t back and forth between R (Re- verse) and D (Drive).
• Apply the accelerator as little as pos- sible to maintain the rocking motion.
• Release the accelerator pedal before shif ting between R (Reverse) and D
(Drive).
• Do not spin the tires above 35 mph (55 km/h).
5. If the vehicle cannot be freed af ter a few tries, contact a professional towing ser-
vice to remove the vehicle.
In case of emergency6-17
Page 548 of 665

8 Do-it-yourself
Maintenance precautions.......................8-2
Engine compartment check locations ...........8-3
Engine cooling system ..........................8-4
Checking engine coolant level ................8-5
Changing engine coolant ....................8-5
Engine oil .......................................8-6
Checking engine oil level .....................8-6
Changing engine oil and oil filter ..............8-6
Automatic Transmission Fluid (ATF) .............8-10
Brake fluid ....................................... 8-11
Windshield-washer fluid .........................8-11
Windshield-washer fluid reservoir ............8-11
Battery......................................... 8-13
Jump starting ............................... 8-14
Variable voltage control system ................8-15
Drive belt ....................................... 8-15
Spark plugs .................................... 8-16
Replacing spark plugs .......................8-16
Air cleaner ..................................... 8-17
In-cabin microfilter .......................... 8-17Windshield wiper blades
........................8-18
Cleaning .................................... 8-18
Replacing ................................... 8-18
Brakes ......................................... 8-20
Fuses .......................................... 8-20
Engine compartment ....................... 8-21
Passenger compartment ...................8-22
Battery replacement ........................... 8-24
NISSAN Intelligent Key® ......................8-24
Lights .......................................... 8-26
Headlights .................................. 8-26
Fog lights (if so equipped) ...................8-26
Exterior and interior lights ...................8-26
Wheels and tires ............................... 8-28
Tire pressure ................................ 8-28
Tire labeling ................................. 8-33
Types of tires ................................ 8-37
Tire chains .................................. 8-38
Changing
wheels and tires .................. 8-39