2023 NISSAN MURANO towing
[x] Cancel search: towingPage 27 of 518
FLEXIBLE SEATING
WARNING
• Never allow anyone to ride in the
cargo area or on the rear seats when
they are in the fold-down position.
In a collision, people riding in these
areas without proper restraints are
more likely to be seriously injured or
killed.
• Do not allow people to ride in any
area of your vehicle that is not
equipped with seats and seat belts.
Be sure everyone in your vehicle is in
a seat and using a seat belt properly.
• Do not allow more than one person
to use the same seat belt.
• Do not fold down the rear seats when
occupants are in the rear seat area or
any luggage is on the rear seats.
– Make sure that the seat path is
clear before moving the seat.
– Be careful not to allow hands or
feet to get caught or pinched in
the seat. •
Head restraints/headrests should be
adjusted properly as they may pro-
vide significant protection against
injury in an accident. Always replace
and adjust them properly if they have
been removed for any reason.
• If the head restraints/headrests are
removed for any reason, they should
be securely stored to prevent them
from causing injury to passengers or
damage to the vehicle in case of sud-
den braking or an accident.
• When returning rear row seatbacks
to the upright position, the operator
should always verif y that the back
is locked in the upright position by
gently rocking the seatback before
allowing passengers to occupy the
rear seats. If they are not completely
secured, passengers may be injured
in an accident or sudden stop.
• Properly secure all cargo to help pre-
vent it from sliding or shif ting. Do not
place cargo higher than the seat-
backs. In a sudden stop or collision,
unsecured cargo could cause per-
sonal injury.
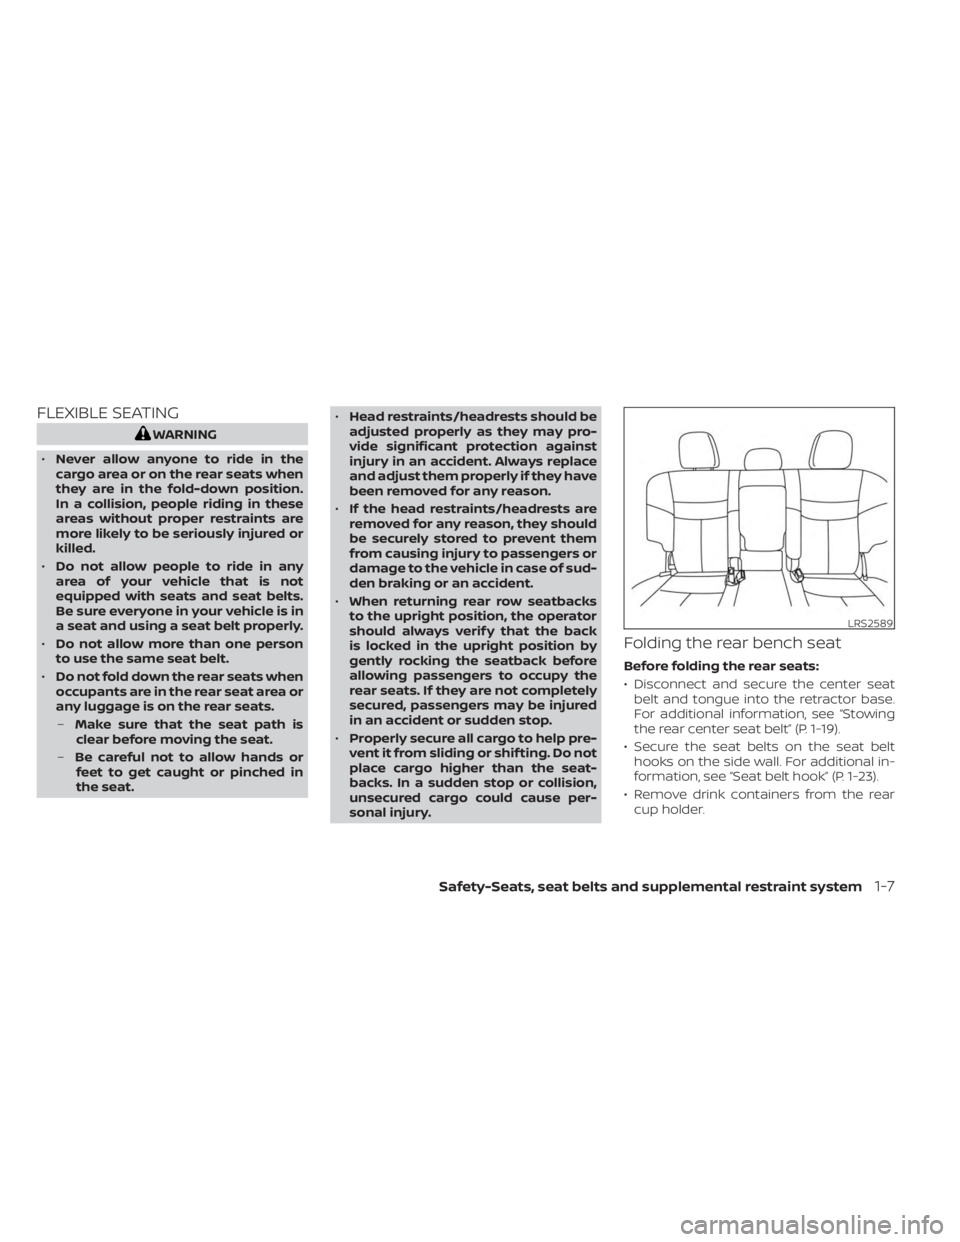
Folding the rear bench seat
Before folding the rear seats:
• Disconnect and secure the center seat belt and tongue into the retractor base.
For additional information, see “Stowing
the rear center seat belt” (P. 1-19).
• Secure the seat belts on the seat belt hooks on the side wall. For additional in-
formation, see “Seat belt hook” (P. 1-23).
• Remove drink containers from the rear cup holder.
LRS2589
Safety-Seats, seat belts and supplemental restraint system1-7
Page 40 of 518
WARNING
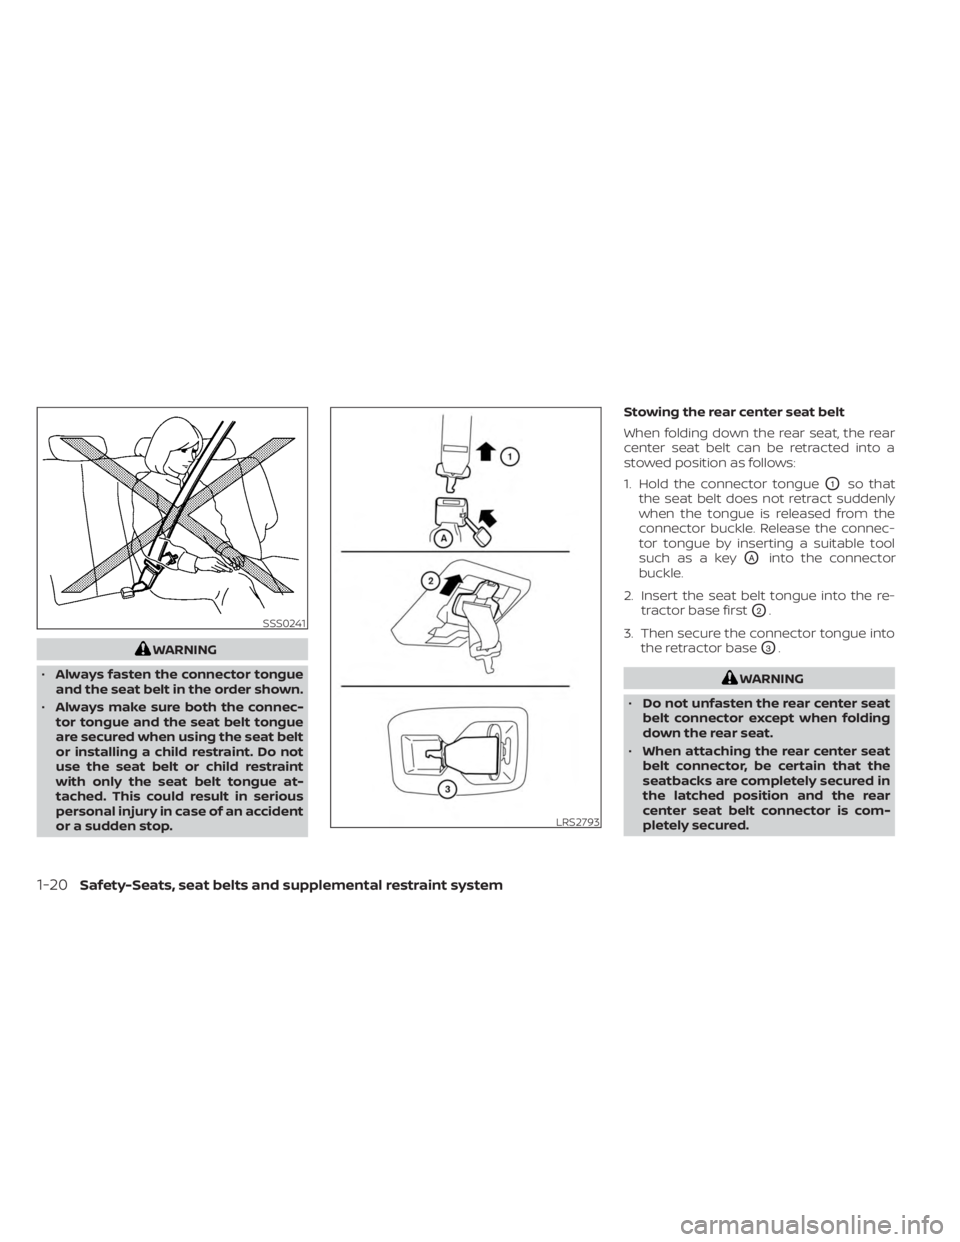
• Always fasten the connector tongue
and the seat belt in the order shown.
• Always make sure both the connec-
tor tongue and the seat belt tongue
are secured when using the seat belt
or installing a child restraint. Do not
use the seat belt or child restraint
with only the seat belt tongue at-
tached. This could result in serious
personal injury in case of an accident
or a sudden stop. Stowing the rear center seat belt
When folding down the rear seat, the rear
center seat belt can be retracted into a
stowed position as follows:
1. Hold the connector tongue
O1so that
the seat belt does not retract suddenly
when the tongue is released from the
connector buckle. Release the connec-
tor tongue by inserting a suitable tool
such as a key
OAinto the connector
buckle.
2. Insert the seat belt tongue into the re- tractor base first
O2.
3. Then secure the connector tongue into the retractor base
O3.
WARNING
• Do not unfasten the rear center seat
belt connector except when folding
down the rear seat.
• When attaching the rear center seat
belt connector, be certain that the
seatbacks are completely secured in
the latched position and the rear
center seat belt connector is com-
pletely secured.
SSS0241
LRS2793
1-20Safety-Seats, seat belts and supplemental restraint system
Page 193 of 518
Auto Power Lif tgate System Battery
Power Saving Mode:
The vehicle goes into power saving mode
when the lif tgate is open for a long time
(approximately 12 hours). This is to prevent
deterioration of the battery. The power
saving mode automatically cuts the power
supply of the power lif tgate door.
When the power to the lif tgate is cut off, the
manual mode must be performed. Af ter
the manual mode is performed, the power
lif tgate function is restored.
NOTE:
When a battery voltage is lower than ap-
proximately 11V, the power lif tgate may
not operate af ter automatic return.
MOTION-ACTIVATED LIFTGATE
(if so equipped)
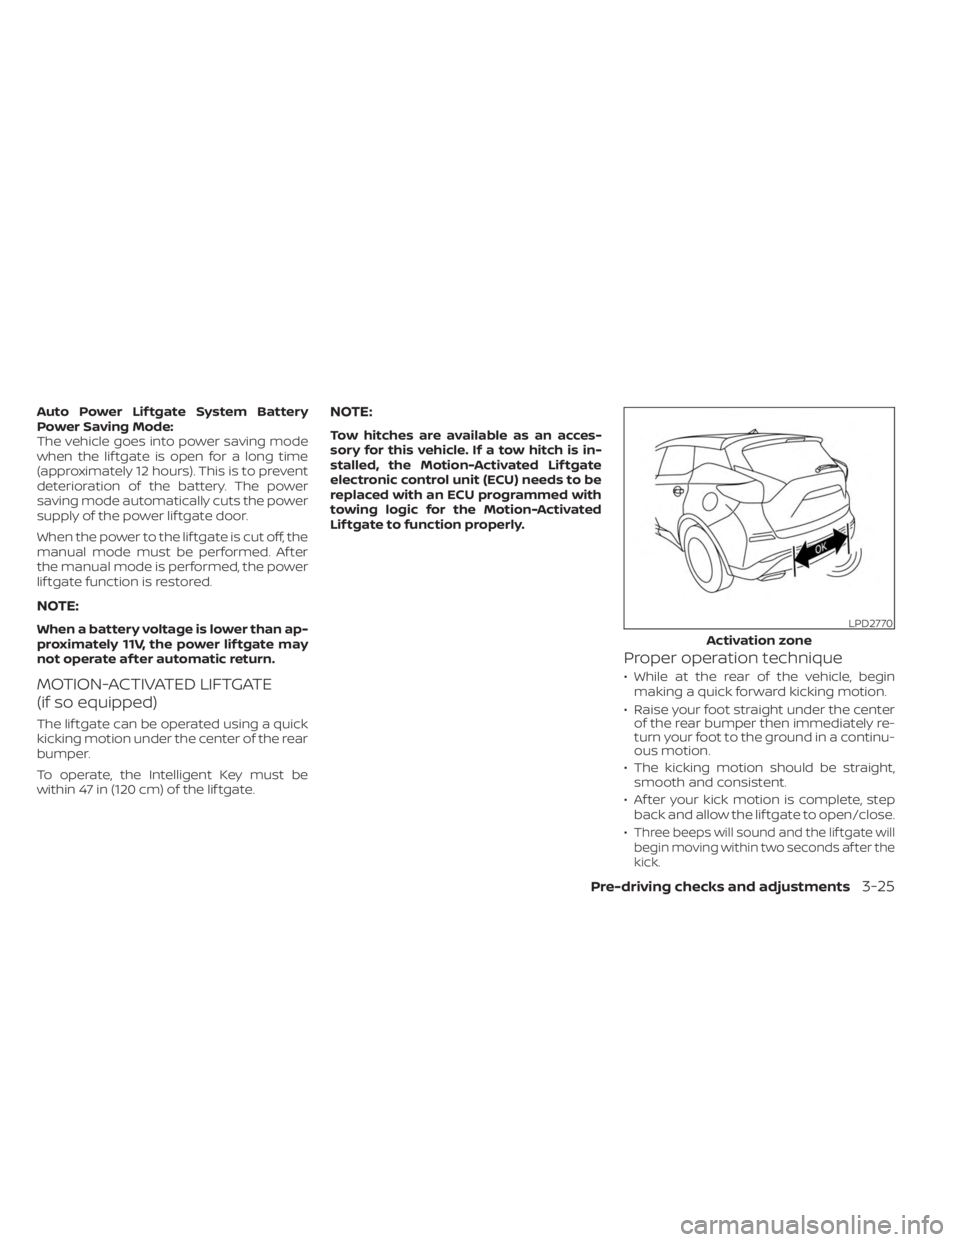
The lif tgate can be operated using a quick
kicking motion under the center of the rear
bumper.
To operate, the Intelligent Key must be
within 47 in (120 cm) of the lif tgate.
NOTE:
Tow hitches are available as an acces-
sory for this vehicle. If a tow hitch is in-
stalled, the Motion-Activated Lif tgate
electronic control unit (ECU) needs to be
replaced with an ECU programmed with
towing logic for the Motion-Activated
Lif tgate to function properly.
Proper operation technique
• While at the rear of the vehicle, beginmaking a quick forward kicking motion.
• Raise your foot straight under the center of the rear bumper then immediately re-
turn your foot to the ground in a continu-
ous motion.
• The kicking motion should be straight, smooth and consistent.
• Af ter your kick motion is complete, step back and allow the lif tgate to open/close.
•
Three beeps will sound and the lif tgate will
begin moving within two seconds af ter the
kick.
LPD2770
Activation zone
Pre-driving checks and adjustments3-25
Page 232 of 518
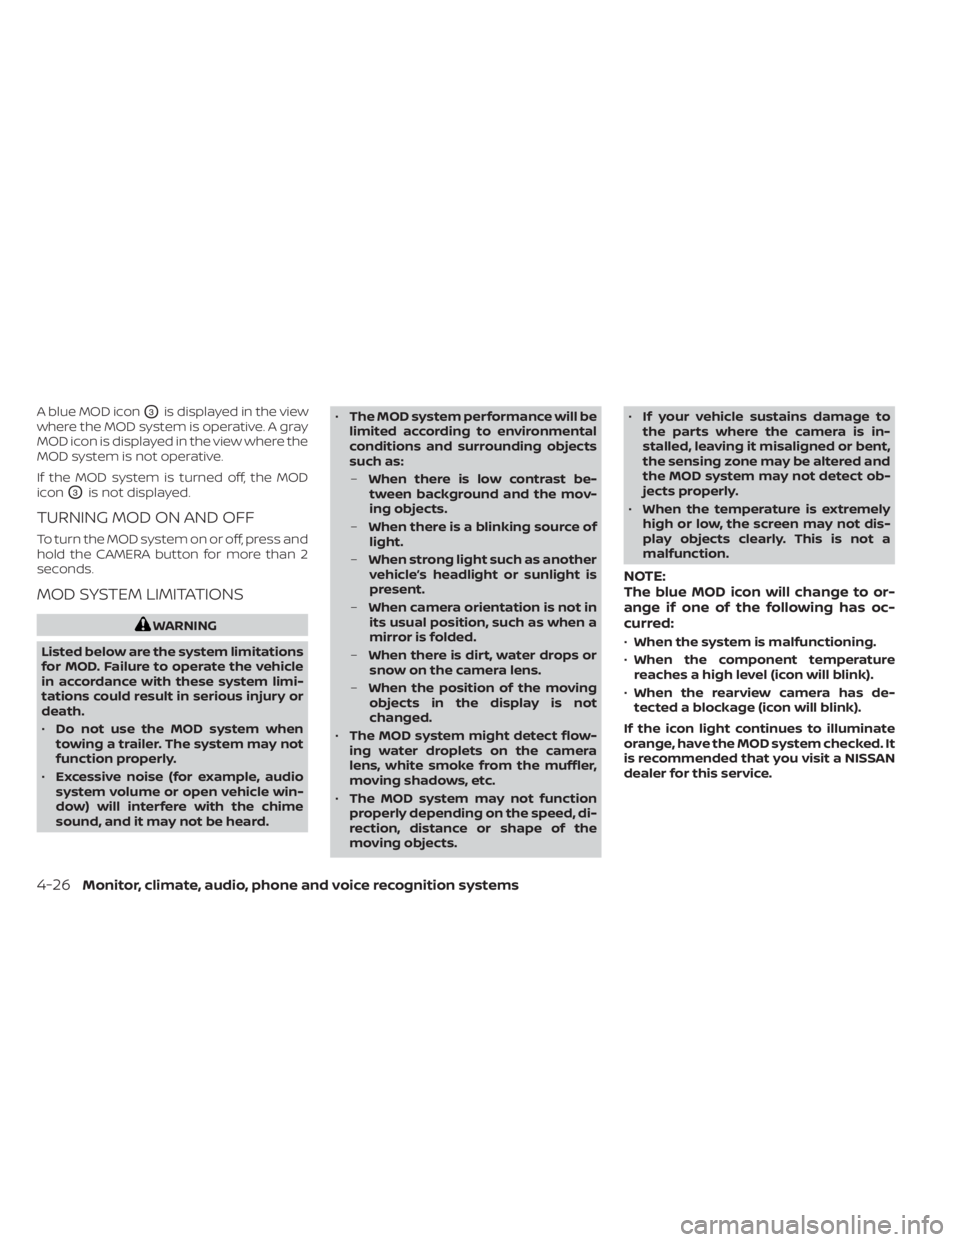
A blue MOD iconO3is displayed in the view
where the MOD system is operative. A gray
MOD icon is displayed in the view where the
MOD system is not operative.
If the MOD system is turned off, the MOD
icon
O3is not displayed.
TURNING MOD ON AND OFF
To turn the MOD system on or off, press and
hold the CAMERA button for more than 2
seconds.
MOD SYSTEM LIMITATIONS
WARNING
Listed below are the system limitations
for MOD. Failure to operate the vehicle
in accordance with these system limi-
tations could result in serious injury or
death.
• Do not use the MOD system when
towing a trailer. The system may not
function properly.
• Excessive noise (for example, audio
system volume or open vehicle win-
dow) will interfere with the chime
sound, and it may not be heard. •
The MOD system performance will be
limited according to environmental
conditions and surrounding objects
such as:
– When there is low contrast be-
tween background and the mov-
ing objects.
– When there is a blinking source of
light.
– When strong light such as another
vehicle’s headlight or sunlight is
present.
– When camera orientation is not in
its usual position, such as when a
mirror is folded.
– When there is dirt, water drops or
snow on the camera lens.
– When the position of the moving
objects in the display is not
changed.
• The MOD system might detect flow-
ing water droplets on the camera
lens, white smoke from the muffler,
moving shadows, etc.
• The MOD system may not function
properly depending on the speed, di-
rection, distance or shape of the
moving objects. •
If your vehicle sustains damage to
the parts where the camera is in-
stalled, leaving it misaligned or bent,
the sensing zone may be altered and
the MOD system may not detect ob-
jects properly.
• When the temperature is extremely
high or low, the screen may not dis-
play objects clearly. This is not a
malfunction.
NOTE:
The blue MOD icon will change to or-
ange if one of the following has oc-
curred:
• When the system is malfunctioning.
• When the component temperature
reaches a high level (icon will blink).
• When the rearview camera has de-
tected a blockage (icon will blink).
If the icon light continues to illuminate
orange, have the MOD system checked. It
is recommended that you visit a NISSAN
dealer for this service.
4-26Monitor, climate, audio, phone and voice recognition systems
Page 251 of 518
NISSAN is committed to safe driving. How-
ever, you must choose not to drive under
the influence of alcohol. Every year thou-
sands of people are injured or killed in
alcohol-related collisions. Although the lo-
cal laws vary on what is considered to be
legally intoxicated, the fact is that alcohol
affects all people differently and most
people underestimate the effects of
alcohol.
Remember, drinking and driving don't mix!
That is true for drugs (over-the-counter,
prescription) and illegal drugs, too. Don't
drive if your ability to operate your vehicle is
impaired by alcohol, drugs, or some other
physical condition.
DRIVING SAFETY PRECAUTIONS
Your NISSAN is designed for both normal
and off-road use. However, avoid driving in
deep water or mud as your NISSAN is
mainly designed for leisure use, unlike a
conventional off-road vehicle.
Remember that 2-Wheel Drive (2WD) mod-
els are less capable than All-Wheel Drive
(AWD) models for rough road driving and
extrication when stuck in deep snow or
mud, or the like.Please observe the following precautions:
WARNING
• Spinning the front wheels on slippery
surfaces may cause the AWD
warning message to display and the
AWD system to automatically switch
from the AWD to the 2WD mode. This
could reduce the traction. Be espe-
cially careful when towing a trailer
(AWD models).
• Drive carefully when off the road and
avoid dangerous areas. Every person
who drives or rides in this vehicle
should be seated with their seat belt
fastened. This will keep you and your
passengers in position when driving
over rough terrain.
• Do not drive across steep slopes. In-
stead drive either straight up or
straight down the slopes. Off-road
vehicles can tip over sideways much
more easily than they can forward or
backward.
• Many hills are too steep for any ve-
hicle. If you drive up them, you may
stall. If you drive down them, you may
not be able to control your speed. If
you drive across them, you may roll
over. •
Do not shif t gears while driving on
downhill grades as this could cause
loss of control of the vehicle.
• Stay alert when driving to the top of a
hill. At the top there could be a drop-
off or other hazard that could cause
an accident.
• If your engine stalls or you cannot
make it to the top of a steep hill,
never attempt to turn around. Your
vehicle could tip or roll over. Always
back straight down in R (Reverse)
gear and apply brakes to control your
speed.
• Heavy braking going down a hill
could cause your brakes to overheat
and fade, resulting in loss of control
and an accident. Apply brakes lightly
and use a low gear to control your
speed.
• Unsecured cargo can be thrown
around when driving over rough ter-
rain. Properly secure all cargo so it
will not be thrown forward and cause
injury to you or your passengers.
• Exceeding the roof rack capacity can
raise the center of gravity excessively
and affect the handling and stability
of the vehicle.
Starting and driving5-11
Page 258 of 518
REMOTE ENGINE START (if so
equipped)
Vehicles started with the Remote Engine
Start require the ignition switch to be
placed in the ON position before the shif t
lever can be moved from the P (Park) posi-
tion. To place the ignition switch in the ON
position, follow these steps:
1. Make sure that the Intelligent Key is onyou.
2. Apply the brake.
3. Push the ignition switch once to the ON position.
For additional information, see “NISSAN In-
telligent Key®” (P. 3-2).
ENGINE PROTECTION MODE
The engine has an engine protection mode
to reduce the chance of damage if the
coolant temperature becomes too high
(for example, when climbing steep grades
in high temperatures with heavy loads,
such as when towing a trailer). When the
engine temperature reaches a certain
level:
• The engine coolant temperature gauge will move toward the H position.
• Engine power may be reduced.
• The air conditioning cooling function may be automatically turned off for a short
time (the blower will continue to operate).
Engine power and, under some conditions,
vehicle speed will decrease. Vehicle speed
can be controlled with the accelerator
pedal, but the vehicle may not accelerate at
the desired speed. The transmission will
downshif t or upshif t as it reaches pre-
scribed shif t points. You can also shif t
manually.
As driving conditions change and engine
coolant temperature is reduced, vehicle
speed can be increased using the accel-
erator pedal, and the air conditioning cool-
ing function will automatically be turned
back on. The Malfunction Indicator Light (MIL) may
also come on if the engine coolant tem-
perature is not reduced or the air condi-
tioning cooling function does not turn back
on. If
only it remains on, you do not need to
have your vehicle towed, but have it in-
spected soon. It is recommended that you
visit a NISSAN dealer for this service. For
additional information, see “Malfunction In-
dicator Light (MIL)” (P. 2-14).
WARNING
Overheating can result in reduced en-
gine power and vehicle speed. The re-
duced speed may be lower than other
traffic, which could increase the chance
of a collision. Be especially careful
when driving. If the vehicle cannot
maintain a safe driving speed, pull to
the side of the road in a safe area. Allow
the engine to cool and return to normal
operation. For additional information,
see “If your vehicle overheats” (P. 6-12).
DRIVING THE VEHICLE
5-18Starting and driving
Page 263 of 518
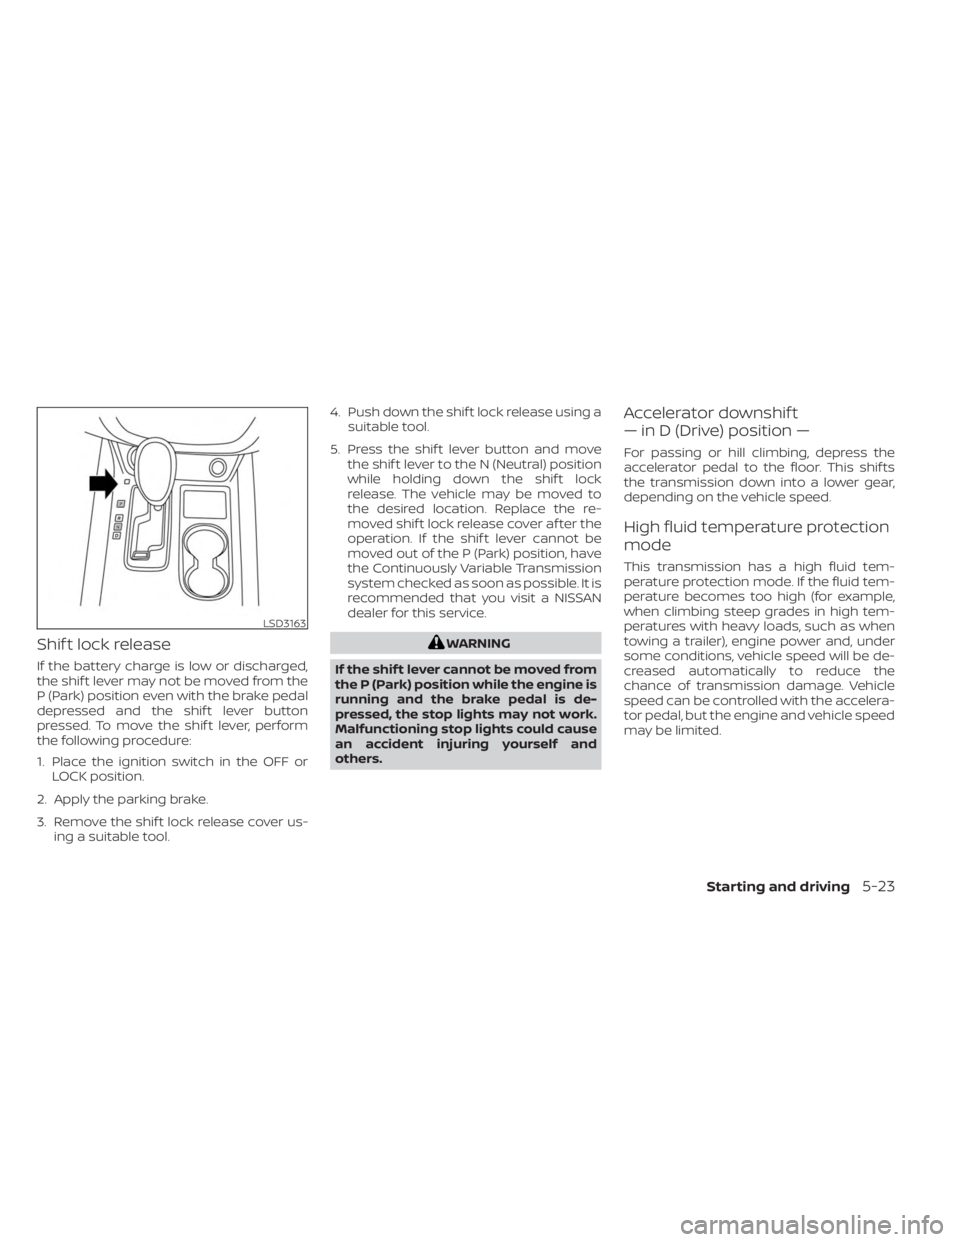
Shif t lock release
If the battery charge is low or discharged,
the shif t lever may not be moved from the
P (Park) position even with the brake pedal
depressed and the shif t lever button
pressed. To move the shif t lever, perform
the following procedure:
1. Place the ignition switch in the OFF orLOCK position.
2. Apply the parking brake.
3. Remove the shif t lock release cover us- ing a suitable tool. 4. Push down the shif t lock release using a
suitable tool.
5. Press the shif t lever button and move the shif t lever to the N (Neutral) position
while holding down the shif t lock
release. The vehicle may be moved to
the desired location. Replace the re-
moved shif t lock release cover af ter the
operation. If the shif t lever cannot be
moved out of the P (Park) position, have
the Continuously Variable Transmission
system checked as soon as possible. It is
recommended that you visit a NISSAN
dealer for this service.
WARNING
If the shif t lever cannot be moved from
the P (Park) position while the engine is
running and the brake pedal is de-
pressed, the stop lights may not work.
Malfunctioning stop lights could cause
an accident injuring yourself and
others.
Accelerator downshif t
— in D (Drive) position —
For passing or hill climbing, depress the
accelerator pedal to the floor. This shif ts
the transmission down into a lower gear,
depending on the vehicle speed.
High fluid temperature protection
mode
This transmission has a high fluid tem-
perature protection mode. If the fluid tem-
perature becomes too high (for example,
when climbing steep grades in high tem-
peratures with heavy loads, such as when
towing a trailer), engine power and, under
some conditions, vehicle speed will be de-
creased automatically to reduce the
chance of transmission damage. Vehicle
speed can be controlled with the accelera-
tor pedal, but the engine and vehicle speed
may be limited.
LSD3163
Starting and driving5-23
Page 271 of 518
LDW SYSTEM LIMITATIONS
WARNING
Listed below are the system limitations
for the LDW system. Failure to follow
the warnings and instructions for
proper use of the LDW system could re-
sult in serious injury or death.
• The system will not operate at
speeds below approximately 37 mph
(60 km/h) or if it cannot detect lane
markers.
• Do not use the LDW system under the
following conditions as it may not
function properly:
– During bad weather (rain, fog,
snow, etc.).
– When driving on slippery roads,
such as on ice or snow.
– When driving on winding or un-
even roads.
– When there is a lane closure due to
road repairs.
– When driving in a makeshif t or
temporary lane.
– When driving on roads where the
lane width is too narrow. –
When driving without normal tire
conditions (for example, tire wear,
low tire pressure, installation of
spare tire, tire chains, nonstan-
dard wheels).
– When the vehicle is equipped with
non-original brake parts or sus-
pension parts.
– When you are towing a trailer or
other vehicle.
• The system may not function prop-
erly under the following conditions:
– On roads where there are multiple
parallel lane markers; lane mark-
ers that are faded or not painted
clearly; yellow painted lane mark-
ers; non-standard lane markers;
or lane markers covered with wa-
ter, dirt, snow, etc.
– On roads where the discontinued
lane markers are still detectable.
– On roads where there are sharp
curves. –
On roads where there are sharply
contrasting objects, such as shad-
ows, snow, water, wheel ruts,
seams or lines remaining af ter
road repairs. (The LDW system
could detect these items as lane
markers.)
– On roads where the traveling lane
merges or separates.
– When the vehicle’s traveling direc-
tion does not align with the lane
marker.
– When traveling close to the ve-
hicle in front of you, which ob-
structs the lane camera unit de-
tection range.
– When rain, snow, dirt or an object
adheres to the windshield in front
of the lane camera unit.
– When the headlights are not
bright due to dirt on the lens or if
the aiming is not adjusted
properly.
– When strong light enters the lane
camera unit. (For example, the
light directly shines on the front of
the vehicle at sunrise or sunset.)
Starting and driving5-31