2023 NISSAN MURANO check transmission fluid
[x] Cancel search: check transmission fluidPage 263 of 518
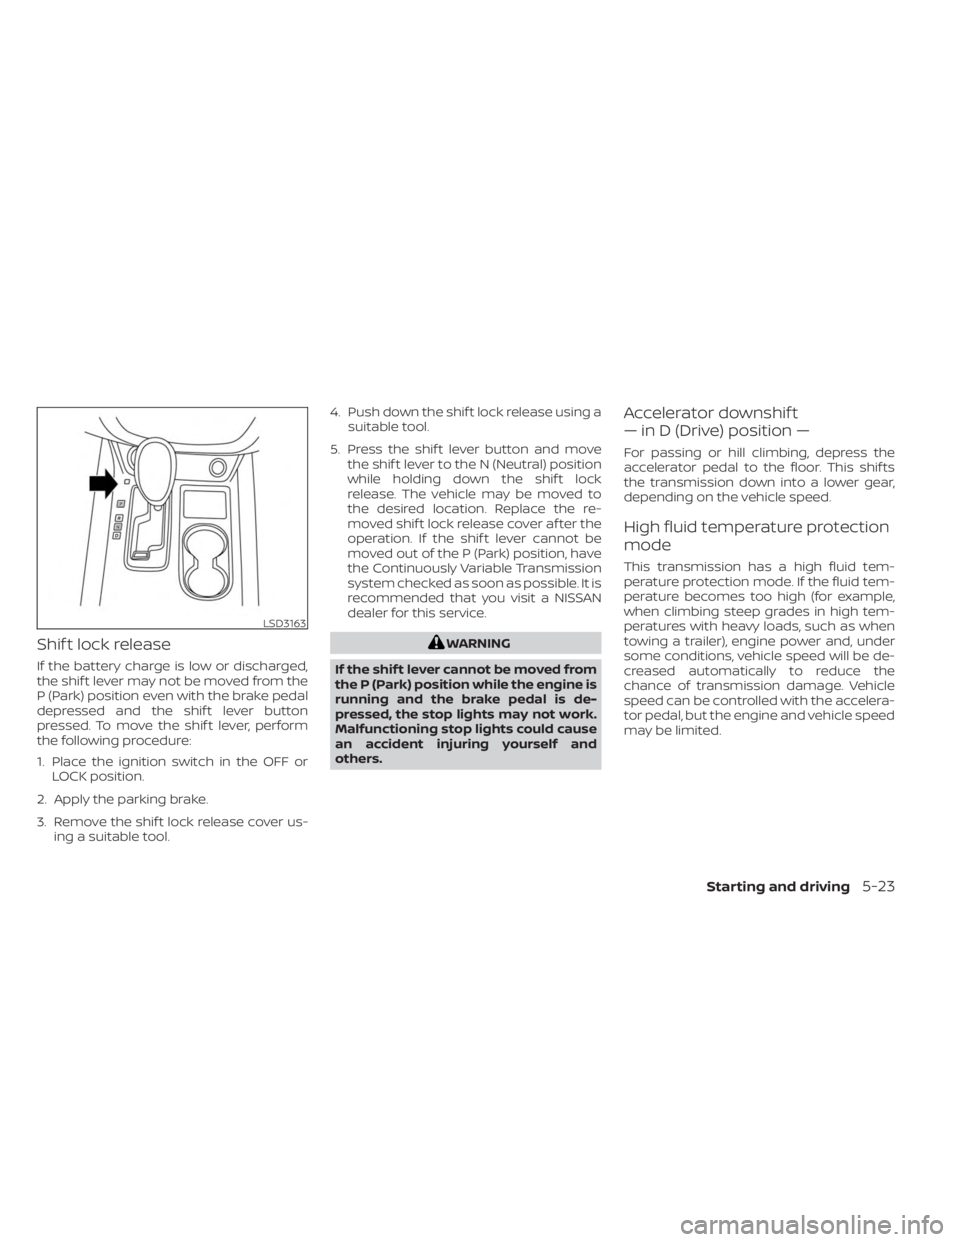
Shif t lock release
If the battery charge is low or discharged,
the shif t lever may not be moved from the
P (Park) position even with the brake pedal
depressed and the shif t lever button
pressed. To move the shif t lever, perform
the following procedure:
1. Place the ignition switch in the OFF orLOCK position.
2. Apply the parking brake.
3. Remove the shif t lock release cover us- ing a suitable tool. 4. Push down the shif t lock release using a
suitable tool.
5. Press the shif t lever button and move the shif t lever to the N (Neutral) position
while holding down the shif t lock
release. The vehicle may be moved to
the desired location. Replace the re-
moved shif t lock release cover af ter the
operation. If the shif t lever cannot be
moved out of the P (Park) position, have
the Continuously Variable Transmission
system checked as soon as possible. It is
recommended that you visit a NISSAN
dealer for this service.
WARNING
If the shif t lever cannot be moved from
the P (Park) position while the engine is
running and the brake pedal is de-
pressed, the stop lights may not work.
Malfunctioning stop lights could cause
an accident injuring yourself and
others.
Accelerator downshif t
— in D (Drive) position —
For passing or hill climbing, depress the
accelerator pedal to the floor. This shif ts
the transmission down into a lower gear,
depending on the vehicle speed.
High fluid temperature protection
mode
This transmission has a high fluid tem-
perature protection mode. If the fluid tem-
perature becomes too high (for example,
when climbing steep grades in high tem-
peratures with heavy loads, such as when
towing a trailer), engine power and, under
some conditions, vehicle speed will be de-
creased automatically to reduce the
chance of transmission damage. Vehicle
speed can be controlled with the accelera-
tor pedal, but the engine and vehicle speed
may be limited.
LSD3163
Starting and driving5-23
Page 264 of 518
Fail-safe
If the vehicle is driven under extreme
conditions, such as excessive wheel
spinning and subsequent hard braking,
the fail-safe system may be activated.
The Malfunction Indicator Light (MIL)
may come on to indicate the fail-safe
mode is activated. For additional infor-
mation, see “Malfunction Indicator Light
(MIL)” (P. 2-14). This will occur even if all
electrical circuits are functioning prop-
erly. In this case, place the ignition switch
in the OFF position and wait for 10 sec-
onds. Then push the switch back to the
ON position. The vehicle should return to
its normal operating condition. If it does
not return to its normal operating condi-
tion, have the transmission checked and
repaired, if necessary. It is recommended
that you visit a NISSAN dealer for this
service.
WARNING
When the high fluid temperature pro-
tection mode or fail-safe operation oc-
curs, vehicle speed may be gradually
reduced. The reduced speed may be
lower than other traffic, which could in-
crease the chance of a collision. Be es-
pecially careful when driving. If neces-
sary, pull to the side of the road at a safe
place and allow the transmission to re-
turn to normal operation, or have it re-
paired if necessary.
WARNING
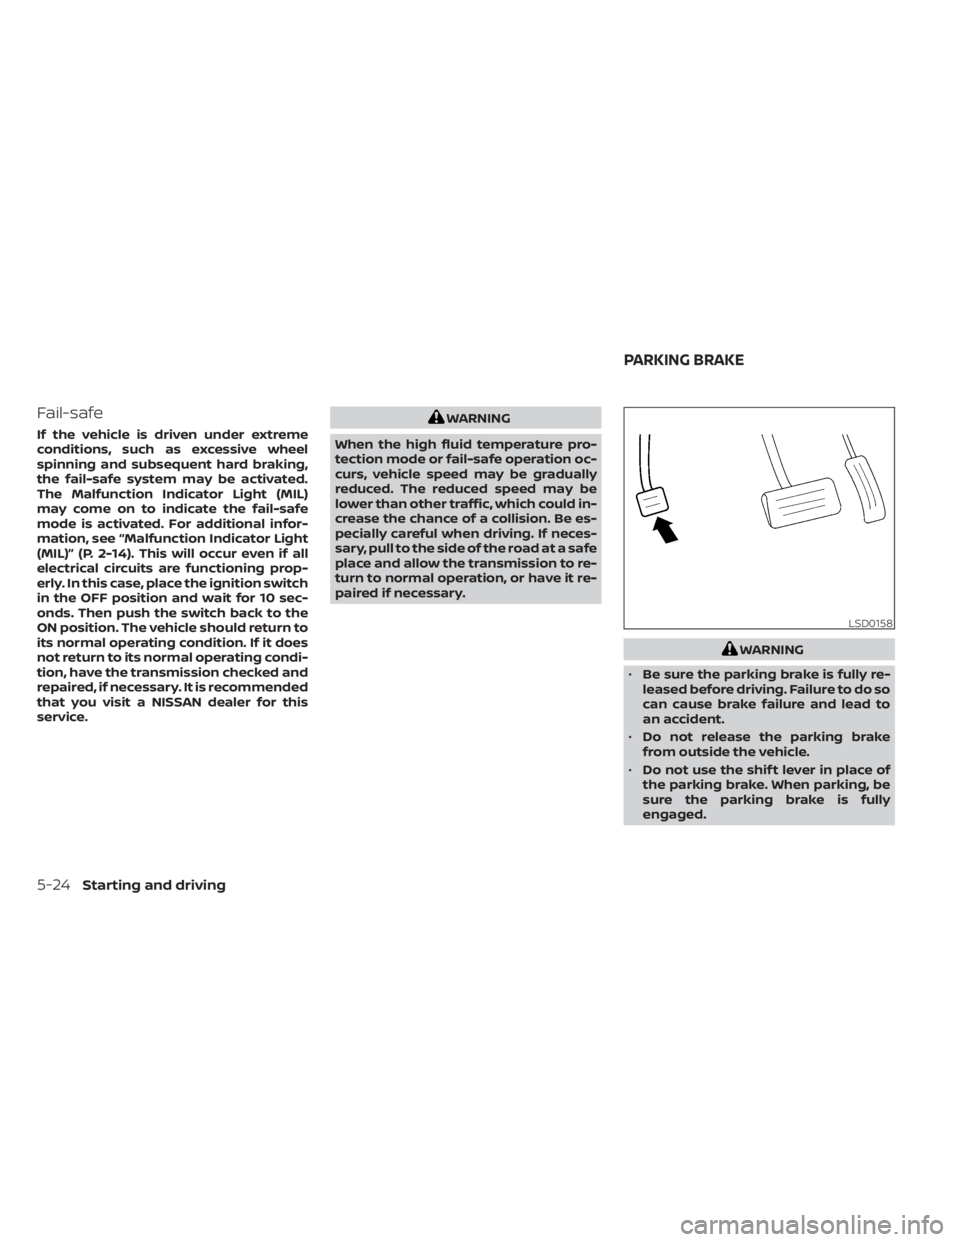
• Be sure the parking brake is fully re-
leased before driving. Failure to do so
can cause brake failure and lead to
an accident.
• Do not release the parking brake
from outside the vehicle.
• Do not use the shif t lever in place of
the parking brake. When parking, be
sure the parking brake is fully
engaged.
LSD0158
PARKING BRAKE
5-24Starting and driving
Page 397 of 518

8 Do-it-yourself
Maintenance precautions.......................8-2
Engine compartment check locations ...........8-3
Engine cooling system ..........................8-4
Checking engine coolant level ................8-5
Changing engine coolant ....................8-5
Engine oil .......................................8-6
Checking engine oil level .....................8-6
Changing engine oil and oil filter ..............8-6
Continuously Variable Transmission (CVT)
fluid ............................................ 8-10
Power Steering Fluid (PSF) .......................8-11
Brake fluid ....................................... 8-11
Windshield-washer fluid ........................8-12
Windshield-washer fluid reservoir ...........8-12
Battery......................................... 8-14
Jump starting ............................... 8-15
Drive belt ....................................... 8-16
Spark plugs .................................... 8-16
Replacing spark plugs .......................8-16
Air cleaner ..................................... 8-17In-cabin microfilter
.......................... 8-18
Windshield wiper blades ........................8-18
Cleaning .................................... 8-18
Replacing ................................... 8-18
Brakes ......................................... 8-20
Fuses .......................................... 8-20
Engine compartment ....................... 8-21
Passenger compartment ...................8-22
Battery replacement ........................... 8-23
NISSAN Intelligent Key® ......................8-24
Lights .......................................... 8-25
Headlights .................................. 8-25
Fog lights (if so equipped) ...................8-25
Exterior and interior lights ...................8-26
Wheels and tires ............................... 8-28
Tire pressure ................................ 8-28
Tire labeling ................................. 8-32
Types of tires ................................
8-35
Tir
e chains .................................. 8-36
Changing wheels and tires ..................8-37
Page 406 of 518
•The dipstick must be inserted in
place to prevent oil spillage from the
dipstick hole when filling the engine
with oil.
6. Coat the gasket on the new filter with clean engine oil.
7. Screw in the oil filter clockwise until a slight resistance is felt, then tighten addi-
tionally more than 2/3 turn.
Oil filter tightening torque: 11 to 15 f t-lb (14.7 to 20.6 N·m)
8. Clean and re-install the drain plug with a new washer. Securely tighten the drain
plug with a wrench. Do not use exces-
sive force.
Drain plug tightening torque: 22 to 29 f t-lb (29.4 to 39.2 N·m)
9. Refill the engine with the recommended oil through the oil filler opening, and in-
stall the oil filler cap securely. For additional information about drain and
refill capacity, see “Recommended fluids/
lubricants and capacities” (P. 10-2). The
drain and refill capacity depends on the oil
temperature and drain time. Use these
specifications for reference only. Always
use the dipstick to determine the proper
amount of oil in the engine.
10. Start the engine and check for leakage
around the drain plug and the oil filter.
Correct as required. Turn the engine off
and wait more than 15 minutes. Check
the oil level with the dipstick. Add en-
gine oil if necessary.
Af ter the operation
1. Reinstall engine protectors in reverse or-der of removal.
2. Lower the vehicle carefully to the ground.
3. Reset oil and oil filter maintenance re- minder. For additional information, see
“Vehicle information display” (P. 2-18).
• Dispose of waste oil and filter properly.
• Check your local regulations.
CAUTION
• NISSAN recommends using Genuine
NISSAN CVT Fluid NS-3 (or equiva-
lent) ONLY in NISSAN CVTs. Do not mix
with other fluids.
• Do not use Automatic Transmission
Fluid (ATF) or manual transmission
fluid in a NISSAN CVT, as it may dam-
age the CVT. Damage caused by the
use of fluids other than as recom-
mended is not covered under
NISSAN's New Vehicle Limited War-
ranty outlined in your Warranty Infor-
mation Booklet.
• Using fluids that are not equivalent
to Genuine NISSAN CVT Fluid NS-3
may also damage the CVT. Damage
caused by the use of fluids other than
as recommended is not covered un-
der NISSAN's New Vehicle Limited
Warranty outlined in your Warranty
Information Booklet.
When checking or replacement of CVT fluid
is required, we recommend a NISSAN
dealer for servicing.
CONTINUOUSLY VARIABLE
TRANSMISSION (CVT) FLUID
8-10Do-it-yourself
Page 440 of 518
Continuously Variable Transmission
(CVT) P (Park) position mechanism:On a
fairly steep hill check that the vehicle is held
securely with the shif t lever in the P (Park)
position without applying any brakes.
Parking brake: Check the parking brake
operation regularly. The vehicle should be
securely held on a fairly steep hill with only
the parking brake applied. If the parking
brake needs adjustment, it is recom-
mended that you visit a NISSAN dealer for
this service.
Seats: Check seat position controls such
as seat adjusters, seatback recliner, etc., to
ensure they operate smoothly and all
latches lock securely in every position.
Check that the head restraints/headrests
move up and down smoothly and the locks
(if so equipped) hold securely in all latched
positions.
Seat belts: Check that all parts of the seat
belt system (for example, buckles, anchors,
adjusters and retractors) operate properly
and smoothly, and are installed securely.
Check the belt webbing for cuts, fraying,
wear or damage.
Steering wheel: Check for changes in the
steering system, such as excessive free
play, hard steering or strange noises. Warning lights and chimes:
Make sure all
warning lights and chimes are operating
properly.
Windshield defroster: Check that the air
comes out of the defroster outlets properly
and in sufficient quantity when operating
the heater or air conditioner.
Windshield wiper and washer*: Check
that the wipers and washer operate prop-
erly and that the wipers do not streak.
Under the hood and vehicle
The maintenance items listed here should
be checked periodically (for example, each
time you check the engine oil or refuel).
Battery* (for maintenance free batter-
ies): This vehicle is equipped with a sealed
maintenance free battery. It is recom-
mended that you visit a NISSAN dealer for
service.
NOTE:
Care should be taken to avoid situations
that can lead to potential battery dis-
charge and potential no-start conditions
such as:
1. Installation or extended use of elec- tronic accessories that consume bat-
tery power when the engine is not
running (Phone chargers, GPS, DVD
players, etc.).
2. Vehicle is not driven regularly and/or only driven short distances.
In these cases, the battery may need to
be charged to maintain battery health.
Brake fluid level*: Make sure that the brake
fluid level is between the MAX and MIN lines
on the reservoir.
Engine coolant level*: Check the coolant
level when the engine is cold.
Engine drive belt*: Make sure the drive
belts are not frayed, worn, cracked or oily.
Engine oil level*: Check the level af ter
parking the vehicle on a level spot and
turning off the engine. Wait more than 15
minutes for the oil to drain back into the oil
pan.
9-4Maintenance and schedules
Page 443 of 518
Steering gear and linkage, axle and sus-
pension parts, drive shaf t boots:Check
for damage, looseness, and leakage of oil
or grease. Under severe driving conditions,
inspect more frequently.
Tire rotation: Rotate tires at the specified
interval shown in the maintenance sched-
ule. When rotating tires, check for damage
and uneven wear. Replace if necessary.
Transmission fluid/oil, differential oil,
transfer case oil: Visually inspect for signs
of leakage at specified intervals. If towing a
trailer, using a camper or car-top carrier, or
driving on rough or muddy roads:
• Replace the fluid/oil every 20,000 miles (32,000 km) or 24 months.
• Replace the CVT fluid every 60,000 miles (96,000 km) or request the dealer to in-
spect the fluid deterioration data using a
CONSULT. If the deterioration data is
more than 210000, replace the CVT fluid. Off-Road Maintenance
Check the follow-
ing items frequently whenever you drive
off-road through deep sand, mud or water:
• Brake pads and rotors
• Brake lines and hoses
• Differential, transmission and transfer case oil
• Steering linkage
• Propeller shaf t(s) and front drive shaf ts
• Engine air filter To help ensure smooth, safe and economi-
cal driving, NISSAN provides two mainte-
nance schedules that may be used, de-
pending upon the conditions in which you
usually drive. These schedules contain
both distance and time intervals, up to
120,000 miles (192,000 km)/96 months. For
most people, the odometer reading will in-
dicate when service is needed. However,
if you drive very little, your vehicle should
be serviced at the regular time intervals
shown in the schedule.
Af ter 120,000 miles (192,000 km)/96
months, continue maintenance at the
same mileage/time intervals.
ADDITIONAL MAINTENANCE ITEMS
FOR SEVERE OPERATING
CONDITIONS
Additional maintenance items for severe
operating conditions
should be per-
formed on vehicles that are driven under
especially demanding conditions. Addi-
tional maintenance items should be per-
formed if you primarily operate your vehicle
under the following conditions:
• Repeated short trips of less than 5 miles (8 km).
MAINTENANCE SCHEDULES
Maintenance and schedules9-7
Page 496 of 518
• Have your vehicle serviced more of tenthan at intervals specified in the recom-
mended Maintenance Schedule in the
“Maintenance and schedules” section of
this manual.
• When making a turn, your trailer wheels will be closer to the inside of the turn than
your vehicle wheels. To compensate for
this, make a larger than normal turning
radius during the turn.
• Crosswinds and rough roads will ad- versely affect vehicle/trailer handling,
possibly causing vehicle sway. When be-
ing passed by larger vehicles, be pre-
pared for possible changes in crosswinds
that could affect vehicle handling.
Do the following if the trailer begins to
sway:
1. Take your foot off the accelerator pedal to allow the vehicle to coast and steer as
straight ahead as the road conditions
allow. This combination will help stabilize
the vehicle
– Do not correct trailer sway by steering or applying the brakes.
2. When the trailer sway stops, gently apply the brakes and pull to the side of the
road in a safe area. 3. Try to rearrange the trailer load so it is
balanced as described in this section.
• Be careful when passing other vehicles. Passing while towing a trailer requires
considerably more distance than normal
passing. Remember, the length of the
trailer must also pass the other vehicle
before you can safely change lanes.
• Downshif t the transmission to a lower gear for engine braking when driving
down steep or long hills. This will help
slow the vehicle without applying the
brakes.
• Avoid holding the brake pedal down too long or too frequently. This could cause
the brakes to overheat, resulting in re-
duced braking efficiency.
• Increase your following distance to allow for greater stopping distances while tow-
ing a trailer. Anticipate stops and brake
gradually.
• NISSAN recommends that the cruise control not be used while towing a trailer.
• Some states or provinces have specific regulations and speed limits for vehicles
that are towing trailers. Obey the local
speed limits. • Check your hitch, trailer wiring harness
connections, and trailer wheel lug nuts
af ter 50 miles (80 km) of travel and at
every break.
• When launching a boat, don't allow the water level to go over the exhaust tail
pipe or rear bumper.
• Make sure you disconnect the trailer lights before backing the trailer into the
water or the trailer lights may burn out.
When towing a trailer, final drive gear oil
should be replaced and transmission oil/
fluid should be changed more fre-
quently. For additional information, see
“Do-it-yourself ” (P. 8-2).
FLAT TOWING FOR ALL–WHEEL
DRIVE VEHICLE (if so equipped)
Towing your vehicle with all four wheels on
the ground is sometimes called flat towing.
This method is sometimes used when
towing a vehicle behind a recreational ve-
hicle, such as a motor home.
10-28Technical and consumer information
Page 504 of 518
Coat hooks.......................2-62
Coldweatherdriving...............5-131
Console box ......................2-59
Console light ......................2-70
Continuously Variable Transmission
(CVT) ............................5-19
Continuously Variable Transmission (CVT)
fluid ..........................8-10
Driving with Continuously Variable
Transmission (CVT) ...............5-19
Controls.........................4-30 Heater and air conditioner controls. . .4-30
Coolant..........................10-2 Capacities and recommended
fuel/lubricants ..................10-2
Changing engine coolant ...........8-5
Checking engine coolant level .......8-5
Engine coolant temperature gauge . . .2-6
Corrosionprotection.................7-7
Cruisecontrol.....................5-56
Cupholders......................2-60
D
Daytime Running Light System ........2-43
Defrosterswitch...................2-37 Rear window and outside mirror defroster
switch.........................2-37
Dimensions and weights ............10-10
Dimmer switch for instrument panel . . .2-43
Door locks ........................3-5
Drivebelt ........................8-16
Drivingthevehicle..................5-18 Driving..........................5
-131
Cold weather driving .............5-131
Driving with Continuously Variable
Transmission (CVT) ...............5-19
Precautions when starting and
driving......................5-4,5-11
Dynamic driver assistance switch ......2-50
E
Eco Drive Report....................2-8
Economy - fuel ...................5 -116
Emergency call (SOS) button ..........2-51
Emergency engine shutoff ...........5-15
Emission control information label .....10-12
Emission control system warranty . . . .10-30
Engine coolant temperature gauge .....2-6
Engine ..........................5-16
Before starting the engine ..........5-16
Capacities and recommended
fuel/lubricants ..................10-2
Changing engine coolant ...........8-5
Changing engine oil filter ...........8-6
Changing engine oil ...............8-6
Checking engine coolant level .......8-5
Checking engine oil level ...........8-6
Engine compartment check
locations .......................8-3
Engine coolant temperature gauge . . .2-6
Engine cooling system .............8-4
Engine oil and oil filter
recommendation ................10-7
Engine oil pressure warning light .....2-11Engine oil viscosity
...............10-7
Engine oil .......................8-6
Engine serial number .............10-12
Engine specifications .............10-9
Starting the engine ...............5-17
EventDatarecorders...............10-32
Exhaust gas (Carbon monoxide) ........5-4
Explanation of maintenance items ......9-2
Explanation of scheduled maintenance
items........................... .9-5
Extended storage switch ............2-55
Eyeglasscase.....................2-59
F
F.M.V.S.S. certification label ...........10-12
Flashers (See hazard warning flasher
switch)...........................6-2
Flattire...........................6-3
Floor mat positioning aid .............7-6
Fluid ............................8-11 Brakefluid......................8-11
Capacities and recommended
fuel/lubricants ..................10-2
Continuously Variable Transmission (CVT)
fluid ..........................8-10
Engine coolant ...................8-4
Engine oil .......................8-6
Powersteeringfluid...............8-11
Windshield-washer fluid ...........8-12
Foglightswitch ...................2-44
Front air bag system (See supplemental
restraintsystem)...................1-56
11-2