2023 NISSAN MURANO ignition
[x] Cancel search: ignitionPage 185 of 518
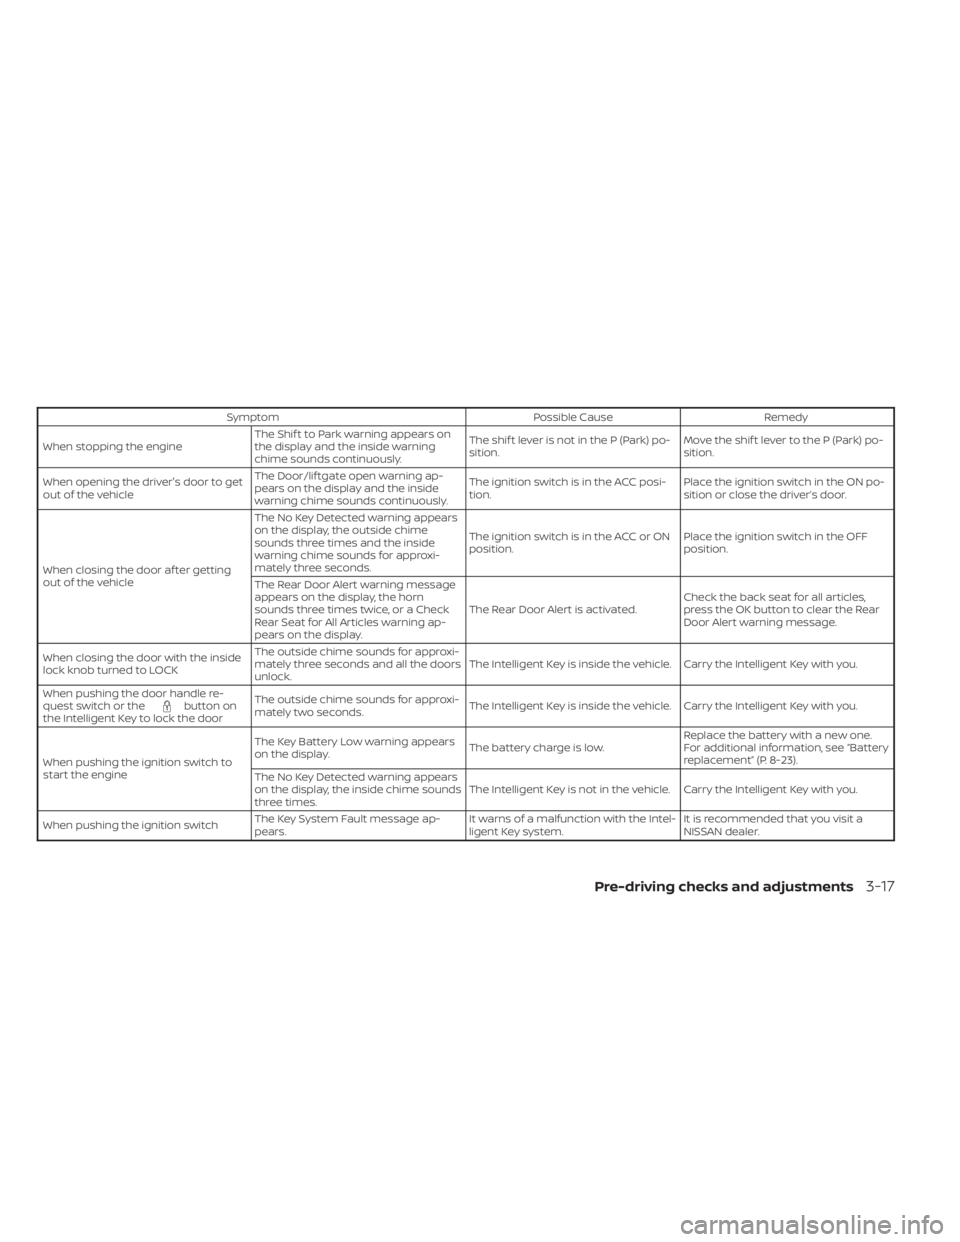
SymptomPossible CauseRemedy
When stopping the engine The Shif t to Park warning appears on
the display and the inside warning
chime sounds continuously. The shif t lever is not in the P (Park) po-
sition.
Move the shif t lever to the P (Park) po-
sition.
When opening the driver's door to get
out of the vehicle The Door/lif tgate open warning ap-
pears on the display and the inside
warning chime sounds continuously. The ignition switch is in the ACC posi-
tion.
Place the ignition switch in the ON po-
sition or close the driver’s door.
When closing the door af ter getting
out of the vehicle The No Key Detected warning appears
on the display, the outside chime
sounds three times and the inside
warning chime sounds for approxi-
mately three seconds.
The ignition switch is in the ACC or ON
position.
Place the ignition switch in the OFF
position.
The Rear Door Alert warning message
appears on the display, the horn
sounds three times twice, or a Check
Rear Seat for All Articles warning ap-
pears on the display. The Rear Door Alert is activated.
Check the back seat for all articles,
press the OK button to clear the Rear
Door Alert warning message.
When closing the door with the inside
lock knob turned to LOCK The outside chime sounds for approxi-
mately three seconds and all the doors
unlock.
The Intelligent Key is inside the vehicle. Carry the Intelligent Key with you.
When pushing the door handle re-
quest switch or the
button on
the Intelligent Key to lock the door The outside chime sounds for approxi-
mately two seconds.
The Intelligent Key is inside the vehicle. Carry the Intelligent Key with you.
When pushing the ignition switch to
start the engine The Key Battery Low warning appears
on the display.
The battery charge is low.Replace the battery with a new one.
For additional information, see “Battery
replacement” (P. 8-23).
The No Key Detected warning appears
on the display, the inside chime sounds
three times. The Intelligent Key is not in the vehicle. Carry the Intelligent Key with you.
When pushing the ignition switch The Key System Fault message ap-
pears. It warns of a malfunction with the Intel-
ligent Key system.It is recommended that you visit a
NISSAN dealer.
Pre-driving checks and adjustments3-17
Page 187 of 518
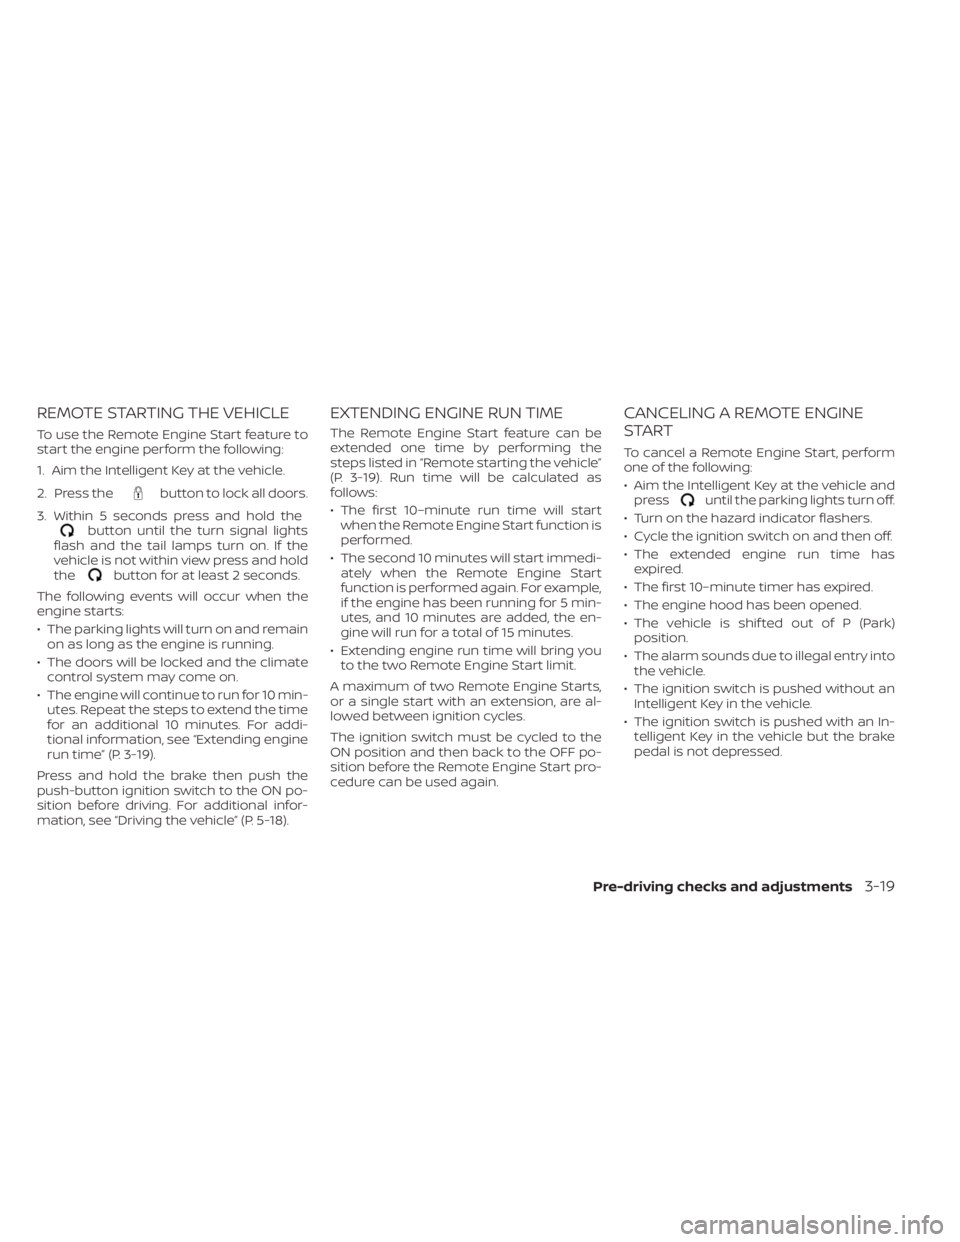
REMOTE STARTING THE VEHICLE
To use the Remote Engine Start feature to
start the engine perform the following:
1. Aim the Intelligent Key at the vehicle.
2. Press the
button to lock all doors.
3. Within 5 seconds press and hold the
button until the turn signal lights
flash and the tail lamps turn on. If the
vehicle is not within view press and hold
the
button for at least 2 seconds.
The following events will occur when the
engine starts:
• The parking lights will turn on and remain on as long as the engine is running.
• The doors will be locked and the climate control system may come on.
• The engine will continue to run for 10 min- utes. Repeat the steps to extend the time
for an additional 10 minutes. For addi-
tional information, see “Extending engine
run time” (P. 3-19).
Press and hold the brake then push the
push-button ignition switch to the ON po-
sition before driving. For additional infor-
mation, see “Driving the vehicle” (P. 5-18).
EXTENDING ENGINE RUN TIME
The Remote Engine Start feature can be
extended one time by performing the
steps listed in “Remote starting the vehicle”
(P. 3-19). Run time will be calculated as
follows:
• The first 10–minute run time will start when the Remote Engine Start function is
performed.
• The second 10 minutes will start immedi- ately when the Remote Engine Start
function is performed again. For example,
if the engine has been running for 5 min-
utes, and 10 minutes are added, the en-
gine will run for a total of 15 minutes.
• Extending engine run time will bring you to the two Remote Engine Start limit.
A maximum of two Remote Engine Starts,
or a single start with an extension, are al-
lowed between ignition cycles.
The ignition switch must be cycled to the
ON position and then back to the OFF po-
sition before the Remote Engine Start pro-
cedure can be used again.
CANCELING A REMOTE ENGINE
START
To cancel a Remote Engine Start, perform
one of the following:
• Aim the Intelligent Key at the vehicle and press
until the parking lights turn off.
• Turn on the hazard indicator flashers.
• Cycle the ignition switch on and then off.
• The extended engine run time has expired.
• The first 10–minute timer has expired.
• The engine hood has been opened.
• The vehicle is shif ted out of P (Park) position.
• The alarm sounds due to illegal entry into the vehicle.
• The ignition switch is pushed without an Intelligent Key in the vehicle.
• The ignition switch is pushed with an In- telligent Key in the vehicle but the brake
pedal is not depressed.
Pre-driving checks and adjustments3-19
Page 188 of 518
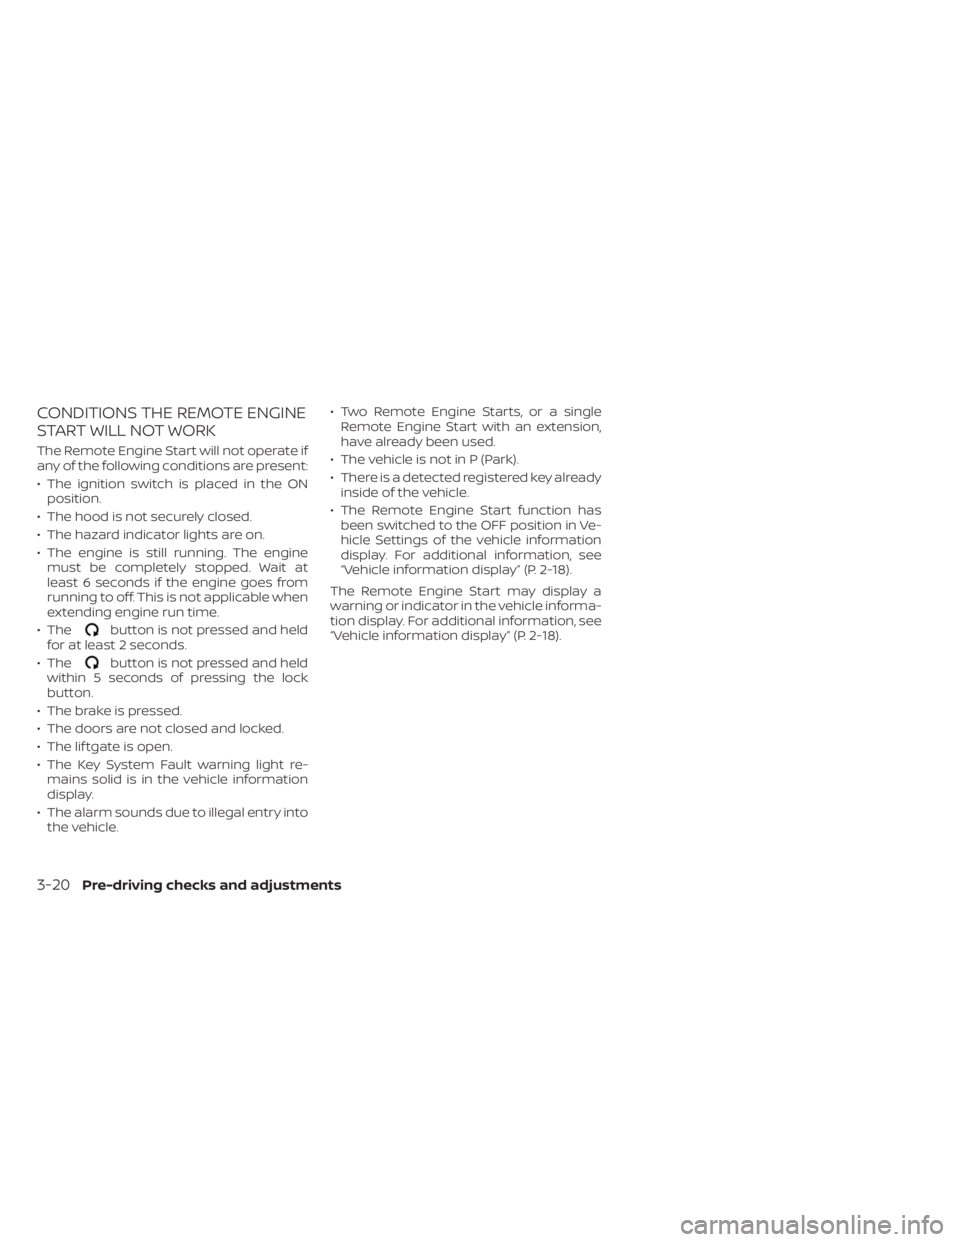
CONDITIONS THE REMOTE ENGINE
START WILL NOT WORK
The Remote Engine Start will not operate if
any of the following conditions are present:
• The ignition switch is placed in the ONposition.
• The hood is not securely closed.
• The hazard indicator lights are on.
• The engine is still running. The engine must be completely stopped. Wait at
least 6 seconds if the engine goes from
running to off. This is not applicable when
extending engine run time.
• The
button is not pressed and held
for at least 2 seconds.
• The
button is not pressed and held
within 5 seconds of pressing the lock
button.
• The brake is pressed.
• The doors are not closed and locked.
• The lif tgate is open.
• The Key System Fault warning light re- mains solid is in the vehicle information
display.
• The alarm sounds due to illegal entry into the vehicle. • Two Remote Engine Starts, or a single
Remote Engine Start with an extension,
have already been used.
• The vehicle is not in P (Park).
• There is a detected registered key already inside of the vehicle.
• The Remote Engine Start function has been switched to the OFF position in Ve-
hicle Settings of the vehicle information
display. For additional information, see
“Vehicle information display” (P. 2-18).
The Remote Engine Start may display a
warning or indicator in the vehicle informa-
tion display. For additional information, see
“Vehicle information display” (P. 2-18).
3-20Pre-driving checks and adjustments
Page 200 of 518
CAUTION
For vehicles with memory seat: Failure
to reset the tilt and telescoping func-
tions of the steering wheel, af ter the
vehicle’s battery has been discharged,
may prevent the steering wheel posi-
tion from being adjusted.
For vehicles with memory seat: Both the tilt
and telescopic steering operation must be
reset af ter the vehicle’s battery has been
discharged in order to prevent the tilt and
telescopic operation from locking in one
position. When the battery has been re-
charged or replaced, perform the following:
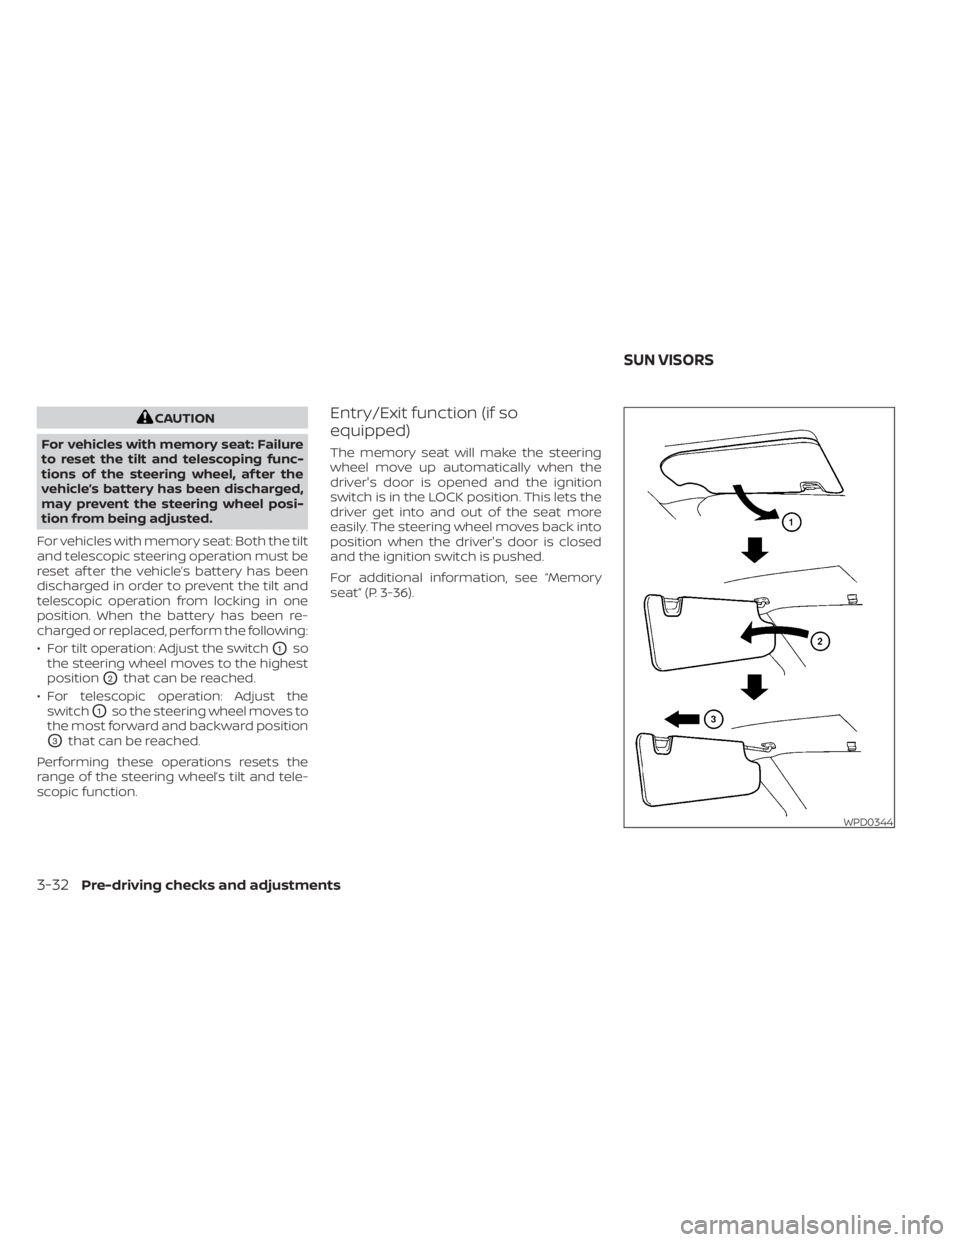
• For tilt operation: Adjust the switch
O1so
the steering wheel moves to the highest
position
O2that can be reached.
• For telescopic operation: Adjust the switch
O1so the steering wheel moves to
the most forward and backward position
O3that can be reached.
Performing these operations resets the
range of the steering wheel’s tilt and tele-
scopic function.
Entry/Exit function (if so
equipped)
The memory seat will make the steering
wheel move up automatically when the
driver's door is opened and the ignition
switch is in the LOCK position. This lets the
driver get into and out of the seat more
easily. The steering wheel moves back into
position when the driver's door is closed
and the ignition switch is pushed.
For additional information, see “Memory
seat” (P. 3-36).
WPD0344
SUN VISORS
3-32Pre-driving checks and adjustments
Page 202 of 518
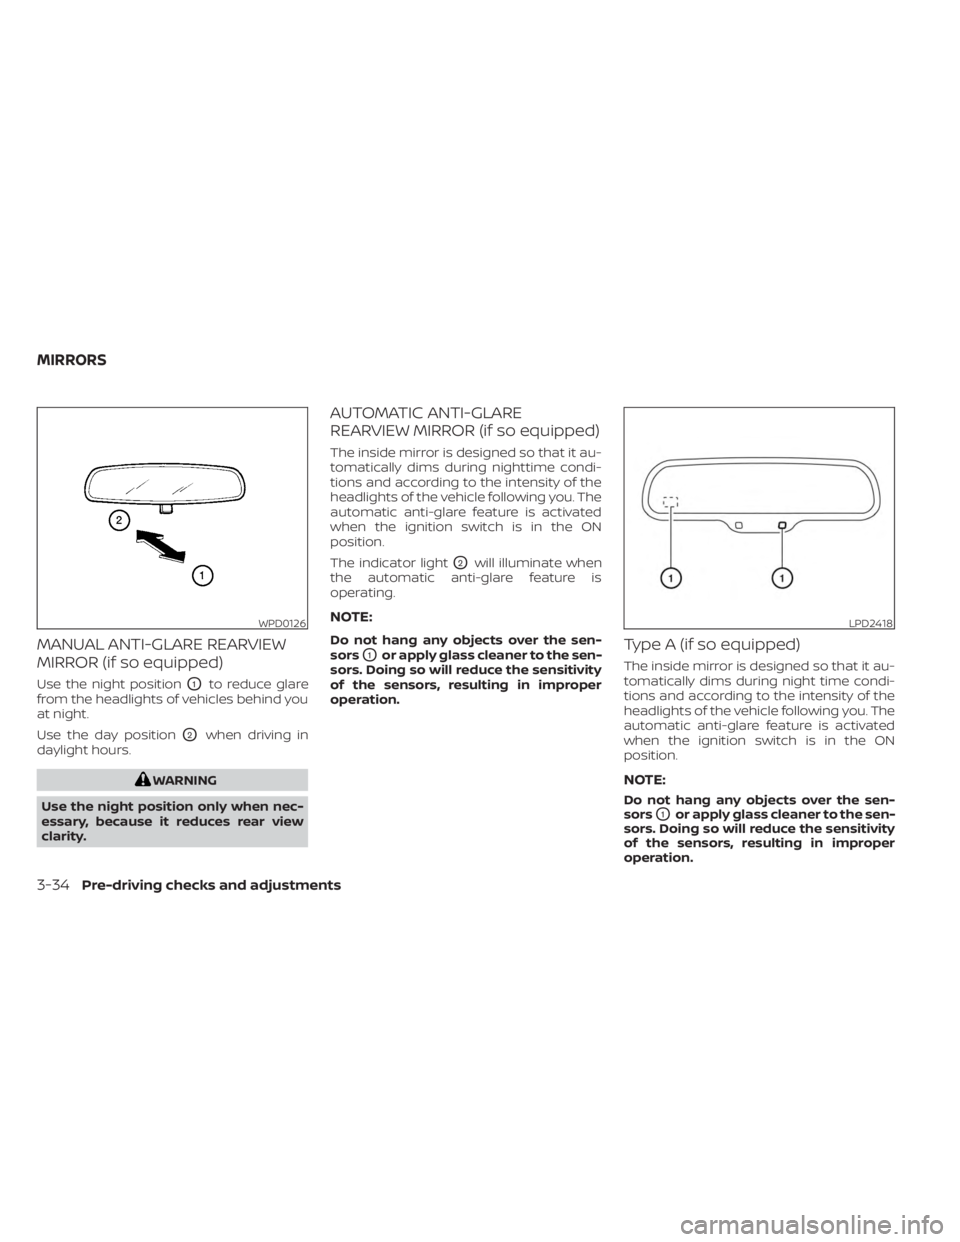
MANUAL ANTI-GLARE REARVIEW
MIRROR (if so equipped)
Use the night positionO1to reduce glare
from the headlights of vehicles behind you
at night.
Use the day position
O2when driving in
daylight hours.
WARNING
Use the night position only when nec-
essary, because it reduces rear view
clarity.
AUTOMATIC ANTI-GLARE
REARVIEW MIRROR (if so equipped)
The inside mirror is designed so that it au-
tomatically dims during nighttime condi-
tions and according to the intensity of the
headlights of the vehicle following you. The
automatic anti-glare feature is activated
when the ignition switch is in the ON
position.
The indicator light
O2will illuminate when
the automatic anti-glare feature is
operating.
NOTE:
Do not hang any objects over the sen-
sors
O1or apply glass cleaner to the sen-
sors. Doing so will reduce the sensitivity
of the sensors, resulting in improper
operation.Type A (if so equipped)
The inside mirror is designed so that it au-
tomatically dims during night time condi-
tions and according to the intensity of the
headlights of the vehicle following you. The
automatic anti-glare feature is activated
when the ignition switch is in the ON
position.
NOTE:
Do not hang any objects over the sen-
sors
O1or apply glass cleaner to the sen-
sors. Doing so will reduce the sensitivity
of the sensors, resulting in improper
operation.
WPD0126LPD2418
MIRRORS
3-34Pre-driving checks and adjustments
Page 203 of 518
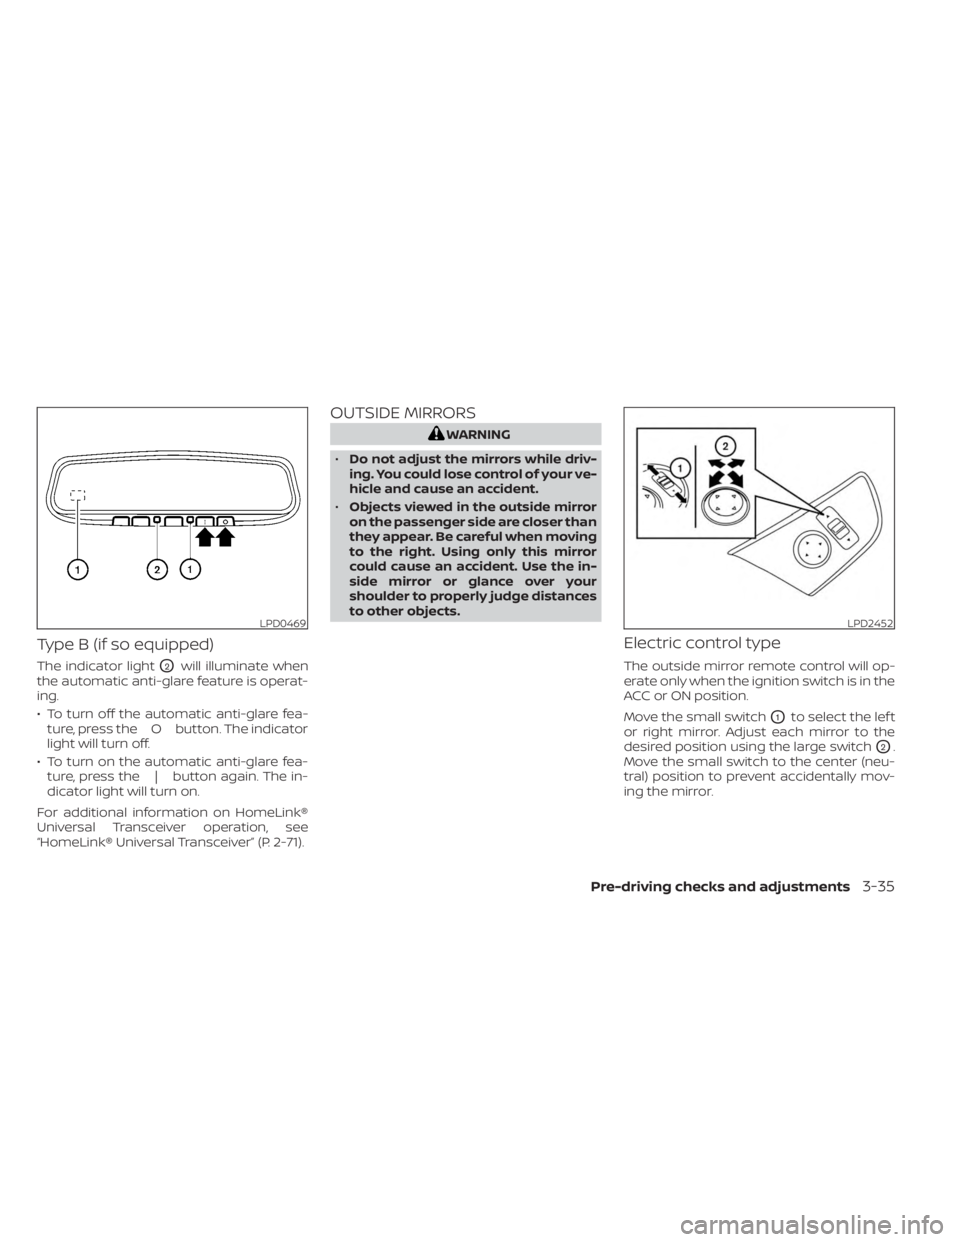
Type B (if so equipped)
The indicator lightO2will illuminate when
the automatic anti-glare feature is operat-
ing.
• To turn off the automatic anti-glare fea- ture, press the O button. The indicator
light will turn off.
• To turn on the automatic anti-glare fea- ture, press the | button again. The in-
dicator light will turn on.
For additional information on HomeLink®
Universal Transceiver operation, see
“HomeLink® Universal Transceiver” (P. 2-71).
OUTSIDE MIRRORS
WARNING
• Do not adjust the mirrors while driv-
ing. You could lose control of your ve-
hicle and cause an accident.
• Objects viewed in the outside mirror
on the passenger side are closer than
they appear. Be careful when moving
to the right. Using only this mirror
could cause an accident. Use the in-
side mirror or glance over your
shoulder to properly judge distances
to other objects.
Electric control type
The outside mirror remote control will op-
erate only when the ignition switch is in the
ACC or ON position.
Move the small switch
O1to select the lef t
or right mirror. Adjust each mirror to the
desired position using the large switch
O2.
Move the small switch to the center (neu-
tral) position to prevent accidentally mov-
ing the mirror.
LPD0469LPD2452
Pre-driving checks and adjustments3-35
Page 204 of 518
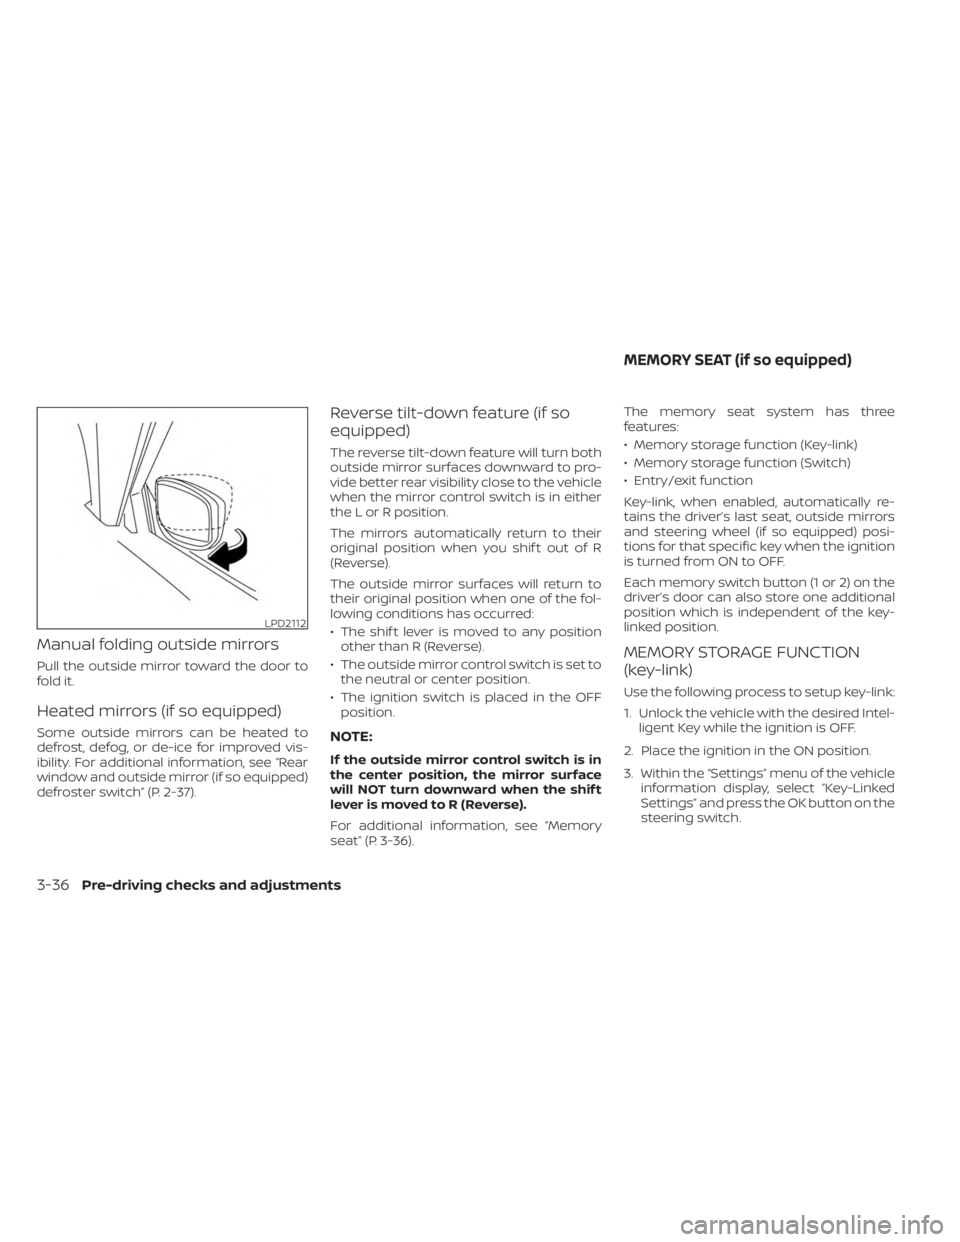
Manual folding outside mirrors
Pull the outside mirror toward the door to
fold it.
Heated mirrors (if so equipped)
Some outside mirrors can be heated to
defrost, defog, or de-ice for improved vis-
ibility. For additional information, see “Rear
window and outside mirror (if so equipped)
defroster switch” (P. 2-37).
Reverse tilt-down feature (if so
equipped)
The reverse tilt-down feature will turn both
outside mirror surfaces downward to pro-
vide better rear visibility close to the vehicle
when the mirror control switch is in either
the L or R position.
The mirrors automatically return to their
original position when you shif t out of R
(Reverse).
The outside mirror surfaces will return to
their original position when one of the fol-
lowing conditions has occurred:
• The shif t lever is moved to any positionother than R (Reverse).
• The outside mirror control switch is set to the neutral or center position.
• The ignition switch is placed in the OFF position.
NOTE:
If the outside mirror control switch is in
the center position, the mirror surface
will NOT turn downward when the shif t
lever is moved to R (Reverse).
For additional information, see “Memory
seat” (P. 3-36). The memory seat system has three
features:
• Memory storage function (Key-link)
• Memory storage function (Switch)
• Entry/exit function
Key-link, when enabled, automatically re-
tains the driver’s last seat, outside mirrors
and steering wheel (if so equipped) posi-
tions for that specific key when the ignition
is turned from ON to OFF.
Each memory switch button (1 or 2) on the
driver’s door can also store one additional
position which is independent of the key-
linked position.
MEMORY STORAGE FUNCTION
(key-link)
Use the following process to setup key-link:
1. Unlock the vehicle with the desired Intel-
ligent Key while the ignition is OFF.
2. Place the ignition in the ON position.
3. Within the “Settings” menu of the vehicle information display, select “Key-Linked
Settings” and press the OK button on the
steering switch.
LPD2112
MEMORY SEAT (if so equipped)
3-36Pre-driving checks and adjustments
Page 205 of 518
4. While in the menu, press the OK buttonon the steering switch to turn the sys-
tem ON/OFF.
Once step 4 is completed, every time the
ignition is switched from ON to OFF, the
memory positions of the driver’s seat, out-
side mirrors and automatic steering wheel
(if so equipped) are linked to the Intelligent
Key.
Follow the same procedure if you want
to link the 2nd, 3rd or 4th Intelligent Key.
NOTE:
If new memory positions are set prior to
turning the ignition from ON to OFF, the
previously linked memory positions for
the respective key will be overwritten by
new positions.
Recalling Intelligent Key memory
positions
If the “Key-Linked Settings” are enabled in
the vehicle information display for that par-
ticular key, every time you enter the vehicle
the driver’s seat, mirrors and automatic
steering wheel (if so equipped) will auto-
matically move to the driver’s last position
of the respective Intelligent Key.
NOTE:
The key-linked memory positions can be
different from the positions stored in the
memory switch (1 or 2).
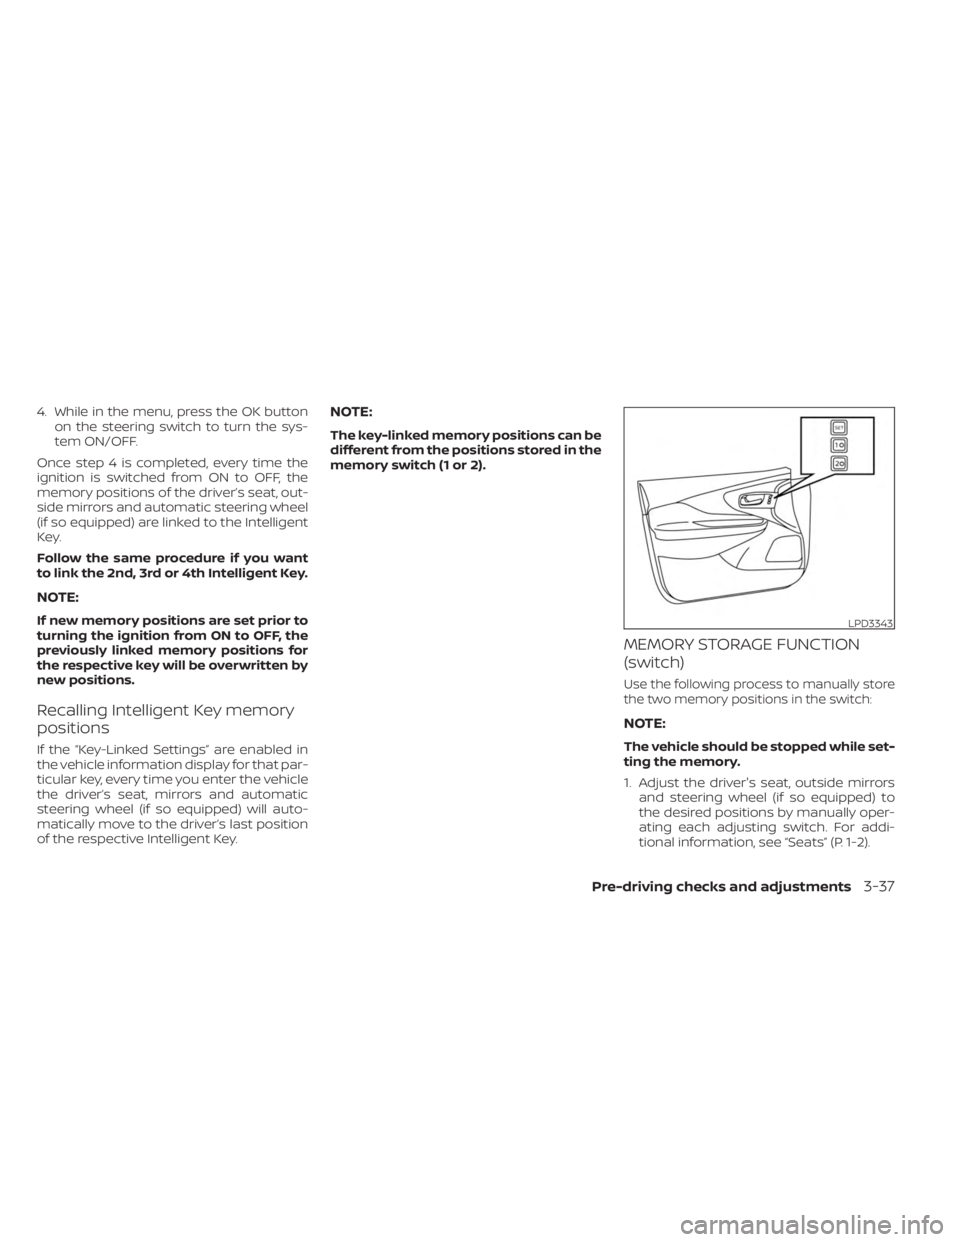
MEMORY STORAGE FUNCTION
(switch)
Use the following process to manually store
the two memory positions in the switch:
NOTE:
The vehicle should be stopped while set-
ting the memory.
1. Adjust the driver's seat, outside mirrors and steering wheel (if so equipped) to
the desired positions by manually oper-
ating each adjusting switch. For addi-
tional information, see “Seats” (P. 1-2).
LPD3343
Pre-driving checks and adjustments3-37