2023 NISSAN LEAF child lock
[x] Cancel search: child lockPage 12 of 612
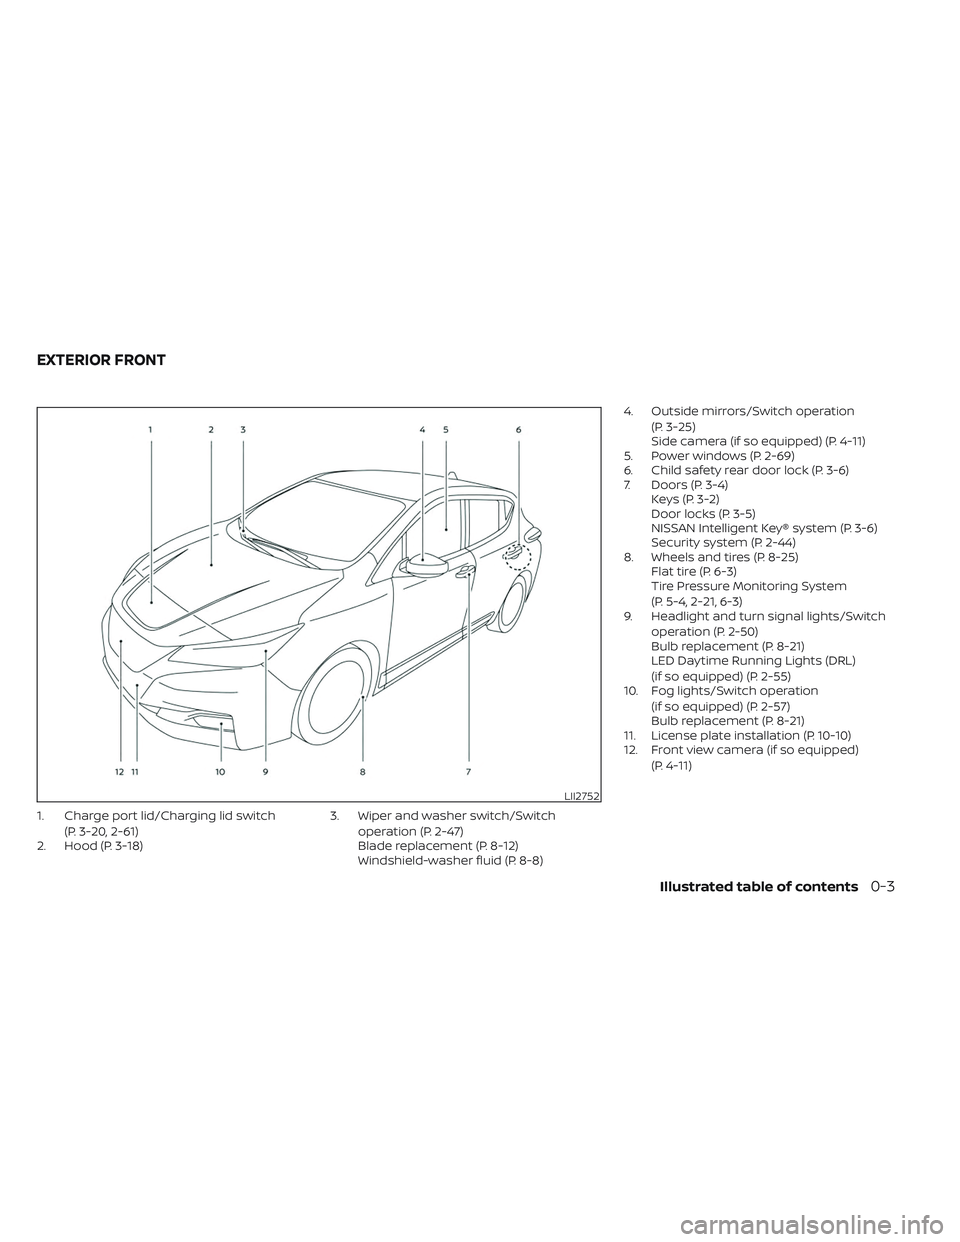
1. Charge port lid/Charging lid switch(P. 3-20, 2-61)
2. Hood (P. 3-18) 3. Wiper and washer switch/Switch
operation (P. 2-47)
Blade replacement (P. 8-12)
Windshield-washer fluid (P. 8-8) 4. Outside mirrors/Switch operation
(P. 3-25)
Side camera (if so equipped) (P. 4-11)
5. Power windows (P. 2-69)
6. Child safety rear door lock (P. 3-6)
7. Doors (P. 3-4) Keys (P. 3-2)
Door locks (P. 3-5)
NISSAN Intelligent Key® system (P. 3-6)
Security system (P. 2-44)
8. Wheels and tires (P. 8-25) Flat tire (P. 6-3)
Tire Pressure Monitoring System
(P. 5-4, 2-21, 6-3)
9. Headlight and turn signal lights/Switch
operation (P. 2-50)
Bulb replacement (P. 8-21)
LED Daytime Running Lights (DRL)
(if so equipped) (P. 2-55)
10. Fog lights/Switch operation
(if so equipped) (P. 2-57)
Bulb replacement (P. 8-21)
11. License plate installation (P. 10-10)
12. Front view camera (if so equipped)
(P. 4-11)
LII2752
EXTERIOR FRONT
Illustrated table of contents0-3
Page 53 of 612
WARNING
• If you use any medical electric de-
vices, such as an implantable cardiac
pacemaker or an implantable cardio-
vascular defibrillator, check with the
electric medical device manufac-
turer concerning the effects that
charging may have on implanted de-
vices before starting the charge op-
eration. Charging may affect the
operation.
• Make sure there is no water or for-
eign materials in the charge port,
charge connector, or electrical plug,
and that they are not damaged or
affected by rust or corrosion. If any of
these conditions are noticeable, do
not charge the Li-ion battery. This
may result in a short circuit or electric
shock and could cause a fire which
may result in serious personal injury
or death.
• To avoid serious personal injury or
death when the Li-ion battery is
charging, be aware of the following
precautions. –
Do not touch the metal contacts of
the charge port, charge connec-
tor, electrical plug or Genuine
NISSAN Adapter.
– Do not touch the vehicle and EVSE
when there is lightning.
– Do not pull, twist, bend, step on, or
drag the cable.
• Make sure the charge connector is
removed from the charge port before
starting your vehicle. If the charge
connector is only partially engaged
and the connector latch is unlocked,
it is possible to place the EV in the
READY to drive position.
• Do not touch the plug or the Genuine
NISSAN Adapter if they are wet or
with wet hands. Do not put the plug
or the Genuine NISSAN Adapter in
water, liquid or snow. This may cause
an electric shock which may result in
serious personal injury or death.
• Do not disassemble or modif y the
charge port, the EVSE or the Genuine
NISSAN Adapter. This may cause a
fire or an electric shock which may
result in serious personal injury or
death. •
If you notice an unusual odor, smoke
or abnormal noises coming from the
vehicle, stop charging immediately.
• Be careful not to allow your hands,
hair, jewelry or clothing to come into
contact with, or get caught in, the
traction motor cooling fan. The cool-
ing fan can start at any time during
charging.
• Do not use extension cords or adapt-
ers unless they are Genuine NISSAN
parts.
• Do not use the Genuine NISSAN
Adapter with any devices except the
Genuine NISSAN EVSE.
• Do not allow an unattended child to
handle or use this product.
• Use the EVSE with outlet and wiring
installed according to the
regulations/standards.
• Pass the lower side belt of the EVSE
case securely through the fastener
on the bottom of the luggage board.
If the case suddenly becomes loose,
it may cause serious injury or death.
PRECAUTIONS ON CHARGING
CH-2Charging
Page 111 of 612
WARNING
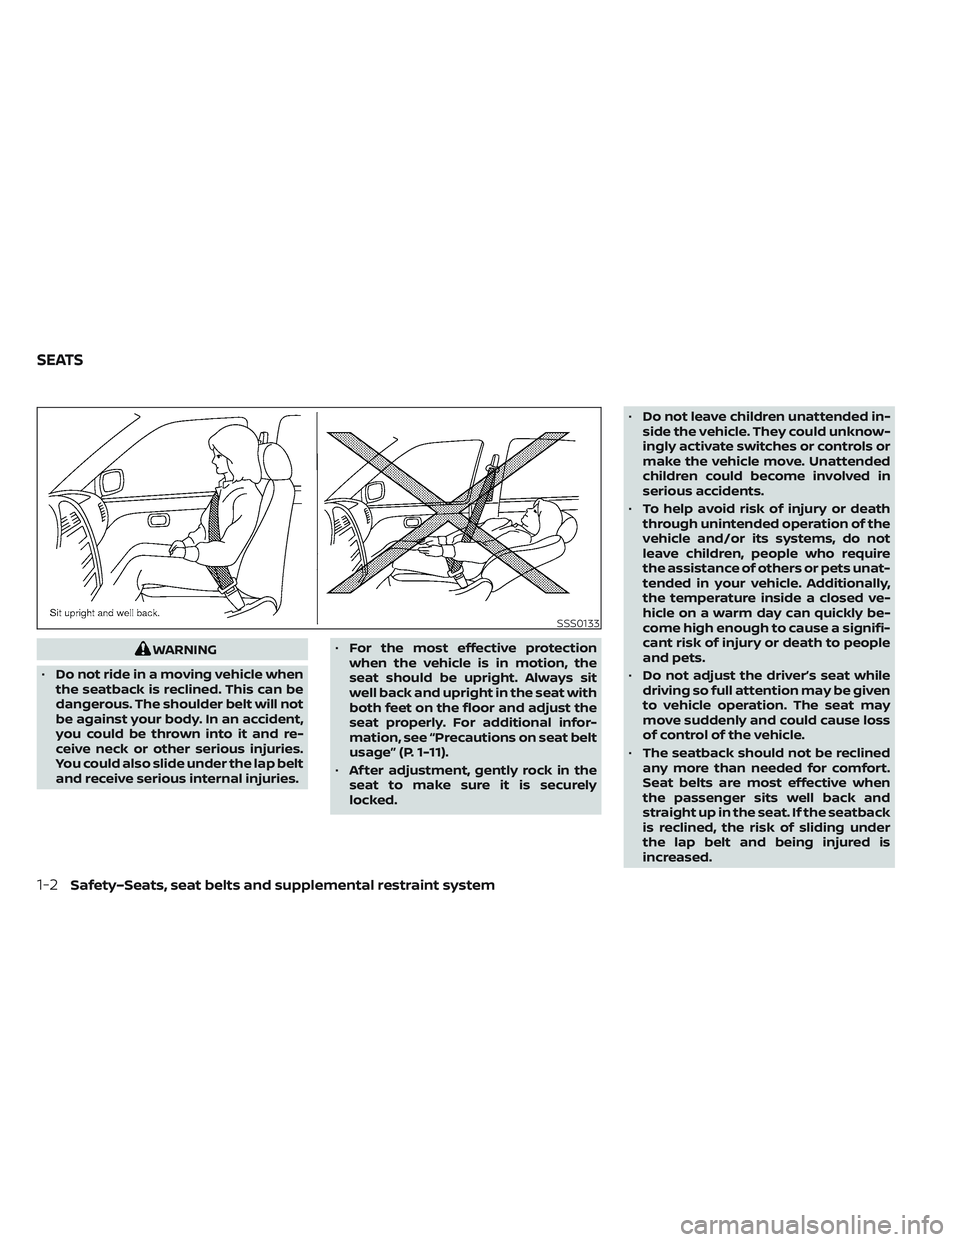
• Do not ride in a moving vehicle when
the seatback is reclined. This can be
dangerous. The shoulder belt will not
be against your body. In an accident,
you could be thrown into it and re-
ceive neck or other serious injuries.
You could also slide under the lap belt
and receive serious internal injuries. •
For the most effective protection
when the vehicle is in motion, the
seat should be upright. Always sit
well back and upright in the seat with
both feet on the floor and adjust the
seat properly. For additional infor-
mation, see “Precautions on seat belt
usage” (P. 1-11).
• Af ter adjustment, gently rock in the
seat to make sure it is securely
locked. •
Do not leave children unattended in-
side the vehicle. They could unknow-
ingly activate switches or controls or
make the vehicle move. Unattended
children could become involved in
serious accidents.
• To help avoid risk of injury or death
through unintended operation of the
vehicle and/or its systems, do not
leave children, people who require
the assistance of others or pets unat-
tended in your vehicle. Additionally,
the temperature inside a closed ve-
hicle on a warm day can quickly be-
come high enough to cause a signifi-
cant risk of injury or death to people
and pets.
• Do not adjust the driver’s seat while
driving so full attention may be given
to vehicle operation. The seat may
move suddenly and could cause loss
of control of the vehicle.
• The seatback should not be reclined
any more than needed for comfort.
Seat belts are most effective when
the passenger sits well back and
straight up in the seat. If the seatback
is reclined, the risk of sliding under
the lap belt and being injured is
increased.
SSS0133
SEATS
1-2Safety–Seats, seat belts and supplemental restraint system
Page 124 of 612
• An object placed under the front passen-ger seat.
• An object placed between the seat cush- ion and center console or between the
seat cushion and the door.
• An object hanging on the seat or placed in the seatback pocket.
• A child restraint or other object pressing against the rear of the seatback.
NOTE:
The rear seats may be equipped with a
seat belt warning in the vehicle informa-
tion display.
For additional information, see “Vehicle In-
formation display” (P. 2-26).
PREGNANT WOMEN
NISSAN recommends that pregnant
women use seat belts. The seat belt should
be worn snug, and always position the lap
belt as low as possible around the hips, not
the waist. Place the shoulder belt over your
shoulder and across your chest. Never put
the lap/shoulder belt over your abdominal
area. Contact your doctor for specific
recommendations.
INJURED PERSONS
NISSAN recommends that injured persons
use seat belts, depending on the injury.
Check with your doctor for specific
recommendations.
THREE-POINT TYPE SEAT BELT
WITH RETRACTOR
WARNING
• Every person who drives or rides in
this vehicle should use a seat belt at
all times.
• Do not ride in a moving vehicle when
the seatback is reclined. This can be
dangerous. The shoulder belt will not
be against your body. In an accident,
you could be thrown into it and re-
ceive neck or other serious injuries.
You could also slide under the lap belt
and receive serious internal injuries.
• For the most effective protection
when the vehicle is in motion, the
seat should be upright. Always sit
well back and upright in the seat with
both feet on the floor and adjust the
seat belt properly. •
Do not allow children to play with the
seat belts. Most seating positions are
equipped with Automatic Locking
Retractor (ALR) mode seat belts. If
the seat belt becomes wrapped
around a child’s neck with the ALR
mode activated, the child can be se-
riously injured or killed if the seat belt
retracts and becomes tight. This can
occur even if the vehicle is parked.
Unbuckle the seat belt to release the
child. If the seat belt cannot be un-
buckled or is already unbuckled, re-
lease the child by cutting the seat
belt with a suitable tool (such as a
knife or scissors) to release the seat
belt.
Fastening the seat belts
1. Adjust the seat. For additional informa- tion, see “Seats” (P. 1-2).
Safety–Seats, seat belts and supplemental restraint system1-15
Page 125 of 612
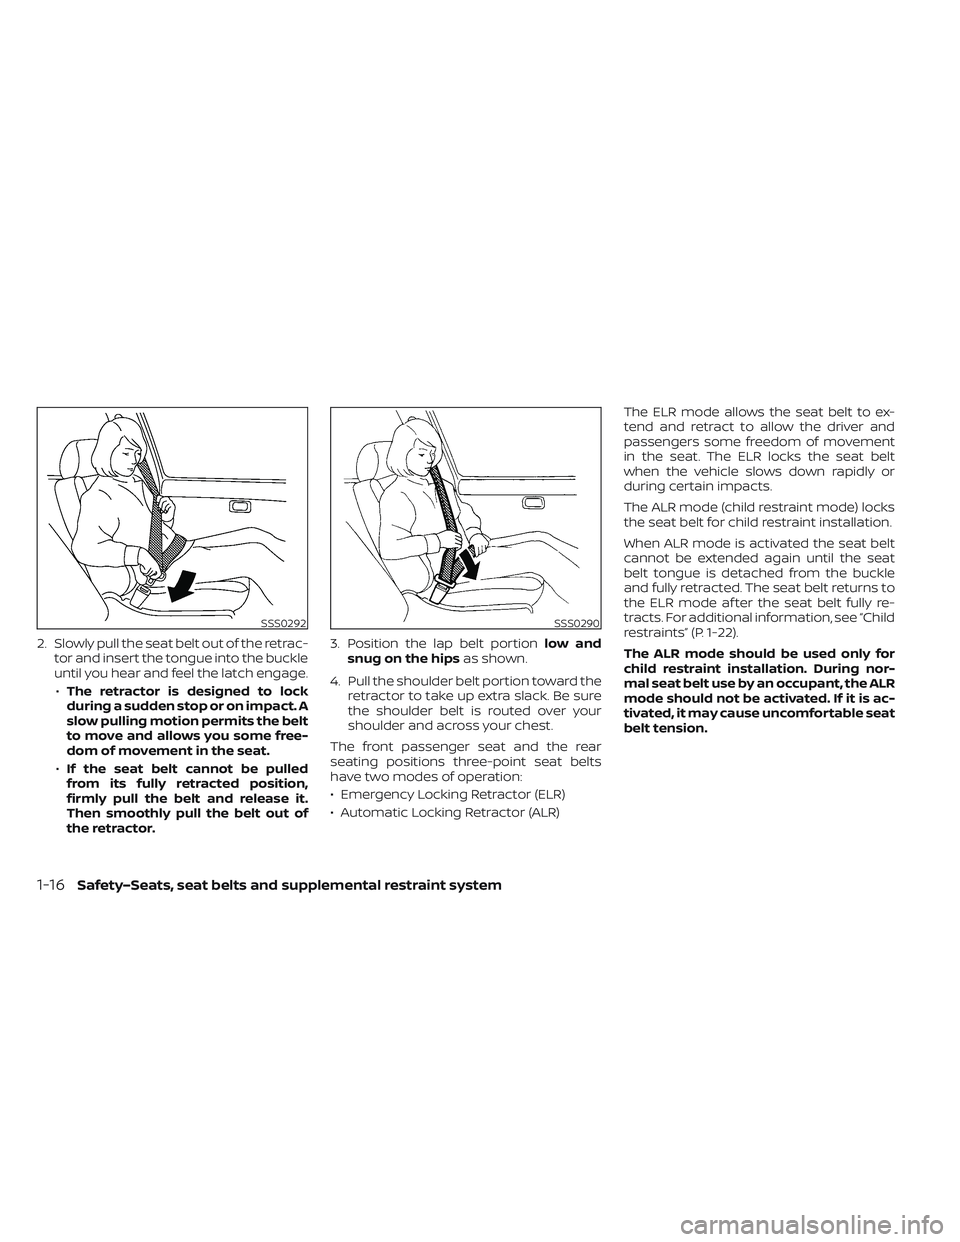
2. Slowly pull the seat belt out of the retrac-tor and insert the tongue into the buckle
until you hear and feel the latch engage.
• The retractor is designed to lock
during a sudden stop or on impact. A
slow pulling motion permits the belt
to move and allows you some free-
dom of movement in the seat.
• If the seat belt cannot be pulled
from its fully retracted position,
firmly pull the belt and release it.
Then smoothly pull the belt out of
the retractor. 3. Position the lap belt portion
low and
snug on the hips as shown.
4. Pull the shoulder belt portion toward the retractor to take up extra slack. Be sure
the shoulder belt is routed over your
shoulder and across your chest.
The front passenger seat and the rear
seating positions three-point seat belts
have two modes of operation:
• Emergency Locking Retractor (ELR)
• Automatic Locking Retractor (ALR) The ELR mode allows the seat belt to ex-
tend and retract to allow the driver and
passengers some freedom of movement
in the seat. The ELR locks the seat belt
when the vehicle slows down rapidly or
during certain impacts.
The ALR mode (child restraint mode) locks
the seat belt for child restraint installation.
When ALR mode is activated the seat belt
cannot be extended again until the seat
belt tongue is detached from the buckle
and fully retracted. The seat belt returns to
the ELR mode af ter the seat belt fully re-
tracts. For additional information, see “Child
restraints” (P. 1-22).
The ALR mode should be used only for
child restraint installation. During nor-
mal seat belt use by an occupant, the ALR
mode should not be activated. If it is ac-
tivated, it may cause uncomfortable seat
belt tension.
SSS0292SSS0290
1-16Safety–Seats, seat belts and supplemental restraint system
Page 128 of 612
WARNING
• Only NISSAN seat belt extenders,
made by the same company which
made the original equipment seat
belts, should be used with NISSAN
seat belts.
• Adults and children who can use the
standard seat belt should not use an
extender. Such unnecessary use
could result in serious personal injury
in the event of an accident.
• Never use seat belt extenders to in-
stall child restraints. If the child re-
straint is not secured properly, the
child could be seriously injured or
killed in a collision or a sudden stop.
SEAT BELT MAINTENANCE
• To clean the seat belt webbing, apply a
mild soap solution or any solution rec-
ommended for cleaning upholstery or
carpets. Then wipe with a cloth and allow
the seat belts to dry in the shade. Do not
allow the seat belts to retract until they
are completely dry.
• If dirt builds up in the shoulder belt
guide of the seat belt anchors, the seat
belts may retract slowly. Wipe the shoul-
der belt guide with a clean, dry cloth. •
Periodically check to see that the seat
belt and the metal components, such
as buckles, tongues, retractors, flexible
wires and anchors, work properly. If loose
parts, deterioration, cuts or other dam-
age on the webbing is found, the entire
seat belt assembly should be replaced.
WARNING
Do not allow children to play with the
seat belts. Most seating positions are
equipped with Automatic Locking Re-
tractor (ALR) mode seat belts. If the seat
belt becomes wrapped around a child’s
neck with the ALR mode activated, the
child can be seriously injured or killed if
the seat belt retracts and becomes
tight. This can occur even if the vehicle
is parked. Unbuckle the seat belt to re-
lease the child. If the seat belt cannot
be unbuckled or is already unbuckled,
release the child by cutting the seat
belt with a suitable tool (such as a knife
or scissors) to release the seat belt.
Children need adults to help protect
them. They need to be properly
restrained.
In addition to the general information in
this manual, child safety information is
available from many other sources, includ-
ing doctors, teachers, government traffic
safety offices, and community organiza-
tions. Every child is different, so be sure to
learn the best way to transport your child.
CHILD SAFETY
Safety–Seats, seat belts and supplemental restraint system1-19
Page 139 of 612
try a different child restraint or try install-
ing by using the vehicle seat belt (if ap-
plicable). Not all child restraints fit in all
types of vehicles.
5. Check to make sure that the child re- straint is properly secured prior to each
use. If the child restraint is loose, repeat
steps 2 through 4.
REAR-FACING CHILD RESTRAINT
INSTALLATION USING THE SEAT
BELTS
WARNING
The three-point seat belt with Auto-
matic Locking Retractor (ALR) must be
used when installing a child restraint.
Failure to use the ALR mode will result
in the child restraint not being properly
secured. The restraint could tip over or
be loose and cause injury to a child in a
sudden stop or collision. Also, it can
change the operation of the front pas-
senger air bag. For additional informa-
tion, see “Front passenger air bag and
status light” (P. 1-55). For additional information, see all Warnings
and Cautions in “Child safety” (P. 1-19) and
“Child restraints” (P. 1-22) before installing a
child restraint. Do not use the lower an-
chors if the combined weight of the child
and child restraint exceeds 65 lbs. (29.5 kg).
If the combined weight of the child and
child restraint is greater than 65 lbs. (29.5
kg), use the vehicle’s seat belt (not the lower
anchors) to install the child restraint. Be
sure to follow the child restraint manufac-
turer’s instructions for installation.
Follow these steps to install a rear-facing
child restraint using the vehicle seat belt in
the rear seats:
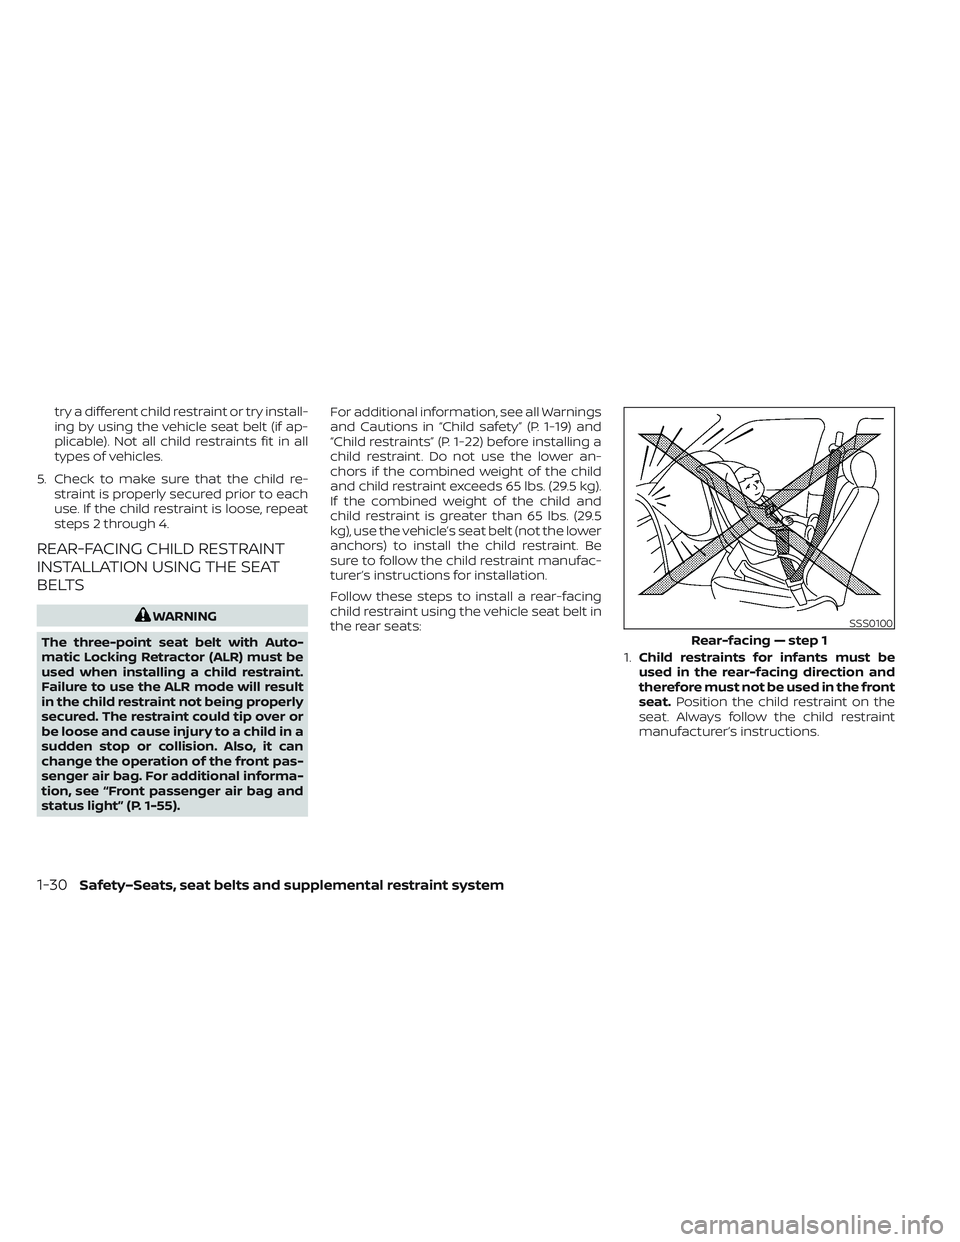
1.Child restraints for infants must be
used in the rear-facing direction and
therefore must not be used in the front
seat. Position the child restraint on the
seat. Always follow the child restraint
manufacturer’s instructions.SSS0100
Rear-facing — step 1
1-30Safety–Seats, seat belts and supplemental restraint system
Page 141 of 612
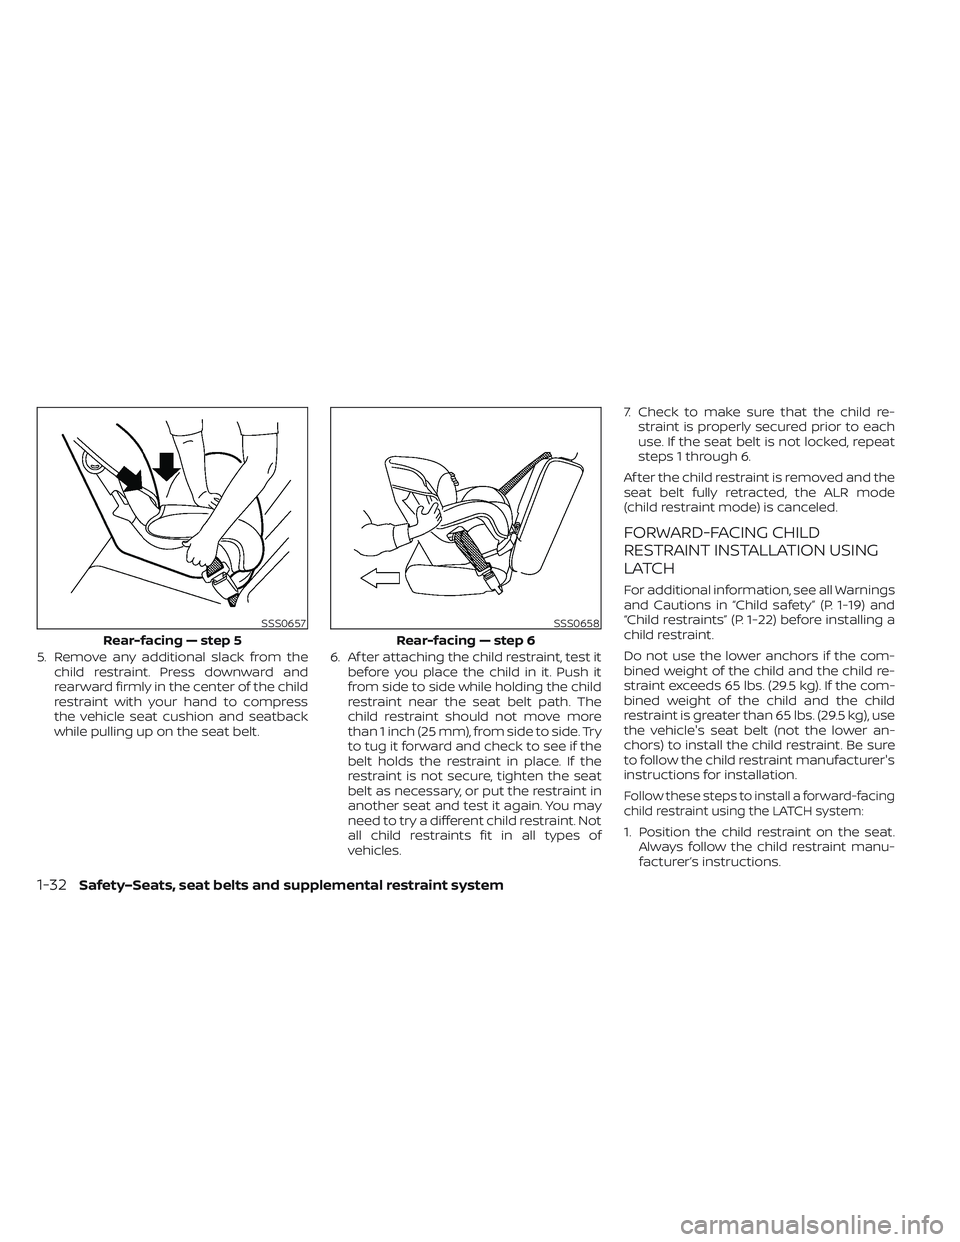
5. Remove any additional slack from thechild restraint. Press downward and
rearward firmly in the center of the child
restraint with your hand to compress
the vehicle seat cushion and seatback
while pulling up on the seat belt. 6. Af ter attaching the child restraint, test it
before you place the child in it. Push it
from side to side while holding the child
restraint near the seat belt path. The
child restraint should not move more
than 1 inch (25 mm), from side to side. Try
to tug it forward and check to see if the
belt holds the restraint in place. If the
restraint is not secure, tighten the seat
belt as necessary, or put the restraint in
another seat and test it again. You may
need to try a different child restraint. Not
all child restraints fit in all types of
vehicles. 7. Check to make sure that the child re-
straint is properly secured prior to each
use. If the seat belt is not locked, repeat
steps 1 through 6.
Af ter the child restraint is removed and the
seat belt fully retracted, the ALR mode
(child restraint mode) is canceled.
FORWARD-FACING CHILD
RESTRAINT INSTALLATION USING
LATCH
For additional information, see all Warnings
and Cautions in “Child safety” (P. 1-19) and
“Child restraints” (P. 1-22) before installing a
child restraint.
Do not use the lower anchors if the com-
bined weight of the child and the child re-
straint exceeds 65 lbs. (29.5 kg). If the com-
bined weight of the child and the child
restraint is greater than 65 lbs. (29.5 kg), use
the vehicle's seat belt (not the lower an-
chors) to install the child restraint. Be sure
to follow the child restraint manufacturer's
instructions for installation.
Follow these steps to install a forward-facing
child restraint using the LATCH system:
1. Position the child restraint on the seat. Always follow the child restraint manu-
facturer’s instructions.
SSS0657
Rear-facing — step 5
SSS0658
Rear-facing — step 6
1-32Safety–Seats, seat belts and supplemental restraint system