2023 NISSAN LEAF window
[x] Cancel search: windowPage 311 of 612
Ventilation
Press the
HEAT button and A/C but-
ton if the indicator lights are on so that
both indicator lights turn off.
NOTE:
• The ventilation mode requires a lower power consumption, so cruising dis-
tance will increase.
• In ventilation mode, temperature is not indicated on the air conditioner
display.
Dehumidified defrosting/defogging
Press the
front defroster button (the
indicator light will illuminate).
• To remove moisture or fog on the front window quickly, set the temperature to
the high temperature and the fan speed
to their maximum level.
• Af ter the windshield is cleared, press the
front defroster button again (the in-
dicator light will turn off ).
• When the
front defroster button is
pressed, the air conditioner will automati-
cally turn on to defog the windshield. The
outside air recirculation mode will be se-
lected to improve the defogging
performance. Fan speed control
Turn the
fan speed control dial to
manually control the fan speed.
Press the AUTO button to change the fan
speed to the automatic mode.
Air flow control
Press the MODE button to change the air
flow mode.
Air flows from the center and
side ventilators.
Air flows from the center and
side ventilators and foot outlets.
Air flows mainly from the foot
outlets.
Air flows from the defroster out-
lets and foot outlets.
Air flows from the defroster
vents. Temperature control
Turn the temperature control dial to set the
desired temperature.
Recirculation
Press the
intake air control button to
change the air circulation mode. When the
indicator light illuminates, the flowing air is
recirculated inside the vehicle.
When the outside temperature exceeds
70°F (21°C) the air conditioning system may
default to air recirculation mode automati-
cally to reduce overall power consumption.
To exit air recirculation mode, deselect the
air recirculation button (indicator will turn
off ) to enter fresh mode.
Fresh air
Press the
intake air control button to
change the air circulation mode. When the
indicator light does not illuminate, the flow-
ing air is drawn from outside the vehicle.
Automatic air intake control
In the AUTO mode, the intake air will be
controlled automatically. When the outside
temperature exceeds 70°F (21°C), the air
conditioning system may default to air re-
circulation mode automatically to reduce
overall power consumption.
4-34Monitor, climate, audio, phone and voice recognition systems
Page 312 of 612
To set the automatic control mode, press
and hold theintake air control button.
The indicator light will blink twice and the
inside/outside circulation will then be con-
trolled automatically. When in automatic
mode, the indicator light will come on when
inside air recirculation is active.
Rear window and outside mirror (if so
equipped) defroster switch
For additional information, see “Rear win-
dow and outside mirror (if so equipped)
defroster switch” (P. 2-49).
To turn the system off
To turn off the climate control, press the
Climate control system OFF button. The
same operating mode (Heater or A/C) that
was active when the system is turned off is
active when system is turned back on.
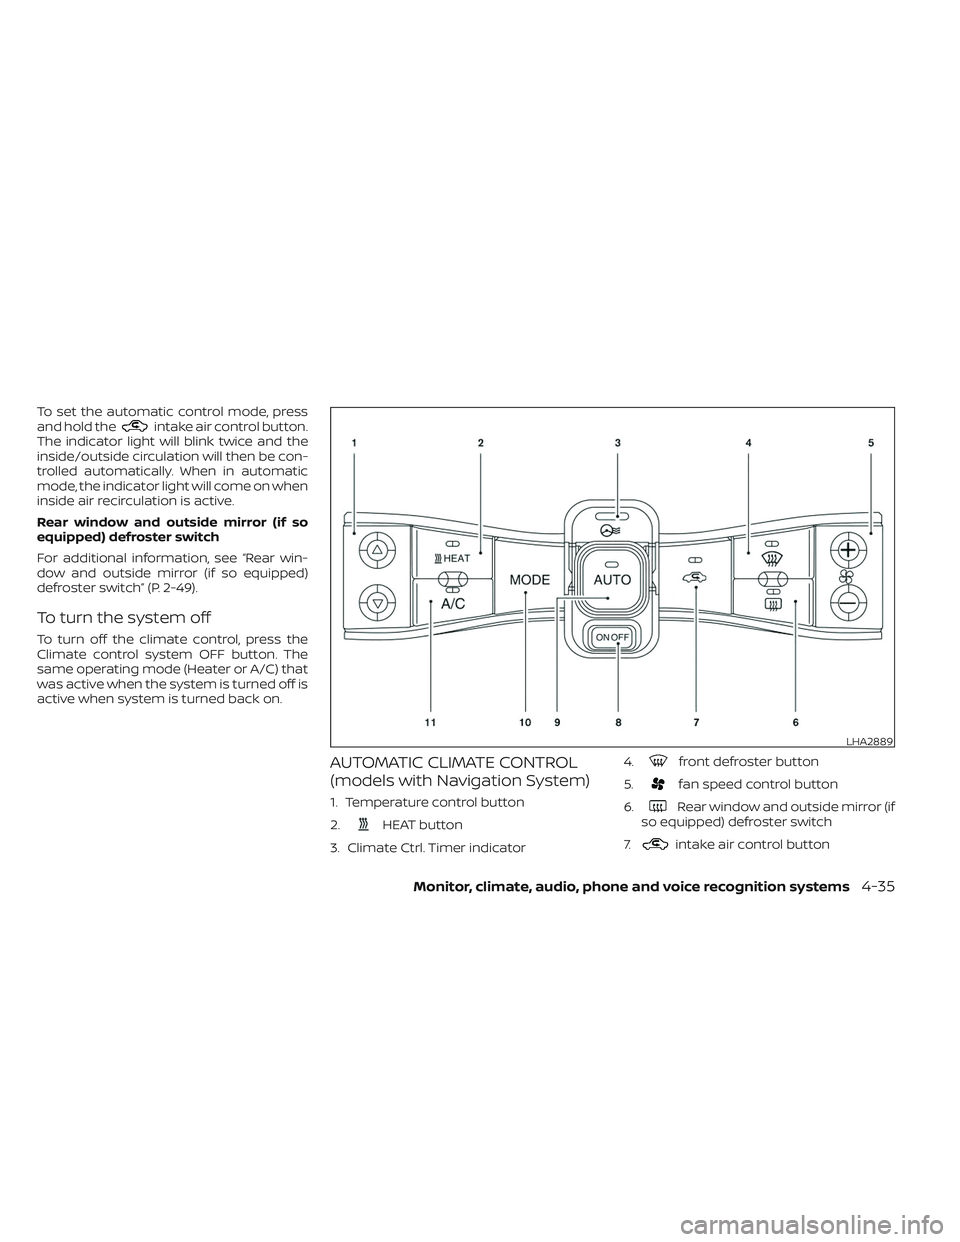
AUTOMATIC CLIMATE CONTROL
(models with Navigation System)
1. Temperature control button
2.
HEAT button
3. Climate Ctrl. Timer indicator 4.
front defroster button
5.
fan speed control button
6.
Rear window and outside mirror (if
so equipped) defroster switch
7.
intake air control button
LHA2889
Monitor, climate, audio, phone and voice recognition systems4-35
Page 314 of 612
Dehumidified heating
1. Press the A/C button to illuminate theA/C indicator light.
2. Press the
HEAT button to illuminate
the HEAT indicator light
NOTE:
Electric power consumption of climate
control increases while A/C button indi-
cator and
HEAT button indicator si-
multaneously illuminate. As a result, the
driving range may be decreased.
Heating (A/C off )
1. Press the
HEAT button to illuminate
the HEAT indicator light.
2. Press the A/C button to turn off the A/C indicator light.
• Do not set temperature lower than the outside air temperature. Doing so may
prevent the temperature from being
controlled properly.
• If the windows fog up, use dehumidi- fied heating instead of the A/C off
heating. Ventilation
Press the
HEAT button and A/C but-
ton if the indicator lights are on so that
both indicator lights turn off.
NOTE:
• The ventilation mode requires a lower power consumption, so cruising dis-
tance will increase.
• In ventilation mode, temperature is not indicated on the navigation monitor or
on the air conditioner display.
Dehumidified defrosting/defogging
Press the
front defroster button (the
indicator light will illuminate).
• To remove moisture or fog on the front window quickly, set the temperature to
the high temperature and the fan speed
to their maximum level.
• Af ter the windshield is cleared, press the
front defroster button again (the in-
dicator light will turn off ).
• When the
front defroster button is
pressed, the air conditioner and heater
will automatically turn on to defog the
windshield. The outside air recirculation
mode will be selected to improve the de-
fogging performance. Fan speed control
Press the
fan speed control button to
manually control the fan speed.
Press the AUTO button to change the fan
speed to the automatic mode.
Air flow control
Press the MODE button to change the air
flow mode.
Air flows from the center and
side ventilators.
Air flows from the center and
side ventilators and foot outlets.
Air flows mainly from the foot
outlets.
Air flows from the defroster out-
lets and foot outlets.
Air flows from the defroster
vents.
Monitor, climate, audio, phone and voice recognition systems4-37
Page 315 of 612
Temperature control
Press the temperature control buttons to
set the desired temperature.
Air recirculation
Press the
intake air control button to
change the air circulation mode. When the
indicator light illuminates, the flowing air is
recirculated inside the vehicle.
When the outside temperature exceeds
70°F (21°C) the air conditioning system may
default to air recirculation mode automati-
cally to reduce overall power consumption.
To exit air recirculation mode, deselect the
air recirculation button (indicator will turn
off ) to enter fresh mode.
Outside air circulation
Press the
intake air control button to
change the air circulation mode. When the
indicator light does not illuminate, the flow-
ing air is drawn from outside the vehicle.
Automatic air intake control
In the AUTO mode, the intake air will be
controlled automatically. When the outside
temperature exceeds 70°F (21°C), the air
conditioning system may default to air re-
circulation mode automatically to reduce
overall power consumption. To set the automatic control mode, press
and hold the
intake air control button.
The indicator light will blink twice and the
inside/outside circulation will then be con-
trolled automatically. When in automatic
mode, the indicator light will come on when
inside air recirculation is active.
Rear window and outside mirror (if so
equipped) defroster switch
For additional information, see “Rear win-
dow and outside mirror (if so equipped)
defroster switch” (P. 2-49).
To turn the system off
To turn off the climate control, press the
Climate control system ON·OFF button.
The same operating mode (Heater or A/C)
that was active when the system is turned
off is active when system is turned back on.
CLIMATE CTRL. TIMER
This function pre-heats or pre-cools the
passenger compartment of the vehicle to
the temperature before driving. This helps
reduce power consumption from the Li-ion
battery.
The Climate Ctrl. Timer operates the air
conditioner using power from the charger
or the Li-ion battery. While the charging connector is connected to the vehicle,
electric power from the Li-ion battery is not
used.
The Climate Ctrl. Timer function allows two
timer settings.
Once the Climate Ctrl. Timer is set, it will
complete air conditioning by the time that
is set. It is not necessary to set the Climate
Ctrl. Timer every day.
WARNING
Even if the Climate Ctrl. Timer is set, the
temperature in the passenger com-
partment may become high or low if
the system automatically stops. Do not
leave children or adults who would nor-
mally require the support of others
alone in your vehicle. Pets should not
be lef t alone either. On hot, sunny days,
temperatures in a closed vehicle could
quickly become high enough to cause
severe or possibly fatal injuries to
people or animals. Also on cold days,
temperature in a vehicle could become
low enough to cause severe or possible
fatal injuries to people or animals.
4-38Monitor, climate, audio, phone and voice recognition systems
Page 329 of 612
•When using a wheel without the
TPMS such as the spare tire, the TPMS
will not function and the low tire
pressure warning light will flash for
approximately 1 minute. The light will
remain on af ter 1 minute. Have your
tires replaced and/or TPMS system
reset as soon as possible. It is recom-
mended that you visit a NISSAN cer-
tified LEAF dealer for this service.
• Replacing tires with those not origi-
nally specified by NISSAN could af-
fect the proper operation of the
TPMS.
• Do not inject any tire liquid or aerosol
tire sealant into the tires, as this may
cause a malfunction of the tire pres-
sure sensors.
CAUTION
• The TPMS may not function properly
when the wheels are equipped with
tire chains or the wheels are buried in
snow. •
Do not place metalized film or any
metal parts (antenna, etc.) on the
windows. This may cause poor re-
ception of the signals from the tire
pressure sensors, and the TPMS will
not function properly.
Some devices and transmitters may tem-
porarily interfere with the operation of the
TPMS and cause the low tire pressure
warning light to illuminate. Some examples
are:
• Facilities or electric devices using similar radio frequencies that are near the
vehicle.
• If a transmitter set to similar frequencies is being used in or near the vehicle.
• If a computer (or similar equipment) or a DC/AC converter is being used in or near
the vehicle.
The low tire pressure warning light may
illuminate in the following cases:
• If the vehicle is equipped with a wheel and tire without TPMS.
• If the TPMS has been replaced and the ID has not been registered.
• If the wheel is not originally specified by NISSAN. FCC Notice:
For USA:
This device complies with Part 15 of the
FCC Rules. Operation is subject to the fol-
lowing two conditions: (1) This device
may not cause harmful interference, and
(2) this device must accept any interfer-
ence received, including interference
that may cause undesired operation.
NOTE:
Changes or modifications not expressly
approved by the party responsible for
compliance could void the user’s author-
ity to operate the equipment.
For Canada:
This device contains licence-exempt
transmitter(s)/receiver(s) that comply
with Innovation, Science and Economic
Development Canada’s licence exempt
RSS(s). Operation is subject to the fol-
lowing two conditions: (1) this device
may not cause interference, and (2) this
device must accept any interference, in-
cluding interference that may cause un-
desired operation of the device.
5-6Starting and driving
Page 333 of 612
NISSAN INTELLIGENT KEY®
SYSTEM
The Intelligent Key system allows the driver
to start the EV system without taking the
key out of a pocket or purse. The operating
environment and/or conditions may affect
Intelligent Key system operation.
Some indicators and warnings for opera-
tion are displayed on the vehicle informa-
tion display. For additional information, see
“Vehicle information display” (P. 2-26).
CAUTION
• Be sure to carry the Intelligent Key
with you when operating the vehicle.
• Never leave the Intelligent Key inside
the vehicle when you leave the
vehicle.
OPERATING RANGE FOR EV START
FUNCTION
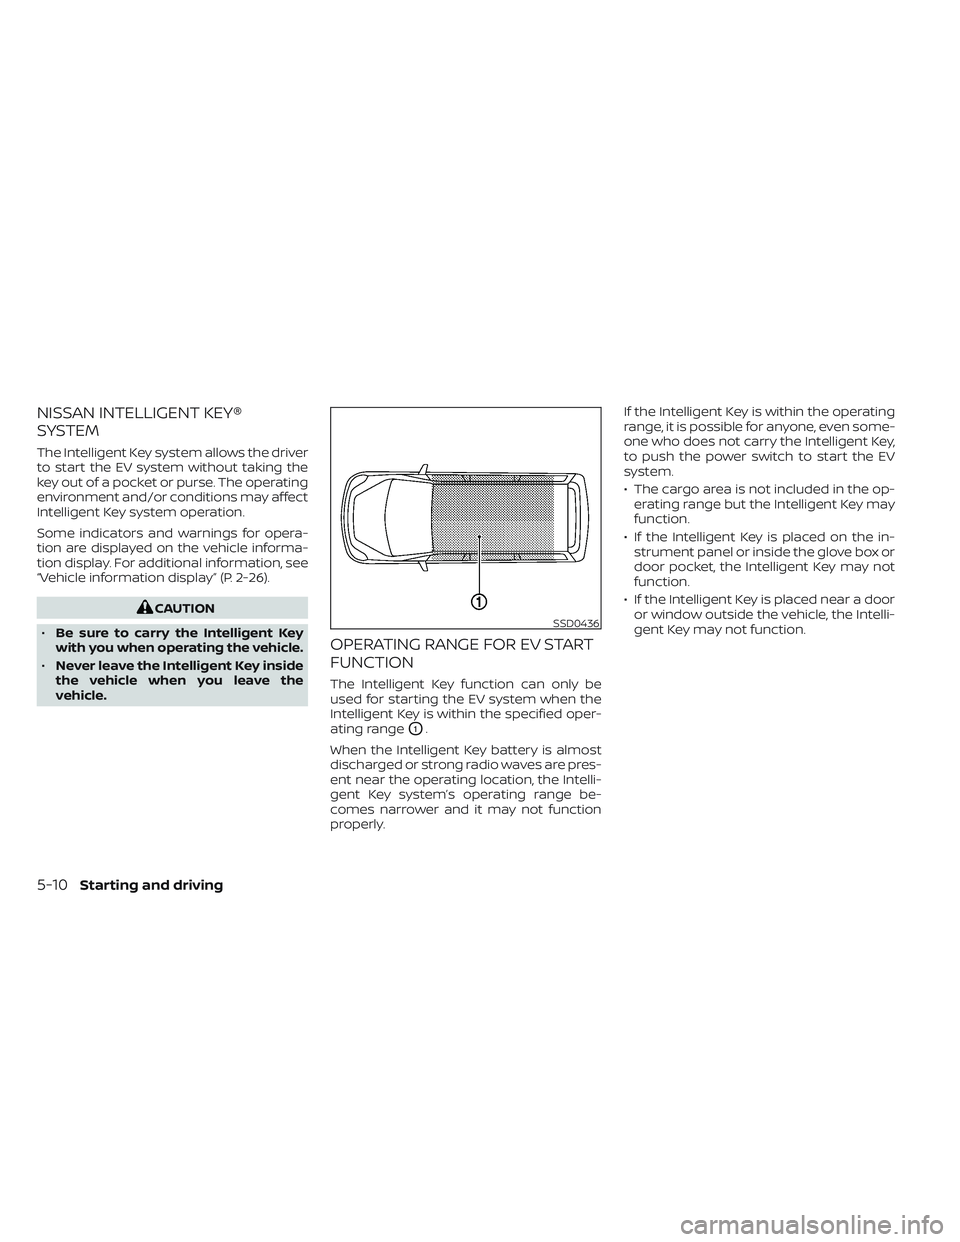
The Intelligent Key function can only be
used for starting the EV system when the
Intelligent Key is within the specified oper-
ating range
O1.
When the Intelligent Key battery is almost
discharged or strong radio waves are pres-
ent near the operating location, the Intelli-
gent Key system’s operating range be-
comes narrower and it may not function
properly. If the Intelligent Key is within the operating
range, it is possible for anyone, even some-
one who does not carry the Intelligent Key,
to push the power switch to start the EV
system.
• The cargo area is not included in the op-
erating range but the Intelligent Key may
function.
• If the Intelligent Key is placed on the in- strument panel or inside the glove box or
door pocket, the Intelligent Key may not
function.
• If the Intelligent Key is placed near a door or window outside the vehicle, the Intelli-
gent Key may not function.
SSD0436
5-10Starting and driving
Page 336 of 612
4. Push the power switch while depressingthe brake pedal within 10 seconds af ter
the chime sounds. The power switch
position changes to the READY to drive
mode.
Af ter step 3 is performed, if the power
switch is pushed without depressing the
brake pedal, the power switch position will
change to ACC.
NOTE:
• When the power switch is placed in the ACC or ON position or READY to drive
mode by the above procedure, the EV
system operation for discharged Intel-
ligent Key system indicator appears on
the vehicle information display even if
the Intelligent Key is inside the vehicle.
This is not a malfunction. To stop the
warning indicator from blinking, touch
the power switch with the Intelligent
Key again.
• If the Intelligent Key battery discharge indicator appears on the vehicle infor-
mation display, replace the battery as
soon as possible. For additional infor-
mation, see “NISSAN Intelligent Key®
battery replacement” (P. 8-19).
NISSAN VEHICLE IMMOBILIZER
SYSTEM
The NISSAN Vehicle Immobilizer System
will not allow the power switch to be placed
in the READY to drive position without the
use of the registered key.
If the power switch fails to place the vehicle
into the READY to drive position using the
registered key, it may be due to interfer-
ence caused by another registered key, an
automated toll road device or automated
payment device on the key ring. Restart the
EV system using the following procedure:
1. Leave the power switch in the ON posi- tion for approximately 5 seconds.
2. Place the power switch in the OFF posi- tion and wait approximately 10 seconds.
3. Repeat steps 1 and 2 again.
4. Place the power switch in the READY to drive position while holding the device
(which may have caused the interfer-
ence) separate from the registered key.
If this procedure allows the power
switch to be placed in the READY to drive
mode, NISSAN recommends placing the
registered key on a separate key ring to
avoid interference from other devices. • Make sure that the area around the ve-
hicle is clear.
• Check fluid levels such as coolant, brake fluid, and windshield-washer fluid as fre-
quently as possible.
• Check that all windows and lights are clean.
• Visually inspect tires for their appearance and condition. Also check tires for proper
inflation.
• Check that all doors are closed.
• Position the seat and adjust the head restraints/headrests.
• Adjust the inside and outside mirrors.
• Fasten seat belts and ask all passengers to do likewise.
• Check the operation of the warning lights when the power switch is pushed to the
ON position. For additional information,
see “Warning lights, indicator lights and
audible reminders” (P. 2-14).
BEFORE STARTING THE EV SYSTEM
Starting and driving5-13
Page 373 of 612
–On roads where discontinued lane
markers are still detectable.
– On roads where there are sharp
curves.
– On roads where there are sharply
contrasting objects, such as shad-
ows, snow, water, wheel ruts,
seams or lines remaining af ter
road repairs.
– On roads where the traveling lane
merges or separates.
– When the vehicle’s traveling direc-
tion does not align with the lane
markers.
– When traveling close to the ve-
hicle in front of you, which ob-
structs the lane camera unit de-
tection range.
– When rain, snow or dirt adheres to
the windshield in front of a lane
camera unit.
– When the headlights are not
bright due to dirt on the lens or if
aiming is not adjusted properly.
– When strong light enters a lane
camera unit. (For example: light
directly shines on the front of the
vehicle at sunrise or sunset.) –
When a sudden change in bright-
ness occurs. (For example: when
the vehicle enters or exits a tunnel
or under a bridge.)
• Do not use the I-BSI system under the
following conditions because the
system may not function properly.
– During bad weather (for example:
rain, fog, snow, etc.).
– When driving on slippery roads,
such as on ice or snow, etc.
– When driving on winding or un-
even roads.
– When there is a lane closure due to
road repairs.
– When driving in a makeshif t or
temporary lane.
– When driving on roads where the
lane width is too narrow.
– When driving with a tire that is not
within normal tire conditions (e.g.,
tire wear, low tire pressure, instal-
lation of spare tire, tire chains,
nonstandard wheels).
– When the vehicle is equipped with
non-original brake parts or sus-
pension parts. •
Excessive noise (e.g., audio system
volume, open vehicle window) will in-
terfere with the chime sound, and it
may not be heard.
I-BSI DRIVING SITUATIONS
Indicator on
Indicator off
Indicator flashing
5-50Starting and driving