2023 NISSAN KICKS turn signal
[x] Cancel search: turn signalPage 247 of 558
• Refresh: Touch the “Refresh” key to up-date the station list displayed on the right
side of the AM Menu screen.
(SEEK/TRACK) buttons
Press the
orbuttons to tune
from low to high or high to low frequencies
and to stop at the next broadcasting
station.
Direct Tune (if so equipped)
Touch the “Direct Tune” key to display the
Direct Tune menu and manually enter a
station.
1 to 6 station memory operations
Up to six stations can be registered in the
preset list.
1. Select the AM radio band.
2. Tune to the station you wish to store.
3. Touch and hold one of the preset num- bers in the preset list.
The information such as frequency will be
displayed on the preset list.
To select and listen to the preset stations,
press
oron the steering wheel
briefly or touch a preferred station on the
preset list on the radio screen.
FM radio operation
Press theMENU button and touch the
“FM” key or press the AUDIO button and
select FM on the bottom of the Launch Bar
to bring up the FM display screen.
If another audio source is playing when the
“FM” key is pressed, the audio source play-
ing will automatically be turned off and the
last radio station played will begin playing.
The FM stereo indicator (STEREO) is shown
on the screen during FM stereo reception.
When the stereo broadcast signal is weak,
the radio automatically changes from ste-
reo to monaural reception.
FM Menu
Touch the “FM Menu” key to display the FM
Menu screen options:
• SCAN: To scan the stations, touch the “FM Menu” key on the radio screen and then
touch the “SCAN” key. The stations will be
tuned from low to high frequencies and
stop at each broadcasting stations for
several seconds. Touching the “SCAN” key
again during this period of several sec-
onds will stop tuning and the radio will
remain tuned to that station. • Refresh: Touch the “Refresh” key to up-
date the station list displayed on the right
side of the FM Menu screen.
• RDS Info: Radio station and song informa- tion can be displayed on the FM display
screen.
(SEEK/TRACK) buttons
Press the
orbuttons to tune
from low to high or high to low frequencies
and to stop at the next broadcasting
station.
1 to 12 station memory operations
Up to 12 stations can be registered in the
preset list.
1. Select the FM radio band.
2. Tune to the station you wish to store.
3. Touch and hold one of the preset num- bers in the preset list.
The information such as frequency will be
displayed on the preset list.
To select and listen to the preset stations,
press
oron the steering wheel
briefly or touch a preferred station on the
preset list on the radio screen.
Monitor, climate, audio, phone and voice recognition systems4-51
Page 285 of 558
•If the low tire pressure warning light
illuminates while driving, avoid sud-
den steering maneuvers or abrupt
braking, reduce vehicle speed, pull
off the road to a safe location and
stop the vehicle as soon as possible.
Driving with under-inflated tires may
permanently damage the tires and
increase the likelihood of tire failure.
Serious vehicle damage could occur
and may lead to an accident and
could result in serious personal in-
jury. Check the tire pressure for all
four tires. Adjust the tire pressure to
the recommended COLD tire pres-
sure shown on the Tire and Loading
Information label to turn the low tire
pressure warning light off. If you have
a flat tire, replace it with a spare tire
as soon as possible. (For additional
information, see “Flat tire” (P. 6-3) for
changing a flat tire.) •
When using a wheel without the
TPMS such as the spare tire, when a
spare tire is mounted or a wheel is
replaced, the TPMS will not function
and the low tire pressure warning
light will flash for approximately 1
minute. The light will remain on af ter
1 minute. Have your tires replaced
and/or TPMS system reset as soon as
possible. It is recommended that you
visit a NISSAN dealer for this service.
• Replacing tires with those not origi-
nally specified by NISSAN could af-
fect the proper operation of the
TPMS.
• Do not inject any tire liquid or aerosol
tire sealant into the tires, as this may
cause a malfunction of the tire pres-
sure sensors.
CAUTION
• The TPMS may not function properly
when the wheels are equipped with
tire chains or the wheels are buried in
snow. •
Do not place metalized film or any
metal parts (antenna, etc.) on the
windows. This may cause poor re-
ception of the signals from the tire
pressure sensors, and the TPMS will
not function properly.
Some devices and transmitters may tem-
porarily interfere with the operation of the
TPMS and cause the low tire pressure
warning light to illuminate.
Some examples are:
• Facilities or electric devices using similar radio frequencies are near the vehicle.
• If a transmitter set to similar frequencies is being used in or near the vehicle.
• If a computer (or similar equipment) or a DC/AC converter is being used in or near
the vehicle.
The low tire pressure warning light may
illuminate in the following cases:
• If the vehicle is equipped with a wheel and tire without TPMS.
• If the TPMS has been replaced and the ID has not been registered.
• If the wheel is not originally specified by NISSAN.
Starting and driving5-7
Page 291 of 558
ON (Normal operating position)
This position turns on the ignition system
and electrical accessories.
ON has a battery saver feature that will
place the ignition switch in the OFF posi-
tion, if the vehicle is not running, af ter some
time under the following conditions:
• The shif t lever is in P (Park).
• The hazard lamps are off.
• The turn signals are off.
The battery saver feature will be canceled if
any of the following occur:
• The shif t lever is moved out of the P (Park)position.
• The ignition switch changes position.
• The hazard lamps are turned on.
• The turn signals are turned on.
CAUTION
Do not leave the vehicle with the igni-
tion switch in the ON or AUTO ACC posi-
tion when the engine is not running for
an extended period. This can discharge
the battery. OFF
The ignition switch is in the OFF position
when the engine is turned off using the
ignition switch.
AUTO ACC:
With the vehicle in the P (Park) position, the
Intelligent Key with you, and the ignition
switch placed from the ON to the OFF po-
sition, the radio can still be used for a period
of time, or until the driver’s door is opened.
Af ter a period of time, functions such as
radio, navigation, and Bluetooth® Hands-
Free Phone System may be restarted by
pressing the “POWER button/VOLUME con-
trol knob” or the key fob unlock button.
For additional information, see “Monitor, cli-
mate, audio, phone and voice recognition
systems” (P. 4-2).EMERGENCY ENGINE SHUT OFF
To shut off the engine in an emergency
situation while driving, perform the follow-
ing procedure:
• Rapidly push the ignition switch three
consecutive times in less than 1.5 sec-
onds, or
• Push and hold the ignition switch for more than 2 seconds.
NISSAN INTELLIGENT KEY®
BATTERY DISCHARGE
If the battery of the NISSAN Intelligent Key®
is discharged or environmental conditions
interfere with the Intelligent Key operation,
start the engine according to the following
procedure:
1. Place the shif t lever in the P (Park) position.
2. Firmly apply the foot brake.
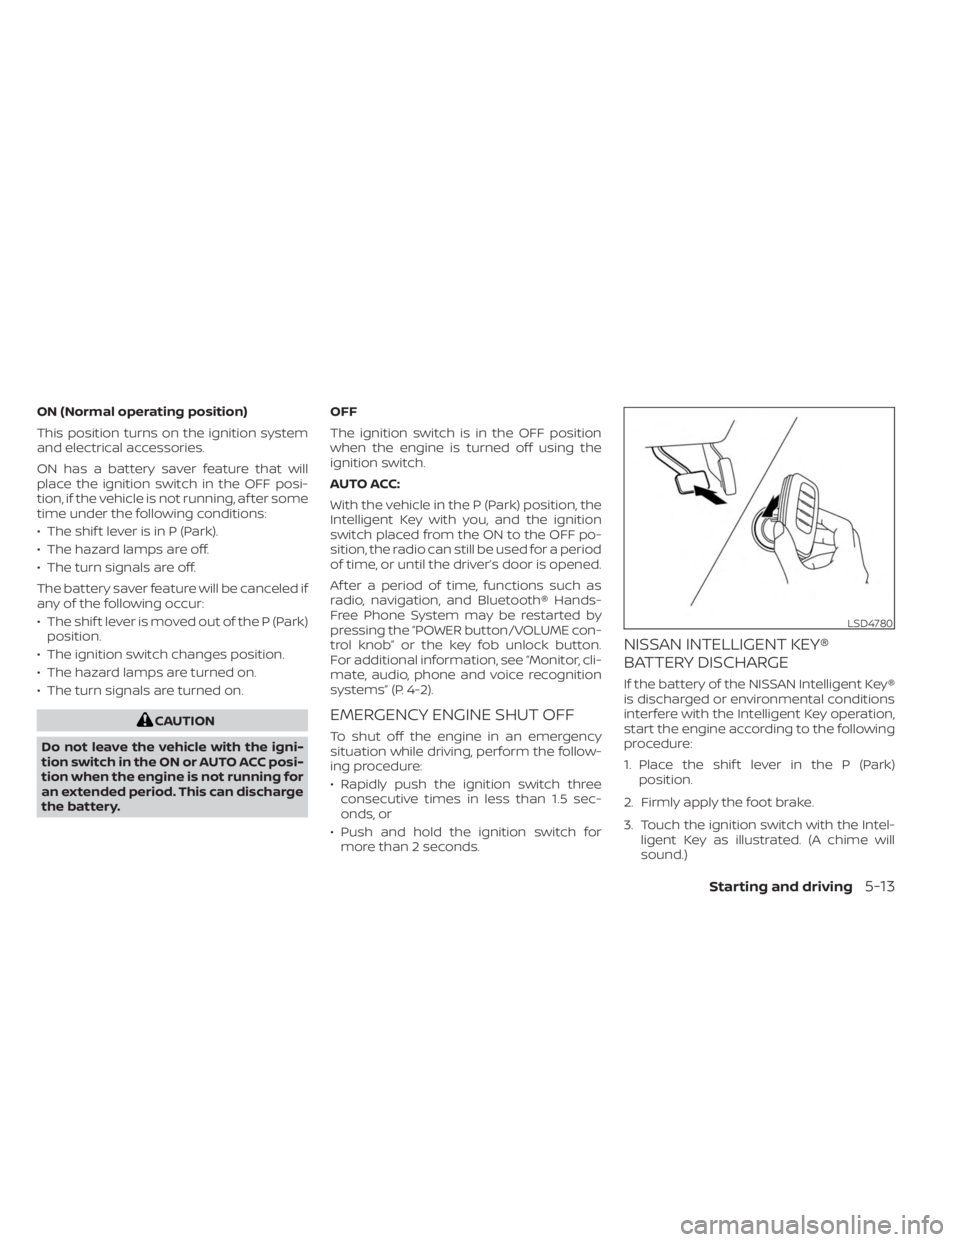
3. Touch the ignition switch with the Intel- ligent Key as illustrated. (A chime will
sound.)
LSD4780
Starting and driving5-13
Page 292 of 558
(Af ter step 3 is performed, when the ig-
nition switch is pushed without de-
pressing the brake pedal, the ignition
switch position will change to ON.)
4. Push the ignition switch while depress- ing the brake pedal within 10 seconds
af ter the chime sounds. The engine will
start.
NOTE:
• When the ignition switch is pushed tothe ON position or the engine is started
by the above procedure, the Intelligent
Key battery discharge indicator ap-
pears in the vehicle information dis-
play (if so equipped) even when the In-
telligent Key is inside the vehicle. This
is not a malfunction. To turn off the In-
telligent Key battery discharge indica-
tor, touch the ignition switch with the
Intelligent Key again.
• If the Intelligent Key battery discharge indicator appears, replace the battery
as soon as possible. For additional in-
formation, see “Battery replacement”
(P. 8-22).
NISSAN ANTI-THEFT SYSTEM
(NATS) (if so equipped)
The NISSAN Anti-Thef t System (NATS) will
not allow the engine to start without the
use of the registered NATS key.
If the engine does not start by using the
registered NATS key, it may be due to inter-
ference caused by:
• Another NATS key.
• An automated toll road device.
• An automated payment device.
•
Other devices that transmit similar signals.
Start the engine using the following proce-
dure:
1. Remove any items that may be causing the interference away from the NATS key.
2. Leave the ignition switch in the ON posi- tion for approximately 5 seconds.
3. Place the ignition switch in the OFF or LOCK position, and wait approximately
10 seconds.
4. Repeat steps 2 and 3.
5. Start the engine.
6. Repeat the steps above until all possible interferences are eliminated. If this procedure allows the engine to start,
NISSAN recommends placing the regis-
tered NATS key separate from other de-
vices to avoid interference.
NISSAN VEHICLE IMMOBILIZER
SYSTEM
The NISSAN Vehicle Immobilizer System
will not allow the engine to start without
the use of the registered key.
If the engine fails to start using a registered
key (for example, when interference is
caused by another registered key, an auto-
mated toll road device or automatic pay-
ment device on the key ring), restart the
engine using the following procedures:
1. Leave the ignition switch in the ON posi-
tion for approximately 5 seconds.
2. Place the ignition switch in the OFF or LOCK position, and wait approximately
10 seconds.
3. Repeat steps 1 and 2.
4. Restart the engine while holding the de- vice (which may have caused the inter-
ference) separate from the registered
key.
5-14Starting and driving
Page 311 of 558
–When driving without normal tire
conditions (for example, tire wear,
low tire pressure, installation of
spare tire, tire chains, nonstan-
dard wheels).
– When the vehicle is equipped with
non-original brake parts or sus-
pension parts.
– When you are towing a trailer or
other vehicle.
• The system may not function prop-
erly under the following conditions:
– On roads where there are multiple
parallel lane markers; lane mark-
ers that are faded or not painted
clearly; yellow painted lane mark-
ers; non-standard lane markers;
or lane markers covered with wa-
ter, dirt, snow, etc.
– On roads where the discontinued
lane markers are still detectable.
– On roads where there are sharp
curves. –
On roads where there are sharply
contrasting objects, such as shad-
ows, snow, water, wheel ruts,
seams or lines remaining af ter
road repairs. (The LDW system
could detect these items as lane
markers.)
– On roads where the traveling lane
merges or separates.
– When the vehicle’s traveling direc-
tion does not align with the lane
marker.
– When traveling close to the ve-
hicle in front of you, which ob-
structs the lane camera unit de-
tection range.
– When rain, snow, dirt or an object
adheres to the windshield in front
of the lane camera unit.
–
When the headlights are not bright due to dirt on the lens or if the aim-
ing is not adjusted properly.
– When strong light enters the lane
camera unit. (For example, the
light directly shines on the front of
the vehicle at sunrise or sunset.) –
When a sudden change in bright-
ness occurs. (For example, when
the vehicle enters or exits a tunnel
or under a bridge.)
SYSTEM TEMPORARILY
UNAVAILABLE
If the vehicle is parked in direct sunlight
under high temperature conditions (over
approximately 104°F [40°C]) and then
started, the LDW system may be deacti-
vated automatically and the following
message will appear in the vehicle infor-
mation display (if so equipped): “Unavail-
able: High Cabin Temperature.”
When the interior temperature is reduced,
the LDW system will resume operating
automatically.
The LDW system is not designed to warn
under the following conditions:
• When you operate the lane change signal and change traveling lanes in the direc-
tion of the signal. (The LDW system will
become operable again approximately 2
seconds af ter the lane change signal is
turned off.)
• When the vehicle speed lowers to less than approximately 37 mph (60 km/h).
Starting and driving5-33
Page 315 of 558
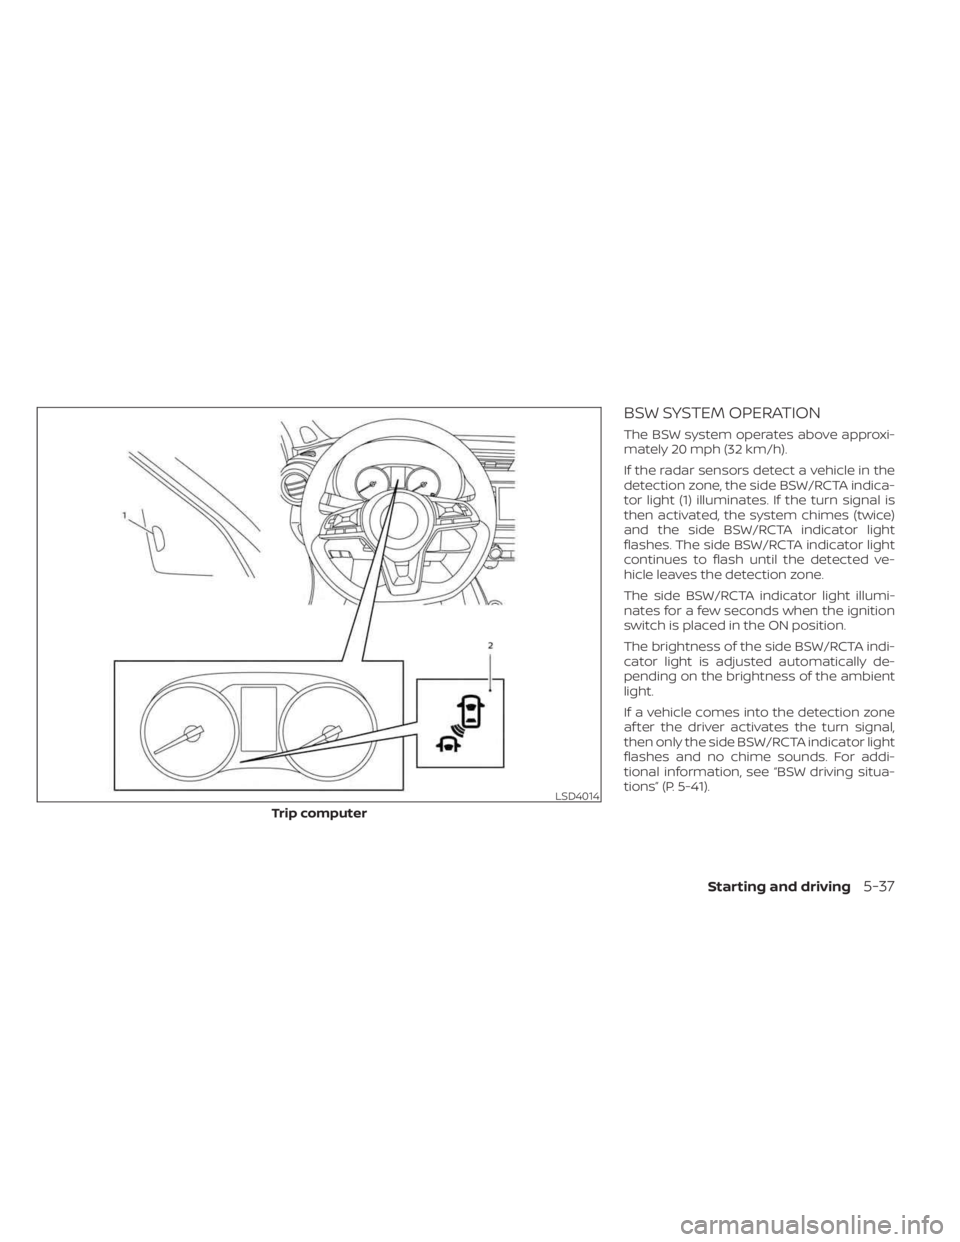
BSW SYSTEM OPERATION
The BSW system operates above approxi-
mately 20 mph (32 km/h).
If the radar sensors detect a vehicle in the
detection zone, the side BSW/RCTA indica-
tor light (1) illuminates. If the turn signal is
then activated, the system chimes (twice)
and the side BSW/RCTA indicator light
flashes. The side BSW/RCTA indicator light
continues to flash until the detected ve-
hicle leaves the detection zone.
The side BSW/RCTA indicator light illumi-
nates for a few seconds when the ignition
switch is placed in the ON position.
The brightness of the side BSW/RCTA indi-
cator light is adjusted automatically de-
pending on the brightness of the ambient
light.
If a vehicle comes into the detection zone
af ter the driver activates the turn signal,
then only the side BSW/RCTA indicator light
flashes and no chime sounds. For addi-
tional information, see “BSW driving situa-
tions” (P. 5-41).
LSD4014
Trip computer
Starting and driving5-37
Page 319 of 558
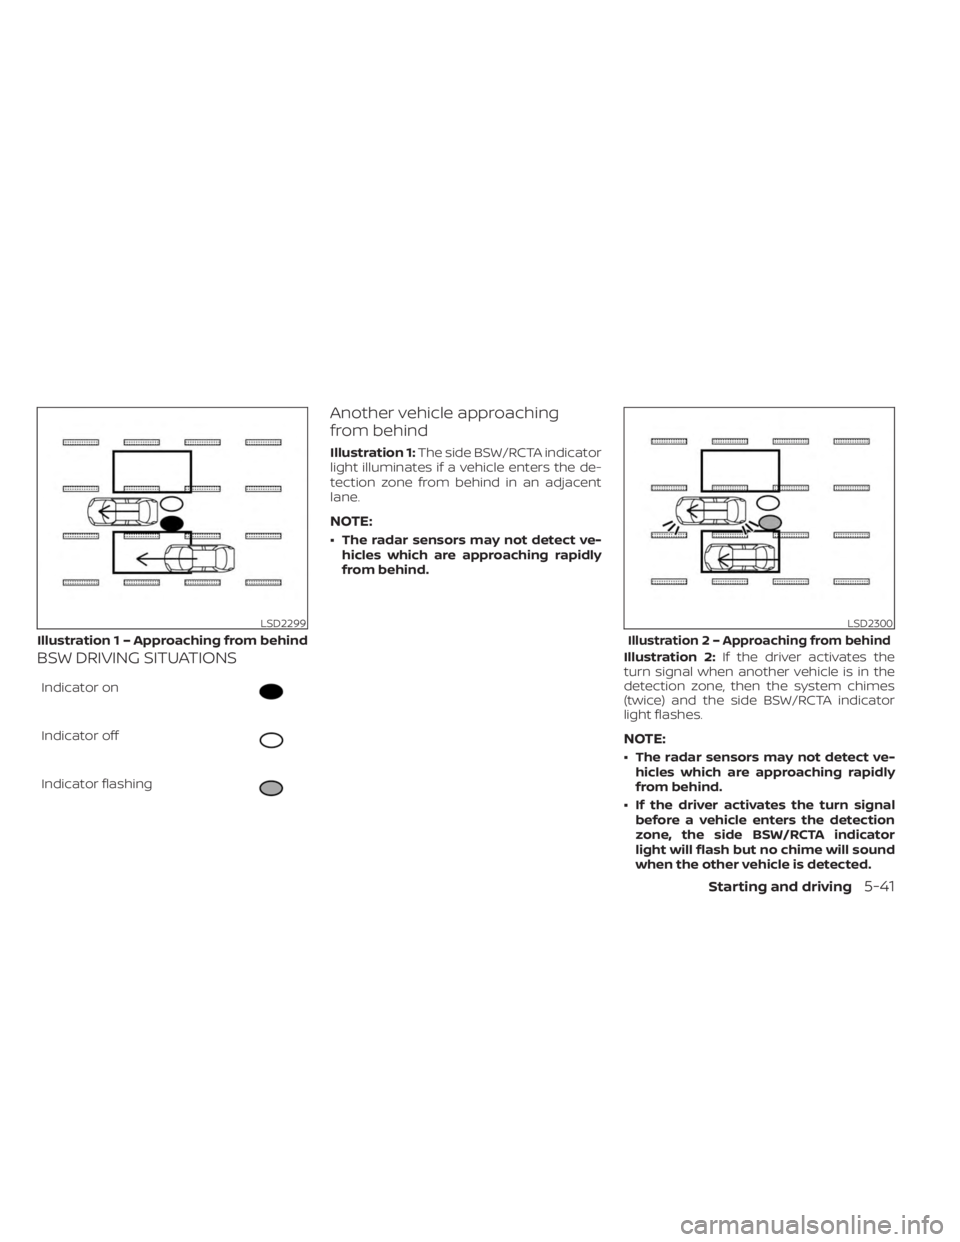
BSW DRIVING SITUATIONS
Indicator on
Indicator off
Indicator flashing
Another vehicle approaching
from behind
Illustration 1:The side BSW/RCTA indicator
light illuminates if a vehicle enters the de-
tection zone from behind in an adjacent
lane.
NOTE:
• The radar sensors may not detect ve- hicles which are approaching rapidly
from behind.
Illustration 2:If the driver activates the
turn signal when another vehicle is in the
detection zone, then the system chimes
(twice) and the side BSW/RCTA indicator
light flashes.
NOTE:
• The radar sensors may not detect ve-
hicles which are approaching rapidly
from behind.
• If the driver activates the turn signal before a vehicle enters the detection
zone, the side BSW/RCTA indicator
light will flash but no chime will sound
when the other vehicle is detected.
LSD2299
Illustratio n 1 – Approaching from behind
LSD2300
Illustration2–Appro aching from behind
Starting and driving5-41
Page 320 of 558
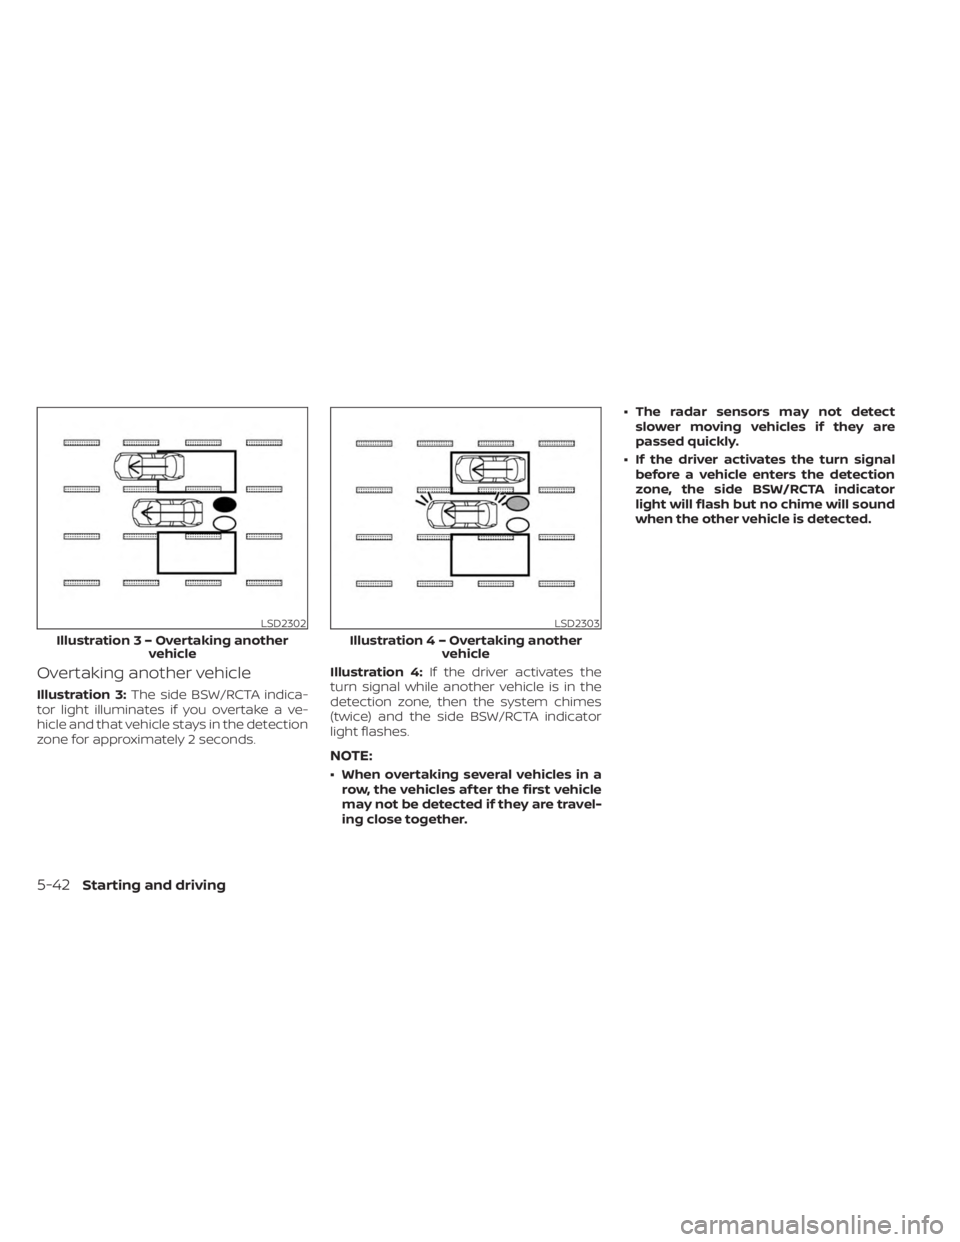
Overtaking another vehicle
Illustration 3:The side BSW/RCTA indica-
tor light illuminates if you overtake a ve-
hicle and that vehicle stays in the detection
zone for approximately 2 seconds. Illustration 4:
If the driver activates the
turn signal while another vehicle is in the
detection zone, then the system chimes
(twice) and the side BSW/RCTA indicator
light flashes.
NOTE:
• When overtaking several vehicles in a row, the vehicles af ter the first vehicle
may not be detected if they are travel-
ing close together. • The radar sensors may not detect
slower moving vehicles if they are
passed quickly.
• If the driver activates the turn signal before a vehicle enters the detection
zone, the side BSW/RCTA indicator
light will flash but no chime will sound
when the other vehicle is detected.
LSD2302
Illustratio n3–Over taking another
vehicle
LSD2303
Illustratio n4–Over taking another
vehicle
5-42Starting and driving