2023 NISSAN ARMADA tire pressure
[x] Cancel search: tire pressurePage 464 of 604

6-4In case of emergency
could affect the proper operation
of the TPMS.
. Do not inject any tire liquid or
aerosol tire sealant into the tires,
as this may cause a malfunction
of the tire pressure sensors.
CHANGING A FLAT TIRE
If you have a flat tire, follow the instruc-
tions below.
Stopping the vehicle
1. Safely move the vehicle off the road
and away from traffic.
2. Turn on the hazard warning flashers.
3. Park on a level surface and apply the parking brake. Move the shift lever to
the P (Park) position.
4. Turn off the engine.
5. Raise the hood to warn other traffic, and to signal professional road assis-
tance personnel that you need assis-
tance.
6. Have all passengers get out of the vehicle and stand in a safe place, away
from traffic and clear of the vehicle.
WARNING
.Make sure the parking brake is
securely applied and the auto-
matic transmission is in the P
(Park) position.
. Never change tires when the ve-
hicle is on a slope, ice or slippery
areas. This is hazardous.
. Never change tires if oncoming
traffic is close to your vehicle.
Wait for professional road assis-
tance.
MCE0001A
Blocking wheels
Place suitable blocksat both the front
and back of the wheel diagonally oppo-
site the flat tire to prevent the vehicle
from moving when it is jacked up.
WARNING
Be sure to block the wheel as the
vehicle may move and result in
personal injury.
Page 471 of 604
fications at each lubrication inter-
val.
.Adjust tire pressure to the COLDpressure.
COLD pressure:
After the vehicle has been parked
for three hours or more or driven
less than 1 mile (1.6 km).
COLD tire pressures are shown on
the Tire and Loading Information
label affixed to the driver side
center pillar.
After adjusting tire pressure to the COLD
tire pressure, the display of the tire
pressure information may show higher
pressure than the COLD tire pressure
after the vehicle has been driven more
than 1 mile (1.6 km). This is because the
tire pressurizes as the tire temperature
rises. This does not indicate a system
malfunction.
Stowing the damaged tire and
tools
1. Securely store the damaged tire, jack and tools in the storage area.
2. Close the cargo floor cover.
3. Replace the cargo floor board.
4. Close the liftgate.
WARNING
. Always make sure that the spare
tire and jacking equipment are
properly secured after use. Such
items can become dangerous
projectiles in an accident or sud-
den stop.
. The full-size temporary use only
spare tire (if so equipped) is de-
signed for emergency use. (See
specific instructions under the
heading “Wheels and tires” (P.8-
28).)
In case of emergency6-11
Page 487 of 604
ing on a base coat/clear coat paint finish
may dull the finish or leave swirl marks.
REMOVING SPOTS
Remove tar and oil spots, industrial dust,
insects, and tree sap as quickly as possi-
ble from the paint surface to avoid lasting
damage or staining. Special cleaning
products are available at a NISSAN dealer
or any automotive accessory stores.
UNDERBODY
In areas where road salt is used in winter,
the underbody must be cleaned regularly.
This will prevent dirt and salt from build-
ing up and causing the acceleration of
corrosion on the underbody and suspen-
sion. Before the winter period and again
in the spring, the underseal must be
checked and, if necessary, re-treated.
GLASS
Use glass cleaner to remove smoke and
dust film from the glass surfaces. It is
normal for glass to become coated with a
film after the vehicle is parked in the hot
sun. Glass cleaner and a soft cloth will
easily remove this film.
CAUTION
When cleaning the inside of the
windows, do not use sharp-edged
tools, abrasive cleaners or chlorine-
based disinfectant cleaners. They
could damage the electrical conduc-
tors, radio antenna elements or rear
window defroster elements.
WHEELS
Wash the wheels when washing the
vehicle to maintain their appearance.
.Clean the inner side of the wheels
when the wheel is changed or the
underside of the vehicle is washed.
. Inspect wheel rims regularly for dents
or corrosion. Such damage may cause
loss of pressure or poor seal at the tire
bead.
. NISSAN recommends that the road
wheels be waxed to protect against
road salt in areas where it is used
during winter.
CAUTION
Do not use abrasive cleaners when
washing the wheels.
Aluminum alloy wheels
Wash regularly with a sponge dampened
in a mild soap solution, especially during
winter months in areas where road salt is
used. Salt could discolor the wheels if not
removed.
CAUTION
Follow the directions below to avoid
staining or discoloring the wheels:
.Do not use a cleaner that uses
strong acid or alkali contents to
clean the wheels.
. Do not apply wheel cleaners to
the wheels when they are hot.
The wheel temperature should be
the same as ambient tempera-
ture.
. Rinse the wheel to completely
remove the cleaner within 15
minutes after the cleaner is ap-
plied.
Appearance and care7-3
Page 493 of 604

8 Do-it-yourself
Maintenance precautions ...................................................... 8-2
Engine compartment check locations ........................ 8-3VK56VD engine ....................................................................... 8-3
Engine cooling system ............................................................. 8-4 Checking engine coolant level .................................... 8-5
Changing engine coolant ................................................ 8-5
Engine oil ........................................................................\
..................... 8-6 Checking engine oil level ................................................. 8-6
Changing engine oil and filter ..................................... 8-6
Automatic Transmission Fluid (ATF) ............................. 8-8
Power steering fluid ................................................................... 8-8
Brake fluid ........................................................................\
.................. 8-9
Window washer fluid .............................................................. 8-10
Battery ........................................................................\
........................ 8-11 Jump starting ........................................................................\
. 8-13
Variable voltage control system ................................... 8-13
Drive belts ........................................................................\
................ 8-13
Spark plugs ........................................................................\
............. 8-14 Replacing spark plugs ..................................................... 8-14
Air cleaner ........................................................................\
............... 8-15 Windshield wiper blades ..................................................... 8-16
Cleaning ........................................................................\
........... 8-16
Replacing ........................................................................\
........ 8-16
Rear window wiper blades ............................................... 8-17
Brakes ........................................................................\
........................ 8-17 Self-adjusting brakes ..................................................... 8-17
Brake pad wear warning ............................................ 8-17
Brake booster ...................................................................... 8-17
Fuses ........................................................................\
........................... 8-18 Engine compartment .................................................... 8-18
Passenger compartment ........................................... 8-20
Intelligent Key battery replacement .......................... 8-21
Lights ........................................................................\
.......................... 8-24
Headlights ........................................................................\
...... 8-25
Exterior and interior lights ........................................ 8-26
Wheels and tires ........................................................................\
8-28
Tire pressure ........................................................................\
8-28
Tire labeling ........................................................................\
.. 8-32
Types of tires ....................................................................... 8-34
Tire chains ........................................................................\
...... 8-35
Changing wheels and tires ...................................... 8-36
Page 520 of 604
8-28Do-it-yourself
If you have a flat tire, see “Flat tire” (P.6-
3).
TIRE PRESSURE
Tire Pressure Monitoring System
(TPMS)
This vehicle is equipped with the Tire
Pressure Monitoring System (TPMS). It
monitors tire pressure of all tires except
the spare. When the low tire pressure
warning light is lit and the “Tire Pressure
Low Add Air” warning appears in the
vehicle information display, one or more
of your tires is significantly under-inflated.
The TPMS will activate only when the
vehicle is driven at speeds above 16 MPH
(25 km/h). Also, this system may not
detect a sudden drop in tire pressure
(for example, a flat tire while driving).
For more details, see “Low tire pressure
warning light” (P.2-16), “Tire Pressure Mon-
itoring System (TPMS)” (P.5-5) and “Tire
Pressure Monitoring System (TPMS) ” (P.6-
3).
Tire inflation pressure
Check the pressure of the tires
(including the spare) often and al-
ways prior to long distance trips.
The recommended tire pressure
specifications are shown on the
Tire and Loading Information label
under the “Cold Tire Pressure”
heading. The Tire and Loading In-
formation label is affixed to the
driver side center pillar. Tire pres-
sures should be checked regularly
because:
.Most tires naturally lose air over
time.
. Tires can lose air suddenly when
driven over potholes or other
objects or if the vehicle strikes
a curb while parking.
The tire pressures should be
checked when the tires are cold.
The tires are considered COLD after
the vehicle has been parked for 3 or
more hours, or driven less than 1
mile (1.6 km) at moderate speeds.
TPMS with Easy Fill Tire Alert pro-
vides visual and audible signals outside the vehicle for inflating the
tires to the recommended COLD
tire pressure. (See “TPMS with Easy
Fill Tire Alert” (P.5-8).)
Incorrect tire pressure, including
under inflation, may adversely
affect tire life and vehicle hand-
ling.
WARNING
.
Improperly inflated tires can
fail suddenly and cause an
accident.
. The Gross Vehicle Weight
rating (GVWR) is located on
the F.M.V.S.S./C.M.V.S.S. cer-
tification label. The vehicle
weight capacity is indicated
on the Tire and Loading In-
formation label. Do not load
your vehicle beyond this ca-
pacity. Overloading your ve-
hicle may result in reduced
tire life, unsafe operating
conditions due to premature
tire failure, or unfavorable
WHEELS AND TIRES
Page 521 of 604
handling characteristics and
could also lead to a serious
accident. Loading beyond
the specified capacity may
also result in failure of other
vehicle components.
. Before taking a long trip, or
whenever you heavily load
your vehicle, use a tire pres-
sure gauge to ensure that
the tire pressures are at the
specified level.
. For additional information
regarding tires, refer to “Im-
portant Tire Safety Informa-
tion” (US) or “Tire Safety
Information” (Canada) in the
Warranty Information Book-
let.
Do-it-yourself8-29
Page 522 of 604
8-30Do-it-yourself
SDI2496
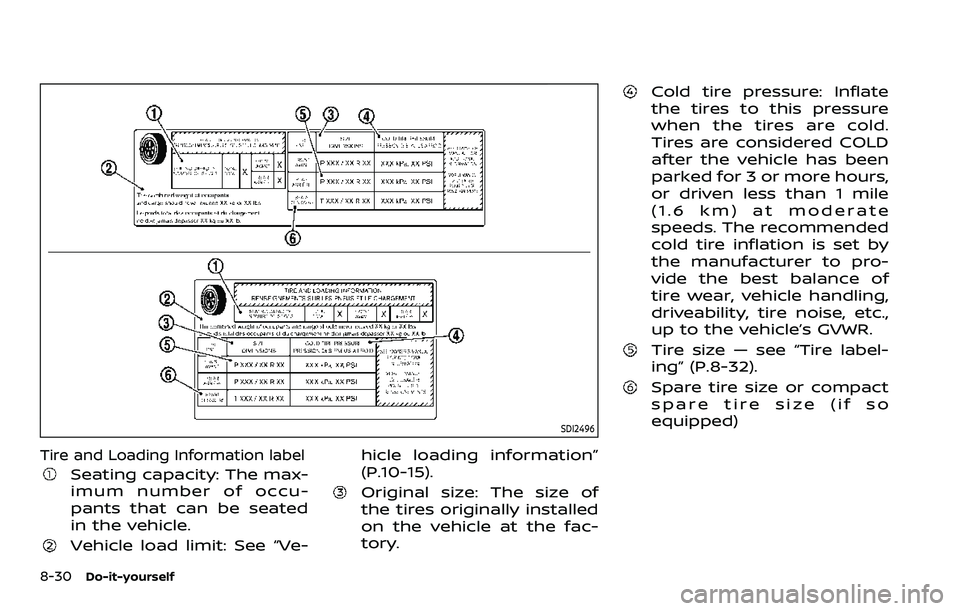
Tire and Loading Information label
Seating capacity: The max-
imum number of occu-
pants that can be seated
in the vehicle.
Vehicle load limit: See “Ve-hicle loading information”
(P.10-15).
Original size: The size of
the tires originally installed
on the vehicle at the fac-
tory.
Cold tire pressure: Inflate
the tires to this pressure
when the tires are cold.
Tires are considered COLD
after the vehicle has been
parked for 3 or more hours,
or driven less than 1 mile
(1.6 km) at moderate
speeds. The recommended
cold tire inflation is set by
the manufacturer to pro-
vide the best balance of
tire wear, vehicle handling,
driveability, tire noise, etc.,
up to the vehicle’s GVWR.
Tire size — see “Tire label-
ing” (P.8-32).
Spare tire size or compact
spare tire size (if so
equipped)
Page 523 of 604
SDI1949
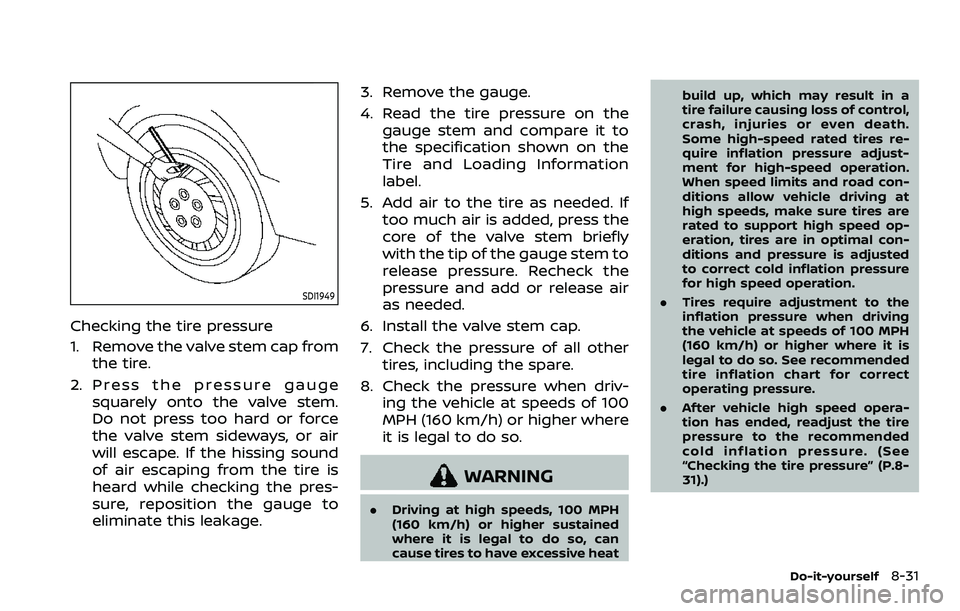
Checking the tire pressure
1. Remove the valve stem cap fromthe tire.
2. Press the pressure gauge squarely onto the valve stem.
Do not press too hard or force
the valve stem sideways, or air
will escape. If the hissing sound
of air escaping from the tire is
heard while checking the pres-
sure, reposition the gauge to
eliminate this leakage. 3. Remove the gauge.
4. Read the tire pressure on the
gauge stem and compare it to
the specification shown on the
Tire and Loading Information
label.
5. Add air to the tire as needed. If too much air is added, press the
core of the valve stem briefly
with the tip of the gauge stem to
release pressure. Recheck the
pressure and add or release air
as needed.
6. Install the valve stem cap.
7. Check the pressure of all other tires, including the spare.
8. Check the pressure when driv- ing the vehicle at speeds of 100
MPH (160 km/h) or higher where
it is legal to do so.
WARNING
. Driving at high speeds, 100 MPH
(160 km/h) or higher sustained
where it is legal to do so, can
cause tires to have excessive heat build up, which may result in a
tire failure causing loss of control,
crash, injuries or even death.
Some high-speed rated tires re-
quire inflation pressure adjust-
ment for high-speed operation.
When speed limits and road con-
ditions allow vehicle driving at
high speeds, make sure tires are
rated to support high speed op-
eration, tires are in optimal con-
ditions and pressure is adjusted
to correct cold inflation pressure
for high speed operation.
. Tires require adjustment to the
inflation pressure when driving
the vehicle at speeds of 100 MPH
(160 km/h) or higher where it is
legal to do so. See recommended
tire inflation chart for correct
operating pressure.
. After vehicle high speed opera-
tion has ended, readjust the tire
pressure to the recommended
cold inflation pressure. (See
“Checking the tire pressure” (P.8-
31).)
Do-it-yourself8-31