2023 NISSAN ALTIMA trunk light
[x] Cancel search: trunk lightPage 91 of 644
Heated seat switches (if so equipped)..........2-64
Heated steering wheel switch (if so equipped) . . 2-65
Steering Assist switch (for vehicles with
ProPILOT Assist) (if so equipped) ................2-66
Emergency call (SOS) button (if so equipped) . . . 2-67
Rear Door Alert ................................. 2-67
Power outlet ................................... 2-69
USB/iPod® charging port (if so equipped) .......2-70
Extended storage switch .......................2-70
Storage ........................................ 2-71
Front-door pockets ......................... 2-71
Seatback pockets (if so equipped) ...........2-71
Glovebox ................................... 2-72
Console box ................................. 2-72
Overhead sunglasses storage ...............2-73
Cup holders ................................. 2-73
Windows ....................................... 2-75
Power windows ............................. 2-75Moonroof (if so equipped)
......................2-77
Power moonroof ............................ 2-77
Interior lights ................................... 2-79
Map lights ................................... 2-80
Personal lights .............................. 2-80
Trunk light ................................... 2-80
HomeLink® Universal Transceiver
(if so equipped) ................................. 2-81
Programming HomeLink® ...................2-81
Programming HomeLink® for Canadian
customers and gate openers ...............2-83
Operating the HomeLink® Universal
Transceiver .................................. 2-84
Programming trouble-diagnosis ............2-84
Clearing the programmed information ......2-84
Reprogramming a single HomeLink®
button ...................................... 2-84
If your vehicle is stolen ......................2-85
Page 105 of 644

CAUTION
• The TPMS is not a substitute for the
regular tire pressure check. Be sure
to check the tire pressure regularly.
• If the vehicle is being driven at
speeds of less than 16 mph (25 km/h),
the TPMS may not operate correctly.
• Be sure to install the specified size of
tires to the four wheels correctly.
Malfunction Indicator Light
(MIL)
If this indicator light comes on steady or
blinks while the engine is running, it may
indicate a potential emission control
malfunction.
The MIL may also come on steady if the
fuel-filler cap is loose or missing, or if the
vehicle runs out of fuel. Check to make sure
the fuel-filler cap is installed and closed
tightly, and that the vehicle has at least 3
gallons (11.4 liters) of fuel in the fuel tank.
Af ter a few driving trips, the
light
should turn off if no other potential emis-
sion control system malfunction exists. If this indicator light comes on steady for 20
seconds and then blinks for 10 seconds
when the engine is not running, it indicates
that the vehicle is not ready for an emission
control system inspection/maintenance
test. For additional information, see “Readi-
ness for Inspection/Maintenance (I/M) test”
(P. 10-24).
Operation
The MIL will come on in one of two ways:
• MIL on steady — An emission control sys-
tem malfunction has been detected.
Check the fuel-filler cap if the Loose Fuel
Cap warning appears in the vehicle infor-
mation display. If the fuel-filler cap is loose
or missing, tighten or install the cap and
continue to drive the vehicle. The
light should turn off af ter a few driving
trips. If thelight does not turn off
af ter a few driving trips, have the vehicle
inspected. It is recommended that you
visit a NISSAN dealer for this service. You
do not need to have your vehicle towed
to the dealer.
• MIL blinking — An engine misfire has been detected which may damage the emis-
sion control system. To reduce or avoid
emission control system damage:– do not drive at speeds above 45 mph (72 km/h). – avoid hard acceleration or
deceleration.
– avoid steep uphill grades.
– if possible, reduce the amount of cargo being hauled or towed.
The MIL may stop blinking and come on
steady. Have the vehicle inspected. It is rec-
ommended that you visit a NISSAN dealer
for this service. You do not need to have
your vehicle towed to the dealer.
CAUTION
Continued vehicle operation without
having the emission control system
checked and repaired as necessary
could lead to poor driveability, reduced
fuel economy, and possible damage to
the emission control system.
Master warning light
When the ignition is in the ON position, the
master warning light illuminates if any of
the following are displayed on the vehicle
information display.
• No key warning
• Low windshield-washer fluid warning
• Door open warning (when stopped)
• Trunk open warning
Instruments and controls2-15
Page 136 of 644
WARNING
Selecting “Dismiss Message” during a
stop within a trip temporarily dis-
misses the message for that stop with-
out turning the system off. Alerts can
be provided for other stops during the
trip. Selecting “Disable Alert” turns off
the Rear Door Alert system for the re-
mainder of a trip and no audible alert
will be provided.
NOTE:
This system is disabled until a driver en-
ables it using the vehicle information
display. For additional information, see
“How to use the vehicle information dis-
play ” (P. 2-35).
For additional information, see “Rear Door
Alert” (P. 2-67).
Check Rear Seat For All Articles
When the system is enabled, this message
appears when the vehicle comes to a com-
plete stop, the vehicle is transitioned from
the D (Drive) position to P (Park) position,
and the driver exits the vehicle. This mes-
sage alerts the driver, af ter a period of time,
to check for items in the rear seat af ter the
audible alert has been provided.
NOTE:
This system is disabled until a driver en-
ables it using the vehicle information
display. For additional information, see
“How to use the vehicle information dis-
play ” (P. 2-35).
For additional information, see “Rear Door
Alert” (P. 2-67).
Door/Trunk Open
This warning appears when a door or the
trunk has been opened.
Drive sport mode indicator
A small “S” appears to the right of the Trans-
mission Shif t Position indicator in the ve-
hicle information display when the drive
sport mode is engaged.
Activate the drive sport mode by pushing
the switch on the shif t lever while the shif t
lever is in the D (Drive) position.
For additional information, see “Driving the
vehicle” (P. 5-18 ).
Engine Oil Service due in – –
– miles
This distance to oil change will display if the
distance to oil change is approximately
1,000 miles (1,600 km) or less. Several re-
minders will display until the remaining dis-
tance is 0.
Engine Oil Service due now
This message will be displayed when re-
maining distance is 0, indicating service is
now due/overdue. Af ter service is com-
pleted, the Oil Control System should be
reset from the Maintenance settings
menu.
Headlight System Error: See Owner’s
Manual
This warning appears when there is an er-
ror with the system. For additional informa-
tion, see “Headlight and turn signal switch”
(P. 2-57).
Loose Fuel Cap
This warning appears when the fuel-filler
cap is not tightened correctly af ter the ve-
hicle has been refueled. For additional in-
formation, see “Fuel-filler cap” (P. 3-25).
2-46Instruments and controls
Page 143 of 644
The system helps deter vehicle thef t but
cannot prevent it, nor can it prevent the
thef t of interior or exterior vehicle compo-
nents in all situations. Always secure your
vehicle even if parking for a brief period.
Never leave your keys in the vehicle, and
always lock the vehicle when unattended.
Be aware of your surroundings, and park in
secure, well-lit areas whenever possible.
Many devices offering additional protec-
tion, such as component locks, identifica-
tion markers, and tracking systems, are
available at auto supply stores and spe-
cialty shops. A NISSAN dealer may also offer
such equipment. Check with your insur-
ance company to see if you may be eligible
for discounts for various thef t protection
features.
How to arm the vehicle security
system
1. Close all windows and the moonroof.The system can be armed even if the
windows and moonroof (if so
equipped) are open.
2. Remove the Intelligent Key from the vehicle. 3. Close all doors, hood and trunk. Lock all
doors. The doors can be locked with the
Intelligent Key, door handle request
switch, or power door lock switch..
4. Confirm that the
indicator light
comes on. Theindicator stays
illuminated for a period of time indicat-
ing that the system is in the pre-armed
phase.
The
indicator light will blink every
3 seconds once the security system is
armed.
If during the pre-armed phase one of
the following occurs, the system will not
arm:
• Any door is unlocked with the Intelligent Key or door request switch.
• The ignition switch is placed in the ON position.
• Even when the driver and/or passen-
gers are in the vehicle, the system will
activate when all the doors, hood and
trunk are locked with the ignition
switch placed in the LOCK position.
When placing the ignition switch in the
AUTO ACC or ON position, the system
will be released.
Vehicle security system activation
The vehicle security system will give the
following alarm:
• The headlights blink and the horn sounds intermittently.
• The alarm automatically turns off af ter a period of time. However, the alarm reacti-
vates if the vehicle is tampered with
again. The alarm can be shut off by press-
ing the
button on the Intelligent Key.
The alarm is activated by:
• opening the door or trunk without using Intelligent Key (even if the door is un-
locked by releasing the door inside lock
knob switch).
How to stop an activated alarm
The alarm stops only by unlocking a door
by pressing thebutton on the Intelli-
gent Key or pushing the request switch on
the driver's or passenger's door with the
Intelligent Key in range of the door handle.
Instruments and controls2-53
Page 170 of 644
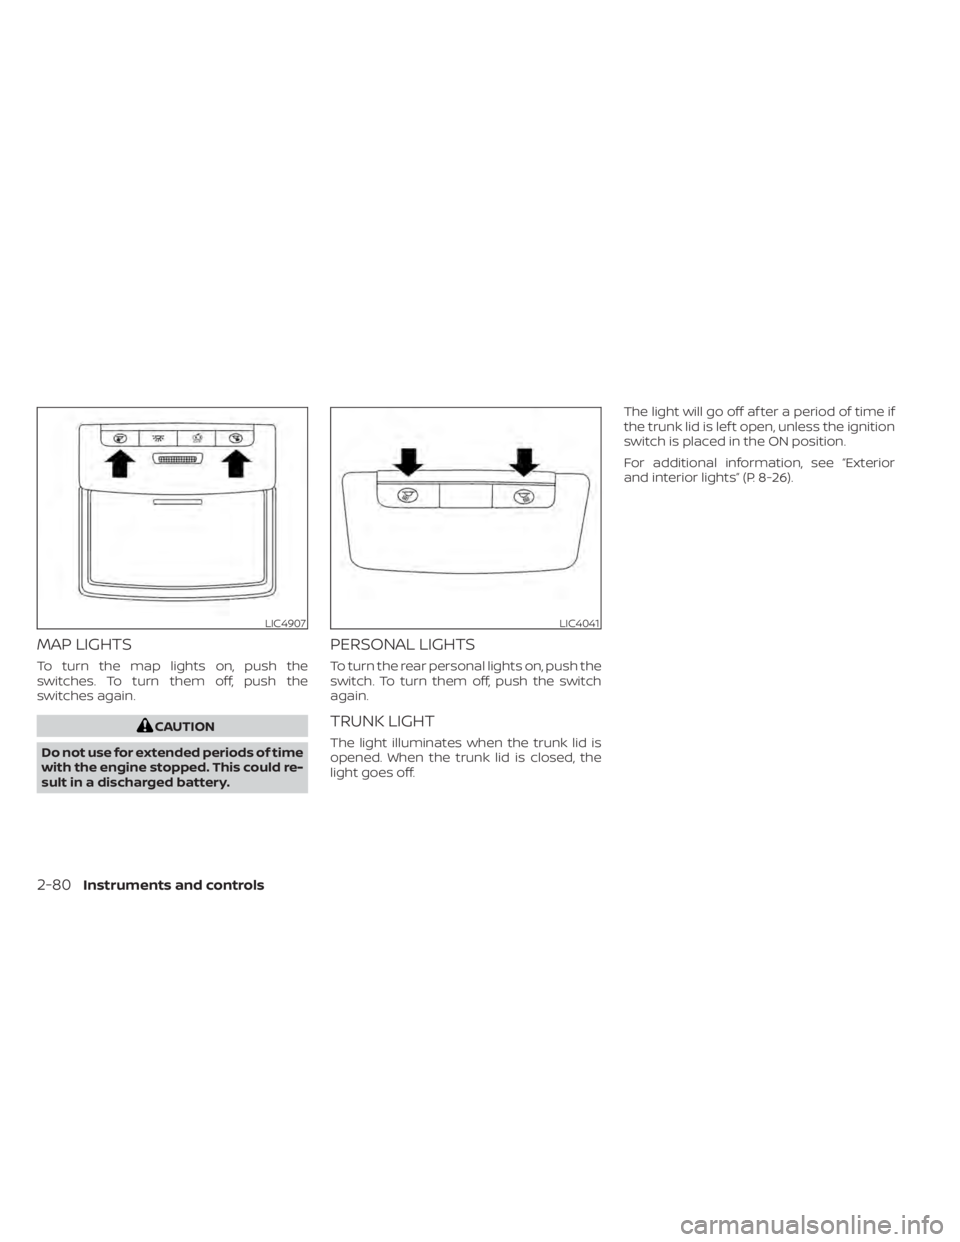
MAP LIGHTS
To turn the map lights on, push the
switches. To turn them off, push the
switches again.
CAUTION
Do not use for extended periods of time
with the engine stopped. This could re-
sult in a discharged battery.
PERSONAL LIGHTS
To turn the rear personal lights on, push the
switch. To turn them off, push the switch
again.
TRUNK LIGHT
The light illuminates when the trunk lid is
opened. When the trunk lid is closed, the
light goes off. The light will go off af ter a period of time if
the trunk lid is lef t open, unless the ignition
switch is placed in the ON position.
For additional information, see “Exterior
and interior lights” (P. 8-26).
LIC4907LIC4041
2-80Instruments and controls
Page 186 of 644
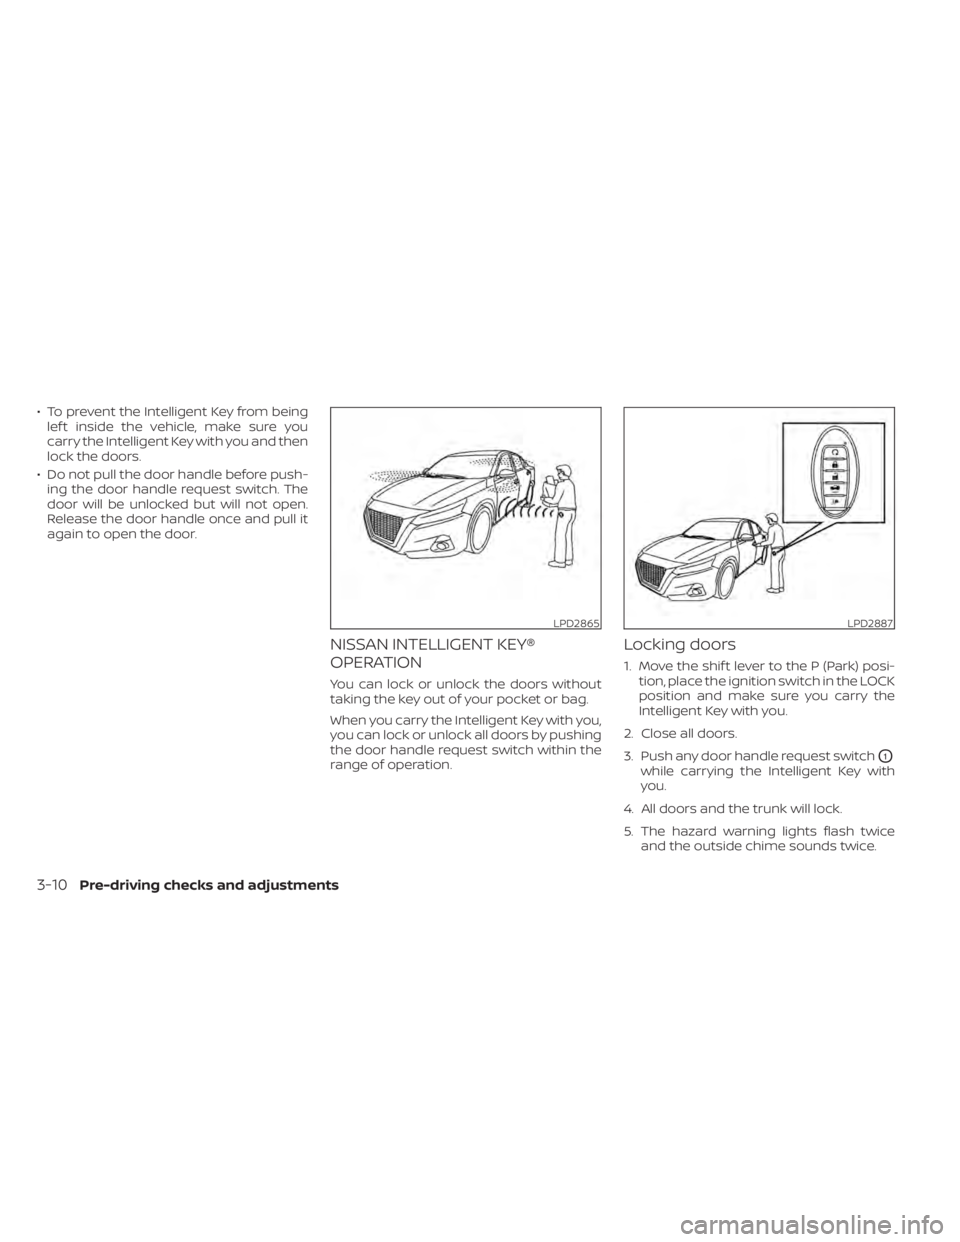
• To prevent the Intelligent Key from beinglef t inside the vehicle, make sure you
carry the Intelligent Key with you and then
lock the doors.
• Do not pull the door handle before push- ing the door handle request switch. The
door will be unlocked but will not open.
Release the door handle once and pull it
again to open the door.
NISSAN INTELLIGENT KEY®
OPERATION
You can lock or unlock the doors without
taking the key out of your pocket or bag.
When you carry the Intelligent Key with you,
you can lock or unlock all doors by pushing
the door handle request switch within the
range of operation.
Locking doors
1. Move the shif t lever to the P (Park) posi- tion, place the ignition switch in the LOCK
position and make sure you carry the
Intelligent Key with you.
2. Close all doors.
3. Push any door handle request switch
O1
while carrying the Intelligent Key with
you.
4. All doors and the trunk will lock.
5. The hazard warning lights flash twice and the outside chime sounds twice.
LPD2865LPD2887
3-10Pre-driving checks and adjustments
Page 188 of 644
CAUTION
The lockout protection may not func-
tion under the following conditions:
• When the Intelligent Key is placed on
top of the instrument panel.
• When the Intelligent Key is placed on
top of the rear parcel shelf.
• When the Intelligent Key is placed in-
side the glove box or a storage bin.
• When the Intelligent Key is placed in-
side the door pockets.
• When the Intelligent Key is placed on
or under the spare tire area.
• When the Intelligent Key is placed in-
side or near metallic materials.
Unlocking doors
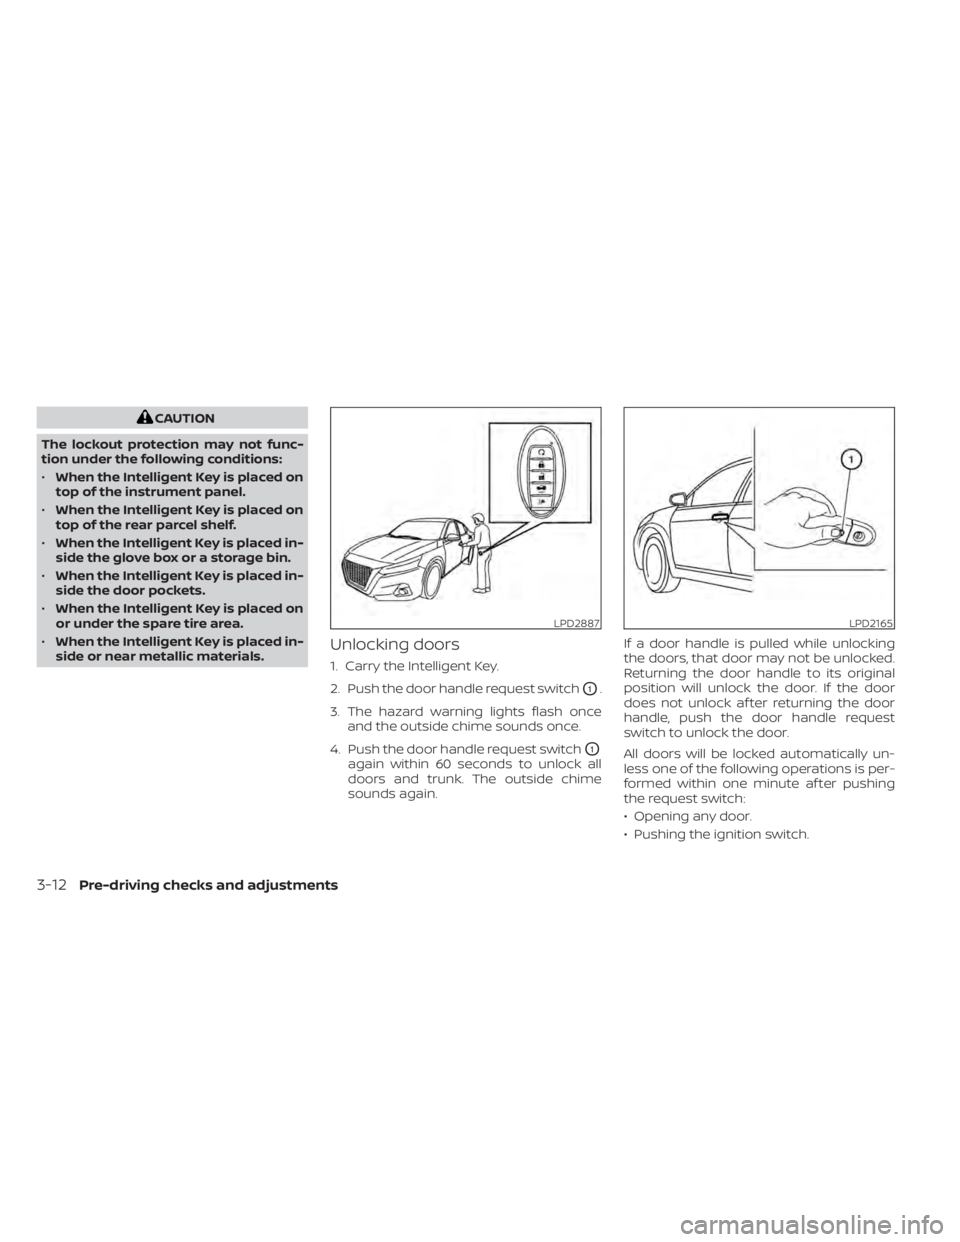
1. Carry the Intelligent Key.
2. Push the door handle request switch
O1.
3. The hazard warning lights flash once and the outside chime sounds once.
4. Push the door handle request switch
O1
again within 60 seconds to unlock all
doors and trunk. The outside chime
sounds again. If a door handle is pulled while unlocking
the doors, that door may not be unlocked.
Returning the door handle to its original
position will unlock the door. If the door
does not unlock af ter returning the door
handle, push the door handle request
switch to unlock the door.
All doors will be locked automatically un-
less one of the following operations is per-
formed within one minute af ter pushing
the request switch:
• Opening any door.
• Pushing the ignition switch.
LPD2887LPD2165
3-12Pre-driving checks and adjustments
Page 189 of 644
Using the interior lights
The interior lights illuminate for a period of
time when a door is unlocked.
The lights can be turned off without waiting
by performing one of the following
operations:
• Placing the ignition switch in the ONposition.
• Locking the doors with the Intelligent Key.
• Switching the interior light switch to the OFF position.
• Switching the Auto Room Lamp feature to the OFF position in the “Vehicle Set-
tings” menu on the vehicle information
display. For additional information, see
“Vehicle information display - 5 inch (13
cm) Type A (if so equipped)” (P. 2-18) or
“Vehicle information display - 7 inch (18
cm) Type B (if so equipped)” (P. 2-34).
For additional information, see “Interior
lights” (P. 2-79).
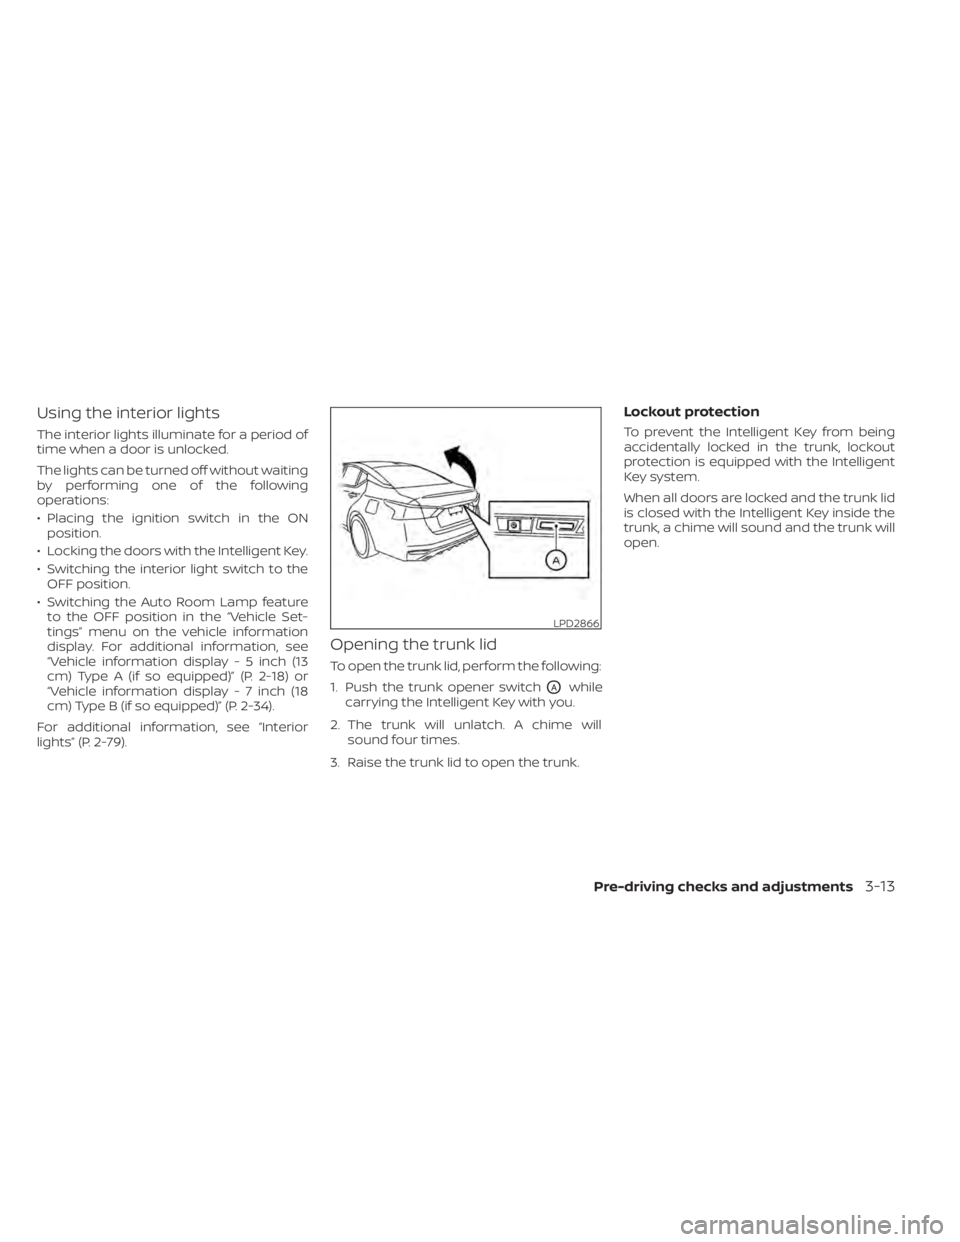
Opening the trunk lid
To open the trunk lid, perform the following:
1. Push the trunk opener switch
OAwhile
carrying the Intelligent Key with you.
2. The trunk will unlatch. A chime will sound four times.
3. Raise the trunk lid to open the trunk.
Lockout protection
To prevent the Intelligent Key from being
accidentally locked in the trunk, lockout
protection is equipped with the Intelligent
Key system.
When all doors are locked and the trunk lid
is closed with the Intelligent Key inside the
trunk, a chime will sound and the trunk will
open.
LPD2866
Pre-driving checks and adjustments3-13