2023 NISSAN ALTIMA Turning
[x] Cancel search: TurningPage 426 of 644
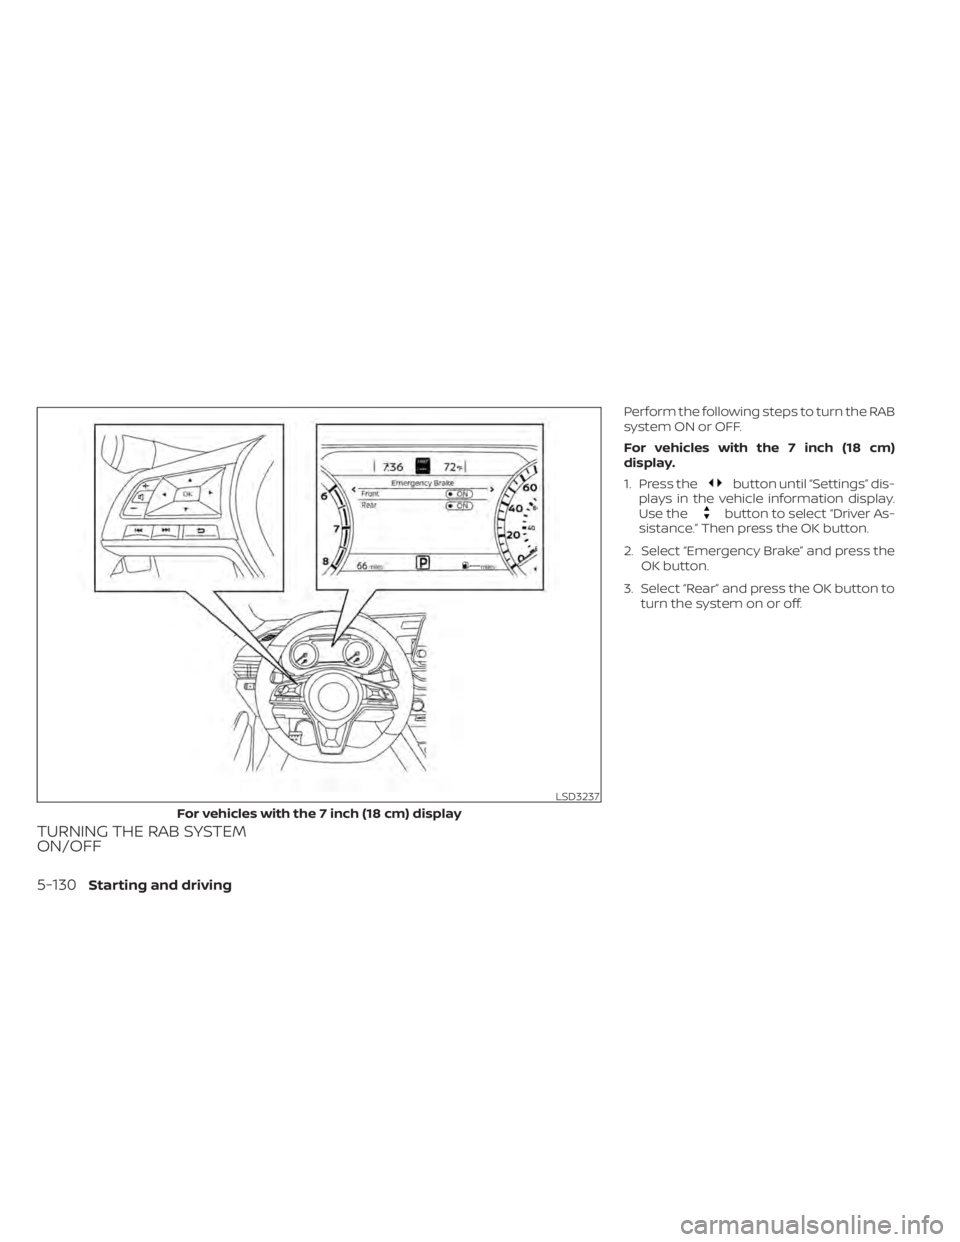
TURNING THE RAB SYSTEM
ON/OFF
Perform the following steps to turn the RAB
system ON or OFF.
For vehicles with the 7 inch (18 cm)
display.
1. Press the
button until “Settings” dis-
plays in the vehicle information display.
Use the
button to select “Driver As-
sistance.” Then press the OK button.
2. Select “Emergency Brake” and press the OK button.
3. Select “Rear” and press the OK button to turn the system on or off.
LSD3237
For vehicles with the 7 inch (18 cm) display
5-130Starting and driving
Page 429 of 644
•Once the automatic brake control
operates, it does not operate again if
the vehicle approaches the same
obstacle.
• The automatic brake control can only
operate for a short period of time.
Therefore, the driver must depress
the brake pedal.
• In the following situations, the RAB
system may not operate properly or
may not function sufficiently:
– The vehicle is driven in bad
weather (rain, fog, snow, etc.).
– The vehicle is driven on a steep
hill.
– The vehicle’s posture is changed
(e.g., when driving over a bump).
– The vehicle is driven on a slippery
road.
– The vehicle is turned sharply by
turning the steering wheel fully.
– Snow chains are used. –
Wheels or tires other than NISSAN
recommended are used.
– The brakes are cold at low ambi-
ent temperatures or immediately
af ter driving has started.
– The braking force becomes poor
due to wet brakes af ter driving
through a puddle or washing the
vehicle.
• Turn the RAB system off in the follow-
ing conditions to prevent the occur-
rence of an unexpected accident re-
sulting from sudden system
operation:
– The vehicle is towed.
– The vehicle is carried on a flatbed
truck.
– The vehicle is on the chassis
dynamometer.
– The vehicle drives on an uneven
road surface.
– The vehicle is towing an object (if
so equipped). –
Suspension parts other than
those designated as Genuine
NISSAN parts are used. (If the ve-
hicle height or the vehicle body in-
clination is changed, the system
may not detect an obstacle
correctly.)
– If the vehicle is using an accessory
like a bike rack, or cargo carrier
that blocks the sensors.
• Excessive noise (e.g., audio system
volume, an open vehicle window) will
interfere with the chime sound, and it
may not be heard.
Starting and driving5-133
Page 434 of 644
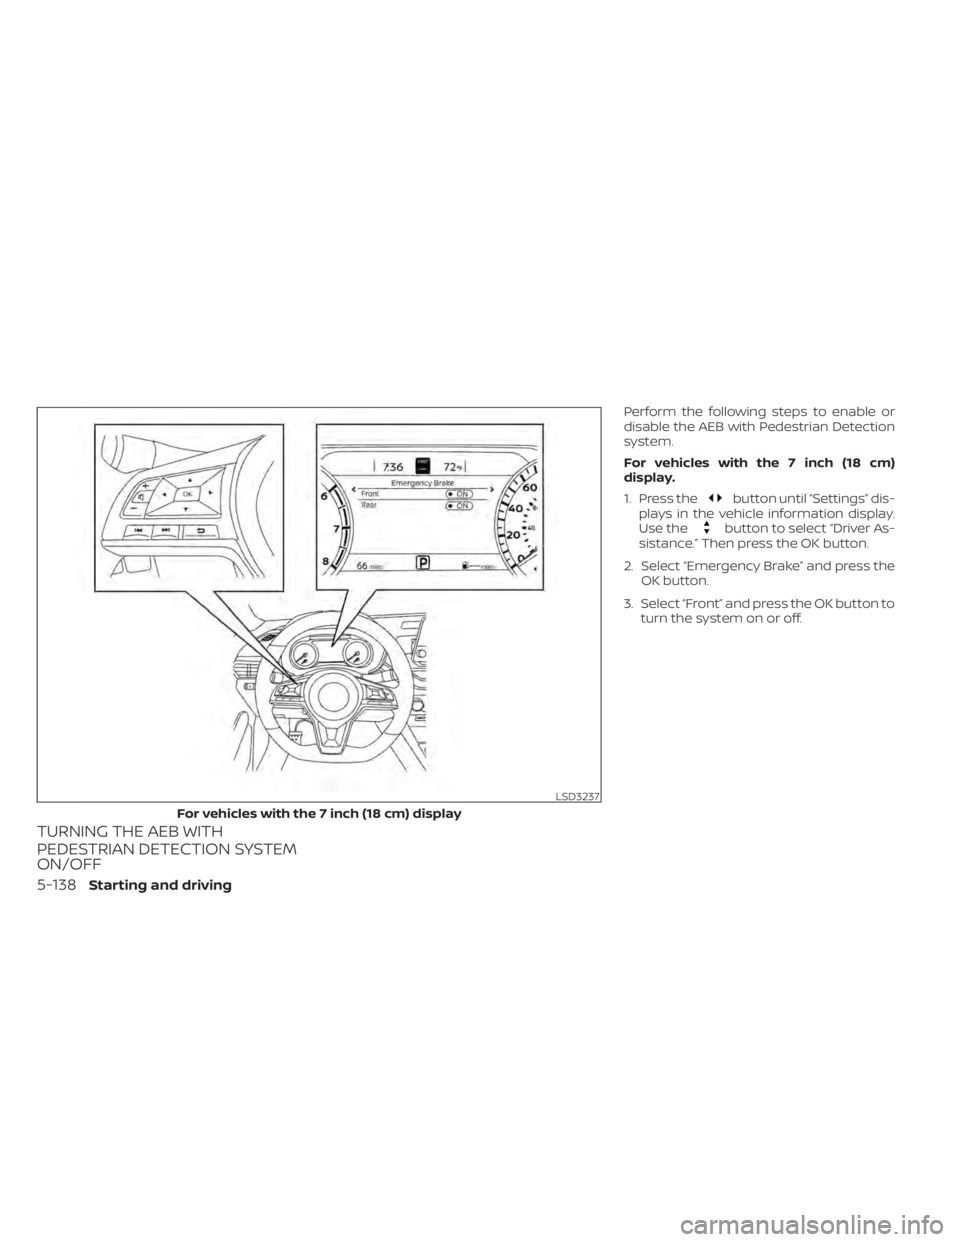
TURNING THE AEB WITH
PEDESTRIAN DETECTION SYSTEM
ON/OFF
Perform the following steps to enable or
disable the AEB with Pedestrian Detection
system.
For vehicles with the 7 inch (18 cm)
display.
1. Press the
button until “Settings” dis-
plays in the vehicle information display.
Use the
button to select “Driver As-
sistance.” Then press the OK button.
2. Select “Emergency Brake” and press the OK button.
3. Select “Front” and press the OK button to turn the system on or off.
LSD3237
For vehicles with the 7 inch (18 cm) display
5-138Starting and driving
Page 436 of 644
AEB WITH PEDESTRIAN
DETECTION SYSTEM LIMITATIONS
WARNING
Listed below are the system limitations
for the AEB with Pedestrian Detection
system. Failure to operate the vehicle in
accordance with these system limita-
tions could result in serious injury or
death.
• The AEB with Pedestrian Detection
system cannot detect all vehicles or
pedestrians under all conditions.
•
The AEB with Pedestrian Detection
system does not detect the following:
– Pedestrians that are small (for ex- ample, children), in a sitting posi-
tion, operating toys/skateboards,
on scooters or in wheelchairs, or
not in an upright standing or
walking position.
– Animals of any size.
–
Obstacles (for example, cargo or
debris) on the roadway or roadside.
– Oncoming or crossing vehicles.
–Vehicles where the tires are difficult
to see or the shape of the rear of the
vehicle is unclear or obstructed.
– Parked vehicles. •
The AEB with Pedestrian Detection
system has some performance limi-
tations.
– If a stationary vehicle is in the ve-
hicle’s path, the system will not
function when the vehicle ap-
proaches the stationary vehicle at
speeds over approximately 50
mph (80 km/h).
– Pedestrian detection will not
function when the vehicle is
driven at speeds over approxi-
mately 37 mph (60 km/h) or below
approximately 6 mph (10km/h).
• For pedestrians, the AEB with Pedes-
trian Detection system will not issue
the first warning.
• The AEB with Pedestrian Detection
system may not function properly or
detect a vehicle or pedestrians
ahead in the following conditions:
– In poor visibility conditions (such
as rain, snow, fog, dust storms,
sand storms, smoke, and road
spray from other vehicles).
– If dirt, ice, snow, fog or other ma-
terial is covering the radar sensor
area or camera area of
windshield. –
If a strong light (for example, sun-
light or high beams) enters the
front camera or a sudden change
in brightness occurs (for example,
entering a tunnel or driving in
lightning).
– In dark or dimly lit conditions,
such as at night or in tunnels, in-
cluding cases where your vehi-
cle’s headlights are off or dim, or
the tail lights of the vehicle ahead
are off.
– When the direction of the camera
is misaligned.
– When driving on a steep downhill
slope, on roads with sharp curves,
and/or bumpy or dirt roads.
– If there is interference by other ra-
dar sources.
– When your vehicle’s position or
movement is changed quickly or
significantly (for example, lane
change, turning vehicle, abrupt
steering, sudden acceleration or
deceleration).
5-140Starting and driving
Page 437 of 644
–When your vehicle or the vehicle
or pedestrian ahead moves
quickly or significantly such that
the system cannot detect and re-
act in time (for example, pedes-
trian moving quickly toward the
vehicle at close range, vehicle cut-
ting in, changing lanes, making a
turn, steering abruptly, sudden
acceleration or deceleration).
– When the vehicle or pedestrian is
offset from the vehicle’s forward
path.
– If the speed difference between
the two vehicles is small.
– The pedestrian’s profile is par-
tially obscured or unidentifiable;
for example, due to transporting
luggage, pushing a stroller, wear-
ing bulky or very loose-fitting
clothing or accessories, or being
in a unique posture (such as rais-
ing hands).
– There is poor contrast of a person
to the background, such as having
clothing color or pattern which is
similar to the background.
– For approximately 15 seconds af-
ter starting the engine. –
If the vehicle ahead has a unique
or unusual shape, extremely low
or high clearance heights, or un-
usual cargo loading or is narrow
(for example, a motorcycle).
– When the vehicle or pedestrian is
located near a traffic sign, a reflec-
tive area (for example, water on
road), or is in a shadow.
– When multiple pedestrians are
grouped together.
– When the view of the pedestrian is
obscured by a vehicle or other
object.
– While towing a trailer or other
vehicle.
• The system performance may be de-
graded in the following conditions:
– The vehicle is driven on a slippery
road.
– The vehicle is driven on a slope.
– Excessively heavy baggage is
loaded in the rear seat or the
cargo area of your vehicle.
• The system is designed to automati-
cally check the sensor’s (radar and
camera) functionality, within certain
limitations. The system may not de-
tect some forms of obstruction of the
sensor area such as ice, snow or stickers, for example. In these cases,
the system may not be able to warn
the driver properly. Be sure that you
check, clean and clear sensor areas
regularly.
• In some road and traffic conditions,
the AEB with Pedestrian Detection
system may unexpectedly apply par-
tial braking. When acceleration is
necessary, depress the accelerator
pedal to override the system.
• The AEB with Pedestrian Detection
system may operate when a pattern,
object, shadow or lights are detected
that are similar to the outline of ve-
hicles or pedestrians, or if they are
the same size and position as a ve-
hicle or motorcycle’s tail lights.
• The system may keep operating
when the vehicle ahead is turning
right or lef t.
• The system may operate when your
vehicle is approaching and passing a
vehicle ahead.
•
Depending on the road shape (curved
road, entrance and exit of the curve,
winding road, lane regulation, under
construction, etc.), the system may
operate temporarily for the oncoming
vehicle in front of your vehicle.
Starting and driving5-141
Page 447 of 644
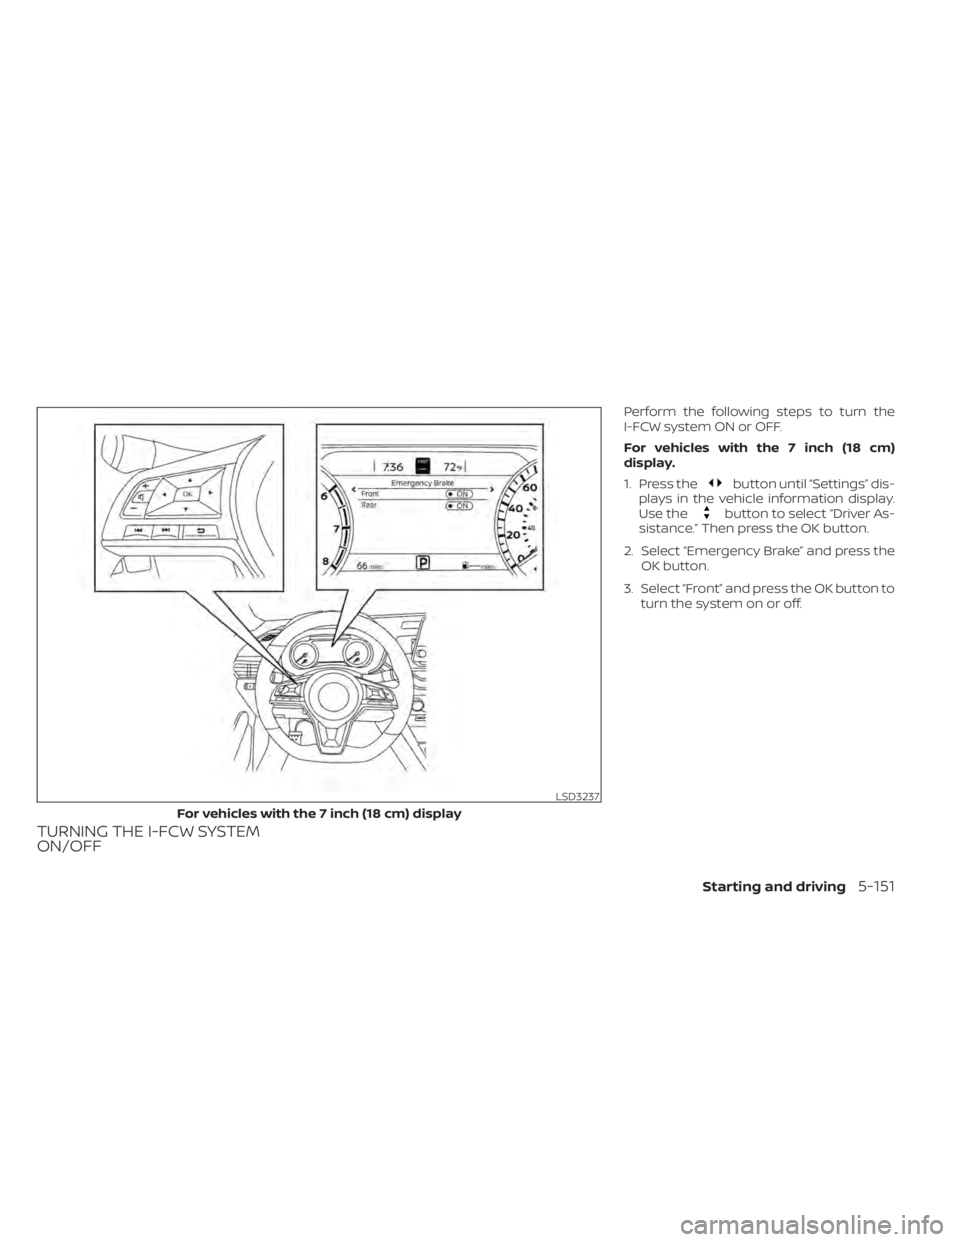
TURNING THE I-FCW SYSTEM
ON/OFF
Perform the following steps to turn the
I-FCW system ON or OFF.
For vehicles with the 7 inch (18 cm)
display.
1. Press the
button until “Settings” dis-
plays in the vehicle information display.
Use the
button to select “Driver As-
sistance.” Then press the OK button.
2. Select “Emergency Brake” and press the OK button.
3. Select “Front” and press the OK button to turn the system on or off.
LSD3237
For vehicles with the 7 inch (18 cm) display
Starting and driving5-151
Page 491 of 644

Always refer to the illustration for the cor-
rect placement and jack-up points for your
specific vehicle model and jack type.
Carefully read the caution label attached
to the jack body and the following in-
structions.
1. Loosen each wheel nut one or two turnsby turning counterclockwise with the
wheel nut wrench. Do not remove the
wheel nuts until the tire is off the
ground. 2. Place the jack directly under the jack-up
point as illustrated so the top of the jack
contacts the vehicle at the jack-up point.
Align the jack head between the two
notches in the front or the rear as
shown. Also fit the groove of the jack
head between the notches as shown.
NOTE:Do not place jack on the notches be-
tween the front most and rear most
jacking points.
The jack should be used on firm and
level ground. 3. To lif t the vehicle, securely hold the jack
lever and rod with both hands. Carefully
raise the vehicle until the tire clears the
ground. Remove the wheel nuts, and
then remove the tire.
LCE0020
In case of emergency6-7
Page 493 of 644

Always refer to the illustration for the cor-
rect placement and jack-up points for your
specific vehicle model and jack type.
Carefully read the caution label attached
to the jack body and the following
instructions.
If a flat tire occurs on the front axle of AWD
vehicle, the spare tire must be applied to
the rear axle of the vehicle.
1. Loosen each wheel nut one or two turnsby turning counterclockwise with the
wheel nut wrench. Do not remove the
wheel nuts until the tire is off the
ground. 2. Place the jack directly under the jack-up
point as illustrated so the top of the jack
contacts the vehicle at the jack-up point.
Align the jack head between the two
notches in the front or the rear as
shown. Also fit the groove of the jack
head between the notches as shown.
NOTE:Do not place jack on the notches be-
tween the front most and rear most
jacking points.
The jack should be used on firm and
level ground. 3. Jack up the rear axle of the vehicle. To lif t
the vehicle, securely hold the jack lever
and rod with both hands. Carefully raise
the vehicle until the tire clears the
ground. Remove the wheel nuts, and
then remove the tire and set aside.
4. Apply the spare tire to the rear axle of the vehicle, replace the wheel nuts and
tighten.
5. Lower the jack and further tighten the wheel nuts to the recommended
torque, see “Installing the spare tire”
(P. 6-10).
6. Jack up the front axle of the vehicle and remove the damaged wheel.
7. Apply the wheel that was removed from the rear axle to the front axle of the ve-
hicle, replace the wheel nuts and tighten.
8. Lower the jack and further tighten the wheel nuts to the recommended
torque, see “Installing the spare tire”
(P. 6-10).
LCE0020
In case of emergency6-9