2023 NISSAN ALTIMA Turning
[x] Cancel search: TurningPage 200 of 644
INTERIOR TRUNK LID RELEASE
WARNING
Closely supervise children when they
are around cars to prevent them from
playing and becoming locked in the
trunk where they could be seriously in-
jured. Keep the car locked, with the rear
seatback and trunk lid securely latched
when not in use, and prevent children's
access to car keys. The interior trunk lid release mechanism
provides a means of escape for children
and adults in the event they become
locked inside the trunk.
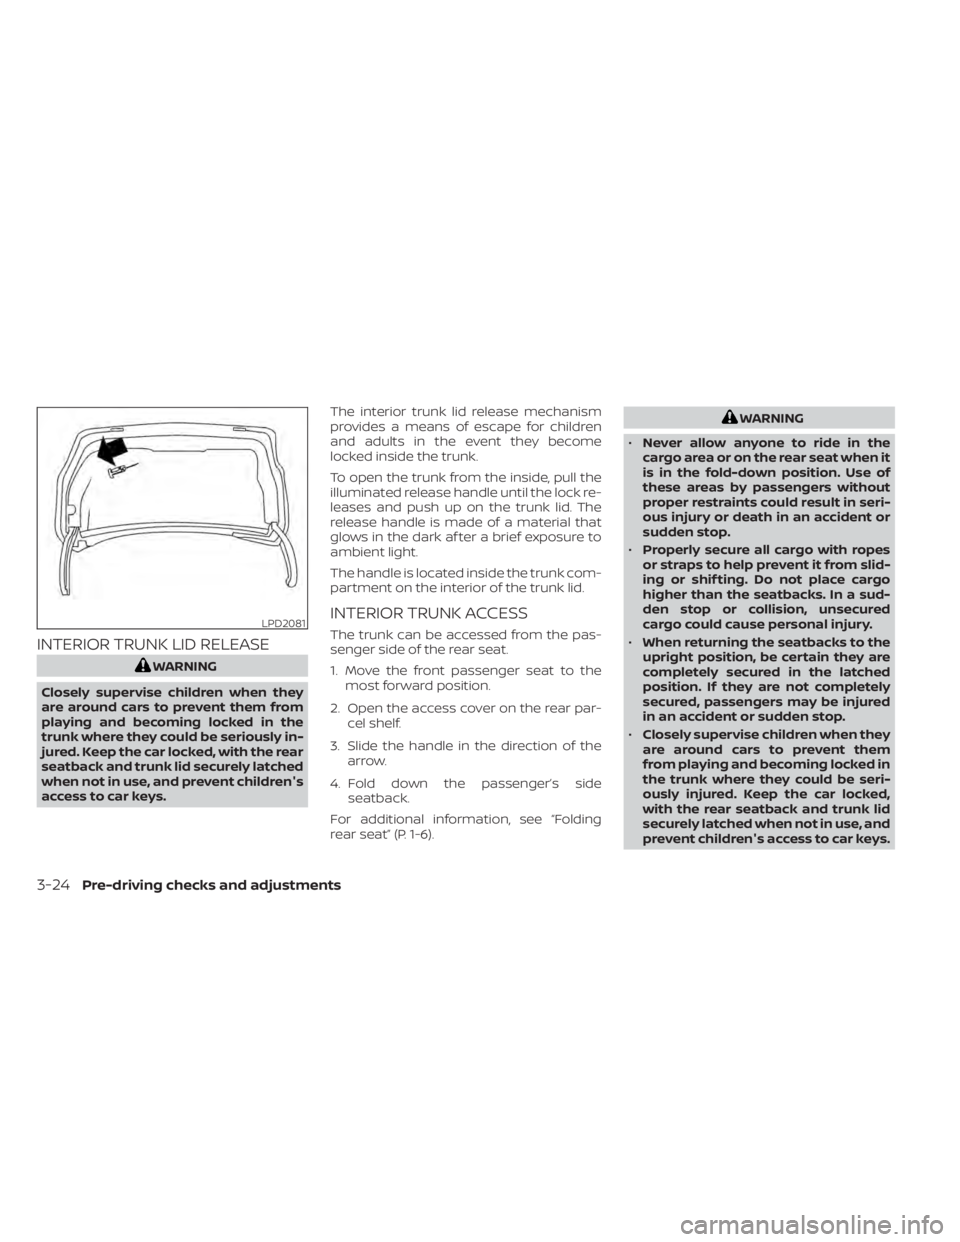
To open the trunk from the inside, pull the
illuminated release handle until the lock re-
leases and push up on the trunk lid. The
release handle is made of a material that
glows in the dark af ter a brief exposure to
ambient light.
The handle is located inside the trunk com-
partment on the interior of the trunk lid.
INTERIOR TRUNK ACCESS
The trunk can be accessed from the pas-
senger side of the rear seat.
1. Move the front passenger seat to the
most forward position.
2. Open the access cover on the rear par- cel shelf.
3. Slide the handle in the direction of the arrow.
4. Fold down the passenger’s side seatback.
For additional information, see “Folding
rear seat” (P. 1-6).
WARNING
• Never allow anyone to ride in the
cargo area or on the rear seat when it
is in the fold-down position. Use of
these areas by passengers without
proper restraints could result in seri-
ous injury or death in an accident or
sudden stop.
• Properly secure all cargo with ropes
or straps to help prevent it from slid-
ing or shif ting. Do not place cargo
higher than the seatbacks. In a sud-
den stop or collision, unsecured
cargo could cause personal injury.
• When returning the seatbacks to the
upright position, be certain they are
completely secured in the latched
position. If they are not completely
secured, passengers may be injured
in an accident or sudden stop.
• Closely supervise children when they
are around cars to prevent them
from playing and becoming locked in
the trunk where they could be seri-
ously injured. Keep the car locked,
with the rear seatback and trunk lid
securely latched when not in use, and
prevent children's access to car keys.
LPD2081
3-24Pre-driving checks and adjustments
Page 204 of 644
Push the lock lever upO1firmly and hold on
until end of stroke to lock the steering
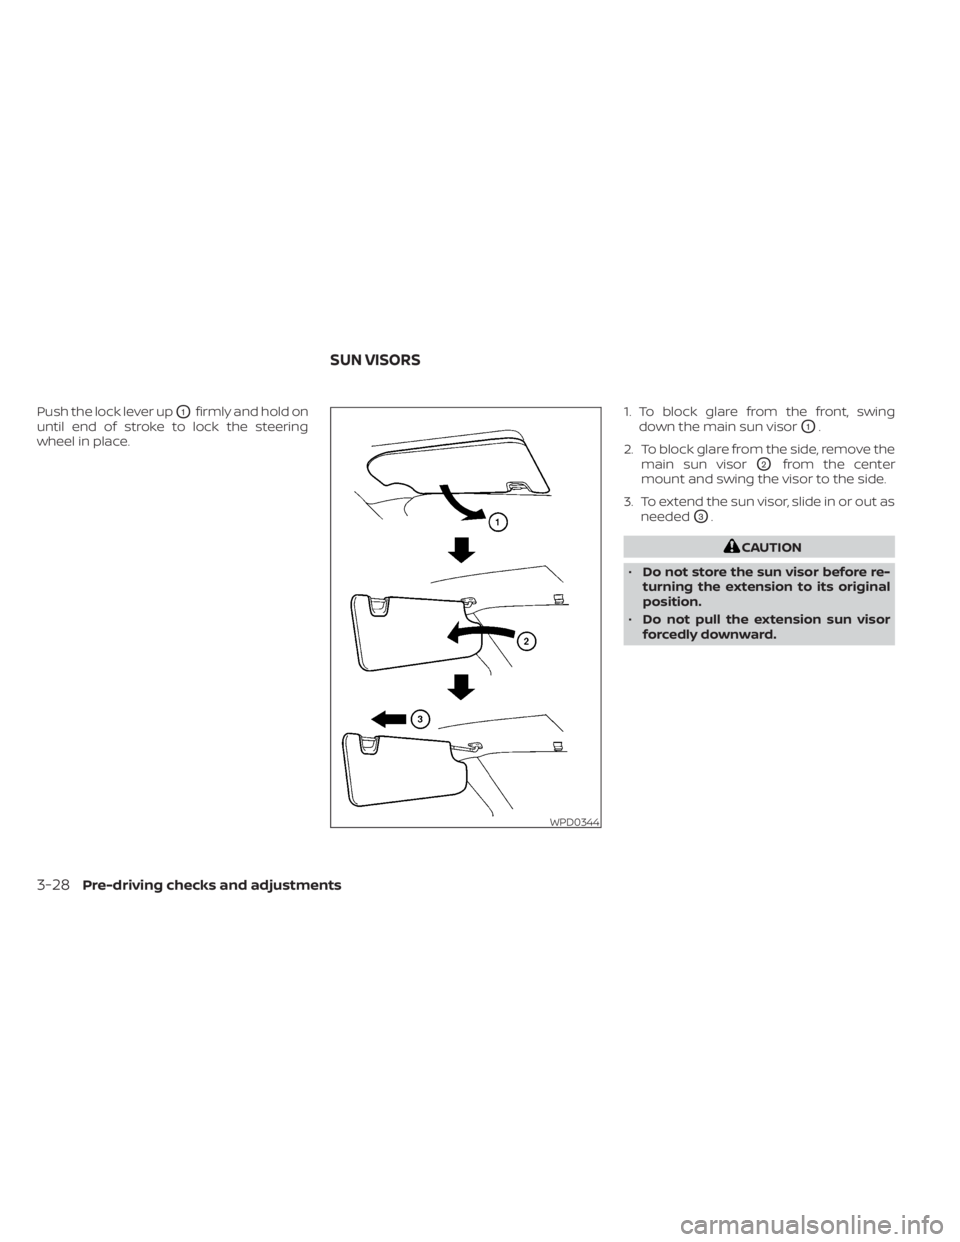
wheel in place. 1. To block glare from the front, swing
down the main sun visor
O1.
2. To block glare from the side, remove the main sun visor
O2from the center
mount and swing the visor to the side.
3. To extend the sun visor, slide in or out as needed
O3.
CAUTION
• Do not store the sun visor before re-
turning the extension to its original
position.
• Do not pull the extension sun visor
forcedly downward.
WPD0344
SUN VISORS
3-28Pre-driving checks and adjustments
Page 208 of 644
Once step 4 is completed, every time the
ignition is switched from ON to OFF, the
memory positions of the driver’s seat and
outside mirror (if so equipped) are linked to
the Intelligent Key.
Follow the same procedure if you want
to link the 2nd, 3rd or 4th Intelligent Key.
NOTE:
If new memory positions are set prior to
turning the ignition from ON to OFF, the
previously linked memory positions for
the respective key will be overwritten by
new positions.
Recalling Intelligent Key memory
positions
If the “Key-Linked Settings” are enabled in
the vehicle information display for that par-
ticular key, every time you enter the vehicle
the driver’s seat and outside mirrors (if so
equipped) will automatically move to the
driver’s last position of the respective Intel-
ligent Key.
NOTE:
The key-linked memory positions can be
different from the positions stored in the
memory switch (1 or 2).
MEMORY STORAGE FUNCTION
(switch)
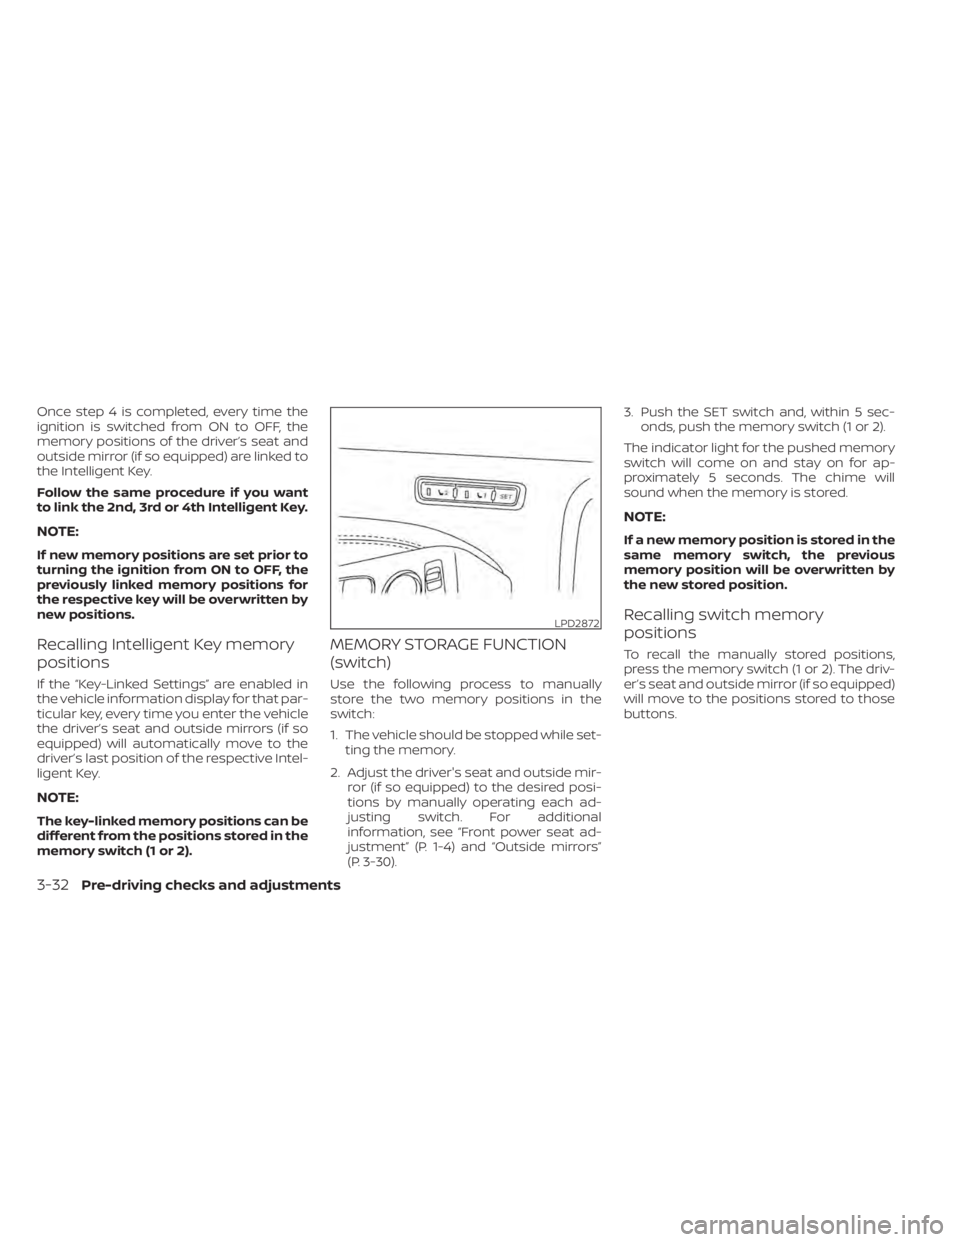
Use the following process to manually
store the two memory positions in the
switch:
1. The vehicle should be stopped while set-ting the memory.
2. Adjust the driver's seat and outside mir- ror (if so equipped) to the desired posi-
tions by manually operating each ad-
justing switch. For additional
information, see “Front power seat ad-
justment” (P. 1-4) and “Outside mirrors”
(P. 3-30). 3. Push the SET switch and, within 5 sec-
onds, push the memory switch (1 or 2).
The indicator light for the pushed memory
switch will come on and stay on for ap-
proximately 5 seconds. The chime will
sound when the memory is stored.
NOTE:
If a new memory position is stored in the
same memory switch, the previous
memory position will be overwritten by
the new stored position.
Recalling switch memory
positions
To recall the manually stored positions,
press the memory switch (1 or 2). The driv-
er’s seat and outside mirror (if so equipped)
will move to the positions stored to those
buttons.
LPD2872
3-32Pre-driving checks and adjustments
Page 210 of 644
4 Monitor, climate, audio, phone and
voice recognition systems
NissanConnect® Owner’s Manual...............4-2
Control panel buttons ...........................4-3
How to use the touch-screen ................4-4
How to use the
MENU button ...........4-5(brightness control) button .............4-7
How to use the VOL (volume) knob /
PUSH
(power)button....................4-7
Selecting menu from launch bar .............4-7
RearView Monitor (if so equipped) ...............4-8
RearView Monitor system operation ..........4-9
How to read the displayed lines ..............4-9
Difference between predicted and
actual distances ............................ 4-10
How to park with predicted course
lines .......................................... 4-11
Adjusting the screen ........................ 4-13
How to turn on and off predicted
course lines ................................. 4-13
RearView Monitor system limitations ........4-13
System maintenance ....................... 4-15
Intelligent Around View Monitor
(if so equipped) ................................. 4-16
Intelligent Around View Monitor system
operation ................................... 4-17
Difference between predicted and
actual distances ............................ 4-20How to park with predicted course
lines
......................................... 4-22
How to switch the display ...................4-23
Adjusting the screen ........................ 4-24
Intelligent Around View Monitor system
limitations .................................. 4-24
System maintenance .......................4-26
Moving Object Detection (MOD)
(if so equipped) ................................. 4-27
MOD system operation ......................4-28
Turning MOD on and off (if so equipped) .....4-30
MOD system limitations .....................4-30
System maintenance ....................... 4-31
Vents .......................................... 4-31
Heater and air conditioner (manual)
(if so equipped) ................................. 4-33
Controls ..................................... 4-34
Heater operation ............................ 4-34
Air conditioner operation ....................4-35
Air flow charts ............................... 4-36
Heater and air conditioner (automatic)
(if so equipped) ................................. 4-40
Automatic operation ........................ 4-41
Manual operation ........................... 4-42
Operating tips ............................... 4-43
Page 240 of 644
If the MOD system is turned off, the MOD
icon
O3is not displayed.
TURNING MOD ON AND OFF (if so
equipped)
Some vehicles include the option to allow
the MOD system to be turned on or off.
To turn the MOD system on or off:
1. Touch the “Setting” key.
2. Touch the “Camera” key.
3. Touch the “Moving Object Detection” keyto switch between ON or OFF.
MOD SYSTEM LIMITATIONS
WARNING
Listed below are the system limitations
for MOD. Failure to operate the vehicle
in accordance with these system limi-
tations could result in serious injury or
death.
• Do not use the MOD system when
towing a trailer. The system may not
function properly.
• Excessive noise (for example, audio
system volume or open vehicle win-
dow) will interfere with the chime
sound, and it may not be heard. •
The MOD system performance will be
limited according to environmental
conditions and surrounding objects
such as:
– When there is low contrast be-
tween background and the mov-
ing objects.
– When there is a blinking source of
light.
– When strong light such as another
vehicle’s headlight or sunlight is
present.
– When camera orientation is not in
its usual position, such as when a
mirror is folded.
– When there is dirt, water drops or
snow on the camera lens.
– When the position of the moving
objects in the display is not
changed.
• The MOD system might detect flow-
ing water droplets on the camera
lens, white smoke from the muffler,
moving shadows, etc.
• The MOD system may not function
properly depending on the speed, di-
rection, distance or shape of the
moving objects. •
If your vehicle sustains damage to
the parts where the camera is in-
stalled, leaving it misaligned or bent,
the sensing zone may be altered and
the MOD system may not detect ob-
jects properly.
• When the temperature is extremely
high or low, the screen may not dis-
play objects clearly. This is not a
malfunction.
NOTE:
The blue MOD icon will change to or-
ange if one of the following has oc-
curred:
• When the system is malfunctioning.
• When the component temperature
reaches a high level (icon will blink).
• When the RearView camera has de-
tected a blockage (icon will blink).
If the icon light continues to illuminate
orange, have the MOD system checked. It
is recommended that you visit a NISSAN
dealer for this service.
4-30Monitor, climate, audio, phone and voice recognition systems
Page 296 of 644
5 Starting and driving
Precautions when starting and driving..........5-4
Exhaust gas (carbon monoxide) ..............5-4
Three-way catalyst ...........................5-4
Tire Pressure Monitoring System
(TPMS) .......................................5-5
Avoiding collision and rollover ................5-9
Off-roadrecovery ............................5-9
Rapid air pressure loss .......................5-9
Drinking alcohol/drugs and driving ..........5-10
Driving safety precautions ...................5-10
Push-button ignition switch ....................5-13
Operating range ............................ 5-14
Push-button ignition switch positions .......5-14
Emergency engine shut off ..................5-15
NISSAN Intelligent Key® battery
discharge ................................... 5-15
NISSAN Vehicle Immobilizer System .........5-16
Before starting the engine .....................5-16
Starting the engine ............................. 5-16
Remote Engine Start ........................ 5-17
Driving the vehicle .............................. 5-18
Continuously Variable Transmission
(CVT) ........................................ 5-18
Parking brake .................................. 5-25
Manual parking brake (pedal type) ...........5-25
Electronic parking brake (switch type) .......5-25 Automatic brake hold (if so equipped)
..........5-27
How to activate/deactivate the
automatic brake hold function ..............5-28
How to use the automatic brake hold
function ..................................... 5-29
Traffic Sign Recognition (TSR) (if so equipped) . . . 5-30 System operation ........................... 5-31
Turning the Traffic Sign Recognition
(TSR) system on and off .....................5-32
System temporarily unavailable .............5-32
System malfunction ......................... 5-32
System maintenance .......................5-33
Lane Departure Warning (LDW) .................5-33
LDW system operation ......................5-34
How to enable/disable the LDW system .....5-36
LDW system limitations .....................5-38
System temporarily unavailable .............5-39
System malfunction ......................... 5-39
System maintenance .......................5-39
Intelligent
Lane Intervention (I-LI)
(if so equipped) ................................. 5-40
I-LI system operation ........................ 5-41
How to enable/disable the I-LI system ......5-42
I-LI system limitations .......................5-43
System temporarily unavailable .............5-44
System malfunction ......................... 5-45
Page 297 of 644
System maintenance.......................5-45
Blind Spot Warning (BSW) (if so equipped) .......5-46
BSW system operation ......................5-48
How to enable/disable the BSW system .....5-49
BSW system limitations .....................5-51
BSW driving situations .......................5-52
System temporarily unavailable .............5-55
System maintenance .......................5-57
Rear Cross Traffic Alert (RCTA) (if so equipped) . . 5-58 RCTA system operation .....................5-58
How to enable/disable the RCTA
system ...................................... 5-61
RCTA system limitations .....................5-63
System temporarily unavailable .............5-65
System maintenance .......................5-67
Cruise control (if so equipped) ..................5-68
Precautions on cruise control ...............5-68
Cruise control operations ...................5-69
Intelligent Cruise Control (ICC) (if so equipped) . . 5-71 How to select the cruise control mode ......5-73
Vehicle-to-vehicle distance control
mode ....................................... 5-73
Vehicle-to-vehicle distance control
mode operation .............................5-74 Vehicle-to-vehicle distance control
mode switches
............................. 5-76
Vehicle-to-vehicle distance control
mode limitations ............................ 5-82
System temporarily unavailable .............5-86
System maintenance .......................5-88
Conventional (fixed speed) cruise
control mode ............................... 5-90
ProPILOT Assist (if so equipped) ................5-94
ProPILOT Assist system operation ...........5-96
Turning the conventional (fixed speed)
cruise control mode on .....................5-99
Operating ProPILOT Assist ..................5-100
How to enable/disable the Steering
Assist ...................................... 5-105
Intelligent Cruise Control (ICC) (for
vehicles with ProPILOT Assist) ..............5-106
Steering Assist .............................. 5-117
Conventional (fixed speed) cruise
control mode .............................. 5-123
Rear Automatic Braking (RAB)
(if so equipped) ................................
5-127
RAB
system operation ...................... 5-128
Turning the RAB system on/off .............5-130
Page 298 of 644
RAB system limitations.....................5-132
System malfunction ........................ 5-134
System maintenance ......................5-134
Automatic Emergency Braking (AEB) with
Pedestrian Detection .......................... 5-135
AEB with Pedestrian Detection system
operation .................................. 5-136
Turning the AEB with Pedestrian
Detection system ON/OFF .................5-138
AEB with Pedestrian Detection system
limitations ................................. 5-140
System temporarily unavailable ............5-143
System malfunction ........................ 5-145
System maintenance ......................5-146
Intelligent Forward Collision Warning (I-FCW) . . 5-147 I-FCW system operation ....................5-150
Turning the I-FCW system on/off ...........5-151
I-FCW system limitations ...................5-153
System temporarily unavailable ............5-158
System malfunction ........................ 5-160
System maintenance ......................5-161
Intelligent Driver Alertness (I-DA) ...............5-162
Intelligent Driver Alertness system
operation .................................. 5-162How to enable/disable the Intelligent
Driver Alertness (I-DA) system
..............5-164
Intelligent Driver Alertness (I-DA)
system limitations ......................... 5-165
Break-in schedule ............................. 5-167
Fuel efficient driving tips .......................5-167
Increasing fuel economy ......................5-168
All-Wheel Drive (AWD) (if so equipped) ..........5-168
Parking/parking on hills ........................5-171
Power steering ................................ 5-172
Brake system ................................. 5-173
Brake precautions .......................... 5-173
Anti-lock Braking System (ABS) .............5-173
Brake Assist ................................ 5-175
Vehicle Dynamic Control (VDC) system ........5-175
Brake force distribution ....................5-177
Chassis Control (if so equipped) ...............
5-178
Intelligent
Trace Control (I-TC) ..............5-178
Active Ride Control (ARC) ...................5-178
Hill start assist system ........................5-178
Rear Sonar System (RSS) (if so equipped) ......5-179
System operation .......................... 5-180