2023 LINCOLN NAUTILUS brake
[x] Cancel search: brakePage 378 of 606

12 Volt Battery
•When storing your vehicle for greaterthan 30 days the state of charge shouldbe approximately 50%. Additionally, werecommend disconnecting the 12vbattery which will reduce system loadson the battery.
•Check and recharge as necessary. Keepconnections clean.
Note:It is necessary to reset memoryfeatures if you disconnect the battery cables.
Brakes
Make sure the brakes and parking brakerelease fully.
Note:If you intend on parking your vehiclefor an extended period after cleaning thewheels with a wheel cleaner, drive yourvehicle for a few minutes before doing so toreduce the risk of increased corrosion of thebrake discs, brake pads and linings.
Tires
Maintain recommended air pressure.
Note:If you intend on parking your vehiclefor an extended period after cleaning thewheels with a wheel cleaner, drive yourvehicle for a few minutes before doing so.This reduces the risk of corrosion of thebrake discs, brake pads and linings.
REMOVING YOUR VEHICLE FROM
STORAGE
When your vehicle is ready to come out ofstorage, do the following:
•We recommend that you change theengine oil before you use your vehicleagain.
•Wash your vehicle to remove any dirt orgrease film build-up on window surfaces.
•Check windshield wipers for anydeterioration.
•Check the underhood for any foreignmaterials such as mice or squirrel nests.
•Check the exhaust for any foreignmaterials.
•Check tire pressures and set tire inflationper the Tire Label.
•Check brake pedal operation. Corrodedbrake rotors could cause brake noise.Drive your vehicle and gently apply andrelease the brakes repeatedly over a10-minute drive to reduce the corrosionfrom the brakes.
•Check fluid levels (including coolant, oiland gas) to make sure there are no leaks,and fluids are at recommended levels.
•If you remove the battery, clean thebattery cable ends and check fordamage.
Contact an authorized dealer if you have anyconcerns or issues.
374
2023 Nautilus (CD9) Canada/United States of America, enUSA, Edition date: 202207, DOMStoring Your Vehicle
Page 386 of 606

WARNING: Only usereplacement tires and wheels that arethe same size, load index, speedrating, and type as those originallyprovided for your vehicle. Therecommended tire and wheel sizescan be found on the Tire Label on thedriver side door frame or the edge ofthe driver door. If this information isnot found in those locations, or foradditional options, contact yourauthorized dealer. Use of any tire orwheel not recommended, could affectthe safety and performance of yourvehicle, which could result in anincreased risk of loss of vehiclecontrol, vehicle rollover, personalinjury and death.
WARNING: To reduce the risk ofserious injury, when mountingreplacement tires and wheels, youshould not exceed the maximumpressure indicated on the sidewall ofthe tire to set the beads withoutadditional precautions listed below. Ifthe beads do not seat at the maximumpressure indicated, re-lubricate andtry again.
WARNING: For a mountingpressure more than 20 psi (1.38 bar)greater than the maximum pressure,a Ford dealer or other tire serviceprofessional should do the mounting.
WARNING: Always inflate steelcarcass tires with a remote air fill withthe person inflating standing at aminimum of 12 ft (3.66 m) away fromthe wheel and tire assembly.
WARNING: Only use thespecified jacking points. If you use anyother locations you could damagevehicle components, such as brakelines.
WARNING: When inflating thetire for mounting pressures up to20 psi (1.38 bar) greater than themaximum pressure on the tire sidewall,the following precautions must betaken to protect the person mountingthe tire:
•Make sure that you have the correcttire and wheel size.
•Lubricate the tire bead and wheelbead seat area again.
•Stand at a minimum of 12 ft (3.66 m)away from the wheel and tireassembly.
•Use both eye and ear protection.
Important: Remember to replace thewheel valve stems when the road tiresare replaced on your vehicle.
382
2023 Nautilus (CD9) Canada/United States of America, enUSA, Edition date: 202207, DOMWheel and Tire Information
Page 395 of 606

What to do when a tire is punctured
A tire puncture within the tire's tread areacan be repaired in two stages with the kit.
•In the first stage, the tire is reinflated witha sealing compound and air. After the tirehas been inflated, drive the vehicle ashort distance approximately 4 mi (6 km)to distribute the sealant in the tire.
•In the second stage, check the tirepressure and adjust, if necessary, to thevehicle's specified tire inflation pressure.
First Stage: Reinflating the Tire withsealing compound and air
WARNING: Do not stand directly overthe kit while inflating the tire. If you noticeany unusual bulges or deformations in thetire's sidewall during inflation, stop and callroadside assistance.
WARNING: If the tire does not inflateto the recommended tire pressure within15 minutes, stop and call roadsideassistance.
Park the vehicle in a safe, level and securearea, away from moving traffic.
Turn the hazard lights on. Apply the parkingbrake and power off the vehicle. Inspect theflat tire for visible damage.
If a puncture is located in the tire sidewall,stop and call roadside assistance.
1.Remove the valve cap from the tire valve.
2.Unwrap the dual purpose hose (blacktube) from the back of the compressorhousing.
3.Fasten the hose to the tire valve byturning the connector clockwise. Tightenthe connection securely.
4.Plug the power cable into the 12-voltpower point in the vehicle.
391
2023 Nautilus (CD9) Canada/United States of America, enUSA, Edition date: 202207, DOMTire Sealant and Inflator Kit (If Equipped) E175979
Page 405 of 606

CHANGING A FLAT TIRE
WARNING: If the tire pressuremonitor sensor becomes damaged it maynot function.
If you get a flat tire while driving, do not applythe brake heavily. Instead, graduallydecrease your speed. Hold the steeringwheel firmly and slowly move to a safe placeon the side of the road.
Have a flat serviced by an authorized dealerin order to prevent damage to the tirepressure monitoring system sensors. SeeTire Pressure Monitoring System Overview(page 396). Replace the spare tire with a roadtire as soon as possible. During repairing orreplacing of the flat tire, have an authorizeddealer inspect the tire pressure monitoringsystem sensor for damage.
Note:The use of tire sealant could damageyour tire pressure monitoring sensor andshould only be used in roadsideemergencies. If you must use a sealant, usethe Tire Mobility Kit sealant. Replace the tirepressure monitoring system sensor andvalve stem on the wheel by an authorizeddealer after use of the sealant.
Note:The tire pressure monitoring systemindicator light will illuminate when the sparetire is in use. To restore the full function ofthe monitoring system, all road wheelsequipped with tire pressure monitoringsensors must be mounted on the vehicle.
Dissimilar Spare Wheel and TireAssembly Information
WARNING: Failure to follow theseguidelines could result in an increased riskof loss of vehicle control, injury or death.
If you have a dissimilar spare wheel and tire,then it is intended for temporary use only.This means that if you need to use it, youshould replace it as soon as possible with aroad wheel and tire assembly that is thesame size and type as the road tires andwheels that were originally provided on yourvehicle. If the dissimilar spare tire or wheelis damaged, replace it instead of repairingit.
A dissimilar spare wheel and tire assemblyis defined as a spare wheel and tire assemblythat is different in brand, size or appearancefrom the road tires and wheels and can beone of three types:
1. T-type mini-spare: This spare tire beginswith the letter T for tire size and could haveTemporary Use Only molded in the sidewall.
2. Full-size dissimilar spare with label onwheel: This spare tire has a label on thewheel that states: THIS WHEEL AND TIREASSEMBLY FOR TEMPORARY USE ONLY.
When driving with one of the dissimilar sparetires listed above, do not:
401
2023 Nautilus (CD9) Canada/United States of America, enUSA, Edition date: 202207, DOMChanging a Road Wheel (If Equipped)
Page 407 of 606

WARNING: To help prevent yourvehicle from moving when changing awheel, shift the transmission into park (P),set the parking brake and use anappropriate block or wheel chock tosecure the wheel diagonally opposite tothe wheel being changed. For example,when changing the front left wheel, placean appropriate block or wheel chock onthe right rear wheel.
WARNING: Never place anythingbetween the vehicle jack and your vehicle.
WARNING: Never place anythingbetween the vehicle jack and the ground.
WARNING: Park your vehicle so thatyou do not obstruct the flow of traffic orplace yourself in any danger and set up awarning triangle.
WARNING: Do not get under avehicle that is supported by a jack.
WARNING: Do not attempt to changea tire on the side of the vehicle close tomoving traffic. Pull far enough off the roadto avoid the danger of being hit whenoperating the jack or changing the wheel.
WARNING: Use only the specifiedjacking points. If you use other locations,you could damage the body, steering,suspension, engine, braking system or thefuel lines.
WARNING: Always use the jackprovided as original equipment with yourvehicle. If using a jack other than the oneprovided, make sure the jack capacity isadequate for the vehicle weight, includingany vehicle cargo or modifications. If youare unsure if the jack capacity is adequate,contact the authorized dealer.
WARNING: The jack supplied withthis vehicle is only intended for changingwheels. Do not use the vehicle jack otherthan when you are changing a wheel in anemergency.
WARNING: Make sure there is nogrease or oil on the threads or the surfacebetween the wheel lugs and nuts. This cancause the lug nuts to loosen while driving.
Note:The jack does not requiremaintenance or additional lubrication overthe service life of your vehicle.
Note:Passengers should not remain in yourvehicle when the vehicle is being jacked.
1.Park on a level surface, set the parkingbrake and activate the hazard flashers.
2.Place the transmission in park (P) andturn the engine off.
403
2023 Nautilus (CD9) Canada/United States of America, enUSA, Edition date: 202207, DOMChanging a Road Wheel (If Equipped)E166722
Page 410 of 606

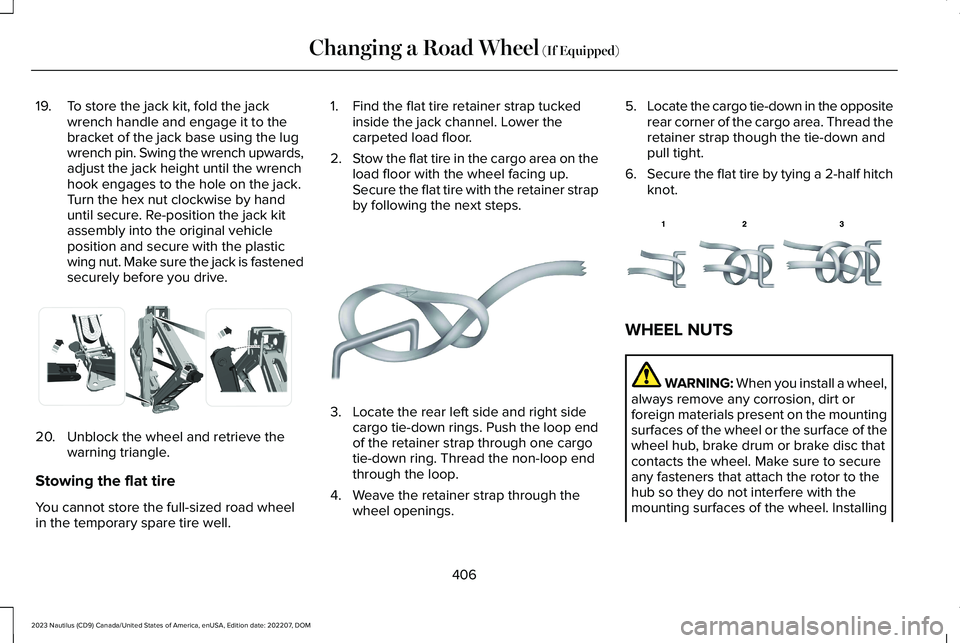
19.To store the jack kit, fold the jackwrench handle and engage it to thebracket of the jack base using the lugwrench pin. Swing the wrench upwards,adjust the jack height until the wrenchhook engages to the hole on the jack.Turn the hex nut clockwise by handuntil secure. Re-position the jack kitassembly into the original vehicleposition and secure with the plasticwing nut. Make sure the jack is fastenedsecurely before you drive.
20.Unblock the wheel and retrieve thewarning triangle.
Stowing the flat tire
You cannot store the full-sized road wheelin the temporary spare tire well.
1.Find the flat tire retainer strap tuckedinside the jack channel. Lower thecarpeted load floor.
2.Stow the flat tire in the cargo area on theload floor with the wheel facing up.Secure the flat tire with the retainer strapby following the next steps.
3.Locate the rear left side and right sidecargo tie-down rings. Push the loop endof the retainer strap through one cargotie-down ring. Thread the non-loop endthrough the loop.
4.Weave the retainer strap through thewheel openings.
5.Locate the cargo tie-down in the oppositerear corner of the cargo area. Thread theretainer strap though the tie-down andpull tight.
6.Secure the flat tire by tying a 2-half hitchknot.
WHEEL NUTS
WARNING: When you install a wheel,always remove any corrosion, dirt orforeign materials present on the mountingsurfaces of the wheel or the surface of thewheel hub, brake drum or brake disc thatcontacts the wheel. Make sure to secureany fasteners that attach the rotor to thehub so they do not interfere with themounting surfaces of the wheel. Installing
406
2023 Nautilus (CD9) Canada/United States of America, enUSA, Edition date: 202207, DOMChanging a Road Wheel (If Equipped)E294121 E142906 E143746
Page 428 of 606

Materials
SpecificationName
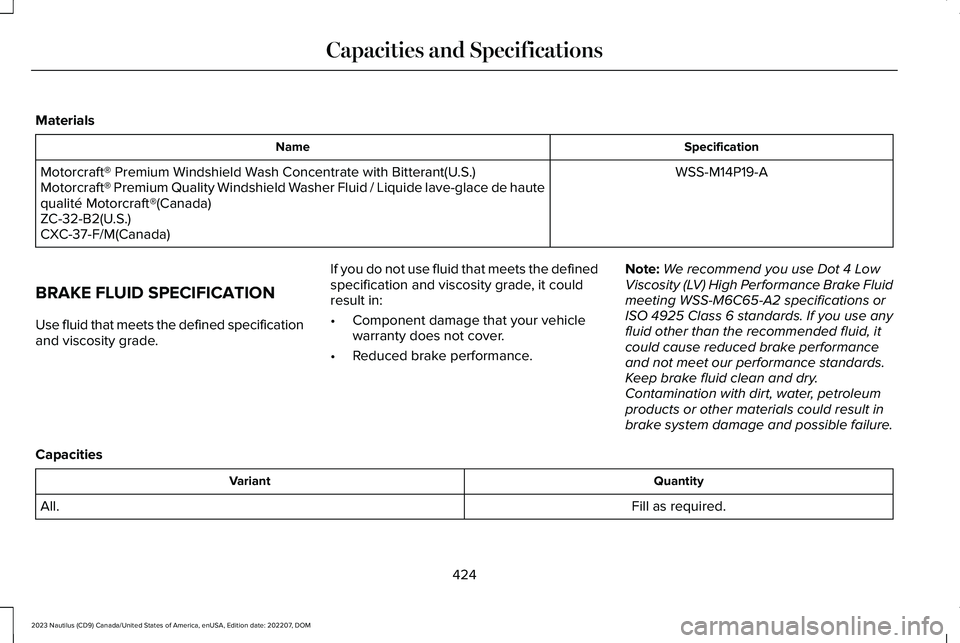
WSS-M14P19-AMotorcraft® Premium Windshield Wash Concentrate with Bitterant(U.S.)Motorcraft® Premium Quality Windshield Washer Fluid / Liquide lave-glace de hautequalité Motorcraft®(Canada)ZC-32-B2(U.S.)CXC-37-F/M(Canada)
BRAKE FLUID SPECIFICATION
Use fluid that meets the defined specificationand viscosity grade.
If you do not use fluid that meets the definedspecification and viscosity grade, it couldresult in:
•Component damage that your vehiclewarranty does not cover.
•Reduced brake performance.
Note:We recommend you use Dot 4 LowViscosity (LV) High Performance Brake Fluidmeeting WSS-M6C65-A2 specifications orISO 4925 Class 6 standards. If you use anyfluid other than the recommended fluid, itcould cause reduced brake performanceand not meet our performance standards.Keep brake fluid clean and dry.Contamination with dirt, water, petroleumproducts or other materials could result inbrake system damage and possible failure.
Capacities
QuantityVariant
Fill as required.All.
424
2023 Nautilus (CD9) Canada/United States of America, enUSA, Edition date: 202207, DOMCapacities and Specifications
Page 429 of 606

Materials
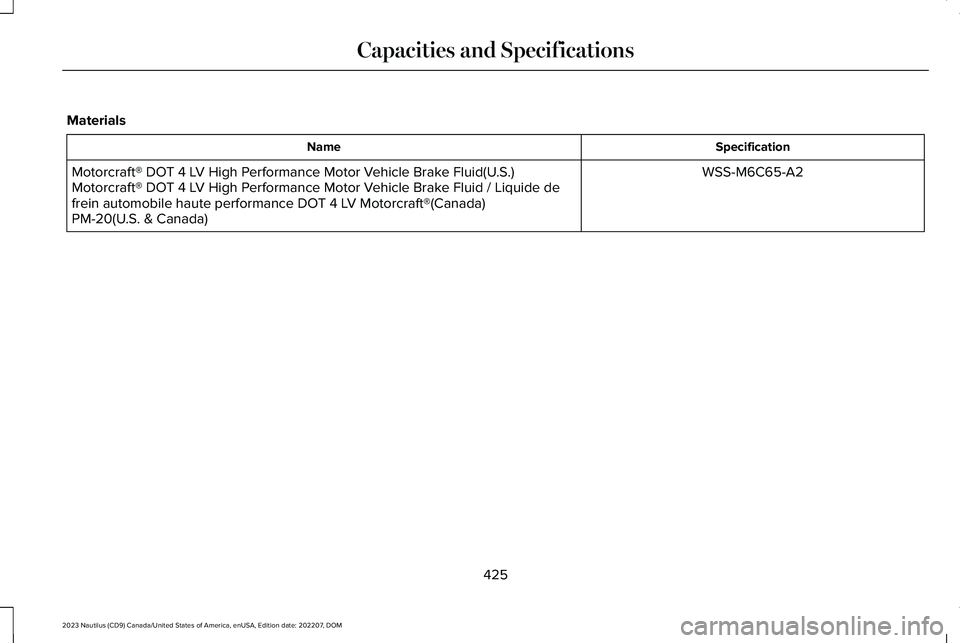
SpecificationName
WSS-M6C65-A2Motorcraft® DOT 4 LV High Performance Motor Vehicle Brake Fluid(U.S.)Motorcraft® DOT 4 LV High Performance Motor Vehicle Brake Fluid / Liquide defrein automobile haute performance DOT 4 LV Motorcraft®(Canada)PM-20(U.S. & Canada)
425
2023 Nautilus (CD9) Canada/United States of America, enUSA, Edition date: 202207, DOMCapacities and Specifications