Page 49 of 72

CENTER PANEL
ALWAYS CHECK THE OWNER ’S MANUAL FOR COMPLETE OPER ATING INFORMATION AND SAFET Y WARNINGS . *IF EQUIPPED47
CENTER PANEL
P
R
N
D
AUTO
HOLD
DRIVE MODEOFFOFF
P
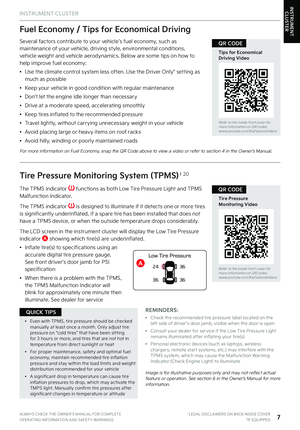
To shift into any gear from Park, depress the brake pedal, then press the
Unlock button A , located on the side of the gear shift lever, and shift .
P: Park – To shift into Park from any gear, press the P button B on the gear shift while vehicle is stationary and the brake pedal is depressed (Shift by Wire only) .
R: Reverse – To shift into Reverse from Drive, depress the brake pedal, press the Unlock button A , and move the shift lever forward twice to skip over Neutral and into Reverse .
N: Neutral
D: Drive
P
R
N D
+
-
� �4�I�J�G�U���C�Z���8�J�S�F���U �Z�Q�F���T�I�P�X�O�
� �4�I�J�G�U���C�Z���$�B�C�M�F���U �Z�Q�F���T�I�P�X�O�
Automatic Transmission (Shift by Cable* / Shift by Wire*)
and Manual Shift Mode (Shift by Cable only)
(Paddles on rear side of steering wheel)
Refer to the inside front cover for more information on QR codes .www .youtube .com/KiaFeatureVideos
Automatic Transmission Control (Shift by Wire) Video
Automatic Transmission with Paddle Shifters
QR CODE
Paddle Shifters
•Press the Unlock but ton A when shifting from P (Park) to any gear
•The instrument cluster and the light on top of the shift lever identifies the gear the vehicle is currently in
QUICK TIPS
REMINDERS:
•
Press and hold the [+} right paddle shifter to return to Automatic mode (Shift by Wire* only)
•
When in Manual Shift mode, pulling the left and right paddle shifters at the same time will NOT shift gears
•
When in P (Park), if the Unlock but ton is not pressed while shifting, the transmission does not shift
•
If the vehicle is turned off while in Neutral without shifting into Park, it will remain in Neutral until the driver ’s door is opened . At that point it will automatically shift into Park
•
If going through a car wash, remind the at tendant to keep the vehicle in Neutral (N) and keep the engine running . Also, disable the power liftgate lid control, turn off the auto rain sensing wipers and fold in the mirrors
A
AB
Paddle Shifters: With the gear shift in Drive, pull the paddle shifter to manually change gears .
[+]: Manual Mode Upshift*
[–]: Manual Mode Downshift*
Page 50 of 72

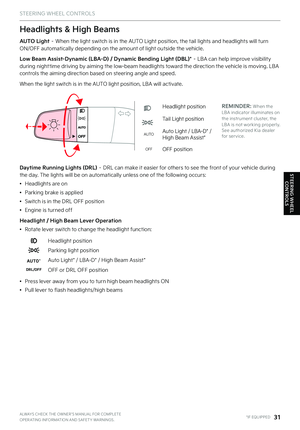
Auto Hold temporarily maintains the vehicle at a standstill even if the brake pedal is not depressed after the driver brings the vehicle to a complete stop by depressing the brake pedal . Auto Hold can be turned On/Off using the
AUTO HOLD switch A on the center panel . Before Auto Hold will operate, the driver ’s door, engine hood and liftgate must be closed and the driver ’s seat belt must be fastened .
Depress the brake pedal, start the engine and then press the AUTO HOLD switch A . The white Auto Hold indicator will come on indicating the system is in standby .
The Auto Hold indicator, which is in the instrument cluster, has four states:
White: Standby – When vehicle is in Park and at a standstill, and AUTO HOLD switch A turned ON, the indicator will illuminate white . While driving the vehicle (vehicle is not at a standstill), the Auto Hold indicator will remain white .
Green: Engaged – When coming to a complete stop by depressing the brake pedal, the Auto Hold indicator changes from white to green .
OFF (not illuminated) – The indicator will turn OFF when the AUTO HOLD switch A is manually turned OFF or when the EPB is manually turned ON .
Yellow: Malfunction – When the indicator is illuminated yellow, there may be a system malfunction . Take your vehicle to a local Kia dealer .
CENTER PANEL
P
R
N
D
OFFOFF
PSee section 5 in the Owner’s Manual for more information .
Refer to the inside front cover for more information on QR codes .www .youtube .com/KiaFeatureVideos
Electric Parking Brake / Auto Hold Video
QR CODE
*IF EQUIPPED48STINGER FEATURES & FUNCTIONS GUIDE
Auto Hold
CENTER PANEL
REMINDERS:
•
Auto Hold only operates when vehicle is in Drive, Neutral or Reverse
•
To reduce the risk of an accident, do not activate Auto Hold while driving downhill, backing up or parking your vehicle
•
Do not rely solely on the Auto Hold system to keep the vehicle stopped . Always pay at tention to traf fic and road conditions, and be prepared to depress the brakes
A
Page 51 of 72

CENTER PANEL
ALWAYS CHECK THE OWNER ’S MANUAL FOR COMPLETE OPER ATING INFORMATION AND SAFET Y WARNINGS . *IF EQUIPPED49
CENTER PANEL
P
R
N
D
AUTO
HOLD
DRIVE MODE
OFFOFF
P
See section 5 in the Owner’s Manual for more information .
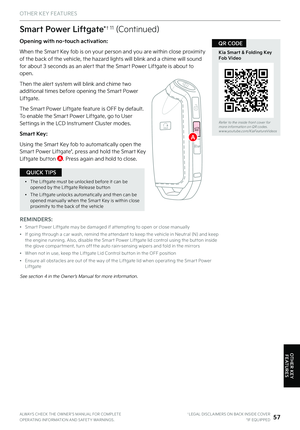
The Electric Parking Brake (EPB) system utilizes an electric motor to engage the parking brake .
Applying the Parking Brake
Depress the brake pedal and pull up the EPB switch A . Ensure that the indicator light is illuminated on the instrument cluster .
Releasing the Parking Brake
The EPB will automatically release when the brake pedal is engaged and shifter is shifted out of P (Park) to R (Reverse) or shifted out of N (Neutral) to Reverse or D (Drive) .
To release EPB manually, depress the brake pedal, then press the EPB switch A , with the ignition switch in the ON position . Ensure that the indicator light is OFF .
Electric Parking Brake (EPB)*
Refer to the inside front cover for more information on QR codes .www .youtube .com/KiaFeatureVideos
Electric Parking Brake / Auto Hold Video
QR CODE
•
Pull up and hold EPB switch again to increase brake pressure if parked on a decline or incline
•
When leaving your keys with parking lot at tendants or valet, make sure to inform them how to operate the EPB
•
If parked on a steep incline, pull up the EPB switch for more than 3 seconds for a firmer EPB application
QUICK TIPSREMINDERS:
•
The EPB malfunction indicator will illuminate for approximately 3 seconds as a bulb check when the ignition switch is turned ON
•
If the warning light does not illuminate temporarily or remains continuously lit, take your vehicle to an authorized Kia dealer and have the system checked
•
The EPB should not be operated while the vehicle is moving
•
A click or electric brake motor sound may be heard while operating or releasing the EPB . These conditions are normal and indicate that the EPB is functioning properly
•
EPB will not release unless the hood, liftgate and all doors are closed and seat belts are fastened
A
Page 52 of 72

•Press button twice for medium setting (2 LEDs lit)
•Press a thi")
P
R
N
D
AUTO
HOLD
DRIVE MODE
OFFOFF
P
P
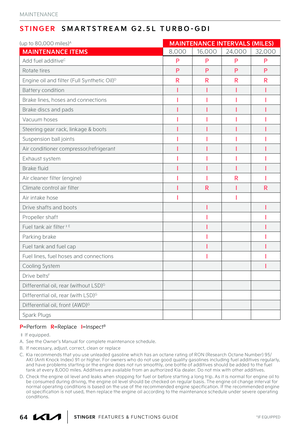
Front Seats
Seat Warmers:
•Press button A up once for high setting (3 LEDs lit)
•Press button twice for medium setting (2 LEDs lit)
•Press a third time for low setting (1 LED lit) and again to turn OFF
Ventilated Seats:
•Press button B down once for high setting (3 LEDs lit)
•Press twice for medium setting (2 LEDs lit)
•Press a third time for low setting (1 LED lit) and again to turn OFF
Seat Warmers† 15 / Ventilated Seats*
See section 4 in the Owner’s Manual for more information .
Refer to the inside front cover for more information on QR codes .www .youtube .com/KiaFeatureVideos
Seat Warmers and Ventilated Seats Video
QR CODE
†LEGAL DISCL AIMERS ON BACK INSIDE COVER*IF EQUIPPED50STINGER FEATURES & FUNCTIONS GUIDE
•
With the seat warmer switch in the ON position, the heating system in the seat turns OFF or ON automatically depending on the seat temperature
•
When the Climate Control System’s temperature is turned up to high heat, the Seat Warmers turn on automatically
QUICK TIPSREMINDER: Use extreme caution when using the seat warmers to avoid burns . See section 4 in the Owner ’s Manual for more information .
A
A
A
B
B
B
S E AT I N G
SEATING
Page 53 of 72
S E AT I N G
ALWAYS CHECK THE OWNER ’S MANUAL FOR COMPLETE OPER ATING INFORMATION AND SAFET Y WARNINGS . †LEGAL DISCL AIMERS ON BACK INSIDE COVER*IF EQUIPPED51
SEATING
SeatbackLumbar / Power Seat-back Bolster Control*Seat Cushion Extension*SeatSeat Cushion
Power Adjustable Driver’s Seat† 13
Move/Press controls to adjust Seat, Seat forward/backward, Seat Cushion tilt up/down, Seatback forward/backward, Lumbar up/down/forward/backward or Seat Cushion Extension forward/backward .
REMINDER: Do not at tempt to adjust the seat while the vehicle is moving . This could result in loss of control of the vehicle .
See section 3 in the Owner’s Manual for more information .
AABC
A
B
C
D
D
Refer to the inside front cover for more information on QR codes .www .youtube .com/KiaFeatureVideos
Power Adjustable Driver’s Seat with Memory Settings Video
QR CODE
Page 54 of 72

S E AT I N G
SEATING
Driver Position Memory System*
The integrated system stores into memory the position of the driver ’s seat, outside rearview mirrors, steering wheel positions and seat cushion extension* . To store positions into memory, first place the gear shift into P (Park) while the Engine Star t/Stop button is in the ON position . Then:
1 .
Adjust the driver ’s seat, outside rearview mirrors, settings and steering wheel positions
2 .
Press the SET button B on the control panel . System will BEEP once
3 .
Press one of the memory buttons 1 or 2 C within 4 seconds . The system will BEEP twice when memory has been stored
(Located on driver ’s door control panel)
†LEGAL DISCL AIMERS ON BACK INSIDE COVER*IF EQUIPPED52STINGER FEATURES & FUNCTIONS GUIDE
REMINDERS:
•But ton may be hard to see if headrest is in its lowest position
•
Do not operate the vehicle with the headrests removed . Headrests can provide critical neck and head suppor t in an accident . Do not at tempt to adjust the seat while the vehicle is moving . This could result in loss of control of the vehicle .
See section 3 in the Owner’s Manual for more information .
REMINDER: Do not operate the vehicle with the headrests removed . Headrests can provide critical neck and head suppor t in an accident .
See section 3 in the Owner’s Manual for more information .
To raise headrest: Pull headrest up .
To lower headrest: Press the lock button A , then press the
headrest down .
Front Seat Headrest Adjustment†7
A
B
C
•
For easy adjustments, hold a headrest post with one hand while using the other hand to pull the headrest from underneath
QUICK TIP
Page 55 of 72

ALWAYS CHECK THE OWNER ’S MANUAL FOR COMPLETE OPER ATING INFORMATION AND SAFET Y WARNINGS . †LEGAL DISCL AIMERS ON BACK INSIDE COVER*IF EQUIPPED53
How to Sync Transmitter with HomeLink®
If programming for the first time, begin with Step 1 (repeating this step will delete all information) .
To program non-rolling and rolling code garage door openers and other devices:
1 . Press and hold the left A and center C buttons simultaneously until the indicator light G begins to flash (to reprogram buttons, skip this step)
2 . Press and hold the desired button A B C and hold the button on the transmitter while it is approximately 1 to 3 inches away from the mirror . The HomeLink® Indicator light F will flash rapidly once the frequency signal has been successfully programmed
To finish programming rolling code garage door openers, complete these steps:
3 . Locate the “learn” or “smart ” button on the garage door ’s motor head unit . Press and release the button and complete Step 4 within 30 seconds
4 . Firmly press and release the programmed HomeLink® button up to three times
Operating HomeLink®:
Press one of the programmed HomeLink® buttons .
Erasing programmed buttons:
Press and hold the A and C buttons simultaneously for approximately 20 seconds, and then release both buttons within 30 seconds .
The HomeLink® / Auto-Dimming Rearview Mirror* is designed to reduce glare from a vehicle’s headlights located in the rear and also connect up to three electronic transmitters into one location .
HomeLink®†2 with Auto-Dimming Rearview Mirror*
A HomeLink® Channel 1
B HomeLink® Channel 2
C HomeLink® Channel 3
D Garage Door Opener Status Indicator: Closing or Closed
E HomeLink® Operation Indicator
F Garage Door Opener Status Indicator: Opening or Open
G HomeLink® User Interface Indicator
Refer to the inside front cover for more information on QR codes .www .youtube .com/KiaFeatureVideos
HomeLink® Support
QR CODE
•
You can reprogram a single HomeLink but ton by repeating Step 2
•Erasing the programmed but tons will delete all trained transmit ters
QUICK TIPS
ABC
D
EF
G
OTHER KEY
FEATURES
OTHER KEY FEATURES
Page 56 of 72

OTHER KEY
FEATURES
OTHER KEY FEATURES
*IF EQUIPPED54STINGER FEATURES & FUNCTIONS GUIDE
The sunroof glass and sunshade operation is controlled by a multi-directional switch A . The Start/Stop button needs to be in the ON or START position to operate the sunroof .
To slide the sunshade and sunroof glass:
Auto Open – Push the switch A backward to the second detent position and release .
Auto Close – Push the switch A forward to the second detent position and release .
To slide the sunshade only:
Auto Open – Push the switch A backward to the first detent position and release .
Auto Close – Push the switch A forward to the first detent position and release .
Slide the sunroof glass (with sunshade open):
Auto Open – Push the switch A backward to the first detent position and release .
Auto Close – Push the switch A forward to the first detent position and release to close sunroof glass only . Push the switch A forward to the second detent position and release to close sunroof glass and sunshade .
To tilt the sunroof glass:
Raise: Push and release switch A upward
Lower: Push and release switch A upward
Auto-close sunroof glass and sunshade:
Slide the switch forward to the farthest position .
Your vehicle’s sunroof controls may differ from that in the illustration .
See section 4 in the Owner’s Manual for more information .
Sunroof Operation*
Refer to the inside front cover for more information on QR codes .www .youtube .com/KiaFeatureVideos
Sunroof Operation Video
QR CODE
A
•To stop the sunroof glass/sunshade at any position, press or pull the sunroof control switch in any direction
QUICK TIP
REMINDERS:
•
Sunshade must remain OPEN while sunroof is open
•
If the vehicle is turned off with the Sunroof not fully closed, the Instrument Cluster LCD will display a warning message and a chime will sound for a few seconds
•
Do not adjust the sunroof or sunshade while driving . This could result in loss of control of the vehicle
•When closing, be mindful of any objects or persons
(But ton located within overhead lamp console)