2023 JEEP RENEGADE parking brake
[x] Cancel search: parking brakePage 116 of 364

114 STARTING AND OPERATING
(Continued)
Move Backward Into Parallel Parking Space
Move Backward Into Perpendicular Parking Space
The system may instruct several more gear shifts
(DRIV E
and REVERSE), with hands off of the
steering wheel, before instructing the driver to
check surroundings and complete the parking
maneuver. When the vehicle is in the parking position, the
maneu
v
er is complete and the driver will be
instructed to check the vehicle's parking position,
then shift the vehicle into PARK. The message
"Active ParkSense Complete - Check Parking
Position" will be displayed momentarily.
NOTE:
It is the driver's responsibility to use the brake
and accelerator during the semi-automatic
parking maneuver.
It is the driver's responsibility to use the brake
and stop the vehicle. The driver should check
their surroundings and be prepared to stop the
vehicle either when instructed to, or when driver
intervention is required.
When the system instructs the driver to remove
their hands from the steering wheel, the driver
should check their surroundings and begin to
back up slowly.
The ParkSense Active Park Assist system will
allow a maximum of six shifts between DRIVE
and REVERSE. If the maneuver cannot be
completed within six shifts, the system will
cancel and the instrument cluster display will
instruct the driver to complete the maneuver
manually.
The system will cancel the maneuver if the
vehicle speed exceeds 5 mph (7 km/h) during
activ e
steering guidance into the parking space.
The system will provide a warning to the driver
at 3 mph (5 km/h) that tells them to slow down.
The d r
iver is then responsible for completing the
maneuver if the system is canceled.
If the system is canceled during the maneuver
for any reason, the driver must take control of
the vehicle.
WARNING!
Drivers must be careful when performing
parallel or perpendicular parking maneuvers
even when using the ParkSense Active Park
Assist system. Always check carefully behind
and in front of your vehicle, look behind and in
front of you, and be sure to check for pedes -
trians, animals, other vehicles, obstructions,
a nd b l
ind spots before backing up and moving
forward. You are responsible for safety and
must continue to pay attention to your
surroundings. Failure to do so can result in
serious injury or death.
Page 117 of 364

STARTING AND OPERATING 115
(Continued)
EXITING THE PARKING SPACE
NOTE:
The function does not work for exiting a perpen -
dicular parking space, but only exiting parallel
p arki n
g spaces.
Activation
To activate this function, push the ParkSense
Activ e
Park Assist switch and then use the steering
wheel arrow buttons to select the Parallel Park Exit
feature. After the selection, the system activates
and instructs the driver through the instrument
cluster display about the operations that have to
be carried out to perform the maneuver correctly. Selection Of The Maneuver Side
Use the right and left arrow buttons on the steering
wheel
to select between parallel or perpendicular
parking mode. Then use the direction indicators
(turn signals) to choose the direction that you want
to perform the maneuver.
During the maneuver, the system asks the driver to
shift
to REVERSE, and operate the turn signal in
the direction you want to exit. Let go of the steering
wheel and use the brake or accelerator pedals as
instructed, while the system handles the steering
automatically for exiting the parking space. If the
driver continues to carry out a voluntary or
involuntary action on the steering wheel during the
exit maneuver (touching or holding the steering
wheel to prevent its movement), the maneuver will
be interrupted.
Check Surroundings — Move Backward
Before using the ParkSense Active Park Assist
system, it is strongly recommended that the
ball mount and hitch ball assembly be discon -
nected from the vehicle when the vehicle is
not us e
d for towing. Failure to do so can result
in injury or damage to vehicles or obstacles
because the hitch ball will be much closer to
the obstacle than the rear fascia when the
vehicle sounds the continuous tone. Also, the
sensors could detect the ball mount and hitch
ball assembly, depending on its size and
shape, giving a false indication that an
obstacle is behind the vehicle.
CAUTION!
The ParkSense Active Park Assist system is
only a parking aid and it is unable to recognize
every obstacle, including small obstacles.
Parking curbs might be temporarily detected
or not detected at all. Obstacles located above
or below the sensors will not be detected
when they are in close proximity.
WARNING!
The vehicle must be driven slowly when using
the ParkSense Active Park Assist system in
order to be able to stop in time when an
obstacle is detected. It is recommended that
the driver looks over his/her shoulder when
using the ParkSense Active Park Assist
system.
CAUTION!
4
Page 123 of 364

STARTING AND OPERATING 121
CHANGING LANESENSE STATUS
The LaneSense system has settings to adjust the
intensity of the torque warning and the warning
zone sensitivity (early/late) that you can configure
through the Uconnect system
Ú page 133.
NOTE:
When enabled the system operates above
37 mph (60 km/h) and below 112 mph
(180 km
/h).
Use of the turn signal suppresses the warnings.
The system will not apply torque to the steering
wheel whenever a safety system engages
(Anti-Lock Brakes, Traction Control System,
Electronic Stability Control, Forward Collision
Warning, etc.).
REAR BACK UP CAMERA
The Rear Back Up Camera allows you to see an
on-screen image of your vehicle's rear
surroundings when the gear selector is put into
REVERSE. The image will be displayed on the
touchscreen display along with a note to “Check
Entire Surroundings” across the top of the screen.
After five seconds, this note will disappear. The
camera is located above the rear license plate.
Parking Camera
When the vehicle is shifted out of REVERSE with
camer a
delay turned off, the rear camera mode is
exited and the navigation or audio screen appears
again.
When the vehicle is shifted out of REVERSE with
camera
delay turned on, the camera image will
continue to be displayed for up to 10 seconds unless
the vehicle speed exceeds 8 mph (13 km/h), the
vehic l
e is shifted into PARK or the ignition is placed
in the OFF position.
When the vehicle is shifted out of REVERSE, a
touchs c
reen "X" button is shown on the camera
image in order to disable the visualization earlier
than 10 seconds.
When enabled, active guidelines are overlaid on
the im
age to illustrate the width of the vehicle and
its projected backup path based on the steering
wheel position. Different colored zones indicate the distance to
the r
e
ar of the vehicle.
The following table shows the approximate
distan
ces for each zone:
NOTE:
If snow, ice, mud, or any foreign substance builds
up on t
he camera lens, clean the lens, rinse with
water, and dry with a soft cloth. Do not cover the
lens.
Zone Distance To The Rear Of
The Ve hicle
Red 0 - 1 ft (0 - 30 cm)
Yellow 1 ft - 3 ft (30 cm - 1 m)
Green 3
ft or greater
(1 m or
greater)
WARNING!
Drivers must be careful when backing up even
when using the Rear Back Up Camera. Always
check carefully behind your vehicle, and be sure
to check for pedestrians, animals, other
vehicles, obstructions, or blind spots before
backing up. You are responsible for the safety of
your surroundings and must continue to pay
attention while backing up. Failure to do so can
result in serious injury or death.
4
Page 129 of 364

STARTING AND OPERATING 127
(Continued)
(Continued)
Towing Requirements — Tires
Do not attempt to tow a trailer while using a
compact spare tire.
Proper tire inflation pressures are essential to
the safe and satisfactory operation of your
vehicle
Ú page 329.
Check the trailer tires for proper tire inflation
pressures before trailer usage.
Check for signs of tire wear or visible tire
damage before towing a trailer Ú page 329.
For the proper tire replacement procedures
Ú page 329. Replacing tires with a higher load
carrying capacity will not increase the vehicle's
G VWR a
nd GAWR limits.
Towing Requirements — Trailer Brakes
Do not interconnect the hydraulic brake system
or vacuum system of your vehicle with that of
the trailer. This could cause inadequate braking
and possible personal injury.
An electronically actuated trailer brake
controller is required when towing a trailer with
electronically actuated brakes. When towing a
trailer equipped with a hydraulic surge actuated
brake system, an electronic brake controller is
not required.
Trailer brakes are recommended for trailers
over 1,000 lb (453 kg) and required for trailers
in excess of 2,000 lb (907 kg).
When hauling cargo, or towing a trailer, do not
overload your vehicle or trailer. Overloading
can cause a loss of control, poor performance,
or damage to brakes, axle, engine, transmis -
sion, steering, suspension, chassis structure,
or tire
s.
Safety chains must always be used between
your vehicle and trailer. Always connect the
chains to the frame or hook retainers of the
vehicle hitch. Cross the chains under the
trailer tongue and allow enough slack for
turning corners.
Vehicles with trailers should not be parked on
a grade. When parking, apply the parking
brake on the tow vehicle. Put the tow vehicle
transmission in PARK. Always block or "chock"
the trailer wheels.
GCWR must not be exceeded.
Total weight must be distributed between the
tow vehicle and the trailer such that the
following four ratings are not exceeded:
GVWR
GTW
WARNING!
GAWR
Tongue weight rating for the trailer hitch
utilized.
CAUTION!
Do not tow a trailer at all during the first
500 miles (805 km) the new vehicle is driven.
The e n
gine, axle or other parts could be
damaged.
Then, during the first 500 miles (805 km) that
a trai
ler is towed, do not drive over 50 mph
( 8
0 k
m /
h) and do not make starts at full
thrott l
e. This helps the engine and other parts
of the vehicle wear in at the heavier loads.
WARNING!
WARNING!
Do not connect trailer brakes to your vehicle's
hydraulic brake lines. It can overload your
brake system and cause it to fail. You might
not have brakes when you need them and
could have a collision.
4
Page 151 of 364
MULTIMEDIA 149
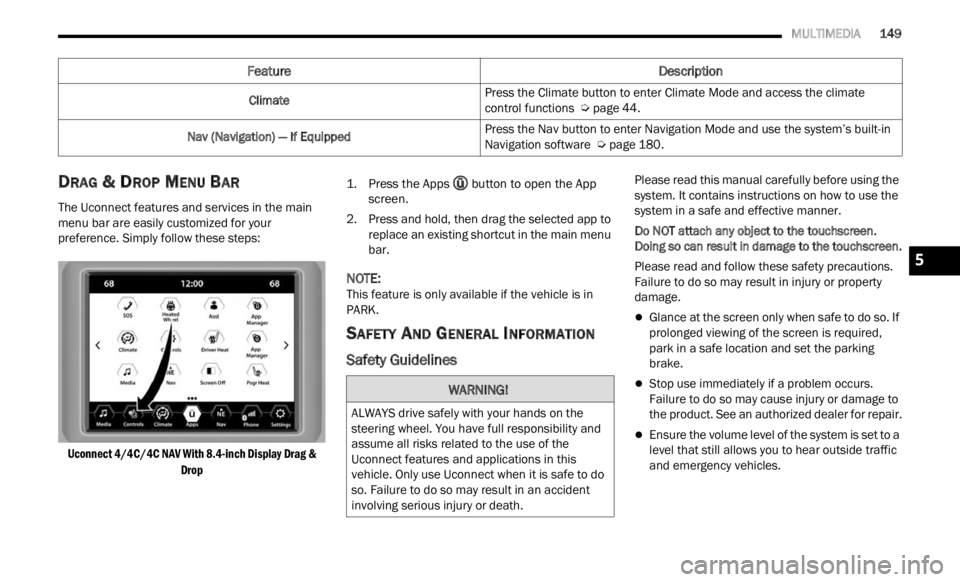
DRAG & DROP MENU BAR
The Uconnect features and services in the main
menu bar are easily customized for your
preference. Simply follow these steps:
Uconnect 4/4C/4C NAV With 8.4-inch Display Drag & Drop
1.
P
ress the Apps
butt
on to open the App
screen.
2. P ress and hold, then drag the selected app to
repla
ce an existing shortcut in the main menu
bar.
NOTE:
This feature is only available if the vehicle is in
PARK.
SAFETY AND GENERAL INFORMATION
Safety Guidelines
Please read this manual carefully before using the
system. It contains instructions on how to use the
system in a safe and effective manner.
Do NOT attach any object to the touchscreen.
Doing s
o can result in damage to the touchscreen.
Please read and follow these safety precautions.
Failur
e to do so may result in injury or property
damage.
Glance at the screen only when safe to do so. If
prolonged viewing of the screen is required,
park in a safe location and set the parking
brake.
Stop use immediately if a problem occurs.
Failure to do so may cause injury or damage to
the product. See an authorized dealer for repair.
Ensure the volume level of the system is set to a
level that still allows you to hear outside traffic
and emergency vehicles.
Climate
Press the Climate button to enter Climate Mode and access the climate
c
ontrol
functions Ú page 44.
Nav (Navigation) — If Equipped Press the Nav button to enter Navigation Mode and use the system’s built-in
Navig
a
tion software Ú page 180.
Feature Description
WARNING!
ALWAYS drive safely with your hands on the
steering wheel. You have full responsibility and
assume all risks related to the use of the
Uconnect features and applications in this
vehicle. Only use Uconnect when it is safe to do
so. Failure to do so may result in an accident
involving serious injury or death.
5
Page 243 of 364

SAFETY 241
SEAT BELT SYSTEMS
Buckle up even though you are an excellent driver,
even on short trips. Someone on the road may be
a poor driver and could cause a collision that
includes you. This can happen far away from home
or on your own street.
Research has shown that seat belts save lives, and
they c
an reduce the seriousness of injuries in a
collision. Some of the worst injuries happen when
people are thrown from the vehicle. Seat belts
reduce the possibility of ejection and the risk of
injury caused by striking the inside of the vehicle.
Everyone in a motor vehicle should be belted at all
times.
Enhanced Seat Belt Use Reminder System
(BeltAlert)
Driver And Passenger BeltAlert — If Equipped
BeltAlert is a feature intended to remind the driver and outboard front seat
passenger to buckle their seat belts. The
BeltAlert feature is active whenever the
ignition switch is in the START or ON/RUN position.
Initial Indication
If the driver is unbuckled when the ignition switch
is fi r
st in the START or ON/RUN position a chime
will signal for a few seconds. If the driver or
outboard front seat passenger is unbuckled when
the ignition switch is first in the START or ON/RUN position the Seat Belt Reminder Light will turn solid
red and remain red until the seat belt is buckled.
After the driver and outboard front seat passenger
have buckled their seat belts all Seat Belt
Reminder Lights will turn off. The outboard front
passenger seat BeltAlert is not active when the
outboard front passenger seat is unoccupied. The
cluster display will inform the driver that you must
fasten the driver’s seat belt in order to release the
parking brake.
BeltAlert Warning Sequence
The BeltAlert warning sequence is activated when
t
he v e
hicle is moving above a specified vehicle
speed range and the driver or outboard front seat
passenger is unbuckled (the outboard front
passenger seat BeltAlert is not active when the
outboard front passenger seat is unoccupied). The
BeltAlert warning sequence starts by blinking the
Seat Belt Reminder Light and sounding an
intermittent chime. Once the BeltAlert warning
sequence has completed, the Seat Belt Reminder
Light will remain solid red until the driver and
outboard front seat passenger are buckled. The
BeltAlert warning sequence may repeat based on
vehicle speed until the driver and occupied
outboard front seat passenger seat belts are
buckled. The driver should instruct all occupants to
buckle their seat belts. Change Of Status
If the driver or outboard front seat passenger
unbuc
k
les their seat belt while the vehicle is
traveling, the BeltAlert warning sequence will begin
until the seat belts are buckled again.
The outboard front passenger seat BeltAlert is not
active
when the outboard front passenger seat is
unoccupied. BeltAlert may be triggered when an
animal or other items are placed on the outboard
front passenger seat or when the seat is folded flat
(if equipped). It is recommended that pets be
restrained in the rear seat (if equipped) in pet
harnesses or pet carriers that are secured by seat
belts, and cargo is properly stowed.
BeltAlert can be activated or deactivated by an
author i
zed dealer. FCA US LLC does not
recommend deactivating BeltAlert.
NOTE:
If BeltAlert has been deactivated, the Seat Belt
Remin d
er Light will turn on and remain on until the
driver and outboard front seat passenger seat
belts are buckled.
Lap/Shoulder Belts
All seating positions in your vehicle are equipped
with lap/shoulder belts.
The seat belt webbing retractor will lock only during
very s
udden stops or collisions. This feature allows
the shoulder part of the seat belt to move freely
with you under normal conditions. However, in a
6
Page 269 of 364

SAFETY 267
PERIODIC SAFETY CHECKS YOU SHOULD
M
AKE OUTSIDE THE VEHICLE
Tires
Examine tires for excessive tread wear and uneven
wear patterns. Check for stones, nails, glass, or
other objects lodged in the tread or sidewall.
Inspect the tread for cuts and cracks. Inspect
sidewalls for cuts, cracks, and bulges. Check the
lug nuts/bolt torque for tightness. Check the tires
(including spare) for proper cold inflation pressure.
Lights
Have someone observe the operation of brake
lights and exterior lights while you work the
controls. Check turn signal and high beam
indicator lights on the instrument panel.
Door Latches
Check for proper closing, latching, and locking.
Fluid Leaks
Check area under the vehicle after overnight
parking for fuel, coolant, oil, or other fluid leaks.
Also, if gasoline fumes are detected or if fuel or
brake fluid leaks are suspected, the cause should
be located and corrected immediately.
EXHAUST GAS
The best protection against carbon monoxide entry
into the vehicle body is a properly maintained
engine exhaust system.
Whenever a change is noticed in the sound of the
exhau s
t system, when exhaust fumes can be
detected inside the vehicle, or when the underside
or rear of the vehicle is damaged, have an
authorized dealer inspect the complete exhaust system and adjacent body areas for broken,
damaged, deteriorated, or mispositioned parts.
Open seams or loose connections could permit
exhaust fumes to seep into the passenger
compartment. In addition, inspect the exhaust
system each time the vehicle is raised for
lubrication or oil change. Replace as required.
CARBON MONOXIDE WARNINGS
WARNING!
Exhaust gases can injure or kill. They contain
carbon monoxide (CO), which is colorless and
odorless. Breathing it can make you
unconscious and can eventually poison you. To
avoid breathing (CO), follow these safety tips:
Do not run the engine in a closed garage or in
confined areas any longer than needed to
move your vehicle in or out of the area.
If you are required to drive with the trunk/lift
-
gate/rear doors open, make sure that all
window s
are closed and the climate control
BLOWER switch is set at high speed. DO NOT
use the recirculation mode.
If it is necessary to sit in a parked vehicle with
the engine running, adjust your heating or
cooling controls to force outside air into the
vehicle. Set the blower at high speed.
WARNING!
Carbon monoxide (CO) in exhaust gases is
deadly. Follow the precautions below to prevent
carbon monoxide poisoning:
Do not inhale exhaust gases. They contain
carbon monoxide, a colorless and odorless gas,
which can kill. Never run the engine in a closed
area, such as a garage, and never sit in a
parked vehicle with the engine running for an
extended period. If the vehicle is stopped in an
open area with the engine running for more
than a short period, adjust the ventilation
system to force fresh, outside air into the
vehicle.
Guard against carbon monoxide with proper
maintenance. Have the exhaust system
inspected every time the vehicle is raised.
Have any abnormal conditions repaired
promptly. Until repaired, drive with all side
windows fully open.
6
Page 275 of 364

IN CASE OF EMERGENCY 273
(Continued)
5. Remove the spare tire.
Jack And Tools
JACKING INSTRUCTIONS
Jack Warning Label
1. Remove the spare tire, jack, and wheel bolt wrench.
2
. If equipped with wheels where the center cap covers
the wheel bolts, use the wheel bolt
wrench to pry the center cap off carefully
before raising the vehicle.
1 — Wheel Bolt Wrench
2 — Jack
3 — Emergency Funnel
4 — Wheel Chocks
5 — Screwdriver
6 — Emergency Allen KeyWARNING!
A loose tire or jack thrown forward in a collision
or hard stop could endanger the occupants of
the vehicle. Always stow the jack parts and the
spare tire in the places provided. Have the
deflated (flat) tire repaired or replaced
immediately.
WARNING!
Carefully follow these tire changing warnings to
help prevent personal injury or damage to your
vehicle:
Always park on a firm, level surface as far from
the edge of the roadway as possible before
raising the vehicle.
Turn on the Hazard Warning Flashers.
Apply the parking brake and place an auto
-
matic transmission in PARK.
Chock the wheel diagonally opposite the
wheel to be raised.
Never start or run the engine with the vehicle
on a jack.
Do not let anyone sit in the vehicle when it is
on a jack.
Do not get under the vehicle when it is on a
jack. If you need to get under a raised vehicle,
take it to a service center where it can be
raised on a lift.
Only use the jack in the positions indicated
and for lifting this vehicle during a tire change.
If working on or near a roadway, be extremely
careful of motor traffic.
To assure that spare tires, flat or inflated, are
securely stowed, spares must be stowed with
the valve stem facing the ground.
WARNING!
7