2023 JEEP CHEROKEE remove seats
[x] Cancel search: remove seatsPage 19 of 276

GETTING TO KNOW YOUR VEHICLE17
(Continued)
Push Button Ignition
The push button ignition can be placed in the following
modes:
OFF
The engine is stopped
Some electrical devices (e.g. power locks, alarm, etc.)
are still available
ACC
Engine is not started
Some electrical devices are available (e.g. power
sunroof, power windows, etc.)
ON/RUN
Driving position
All electrical devices are available (e.g. climate
controls, heated seats, etc.) START
The engine will start (when foot is on the brake)
NOTE:If the ignition switch does not change with the push of a
button, the key fob may have a low battery. In this situ -
ation, a backup method can be used to operate the
ignition switch. Put the nose side (side opposite of the
emergency key) of the key fob against the START/STOP
ignition button and push to operate the ignition switch.
Starting The Ignition With Depleted Key Fob Battery
NOTE:
For information on normal starting, see Úpage 77.
When opening the driver's door and the ignition is in
the ON/RUN (engine not running) position, a chime will
sound to remind you to place the ignition in the OFF
1 — OFF
2 — ACC
3 — ON/RUN
WARNING!
Before exiting a vehicle, always come to a complete
stop, then shift the automatic transmission into
PARK, apply the parking brake, place the engine in
the OFF position, remove the key fob from the vehicle
and lock your vehicle. If equipped with Keyless
Enter ‘n Go™, always make sure the keyless ignition
is in OFF position, remove the key fob from the
vehicle and lock the vehicle.
Never leave children alone in a vehicle, or with
access to an unlocked vehicle.
Allowing children to be in a vehicle unattended is
dangerous for a number of reasons. A child or others
could be seriously or fatally injured. Children should
be warned not to touch the parking brake, brake
pedal or the gear selector.
Do not leave the key fob in or near the vehicle, or in
a location accessible to children, and do not leave
the ignition of a vehicle equipped with Keyless
Enter ‘n Go™ in the ON/RUN position. A child could
operate power windows, other controls, or move the
vehicle.
Do not leave children or animals inside parked vehi -
cles in hot weather. Interior heat buildup may cause
serious injury or death.
CAUTION!
An unlocked vehicle is an invitation for thieves. Always
remove key fob from the vehicle and lock all doors
when leaving the vehicle unattended.
WARNING!
2
23_KL_OM_EN_USC_t.book Page 17
Page 34 of 276

32GETTING TO KNOW YOUR VEHICLE
VENTILATED SEATS — IF EQUIPPED
Located in the seat cushion and seatback are fans that
draw the air from the passenger compartment and move
air through fine perforations in the seat cover to help keep
the occupant cooler in higher ambient temperatures.
Front Ventilated Seats — If Equipped
The front ventilated seat controls are located
within the climate and control screen in the
Uconnect system. The fans operate at two
speeds: HI and LO.
Press the ventilated seat button once to choose HI.
Press the ventilated seat button a second time to
choose LO.
Press the ventilated seat button a third time to turn the
ventilated seat off.
NOTE:The engine must be running for the ventilated seats to
operate.
For information on use with the Remote Start system, see
Úpage 19.
HEAD RESTRAINTS
Head restraints are designed to reduce the risk of injury by
restricting head movement in the event of a rear impact.
Head restraints should be adjusted so that the top of the
head restraint is located above the top of your ear.
NOTE:Do not reverse the head restraints (making the rear of the
head restraint face forward) in an attempt to gain addi -
tional clearance to the back of your head.
Reactive Head Restraints — Front Seats
The front driver and passenger seats are equipped with
Reactive Head Restraints (RHR). In the event of a rear
impact, the RHRs will automatically extend forward
minimizing the gap between the back of the occupant’s
head and the RHR.
The RHRs will automatically return to their normal position
following a rear impact. If the RHRs do not return to their
normal position, see an authorized dealer immediately. To raise the head restraint, pull upward on the head
restraint. To lower the head restraint, push the adjustment
button, located at the base of the head restraint, and push
downward on the head restraint.
NOTE:To remove the head restraint, raise it as far as it can go.
Then, push the release button and the adjustment button
at the base of each post while pulling the head restraint
up. Seatback angle may need to be adjusted to fully
remove the head restraint. To reinstall the head restraint,
put the head restraint posts into the holes and push
downward. Then adjust the head restraint to the appro
-
priate height.
Front Head Restraint
WARNING!
All occupants, including the driver, should not
operate a vehicle or sit in a vehicle’s seat until the
head restraints are placed in their proper positions in
order to minimize the risk of neck injury in the event
of a crash.
Head restraints should never be adjusted while the
vehicle is in motion. Driving a vehicle with the head
restraints improperly adjusted or removed could
cause serious injury or death in the event of a colli -
sion.
1 — Release Button
2 — Adjustment Button
23_KL_OM_EN_USC_t.book Page 32
Page 61 of 276

GETTING TO KNOW YOUR VEHICLE59
There are pinch sensors attached to the side of the lift -
gate opening. Light pressure anywhere along these
strips will cause the liftgate to return to the open posi -
tion.
If the power liftgate encounters multiple obstructions
within the same cycle, the system will automatically
stop. If this occurs, the liftgate must be operated manu -
ally.
The power liftgate will release, but not power open, in
temperatures below −12°F (−24°C). Be sure to
remove any buildup of snow or ice from the liftgate
before opening the liftgate.
If the liftgate is left open for an extended period of time,
the liftgate may need to be closed manually to reset
power liftgate functionality.
Gas props support the liftgate in the open position.
However, because the gas pressure drops with
temperature, it may be necessary to assist the props when
opening the liftgate in cold weather.NOTE:Allow the power system to open the liftgate. Manually
pushing or pulling the liftgate may activate the liftgate
obstacle detection feature and stop the power operation
or reverse its direction.
CARGO AREA FEATURES
Cargo Load Floor
The cargo load floor system has a load capacity of 300 lb
(136 kg).
To provide additional storage area, each rear seat can be
folded flat. This allows for extended cargo space and still
maintains some rear seating room
Úpage 28.
Cargo Tie-Down Hooks And Loops
The tie-downs located on the cargo area floor should be
used to secure loads safely when the vehicle is moving.
Cargo tie-down loops are located on the trim panels.
WARNING!
Driving with the liftgate open can allow poisonous
exhaust gases into your vehicle. You and your
passengers could be injured by these fumes. Keep
the liftgate closed when you are operating the
vehicle.
If you are required to drive with the liftgate open,
make sure that all windows are closed, and the
climate control blower switch is set at high speed. Do
not use the recirculation mode.
WARNING!
During power operation, personal injury or cargo
damage may occur. Ensure the liftgate travel path is
clear. Make sure the liftgate is closed and latched
before driving away.
WARNING!
Cargo tie-downs are not safe anchors for a child seat
tether strap. In a sudden stop or accident, a tie-down
could pull loose and allow the child seat to come
loose. A child could be badly injured. Use only the
anchors provided for child seat tethers.
To help protect against personal injury, passengers
should not be seated in the rear cargo area. The rear
cargo space is intended for load carrying purposes
only, not for passengers, who should sit in seats and
use seat belts.
The weight and position of cargo and passengers can
change the vehicle center of gravity and vehicle
handling. To avoid loss of control resulting in personal
injury, follow these guidelines for loading your vehicle:
Do not carry loads that exceed the load limits
described on the label attached to the left door or left
door center pillar.
Always place cargo evenly on the cargo floor. Put
heavier objects as low and as far forward as possible.
Place as much cargo as possible in front of the rear
axle. Too much weight or improperly placed weight
over or behind the rear axle can cause the vehicle to
sway.
Do not pile luggage or cargo higher than the top of
the seatback. This could impair visibility or become a
dangerous projectile in a sudden stop or accident.
2
23_KL_OM_EN_USC_t.book Page 59
Page 164 of 276

162SAFETY
(Continued)
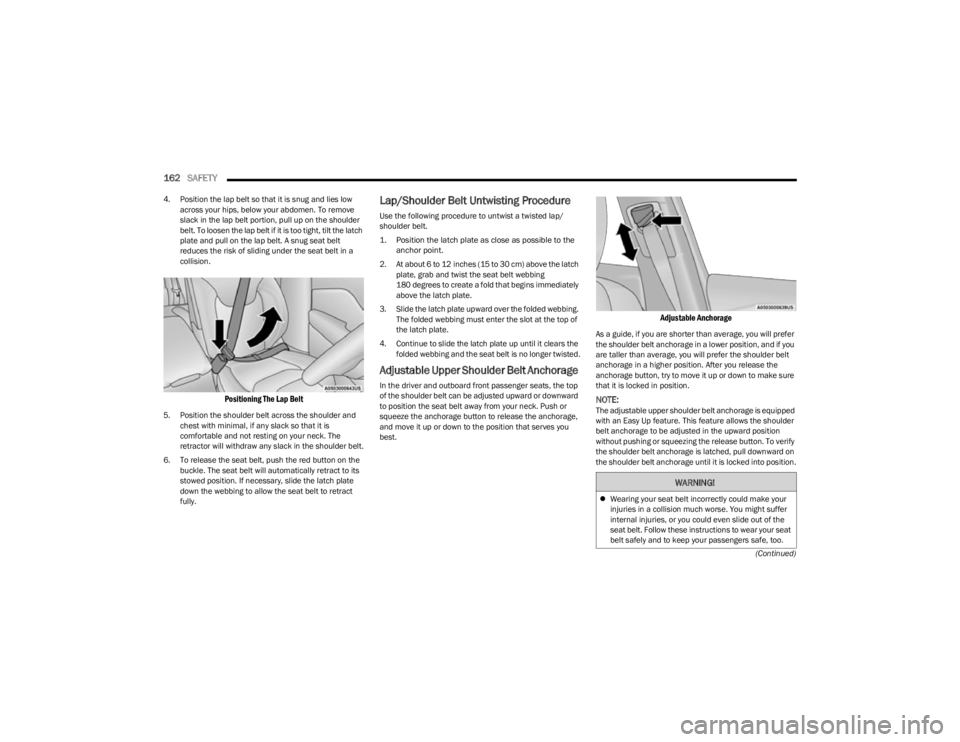
4. Position the lap belt so that it is snug and lies low
across your hips, below your abdomen. To remove
slack in the lap belt portion, pull up on the shoulder
belt. To loosen the lap belt if it is too tight, tilt the latch
plate and pull on the lap belt. A snug seat belt
reduces the risk of sliding under the seat belt in a
collision.
Positioning The Lap Belt
5. Position the shoulder belt across the shoulder and chest with minimal, if any slack so that it is
comfortable and not resting on your neck. The
retractor will withdraw any slack in the shoulder belt.
6. To release the seat belt, push the red button on the buckle. The seat belt will automatically retract to its
stowed position. If necessary, slide the latch plate
down the webbing to allow the seat belt to retract
fully.
Lap/Shoulder Belt Untwisting Procedure
Use the following procedure to untwist a twisted lap/
shoulder belt.
1. Position the latch plate as close as possible to the anchor point.
2. At about 6 to 12 inches (15 to 30 cm) above the latch plate, grab and twist the seat belt webbing
180 degrees to create a fold that begins immediately
above the latch plate.
3. Slide the latch plate upward over the folded webbing. The folded webbing must enter the slot at the top of
the latch plate.
4. Continue to slide the latch plate up until it clears the folded webbing and the seat belt is no longer twisted.
Adjustable Upper Shoulder Belt Anchorage
In the driver and outboard front passenger seats, the top
of the shoulder belt can be adjusted upward or downward
to position the seat belt away from your neck. Push or
squeeze the anchorage button to release the anchorage,
and move it up or down to the position that serves you
best.
Adjustable Anchorage
As a guide, if you are shorter than average, you will prefer
the shoulder belt anchorage in a lower position, and if you
are taller than average, you will prefer the shoulder belt
anchorage in a higher position. After you release the
anchorage button, try to move it up or down to make sure
that it is locked in position.
NOTE:The adjustable upper shoulder belt anchorage is equipped
with an Easy Up feature. This feature allows the shoulder
belt anchorage to be adjusted in the upward position
without pushing or squeezing the release button. To verify
the shoulder belt anchorage is latched, pull downward on
the shoulder belt anchorage until it is locked into position.
WARNING!
Wearing your seat belt incorrectly could make your
injuries in a collision much worse. You might suffer
internal injuries, or you could even slide out of the
seat belt. Follow these instructions to wear your seat
belt safely and to keep your passengers safe, too.
23_KL_OM_EN_USC_t.book Page 162
Page 165 of 276

SAFETY163
Second Row Center Seat Belt Operating
Instructions — Fixed Rear Seat
(If Equipped)
The second row center seat belt may feature a seat belt
with a mini-latch plate and buckle, which allows the seat
belt to detach from the lower anchor when the seat is
folded. The mini-latch plate and regular latch plate can
then be stored out of the way in the left side trim panel for
added convenience to open up utilization of the storage
areas behind the front seats when the seat is not
occupied.
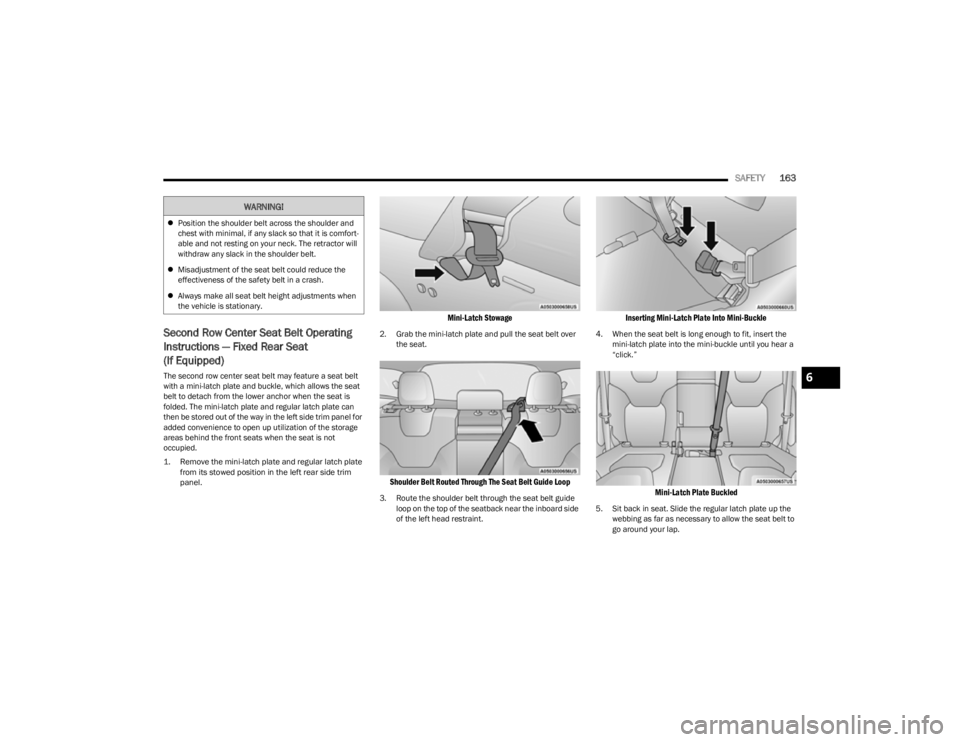
1. Remove the mini-latch plate and regular latch plate
from its stowed position in the left rear side trim
panel.
Mini-Latch Stowage
2. Grab the mini-latch plate and pull the seat belt over the seat.
Shoulder Belt Routed Through The Seat Belt Guide Loop
3. Route the shoulder belt through the seat belt guide loop on the top of the seatback near the inboard side
of the left head restraint.
Inserting Mini-Latch Plate Into Mini-Buckle
4. When the seat belt is long enough to fit, insert the mini-latch plate into the mini-buckle until you hear a
“click.”
Mini-Latch Plate Buckled
5. Sit back in seat. Slide the regular latch plate up the webbing as far as necessary to allow the seat belt to
go around your lap.
Position the shoulder belt across the shoulder and
chest with minimal, if any slack so that it is comfort -
able and not resting on your neck. The retractor will
withdraw any slack in the shoulder belt.
Misadjustment of the seat belt could reduce the
effectiveness of the safety belt in a crash.
Always make all seat belt height adjustments when
the vehicle is stationary.
WARNING!
6
23_KL_OM_EN_USC_t.book Page 163
Page 168 of 276

166SAFETY
webbing necessary to comfortably wrap around the
occupant’s mid-section. Slide the latch plate into the
buckle until you hear a "click."
In Automatic Locking Mode, the shoulder belt is
automatically pre-locked. The seat belt will still retract to
remove any slack in the shoulder belt. Use the Automatic
Locking Mode anytime a child restraint is installed in a
seating position that has a seat belt with this feature.
Children 12 years old and under should always be properly
restrained in the rear seat of a vehicle with a rear seat.
How To Engage The Automatic Locking Mode
1. Buckle the combination lap and shoulder belt.
2. Grab the shoulder portion and pull downward until
the entire seat belt is extracted.
3. Allow the seat belt to retract. As the seat belt retracts, you will hear a clicking sound. This indicates the seat
belt is now in the Automatic Locking Mode. How To Disengage The Automatic Locking Mode
Unbuckle the combination lap/shoulder belt and allow it
to retract completely to disengage the Automatic Locking
Mode and activate the vehicle sensitive (emergency)
locking mode.
SUPPLEMENTAL RESTRAINT SYSTEMS
(SRS)
Some of the safety features described in this section may
be standard equipment on some models, or may be
optional equipment on others. If you are not sure, ask an
authorized dealer. The air bag system must be ready to protect you in a
collision. The Occupant Restraint Controller (ORC)
monitors the internal circuits and interconnecting wiring
associated with the electrical Air Bag System
Components. Your vehicle may be equipped with the
following Air Bag System Components:
Air Bag System Components
Occupant Restraint Controller (ORC)
Air Bag Warning Light
Steering Wheel and Column
Instrument Panel
Knee Impact Bolsters
Driver and Front Passenger Air Bags
Seat Belt Buckle Switch
Supplemental Side Air Bags
Supplemental Knee Air Bags
Front and Side Impact Sensors
Seat Belt Pretensioners
Seat Track Position Sensors
Occupant Classification System
Air Bag Warning Light
The Occupant Restraint Controller (ORC)
monitors the readiness of the electronic parts
of the air bag system whenever the ignition
switch is in the START or ON/RUN position. If
the ignition switch is in the OFF position or in the ACC
position, the air bag system is not on and the air bags will
not inflate.
WARNING!
Never place a rear-facing child restraint in front of an
air bag. A deploying passenger front air bag can
cause death or serious injury to a child 12 years or
younger, including a child in a rear-facing child
restraint.
Never install a rear-facing child restraint in the front
seat of a vehicle. Only use a rear-facing child
restraint in the rear seat. If the vehicle does not have
a rear seat, do not transport a rear-facing child
restraint in that vehicle.
WARNING!
The seat belt assembly must be replaced if the
switchable Automatic Locking Retractor (ALR)
feature or any other seat belt function is not working
properly when checked according to the procedures
in the Service Manual.
Failure to replace the seat belt assembly could
increase the risk of injury in collisions.
Do not use the Automatic Locking Mode to restrain
occupants who are wearing the seat belt or children
who are using booster seats. The locked mode is only
used to install rear-facing or forward-facing child
restraints that have a harness for restraining the
child.
23_KL_OM_EN_USC_t.book Page 166
Page 180 of 276

178SAFETY
Children Too Large For Booster Seats
Children who are large enough to wear the shoulder belt
comfortably, and whose legs are long enough to bend over
the front of the seat when their back is against the
seatback, should use the seat belt in a rear seat. Use this
simple 5-step test to decide whether the child can use the
vehicle’s seat belt alone:
1. Can the child sit all the way back against the back of
the vehicle seat?
2. Do the child’s knees bend comfortably over the front of the vehicle seat while the child is still sitting all the
way back?
3. Does the shoulder belt cross the child’s shoulder between the neck and arm?
4. Is the lap part of the belt as low as possible, touching the child’s thighs and not the stomach?
5. Can the child stay seated like this for the whole trip? If the answer to any of these questions was “no”, then the
child still needs to use a booster seat in this vehicle. If the
child is using the lap/shoulder belt, check seat belt fit
periodically and make sure the seat belt buckle is latched.
A child’s squirming or slouching can move the belt out of
position. If the shoulder belt contacts the face or neck,
move the child closer to the center of the vehicle, or use a
booster seat to position the seat belt on the child correctly.
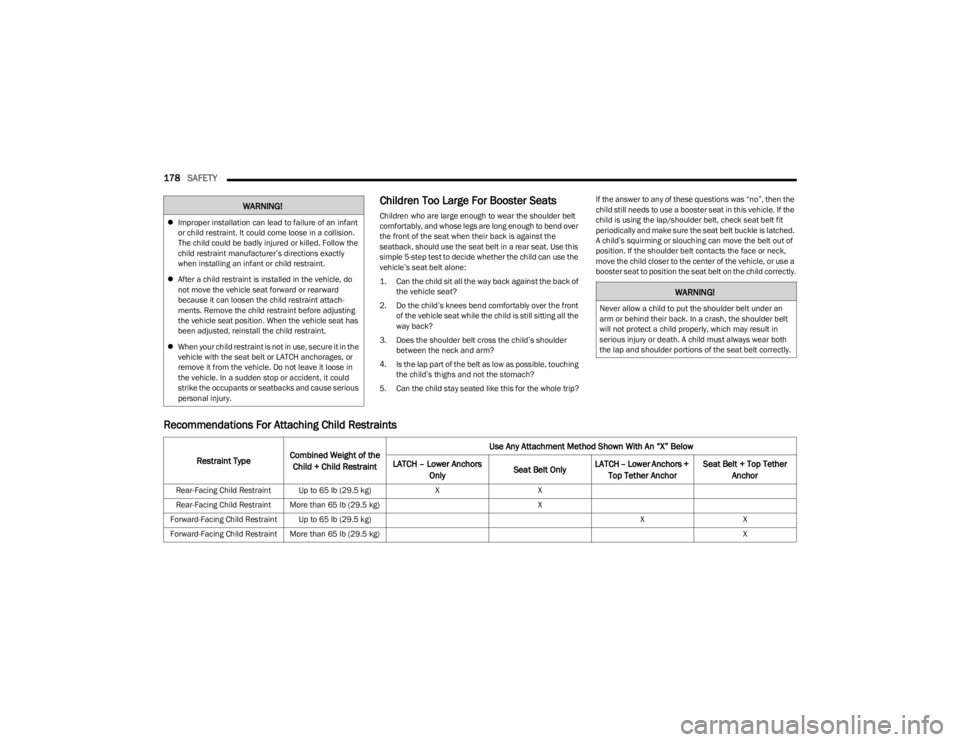
Recommendations For Attaching Child Restraints
WARNING!
Improper installation can lead to failure of an infant
or child restraint. It could come loose in a collision.
The child could be badly injured or killed. Follow the
child restraint manufacturer’s directions exactly
when installing an infant or child restraint.
After a child restraint is installed in the vehicle, do
not move the vehicle seat forward or rearward
because it can loosen the child restraint attach-
ments. Remove the child restraint before adjusting
the vehicle seat position. When the vehicle seat has
been adjusted, reinstall the child restraint.
When your child restraint is not in use, secure it in the
vehicle with the seat belt or LATCH anchorages, or
remove it from the vehicle. Do not leave it loose in
the vehicle. In a sudden stop or accident, it could
strike the occupants or seatbacks and cause serious
personal injury.
WARNING!
Never allow a child to put the shoulder belt under an
arm or behind their back. In a crash, the shoulder belt
will not protect a child properly, which may result in
serious injury or death. A child must always wear both
the lap and shoulder portions of the seat belt correctly.
Restraint Type Combined Weight of the
Child + Child Restraint Use Any Attachment Method Shown With An “X” Below
LATCH – Lower Anchors Only Seat Belt OnlyLATCH – Lower Anchors +
Top Tether Anchor Seat Belt + Top Tether
Anchor
Rear-Facing Child Restraint Up to 65 lb (29.5 kg) XX
Rear-Facing Child Restraint More than 65 lb (29.5 kg) X
Forward-Facing Child Restraint Up to 65 lb (29.5 kg) XX
Forward-Facing Child Restraint More than 65 lb (29.5 kg) X
23_KL_OM_EN_USC_t.book Page 178
Page 182 of 276

180SAFETY
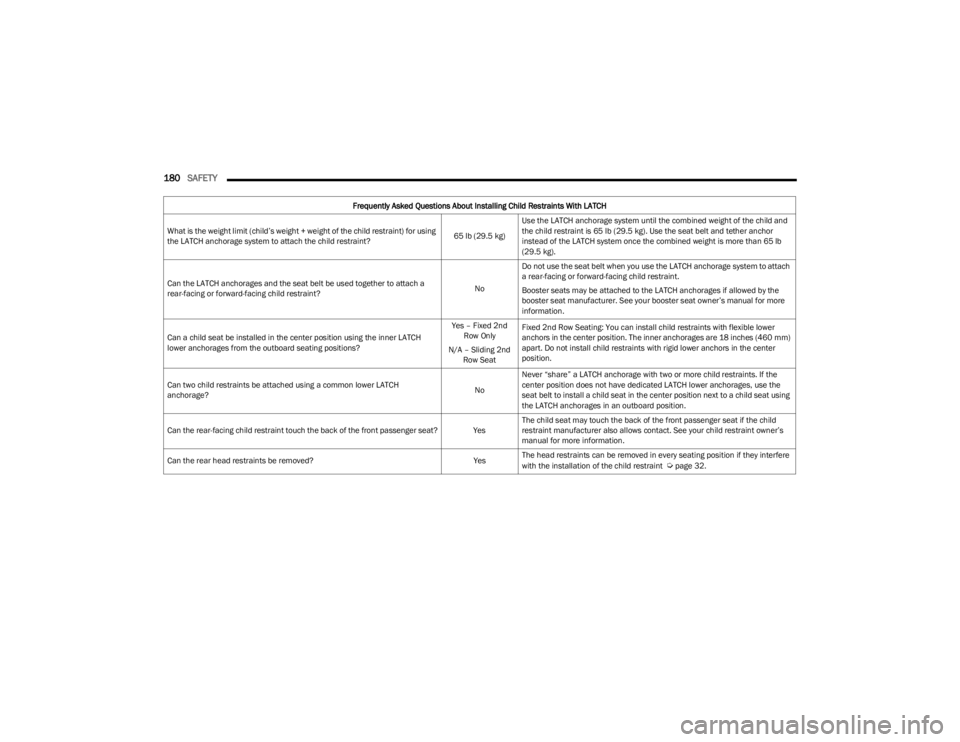
Frequently Asked Questions About Installing Child Restraints With LATCH
What is the weight limit (child’s weight + weight of the child restraint) for using
the LATCH anchorage system to attach the child restraint? 65 lb (29.5 kg)Use the LATCH anchorage system until the combined weight of the child and
the child restraint is 65 lb (29.5 kg). Use the seat belt and tether anchor
instead of the LATCH system once the combined weight is more than 65 lb
(29.5 kg).
Can the LATCH anchorages and the seat belt be used together to attach a
rear-facing or forward-facing child restraint? NoDo not use the seat belt when you use the LATCH anchorage system to attach
a rear-facing or forward-facing child restraint.
Booster seats may be attached to the LATCH anchorages if allowed by the
booster seat manufacturer. See your booster seat owner’s manual for more
information.
Can a child seat be installed in the center position using the inner LATCH
lower anchorages from the outboard seating positions? Yes – Fixed 2nd
Row Only
N/A – Sliding 2nd Row Seat Fixed 2nd Row Seating: You can install child restraints with flexible lower
anchors in the center position. The inner anchorages are 18 inches (460 mm)
apart. Do not install child restraints with rigid lower anchors in the center
position.
Can two child restraints be attached using a common lower LATCH
anchorage? NoNever “share” a LATCH anchorage with two or more child restraints. If the
center position does not have dedicated LATCH lower anchorages, use the
seat belt to install a child seat in the center position next to a child seat using
the LATCH anchorages in an outboard position.
Can the rear-facing child restraint touch the back of the front passenger seat? Yes The child seat may touch the back of the front passenger seat if the child
restraint manufacturer also allows contact. See your child restraint owner’s
manual for more information.
Can the rear head restraints be removed? YesThe head restraints can be removed in every seating position if they interfere
with the installation of the child restraint
Úpage 32.
23_KL_OM_EN_USC_t.book Page 180