2023 HYUNDAI TUCSON fuel pressure
[x] Cancel search: fuel pressurePage 99 of 638

Instrument cluster
Instrument cluster ........................................................................\
....................4-4Instrument cluster control ........................................................................\
...................4-5
Instrument panel illumination ........................................................................\
...........4-5
Gauges and meters ........................................................................\
..............................4-5
Speedometer ........................................................................\
.....................................4-5
Tachometer ........................................................................\
........................................4-5
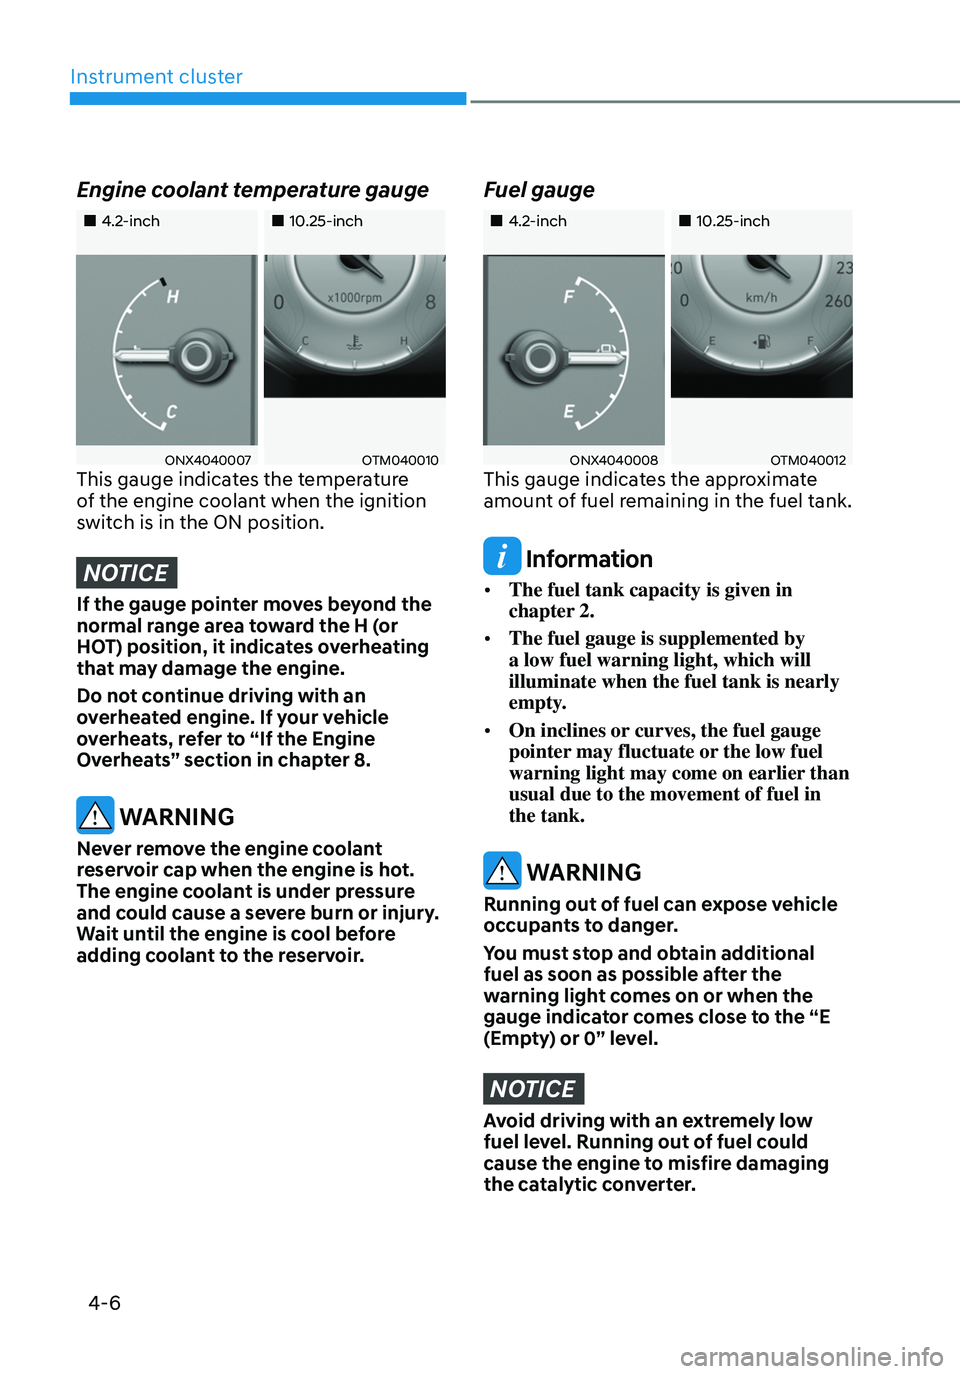
Engine coolant temperature gauge ........................................................................\
.4-6
Fuel gauge ........................................................................\
.........................................4-6
Outside temperature gauge ........................................................................\
..............4 -7
Odometer ........................................................................\
...........................................4 -7
Distance to empty ........................................................................\
............................4-8
Fuel economy (for 10.25-inch cluster) ....................................................................4-8
Transmission shift indicator ........................................................................\
................4-9
Automatic transmission ........................................................................\
...................4-9
Warning and indicator lights ........................................................................\
..............4-9
Seat belt warning light ........................................................................\
.....................4-9
Air bag warning light ........................................................................\
........................4-9
Parking brake & Brake fluid warning light ..............................................................4-10
Anti-lock Brake System (ABS) warning light ...........................................................4-11
Electronic Brake Force Distribution (EBD) system warning light ..........................4-11
Electric Power Steering (EPS) warning light ..........................................................4-12
Charging system warning light ........................................................................\
.......4-12
Engine oil pressure warning light ........................................................................\
...4-12
Low fuel level warning light ........................................................................\
............4-13
Malfunction Indicator Lamp (MIL) ........................................................................\
..4-13
Exhaust system (GPF) warning light .......................................................................4-14
Electronic Parking Brake (EPB) warning light ........................................................4-15
AUTO HOLD indicator light ........................................................................\
.............4-15
Low tire pressure warning light ........................................................................\
......4-15
Forward Safety warning light ........................................................................\
..........4-16
Lane Safety indicator light ........................................................................\
..............4-16
4 Wheel Drive (AWD) warning light ........................................................................\
4-16
4 Wheel Drive (AWD) LOCK Indicator Light ............................................................4-17
LED headlight warning light ........................................................................\
.............4-17
Icy road warning light ........................................................................\
......................4-18
Electronic Stability Control (ESC) indicator light ...................................................4-18
Electronic Stability Control (ESC) OFF indicator light ...........................................4-18
Immobilizer Indicator Light (without smart key) ...................................................4-19
Immobilizer Indicator Light (with smart key) ........................................................4-19
Downhill Brake Control (DBC) indicator light ........................................................4-20
4. Instrument cluster
4
Page 100 of 638

AUTO STOP indicator light ........................................................................\
..............4-20
Turn signal indicator light ........................................................................\
.................4-21
High beam indicator light ........................................................................\
................4-21
High Beam Assist indicator light ........................................................................\
......4-21
Cruise Indicator Light ........................................................................\
.......................4-21
SPORT Mode Indicator Light ........................................................................\
...........4-22
SMART Mode Indicator Light ........................................................................\
..........4-22
Master warning light ........................................................................\
........................4-22
LCD display messages for vehicles equipped with Smart Key ...............................4-23
Shift to P ........................................................................\
...........................................4-23
Low key battery ........................................................................\
................................4-23
Press START button while turning wheel ...............................................................4-23
Check steering wheel lock system ........................................................................\
.4-23
Press brake pedal to start engine ........................................................................\
..4-23
Key not in vehicle ........................................................................\
.............................4-23
Key not detected ........................................................................\
..............................4-23
Press START button again ........................................................................\
..............4-23
Press START button with key ........................................................................\
..........4-24
Check BRAKE SWITCH fuse ........................................................................\
...........4-24
Shift to P or N to start engine ........................................................................\
.........4-24
Battery discharging due to external electrical devices .........................................4-24
Door, Hood, Liftgate open indicator
.......................................................................4-25
Sunroof open indicator ........................................................................\
....................4-25
Low tire pressure ........................................................................\
.............................4-25
Lights ........................................................................\
................................................4-26
Wiper ........................................................................\
................................................4-26
Low washer fluid ........................................................................\
..............................4-26
Low fuel ........................................................................\
............................................4-26
Low engine oil ........................................................................\
..................................4-26
Engine overheated / Engine has overheated .........................................................4-27
Check exhaust system ........................................................................\
.....................4-27
Check headlight ........................................................................\
...............................4-27
Check turn signal ........................................................................\
.............................4-27
Check headlamp LED ........................................................................\
......................4-27
Check Forward Collision-Avoidance Assist system ...............................................4-28
Check Lane Keeping Assist system ........................................................................\
4-28
Check Blind-Spot Collision Warning system ..........................................................4-28
Check Driver Attention Warning system
................................................................4-28
Check High Beam Assist system ........................................................................\
.....4-28
Check Smart Cruise Control system .......................................................................4-28
4
Page 104 of 638
Instrument cluster
4-6
Engine coolant temperature gauge
„„4.2-inch„„10.25-inch
ONX4040007OTM040010This gauge indicates the temperature
of the engine coolant when the ignition
switch is in the ON position.
NOTICE
If the gauge pointer moves beyond the
normal range area toward the H (or
HOT) position, it indicates overheating
that may damage the engine.
Do not continue driving with an
overheated engine. If your vehicle
overheats, refer to “If the Engine
Overheats” section in chapter 8.
WARNING
Never remove the engine coolant
reservoir cap when the engine is hot.
The engine coolant is under pressure
and could cause a severe burn or injury.
Wait until the engine is cool before
adding coolant to the reservoir.
Fuel gauge
„„4.2-inch„„10.25-inch
ONX4040008 OTM040012This gauge indicates the approximate
amount of fuel remaining in the fuel tank.
Information
• The fuel tank capacity is given in
chapter 2.
• The fuel gauge is supplemented by
a low fuel warning light, which will
illuminate when the fuel tank is nearly
empty.
• On inclines or curves, the fuel gauge
pointer may fluctuate or the low fuel
warning light may come on earlier than
usual due to the movement of fuel in
the tank.
WARNING
Running out of fuel can expose vehicle
occupants to danger.
You must stop and obtain additional
fuel as soon as possible after the
warning light comes on or when the
gauge indicator comes close to the “E
(Empty) or 0” level.
NOTICE
Avoid driving with an extremely low
fuel level. Running out of fuel could
cause the engine to misfire damaging
the catalytic converter.
Page 111 of 638
04
4-13
NOTICE
• If the engine does not stop
immediately after the Engine Oil
Pressure warning light is illuminated,
severe damage could result.
• If the warning light stays on while the
engine is running, it indicates that
there may be serious engine damage
or malfunction. In this case:
1. Stop the vehicle as soon as it is
safe to do so.
2. Turn off the engine and check the
oil level. If the oil level is low, fill
the engine oil to the proper level.
3. Start the engine again. If the
warning light stays on after the
engine is started, turn the engine
off immediately. If this occurs,
we recommend that you have
the vehicle inspected by an
authorized HYUNDAI dealer.
Low fuel level warning light
This warning light illuminates:
When the fuel tank is nearly empty.
Add fuel as soon as possible.
NOTICE
Driving with the Low Fuel Level
warning light on or with the fuel level
below "E" or "- - -" on the Distance to
Empty indicator can cause the engine
to misfire and damage the catalytic
converter.
Malfunction Indicator Lamp
(MIL)
This indicator light illuminates:
• When you set the ignition switch or
the Engine Start/Stop button to the
ON position.
-The malfunction indicator light
illuminates for about 3 seconds and
then goes off.
• Whenever there is a malfunction with
either the emission control system or
the engine or the vehicle powertrain.
If the MIL warning light remains
illuminated while driving, have the
vehicle inspected by an authorized
HYUNDAI dealer.
• If enhanced engine protection system
becomes activated due to lack of
engine oil, engine power will be
limited. If such condition continues
repeatedly, The Malfunction Indicator
Lamp will illuminate.
Page 137 of 638

04
4-39
ItemsExplanation
Wireless
Charging SystemTo activate or deactivate the wireless charging system in the front seat.
For more details, refer to "Wireless cellular phone charging system" in
chapter 5.
Auto Rear
Wiper (in R)To activate or deactivate the Auto Rear Wiper function.
If you move the shift button from D to R when the front wiper operates, the
rear wiper will operate automatically. Then, if you move the shift button
from R to D, the rear wiper will stop."
Service
Interval
• Service Interval
To activate or deactivate the service interval function.
• Adjust Interval
If the service interval menu is activated, you may adjust the time and
distance.
• Reset
To reset the service interval.
6. Units
Items Explanation
Speed UnitTo select the speed unit. (km/h, MPH)
Temperature
UnitTo select the temperature unit. (°C,°F)
Fuel
Economy Unit To select the fuel economy unit. (km/L, L/100km, MPG)
Tire Pressure Unit To select the tire pressure unit. (psi, kPa, bar)
Page 165 of 638
05
5-21
Remote Start with Digital Key
• Using the Hyundai Digital Key app
on your phone, press the Door Lock
button and then press the Remote
Start button (buttons must be pressed
within about 4 seconds). If all the
doors of your vehicle are closed
(including the hood and the liftgate),
the engine will be automatically
started.
Note that when the remote start
feature is activated, the hazard
warning lights will blink two times
and a chime will sound before engine
startup. Also note the following:
• The climate control system will come
on using the same settings from when
you last used the vehicle
• To turn off the engine, press the
Remote Engine Stop button within the
Hyundai Digital Key app.
• The engine will remain running for
approximately 10 minutes, and then
engine will automatically shut OFF.
• To keep the engine running, access
the vehicle and place the smartphone
on the wireless charging pad
(authentication pad) while the engine
is still in remote engine-ON mode.
For more information, refer to the Engine
Start/Stop button in chapter 6. Vehicle information Display
The digital key application displays
the vehicle information such as
driving or door conditions through the
communication with the vehicle.
•
How to check : Select the vehicle
what you want to check and touch
the vehicle image, then vehicle
information display page will be
shown.
• Contents : accumulated odometer,
latest fuel economy, driving range,
fuel remaining, tire pressure, doors
lock/unlock status and last data
updated time.
ÃNote that displayed vehicle data may
be slightly different from the current
vehicle condition
ÃFor more information, please refer to
the ‘Tutorial’ on your Digital key app.
Page 220 of 638
Convenient features
5 -76
Fuel filler door
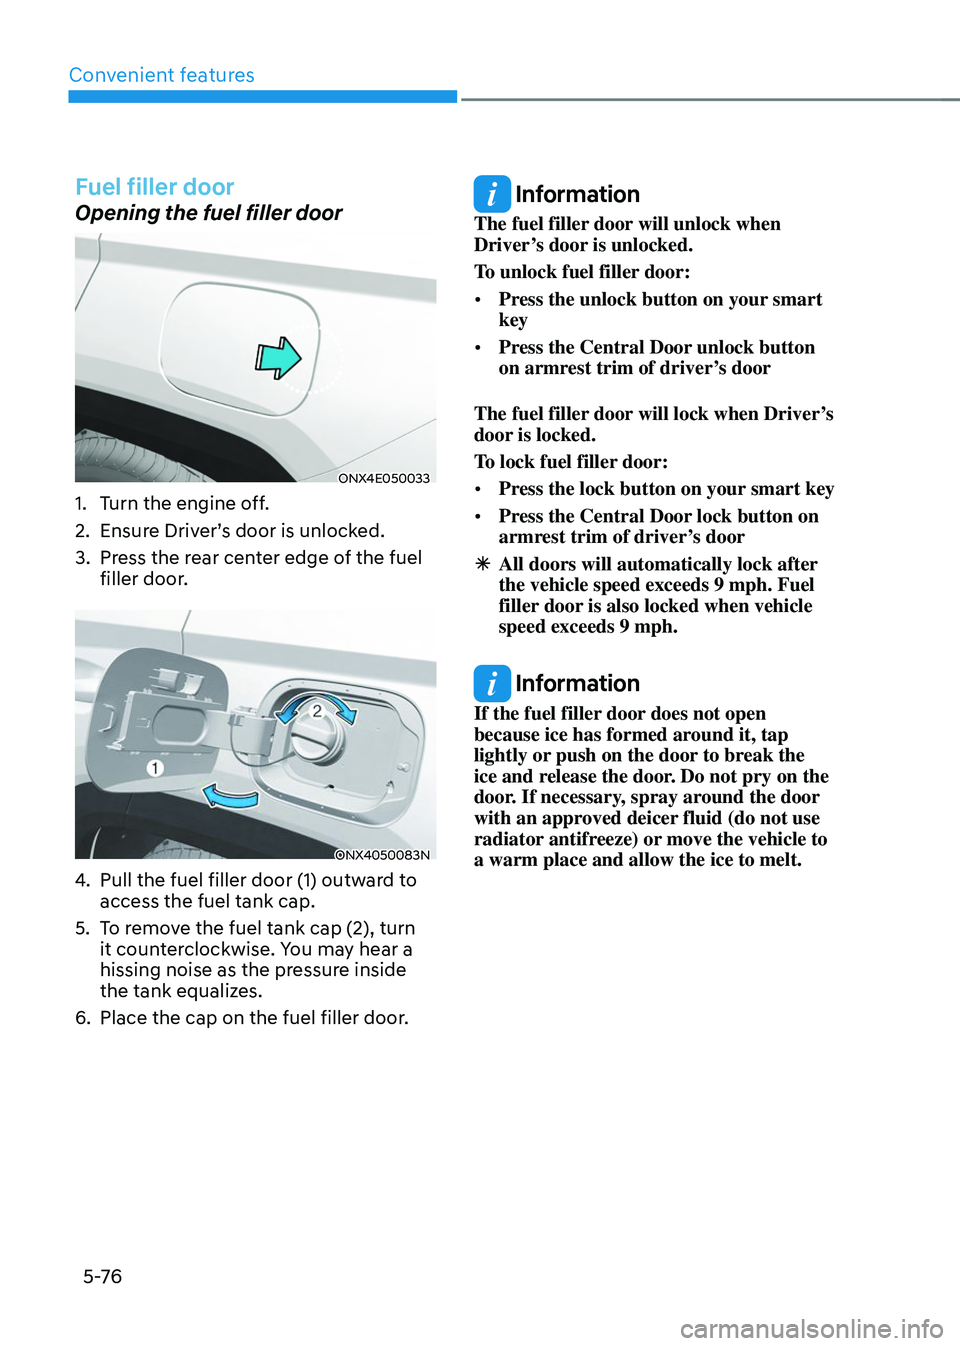
Opening the fuel filler door
ONX4E050033
1. Turn the engine off.
2. Ensure Driver’s door is unlocked.
3. Press the rear center edge of the fuel
filler door.
ONX4050083N
4. Pull the fuel filler door (1) outward to
access the fuel tank cap.
5. To remove the fuel tank cap (2), turn
it counterclockwise. You may hear a
hissing noise as the pressure inside
the tank equalizes.
6. Place the cap on the fuel filler door.
Information
The fuel filler door will unlock when
Driver’s door is unlocked.
To unlock fuel filler door:
• Press the unlock button on your smart
key
• Press the Central Door unlock button
on armrest trim of driver’s door
The fuel filler door will lock when Driver’s
door is locked.
To lock fuel filler door:
• Press the lock button on your smart key
• Press the Central Door lock button on
armrest trim of driver’s door
ÃAll doors will automatically lock after
the vehicle speed exceeds 9 mph. Fuel
filler door is also locked when vehicle
speed exceeds 9 mph.
Information
If the fuel filler door does not open
because ice has formed around it, tap
lightly or push on the door to break the
ice and release the door. Do not pry on the
door. If necessary, spray around the door
with an approved deicer fluid (do not use
radiator antifreeze) or move the vehicle to
a warm place and allow the ice to melt.
Page 221 of 638
05
5-77
Closing the fuel filler door
1. To install the fuel tank cap, turn it
clockwise until it “clicks” one time.
2. Close the fuel filler door until it is
latched securely.
Information
To lock the fuel filler door, make sure the
fuel filler door is completely closed. Press
the LOCK button on the remote key or
smart key to lock your vehicle. The fuel
filler door will also lock.
Note that if the fuel filler door is not
completely closed when the vehicle is
locked, the fuel filler door will not be
locked.
CAUTION
Make sure the fuel filler door is
completely closed before driving
through a car wash or operating a high
pressure spray washer.
WARNING
Automotive fuel is highly flammable
and explosive. Failure to follow these
guidelines may result in SERIOUS
INJURY or DEATH:
• Read and follow all warnings posted
at the gas station.
• Before refueling, note the location
of the Emergency Fuel Shut-Off, if
available, at the gas station.
• Before touching the fuel nozzle, you
should eliminate the potential build-
up of static electricity by touching
a metal part of the vehicle, a safe
distance away from the fuel filler
neck, nozzle, or other gas source,
with your bare hand.
• Do not use mobile phones while
refueling. Electric current and/or
electronic interference from cellular
phones can potentially ignite fuel
vapors and cause a fire. •
Do not get back into a vehicle
once you have begun refueling.
You can generate a buildup of
static electricity by touching,
rubbing or sliding against any item
or fabric capable of producing
static electricity. Static electricity
discharge can ignite fuel vapors
causing a fire. If you must re-enter
the vehicle, you should once again
eliminate potentially dangerous
static electricity discharge by
touching a metal part of the vehicle,
away from the fuel filler neck, nozzle
or other fuel source, with your bare
hand.
• When using an approved portable
fuel container, be sure to place the
container on the ground prior to
refueling. Static electricity discharge
from the container can ignite fuel
vapors causing a fire.
Once refueling has begun, contact
between your bare hand and the
vehicle should be maintained until
the filling is complete.
• Use only approved portable plastic
fuel containers designed to carry and
store fuel.
• When refueling, always shift the
gear to the P (Park) position, set
the parking brake, and press the
Engine Start/Stop button to the
OFF position. Sparks produced by
electrical components related to the
engine can ignite fuel vapors causing
a fire.
• Do not use matches or a lighter and
do not smoke or leave a lit cigarette
in your vehicle while at a gas station,
especially during refueling.