2023 HYUNDAI TUCSON ESP
[x] Cancel search: ESPPage 166 of 638
Convenient features
5-22
Smartphone change/App deletion
If you change your smartphone or delete
the Hyundai Digital Key App, please refer
to the following to set up your Digital
Key:
Smartphone Change/ Reset
If you change or reset the smartphone,
the registered digital key in your previous
smartphone may not be used. Please
refer to following procedure to use the
digital key.
1. Install the digital key application and
log in.
2. If you are the owner, retry the Digital
key save process.
3. If you are the sharer, need to re-share
the key from owner.
App delete & reinstall/ Delete App data
You can re-download the digital key
from server in these cases as follow
procedure.
1. Reinstall the application and log in.
2. Input the PIN number for user
verification.
3. If PIN is correct, digital key data
will be re-downloaded to your
smartphone and you can use it
without any further registration or
sharing.
Smartphone operability with Digital Key
The digital key application may not
be available to old type smartphones.
Please check the available smartphone
models with your dealer. NFC antenna
position on the smartphone can be
confirmed on each smartphone’s manual
or contact to customer service center of
the smartphone manufacture.
CAUTION
• Do not leave the registered digital
key (smartphone) and card key in
your vehicle. Please carry around
your keys all the times.
• If you happen to lose your digital
key (smartphone) or card key
registered as a main user’s key, you
should immediately delete the key
on the vehicle’s key menu. For more
information, refer to the Digital Key
Deletion in this chapter.
• If you registered your digital key
(smartphone) or card key in the
vehicle, a message appears on the
instrument cluster and let you know
the key is registered.
(Message: Digital key(s) active.)
• If you buy a used vehicle, you should
confirm the message and delete the
registered smartphone key and card
key. In this case, you should carry
your smart key.
• If you keep place the NFC card
of the digital key on the interior
authentication pad (wireless
charger) while driving, it may cause a
malfunction of the NFC card.
• You should remove your NFC card
of the digital key on the interior
authentication pad after turning on
the engine.
• Hyundai digital key app may not
work properly when the NFC or
Bluetooth communication between
smartphone and car is not good.
• If the remote control operation
is executed where the mobile
connection is weak, Bluetooth
connection is poor due to lots of
Bluetooth devices or there is an
object such as metal or concrete, it
might be delayed or the operable
distance might decrease. Especially,
you should not cover the smartphone
with your hand or place other
devices which can cause frequency
interference. It may result in poor
performance.
Page 182 of 638
Convenient features
5-38
Recalling memory positions
1. Make sure that the vehicle is in the ON
position and the gear selector is in P
(Park).
2. Press the desired button (1 or 2). The
system will beep once and the driver’s
seat position and side view mirror
position will be automatically adjusted
to the stored positions.
3. ‘Driver 1 (or 2) settings applied’ will
appear on the cluster LCD display.
Information
• Note that while the memory settings
are being recalled, if you press the
SET button or the corresponding IMS
memory button (1 or 2) for which the
settings are being recalled, the IMS will
temporarily deactivate. If you select
the alternate IMS memory button (1 or
2), the IMS will activate according to
the settings of the alternate button.
For example, if you press the SET
button or the number 1 button with the
number 1 setting in operation, the IMS
will temporarily deactivate.
If you press the number 2 button, then
the IMS memory settings according to
number 2 will activate.
• If you adjust the driver seat settings
while the IMS is recalling the stored
positions, the memory settings will not
be applied.
Resetting the system
Follow the below procedures to reset the
Integrated Memory System (IMS) if it is
not operating properly:
Resetting the Integrated Memory
System (IMS)
1. Make sure that the vehicle is in Park
(P) and the engine is ON. Open the
driver’s door.
2. Adjust the driver’s seat and seatback
angle to the most forward positions.
3. Press the SET button and push
forward the driver’s seat movement
switch over 2 seconds simultaneously.
While resetting integrated memory
system
1. Resetting starts with a notification
sound.
2. The driver’s seat and seatback is
adjusted to the rearward position with
the notification sound.
3. The driver’s seat and seatback is
re-adjusted to the default position
(central position) with the notification
sound.
However, in the following cases, the
resetting procedure and the notification
sound may stop.
• The memory button is pressed.
• The seat control switch is operated.
• The gear is shifted out of P (Park).
• The driving speed exceeds
2 mph (3km/h).
• The driver’s door is closed.
Page 195 of 638
05
5-51
FCC (USA) and ISED (Canada)
This device complies with FCC rules
part 15 and Innovation, Science, and
Economic Development Canada RSS-
210. Operation is subject to the following
two conditions: (1) This device may not
cause harmful interference, and (2) This
device must accept any interference that
may be received including interference
that may cause undesired operation.
WARNING: The transmitter has been
tested and complies with FCC and
ISED rules. Changes or modifications
not expressly approved by the party
responsible for compliance could void
the user’s authority to operate the
device.
This equipment complies with FCC
and ISED radiation exposure limits set
forth for an uncontrolled environment.
End Users must follow the specific
operating instructions for satisfying RF
exposure compliance. This transmitter
must be at least 20cm from the user and
must not be co-located or operating in
conjunction with any other antenna or
transmitter.
FCC (Htats-Unis) et ISED (Canada)
Cet appareil est conforme aux
règlements de la FCC, section 15, et
au CNR-210 d’Innovation, Sciences et
Dhveloppement économique Canada. Le
fonctionnement est assujetti aux deux
conditions suivantes : (1) cet appareil ne doit pas causer d’interférences nuisibles
et (2) cet appareil doit accepter toute
interférence reçue, y compris celle qui
pourrait entraîner un dysfonctionnement.
MISE EN GARDE : L’émetteur a subi des
tests et est conforme aux règlements de
la FCC et d’ISDE. Les changements ou
modifications non approuvés explicitement
par la partie responsable de la conformité
pourraient rendre caduque l’autorisation de
l’utilisateur de se servir du dispositif.
Cet appareil est conforme aux limites
d’exposition aux radiations de la FCC et
d’ISDE établies pour un environnement
non contrôlé. Les utilisateurs finaux doivent
respecter les instructions d’utilisation
spécifiques pour satisfaire aux exigences
de conformité aux expositions de RF.
L’émetteur doit se trouver à 20 cm au
minimum de l’utilisateur et ne doit pas
être situé au même endroit que tout autre
émetteur ou antenne ni fonctionner avec
un autre émetteur ou antenne.
Méjico
La operación de este equipo está sujeta
a las siguientes dos condiciones: (1) es
posible que este equipo o dispositivo
pueda no causar interferencia dañina, y
(2) este dispositivo o dispositivos deben
aceptar cualquier interferencia, que
incluye la interferencia que puede causar
su operación no deseada.
Page 212 of 638
Convenient features
5-68
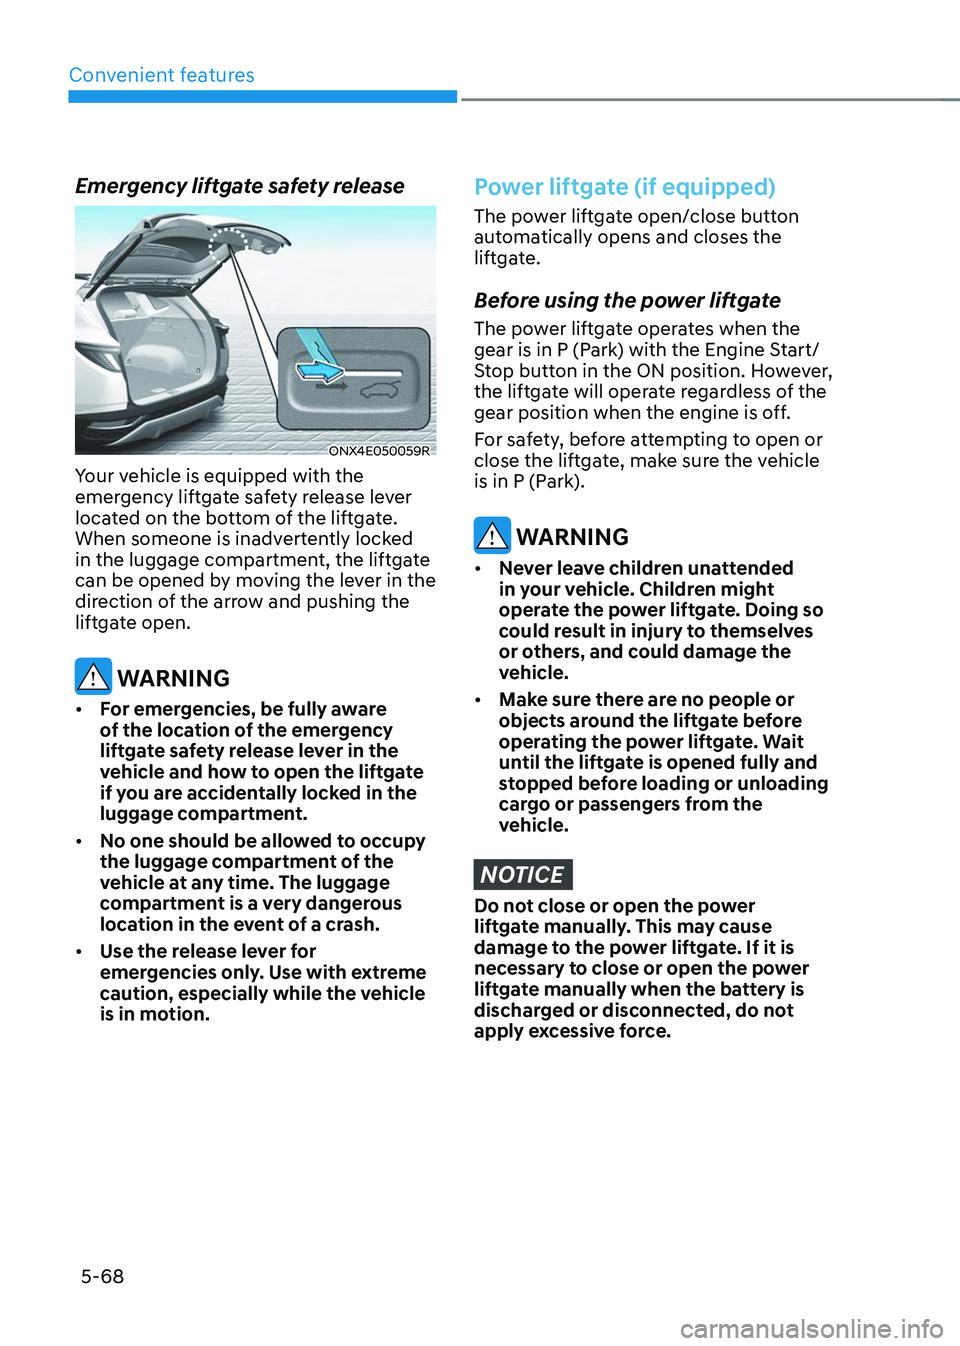
Emergency liftgate safety release
ONX4E050059R
Your vehicle is equipped with the
emergency liftgate safety release lever
located on the bottom of the liftgate.
When someone is inadvertently locked
in the luggage compartment, the liftgate
can be opened by moving the lever in the
direction of the arrow and pushing the
liftgate open.
WARNING
• For emergencies, be fully aware
of the location of the emergency
liftgate safety release lever in the
vehicle and how to open the liftgate
if you are accidentally locked in the
luggage compartment.
• No one should be allowed to occupy
the luggage compartment of the
vehicle at any time. The luggage
compartment is a very dangerous
location in the event of a crash.
• Use the release lever for
emergencies only. Use with extreme
caution, especially while the vehicle
is in motion.
Power liftgate (if equipped)
The power liftgate open/close button
automatically opens and closes the
liftgate.
Before using the power liftgate
The power liftgate operates when the
gear is in P (Park) with the Engine Start/
Stop button in the ON position. However,
the liftgate will operate regardless of the
gear position when the engine is off.
For safety, before attempting to open or
close the liftgate, make sure the vehicle
is in P (Park).
WARNING
• Never leave children unattended
in your vehicle. Children might
operate the power liftgate. Doing so
could result in injury to themselves
or others, and could damage the
vehicle.
• Make sure there are no people or
objects around the liftgate before
operating the power liftgate. Wait
until the liftgate is opened fully and
stopped before loading or unloading
cargo or passengers from the
vehicle.
NOTICE
Do not close or open the power
liftgate manually. This may cause
damage to the power liftgate. If it is
necessary to close or open the power
liftgate manually when the battery is
discharged or disconnected, do not
apply excessive force.
Page 217 of 638
05
5-73
If ‘User Height Setting’ is selected, follow
the instructions below to set the height
of the power liftgate manually.
1. Position the liftgate manually to the
height you prefer.
2. Press the power liftgate open/close
button located inside the liftgate for
more than 3 seconds.
3. Close the liftgate manually after
hearing the buzzer sound.
4. The liftgate will open to the manually
adjusted height that was set.
WARNING
Always keep the liftgate completely
closed while the vehicle is in motion. If
it is left open or ajar, poisonous exhaust
gases containing carbon monoxide
(CO) may enter the vehicle and serious
illness or death may result.
WARNING
Occupants should never ride in the
rear cargo area where no restraints are
available. To avoid injury in the event of
an accident or sudden stops, occupants
should always be properly restrained.
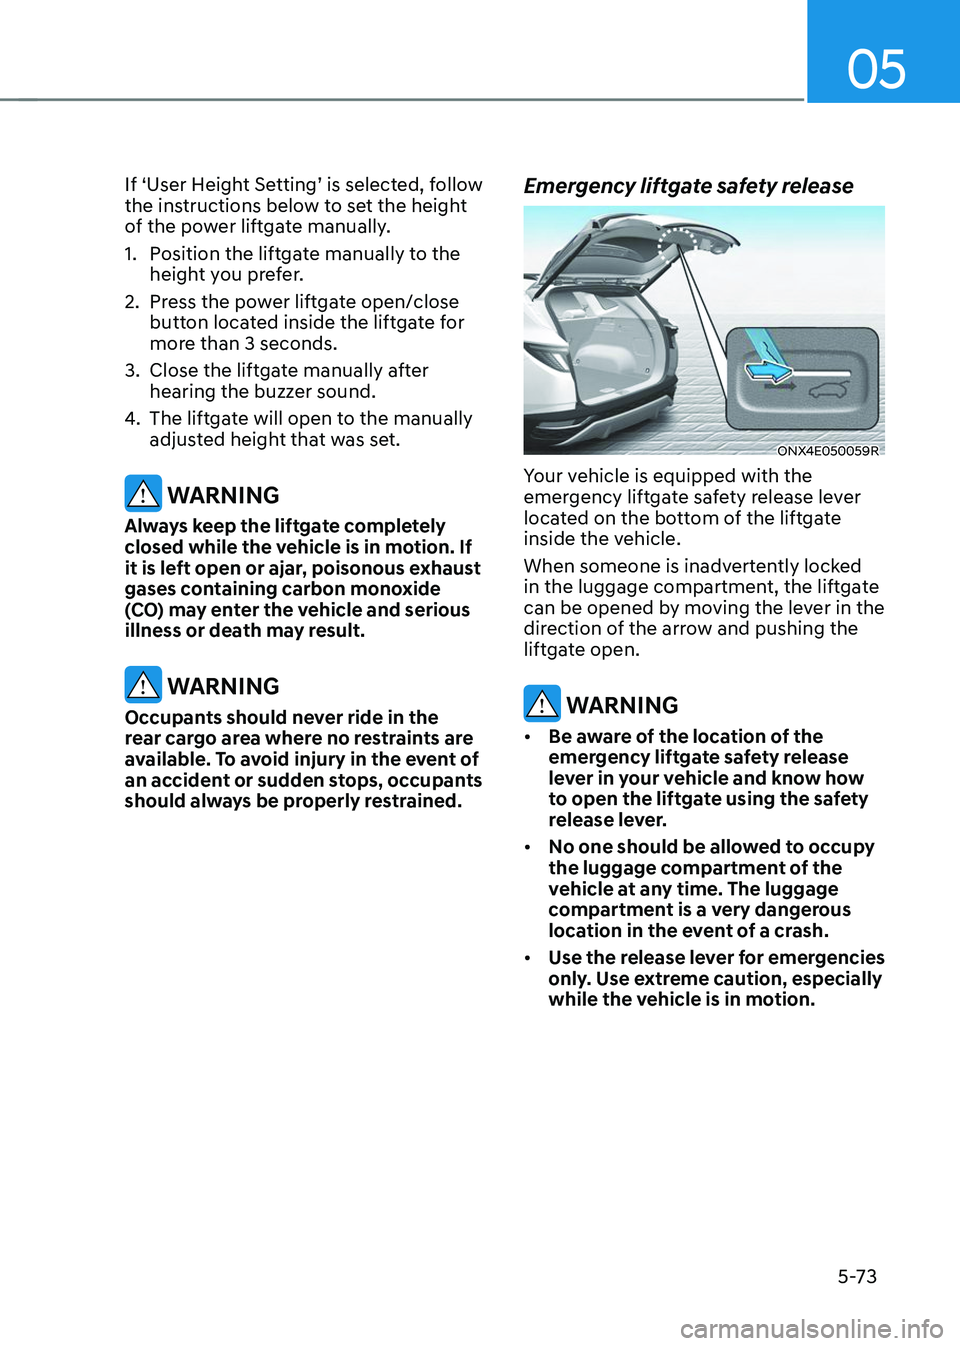
Emergency liftgate safety release
ONX4E050059R
Your vehicle is equipped with the
emergency liftgate safety release lever
located on the bottom of the liftgate
inside the vehicle.
When someone is inadvertently locked
in the luggage compartment, the liftgate
can be opened by moving the lever in the
direction of the arrow and pushing the
liftgate open.
WARNING
• Be aware of the location of the
emergency liftgate safety release
lever in your vehicle and know how
to open the liftgate using the safety
release lever.
• No one should be allowed to occupy
the luggage compartment of the
vehicle at any time. The luggage
compartment is a very dangerous
location in the event of a crash.
• Use the release lever for emergencies
only. Use extreme caution, especially
while the vehicle is in motion.
Page 221 of 638
05
5-77
Closing the fuel filler door
1. To install the fuel tank cap, turn it
clockwise until it “clicks” one time.
2. Close the fuel filler door until it is
latched securely.
Information
To lock the fuel filler door, make sure the
fuel filler door is completely closed. Press
the LOCK button on the remote key or
smart key to lock your vehicle. The fuel
filler door will also lock.
Note that if the fuel filler door is not
completely closed when the vehicle is
locked, the fuel filler door will not be
locked.
CAUTION
Make sure the fuel filler door is
completely closed before driving
through a car wash or operating a high
pressure spray washer.
WARNING
Automotive fuel is highly flammable
and explosive. Failure to follow these
guidelines may result in SERIOUS
INJURY or DEATH:
• Read and follow all warnings posted
at the gas station.
• Before refueling, note the location
of the Emergency Fuel Shut-Off, if
available, at the gas station.
• Before touching the fuel nozzle, you
should eliminate the potential build-
up of static electricity by touching
a metal part of the vehicle, a safe
distance away from the fuel filler
neck, nozzle, or other gas source,
with your bare hand.
• Do not use mobile phones while
refueling. Electric current and/or
electronic interference from cellular
phones can potentially ignite fuel
vapors and cause a fire. •
Do not get back into a vehicle
once you have begun refueling.
You can generate a buildup of
static electricity by touching,
rubbing or sliding against any item
or fabric capable of producing
static electricity. Static electricity
discharge can ignite fuel vapors
causing a fire. If you must re-enter
the vehicle, you should once again
eliminate potentially dangerous
static electricity discharge by
touching a metal part of the vehicle,
away from the fuel filler neck, nozzle
or other fuel source, with your bare
hand.
• When using an approved portable
fuel container, be sure to place the
container on the ground prior to
refueling. Static electricity discharge
from the container can ignite fuel
vapors causing a fire.
Once refueling has begun, contact
between your bare hand and the
vehicle should be maintained until
the filling is complete.
• Use only approved portable plastic
fuel containers designed to carry and
store fuel.
• When refueling, always shift the
gear to the P (Park) position, set
the parking brake, and press the
Engine Start/Stop button to the
OFF position. Sparks produced by
electrical components related to the
engine can ignite fuel vapors causing
a fire.
• Do not use matches or a lighter and
do not smoke or leave a lit cigarette
in your vehicle while at a gas station,
especially during refueling.
Page 223 of 638
05
5-79
Exterior lights
Lighting control
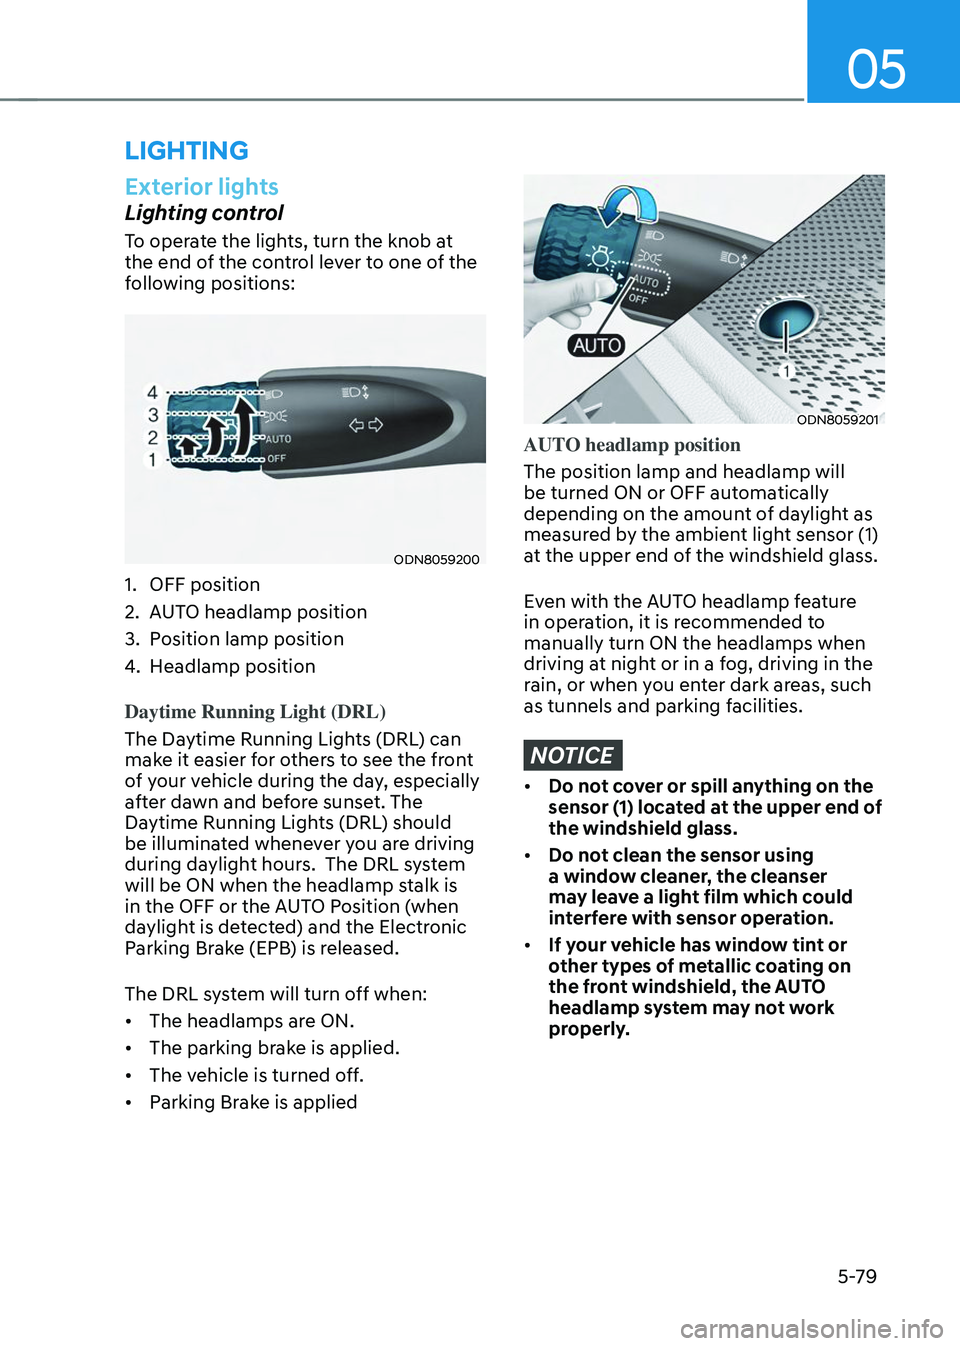
To operate the lights, turn the knob at
the end of the control lever to one of the
following positions:
ODN8059200
1. OFF position
2. AUTO headlamp position
3. Position lamp position
4. Headlamp position
Daytime Running Light (DRL)
The Daytime Running Lights (DRL) can
make it easier for others to see the front
of your vehicle during the day, especially
after dawn and before sunset. The
Daytime Running Lights (DRL) should
be illuminated whenever you are driving
during daylight hours. The DRL system
will be ON when the headlamp stalk is
in the OFF or the AUTO Position (when
daylight is detected) and the Electronic
Parking Brake (EPB) is released.
The DRL system will turn off when:
• The headlamps are ON.
• The parking brake is applied.
• The vehicle is turned off.
• Parking Brake is applied
ODN8059201
AUTO headlamp position
The position lamp and headlamp will
be turned ON or OFF automatically
depending on the amount of daylight as
measured by the ambient light sensor (1)
at the upper end of the windshield glass.
Even with the AUTO headlamp feature
in operation, it is recommended to
manually turn ON the headlamps when
driving at night or in a fog, driving in the
rain, or when you enter dark areas, such
as tunnels and parking facilities.
NOTICE
• Do not cover or spill anything on the
sensor (1) located at the upper end of
the windshield glass.
• Do not clean the sensor using
a window cleaner, the cleanser
may leave a light film which could
interfere with sensor operation.
• If your vehicle has window tint or
other types of metallic coating on
the front windshield, the AUTO
headlamp system may not work
properly.
LIGHTING
Page 228 of 638
Convenient features
5-84
System operation
Display and control
• After selecting ‘High Beam Assist’
in the Settings menu, High Beam
Assist will operate by following the
procedure below.
-Place the headlamp switch in
the AUTO position and push
the headlamp lever towards the
instrument cluster. The High Beam
Assist (
) indicator light will
illuminate on the cluster and the
system will be enabled.
- When the system is enabled, high
beam will turn on when vehicle
speed is above 25mph (40km/h).
When vehicle speed is below 15mph
(25km/h), high beam will not turn
on.
-The High Beam () indicator light
will illuminate on the cluster when
high beam is on.
• When High Beam Assist is operating, if
the headlamp lever or switch is used,
the system operates as follow:
-If the headlamp lever is pulled
towards you when the high beam
is off, the high beam will turn on
without High Beam Assist canceled.
When you let go of the headlamp
lever, the lever will move to the
middle and the high beam will turn
off.
-If the headlamp lever is pulled
towards you when the high beam is
on by High Beam Assist, low beam
will be on and the system will turn
off.
-If the headlamp switch is placed
from AUTO to another position
(headlamp/position/off), High
Beam Assist will turn off and the
corresponding lamp will turn on. •
When High Beam Assist is operating,
high beam switches to low beam if
any of the following conditions occur:
-When the headlamp of an
oncoming vehicle is detected.
-When the tail lamp of a vehicle in
front is detected.
-When the headlamp or tail lamp of a
motorcycle or a bicycle is detected.
-When the surrounding ambient light
is bright enough that high beams
are not required.
-When streetlights or other lights are
detected.
System malfunction and
limitations
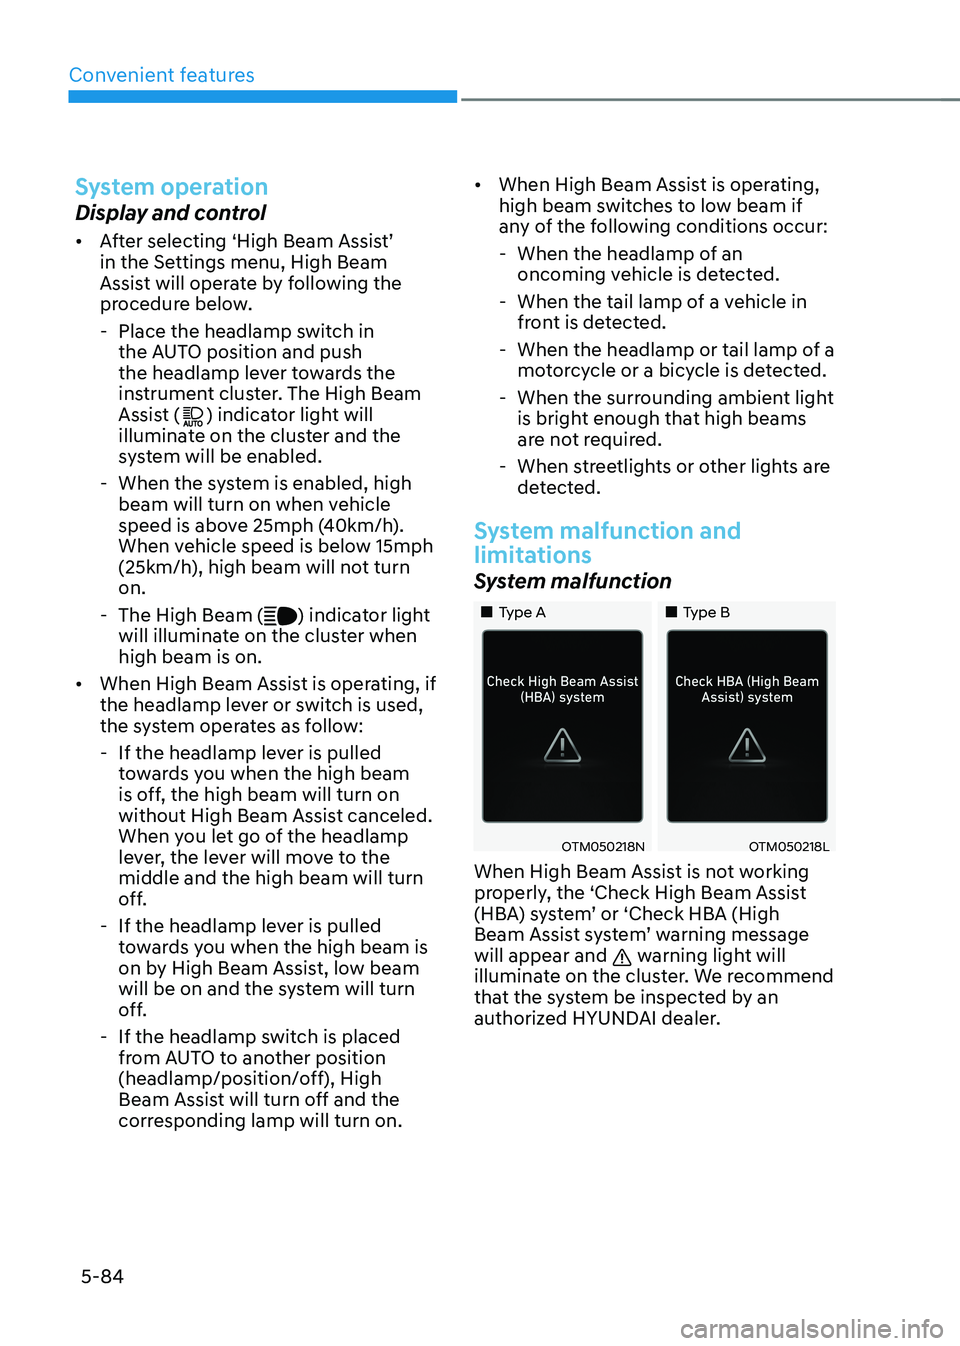
System malfunction
„„Type A„„Type B
OTM050218NOTM050218L
When High Beam Assist is not working
properly, the ‘Check High Beam Assist
(HBA) system’ or ‘Check HBA (High
Beam Assist system’ warning message
will appear and
warning light will
illuminate on the cluster. We recommend
that the system be inspected by an
authorized HYUNDAI dealer.