2023 HYUNDAI SONATA oil temperature
[x] Cancel search: oil temperaturePage 26 of 555
02
2-15
Recommended SAE Viscosity Number
CAUTION
Always be sure to clean the area around
any filler plug, drain plug, or dipstick
before checking or draining any
lubricant. This is especially important
in dusty or sandy areas and when the
vehicle is used on unpaved roads.
Cleaning the plug and dipstick areas
will prevent dirt and grit from entering
the engine and other mechanisms that
could be damaged. Engine oil viscosity (thickness) has an
effect on fuel economy and cold weather
operating (engine start and engine oil
flowability). Lower viscosity engine oils
can provide better fuel economy and
cold weather performance, however,
higher viscosity engine oils are required
for satisfactory lubrication in hot
weather.
Using oils of any viscosity other than
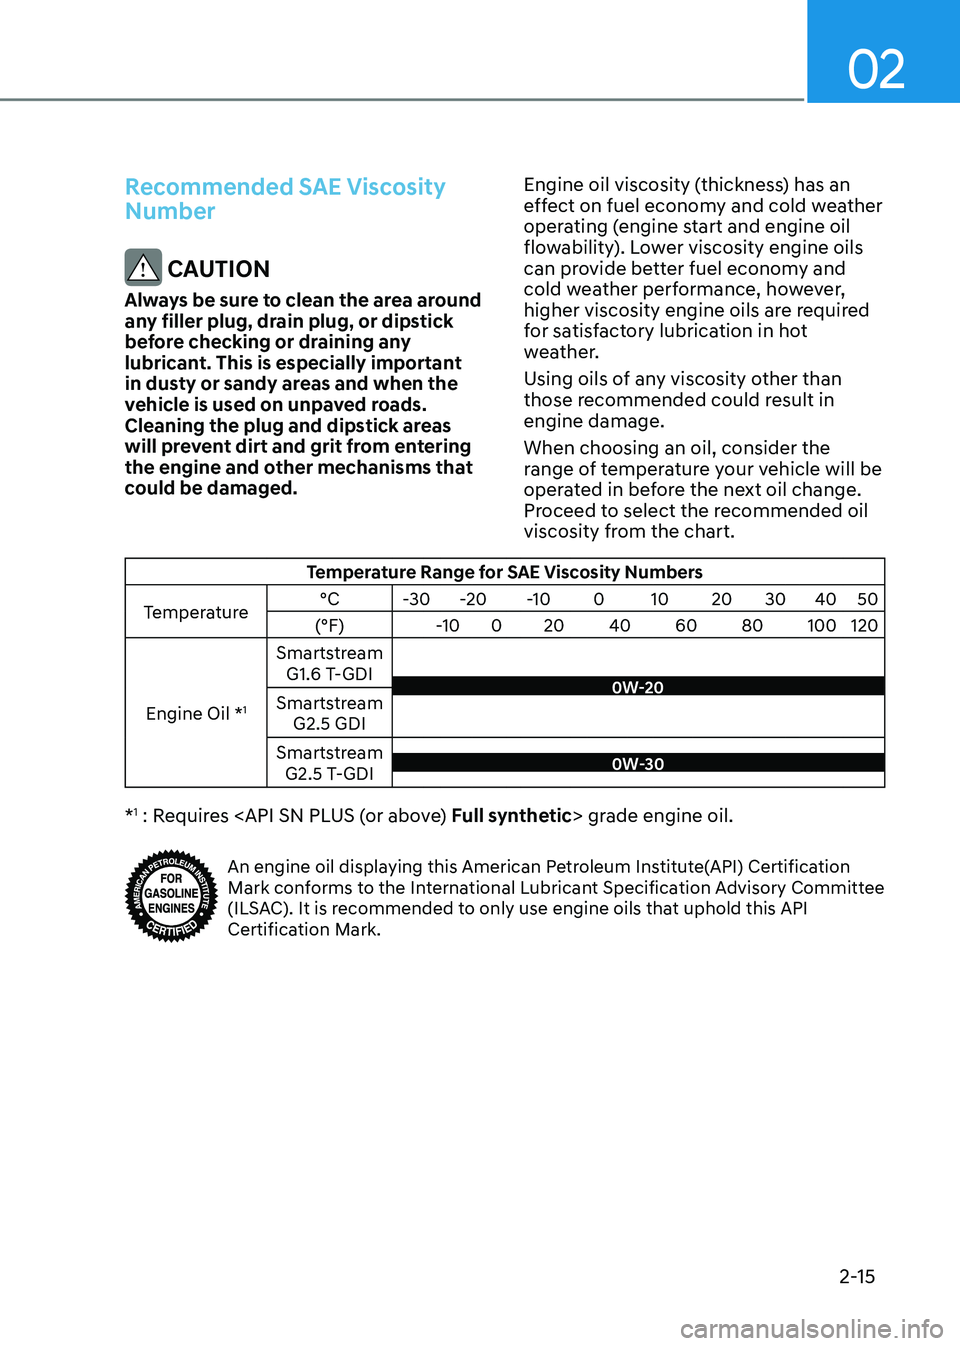
those recommended could result in engine damage. When choosing an oil, consider the
range of temperature your vehicle will be
operated in before the next oil change.
Proceed to select the recommended oil
viscosity from the chart.
Temperature Range for SAE Viscosity Numbers
Temperature °C
-30-20 -10 0 10 20 30 40 50
(°F) -100 20 40 60 80 100 120
Engine Oil * 1Smartstream
G1.6 T-GDI
Smartstream G2.5 GDI
Smartstream G2.5 T-GDI
0W-30
0W-20
* 1
: Requires
An engine oil displaying this American Petroleum Institute(API) Certification
Mark conforms to the International Lubricant Specification Advisory Committee
(ILSAC). It is recommended to only use engine oils that uphold this API
Certification Mark.
Page 138 of 555
Instrument Cluster
4-52
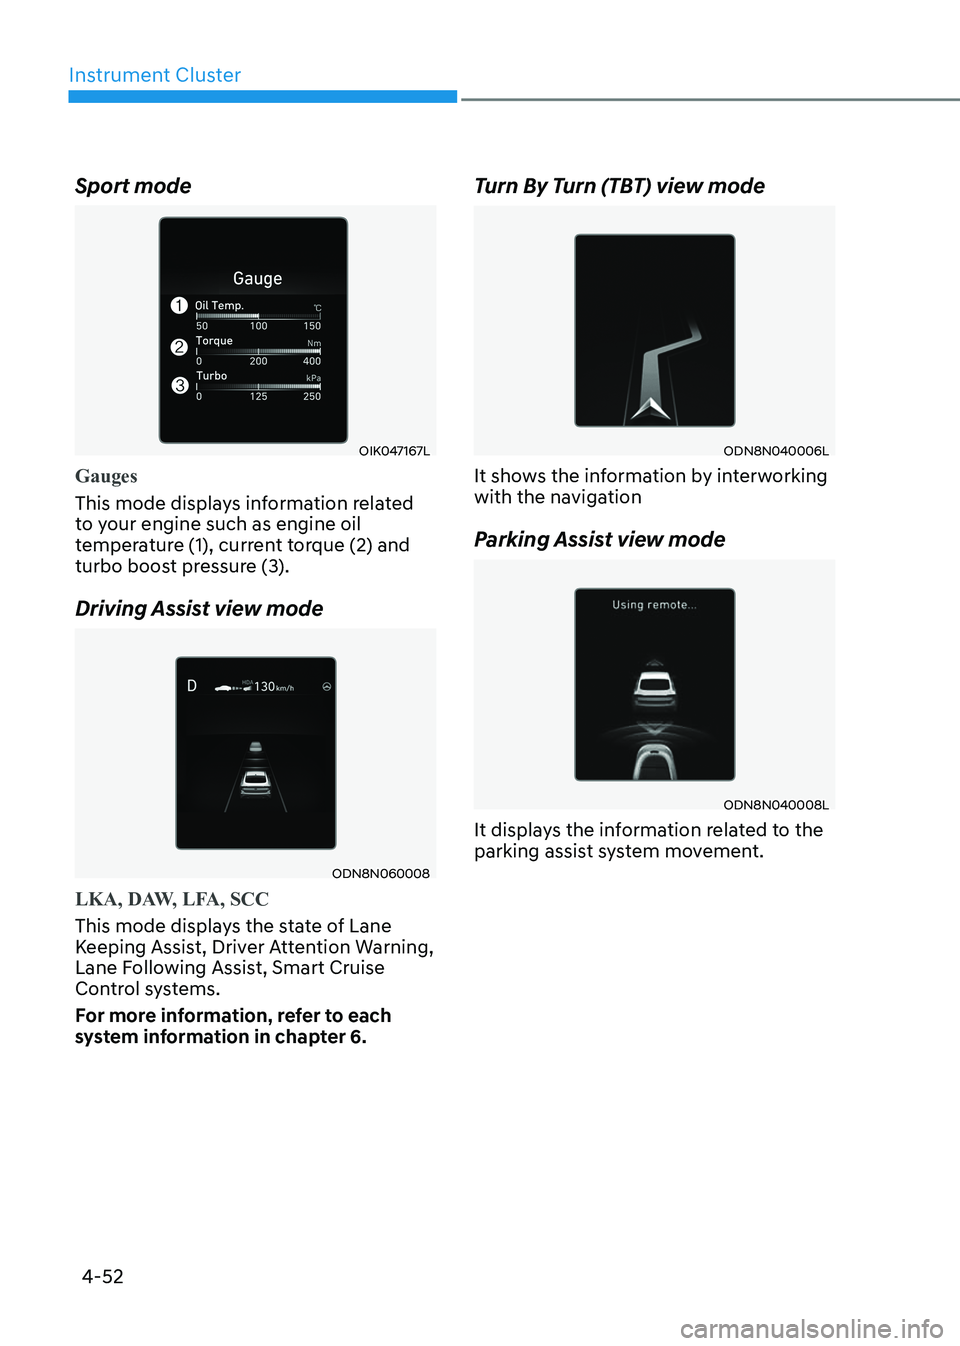
Sport mode
OIK047167L
Gauges
This mode displays information related
to your engine such as engine oil
temperature (1), current torque (2) and
turbo boost pressure (3).
Driving Assist view mode
ODN8N060008
LKA, DAW, LFA, SCC
This mode displays the state of Lane
Keeping Assist, Driver Attention Warning,
Lane Following Assist, Smart Cruise
Control systems.
For more information, refer to each
system information in chapter 6.
Turn By Turn (TBT) view mode
ODN8N040006L
It shows the information by interworking
with the navigation
Parking Assist view mode
ODN8N040008L
It displays the information related to the
parking assist system movement.
Page 331 of 555
While Driving
6-44
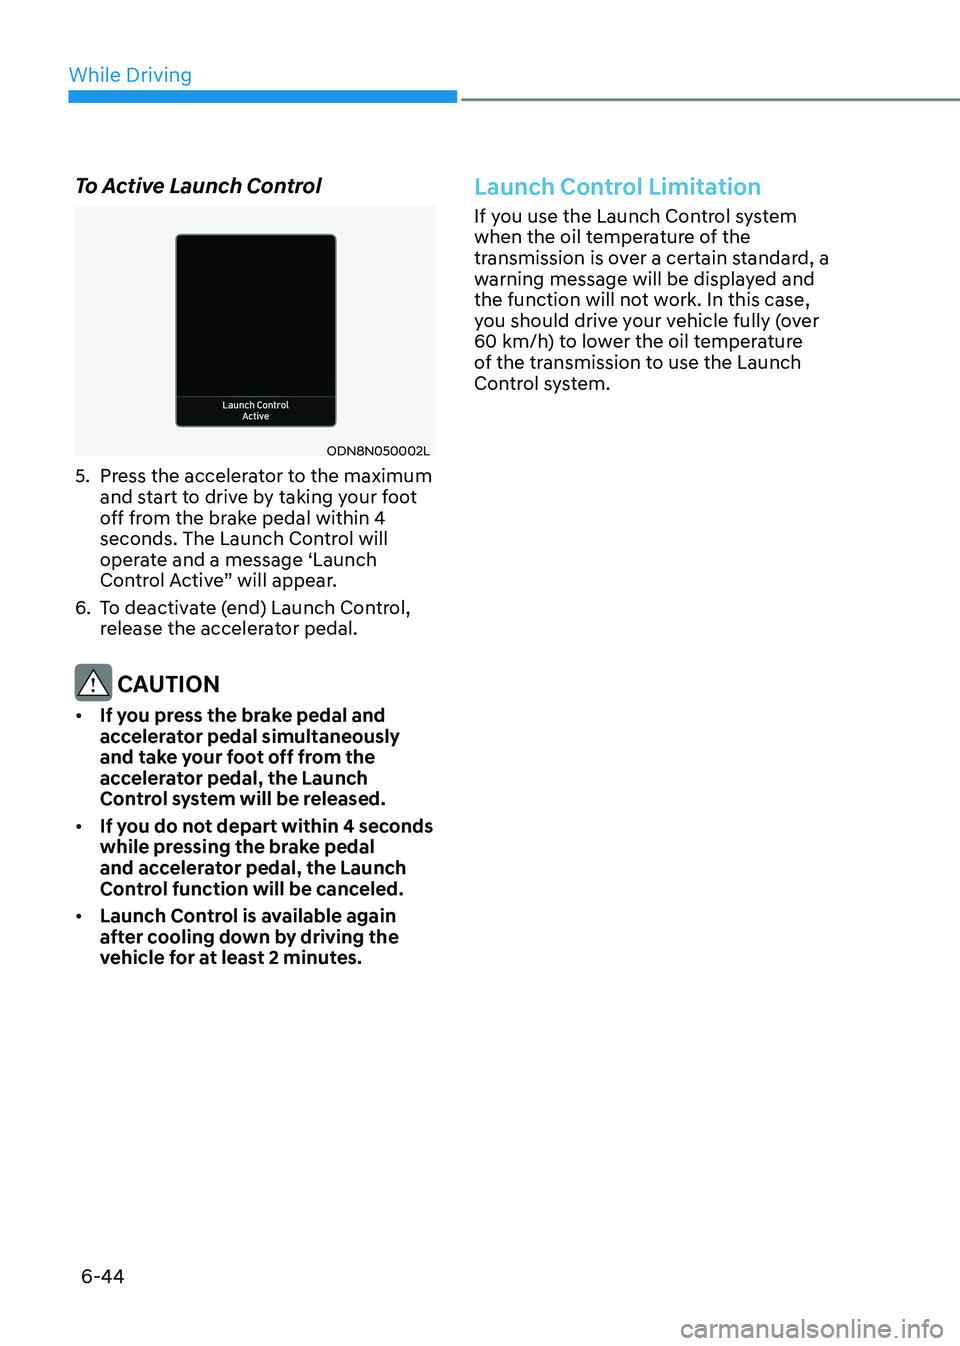
To Active Launch Control
ODN8N050002L
5. Press the accelerator to the maximum and start to drive by taking your foot
off from the brake pedal within 4
seconds. The Launch Control will
operate and a message ‘Launch
Control Active” will appear.
6. To deactivate (end) Launch Control, release the accelerator pedal.
CAUTION
• If you press the brake pedal and
accelerator pedal simultaneously
and take your foot off from the
accelerator pedal, the Launch
Control system will be released.
• If you do not depart within 4 seconds
while pressing the brake pedal
and accelerator pedal, the Launch
Control function will be canceled.
• Launch Control is available again
after cooling down by driving the
vehicle for at least 2 minutes.
Launch Control Limitation
If you use the Launch Control system
when the oil temperature of the
transmission is over a certain standard, a
warning message will be displayed and
the function will not work. In this case,
you should drive your vehicle fully (over
60 km/h) to lower the oil temperature
of the transmission to use the Launch
Control system.
Page 335 of 555
While Driving
6-48
Various driving situations, which you may
encounter in SMART mode
• The driving mode automatically
changes to SMART SPORT, when
you abruptly accelerate the vehicle
or repetitively operate the steering
wheel (Your driving is categorized
to be sporty.). In this mode, your
vehicle drives in a lower gear for
abrupt accelerating/decelerating
and increases the engine brake
performance.
• You may still sense the engine
braking performance, even when
you release the accelerator pedal in
SMART SPORT mode. It is because
your vehicle remains in lower gear
over a certain period of time for next
acceleration. Thus, it is a normal
driving situation, not indicating any malfunction.
• The driving mode automatically
changes to SMART SPORT mode only
in harsh driving situations. In most
of the normal driving situations, the
driving mode sets to be in SMART NORMAL mode.
Limitation of SMART mode
The SMART mode may be limited in
following situations. (The OFF indicator
illuminates in those situations.) • The driver uses the paddle shifter
(manual shift mode) :
It deactivates SMART mode. The
vehicle drives, as the driver manually
changes gear with the paddle shifter.
• The cruise control is activated :
The cruise control system may
deactivate the SMART mode when
the vehicle is controlled by the set
speed of Smart Cruise Control system.
(SMART mode is not deactivated
just by activating the cruise control
system.)
• The transmission oil temperature is
either extremely low or extremely high :
The SMART mode can be active in
most of the normal driving situations.
However, an extremely high/ low
transmission oil temperature may
temporarily deactivate the SMART
mode, because the transmission
condition is out of normal operation condition.
Page 441 of 555
While Driving
6-154
Winter Precautions
Use high quality ethylene glycol
coolant
Your vehicle is delivered with high
quality ethylene glycol coolant in the
cooling system. It is the only type of
coolant that should be used because it
helps prevent corrosion in the cooling
system, lubricates the water pump and
prevents freezing. Be sure to replace or
replenish your coolant in accordance
with the maintenance schedule in
chapter 8. Before winter, have your
coolant tested to assure that its freezing
point is sufficient for the temperatures
anticipated during the winter.
Change to "winter weight" oil if necessary
In some climates it is recommended that
a lower viscosity "winter weight" oil be
used during cold weather. See chapter 8
for recommendations. If you aren't sure
what weight oil you should use, consult
an authorized HYUNDAI dealer.
Check battery and cables
Winter puts additional burdens on the
battery system. Visually inspect the
battery and cables as described in
chapter 8. The level of charge in your
battery can be checked by an authorized
HYUNDAI dealer or a service station.Check spark plugs and ignition
system
Inspect your spark plugs as described in
chapter 8 and replace them if necessary. Also check all ignition wiring and
components to be sure they are not
cracked, worn or damaged in any way.
Use approved window washer anti-
freeze in system
To keep the water in the window washer
system from freezing, add an approved
window washer anti-freeze solution in
accordance with instructions on the
container. Window washer anti-freeze is
available from an authorized HYUNDAI
dealer and most auto parts outlets. Do
not use engine coolant or other types
of antifreeze as these may damage the
paint finish.
Do not let your parking brake freeze
Under some conditions your parking
brake can freeze in the engaged position.
This is most likely to happen when
there is an accumulation of snow or
ice around or near the rear brakes or
if the brakes are wet. If there is a risk
the parking brake may freeze, apply
it only temporarily while you put the
gear selector lever in P and block the
rear wheels so the car cannot roll. Then
release the parking brake.
Page 493 of 555
08
8-23
Checking the Engine Oil Level
Engine oil is used for lubricating,
cooling, and operating various hydraulic
components in the engine. Engine oil
consumption while driving is normal,
and it is necessary to check and refill the
engine oil regularly. Also, check and refill
the oil level within the recommended
maintenance schedule to prevent
deterioration of oil performance.
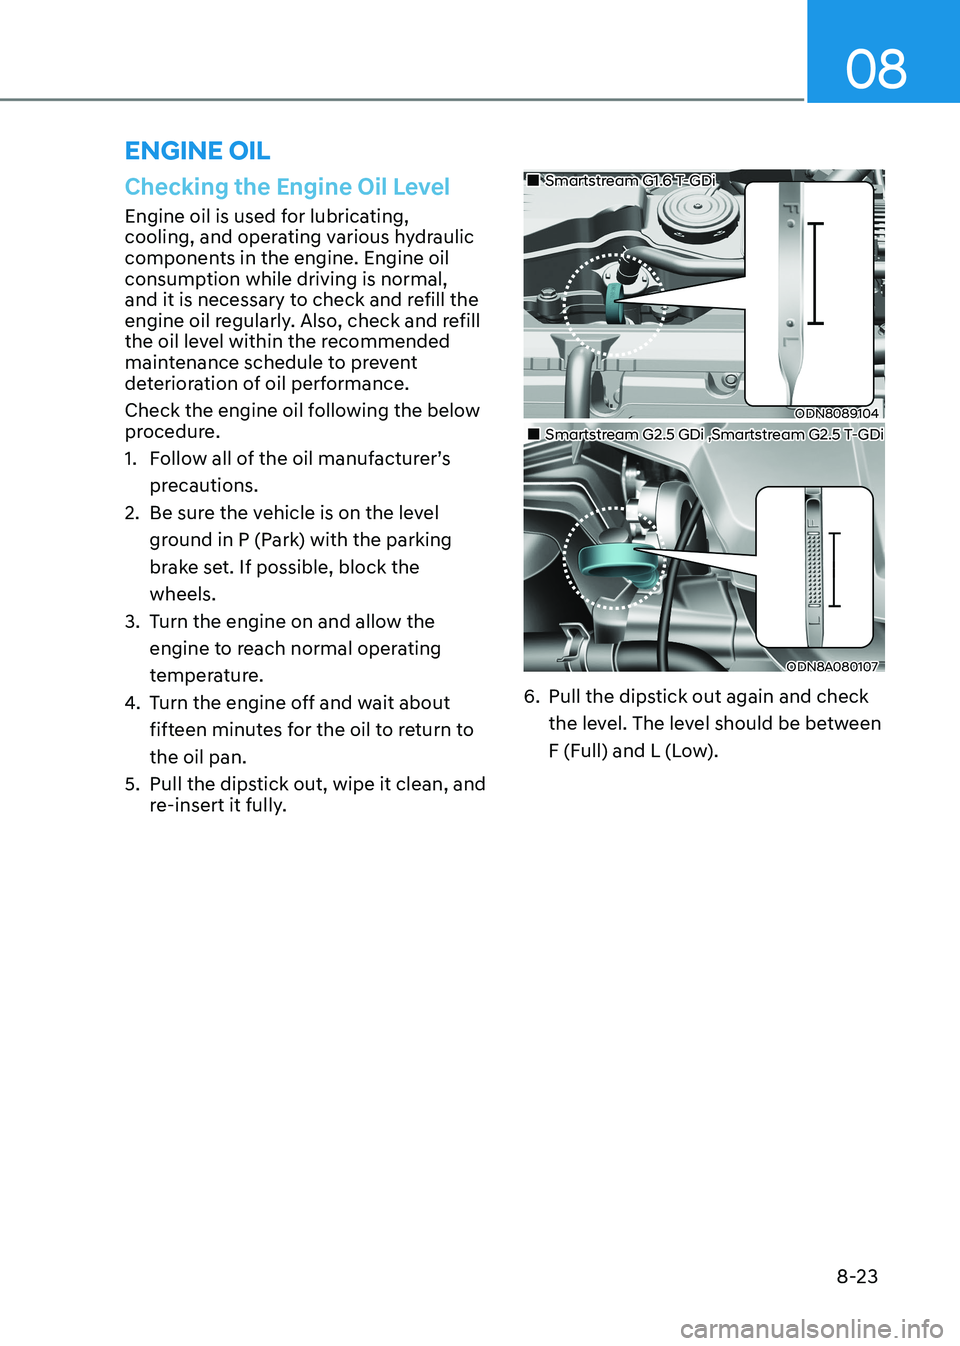
Check the engine oil following the below
procedure.
1. Follow all of the oil manufacturer’sprecautions.
2. Be sure the vehicle is on the level
ground in P (Park) with the parking
brake set. If possible, block thewheels.
3. Turn the engine on and allow the engine to reach normal operating
temperature.
4. Turn the engine off and wait about
fifteen minutes for the oil to return tothe oil pan.
5. Pull the dipstick out, wipe it clean, and re-insert it fully.
ODN8089104
„
„Smartstream G1.6 T-GDi
ODN8A080107
„
„Smartstream G2.5 GDi ,Smartstream G2.5 T-GDi
6. Pull the dipstick out again and check the level. The level should be between
F (Full) and L (Low).
EnginE oiL
Page 515 of 555
08
8-45
WARNING
The traction grade assigned to this tire
is based on straight-ahead braking
traction tests, and does not include
acceleration, cornering, hydroplaning,
or peak traction characteristics.
Temperature A, B & C
The temperature grades are A (the
highest), B and C representing the tire’s
resistance to the generation of heat
and its ability to dissipate heat when
tested under controlled conditions on a
specified indoor laboratory test wheel.
Sustained high temperature can cause
the material of the tire to degenerate
and reduce tire life, and excessive
temperature can lead to sudden tire
failure.
WARNING
The temperature grade for this tire is
established for a tire that is properly
inflated and not overloaded. Excessive
speed, under-inflation, over-inflation,
or excessive loading, either separately
or in combination, can cause heat build-
up and possible sudden tire failure.
This may cause loss of vehicle control
resulting in an accident.
Tire Terminology and Definitions
Air Pressure
The amount of air inside the tire pressing
outward on the tire. Air pressure is
expressed in kilopascal (kPa) or pounds
per square inch (psi).
Accessory Weight
This means the combined weight of
optional accessories. Some examples
of optional accessories are automatic
transmission, power seats, and air conditioning.
Aspect Ratio
The relationship of a tire’s height to its width. Belt
A rubber coated layer of cords that is
located between the plies and the tread.
Cords may be made from steel or other
reinforcing materials. Bead
The tire bead contains steel wires
wrapped by steel cords that hold the tire
onto the rim.
Bias Ply Tire
A pneumatic tire in which the plies are
laid at alternate angles less than 90
degrees to the centerline of the tread.
Cold Tire Pressure
The amount of air pressure in a tire,
measured in kilopascals (kPa) or pounds
per square inch (psi) before a tire has
built up heat from driving.
Curb Weight
This means the weight of a motor vehicle
with standard and optional equipment
including the maximum capacity of fuel,
oil and coolant, but without passengers
and cargo.
Page 535 of 555
08
8-65
ODN8A089039
NOTICE
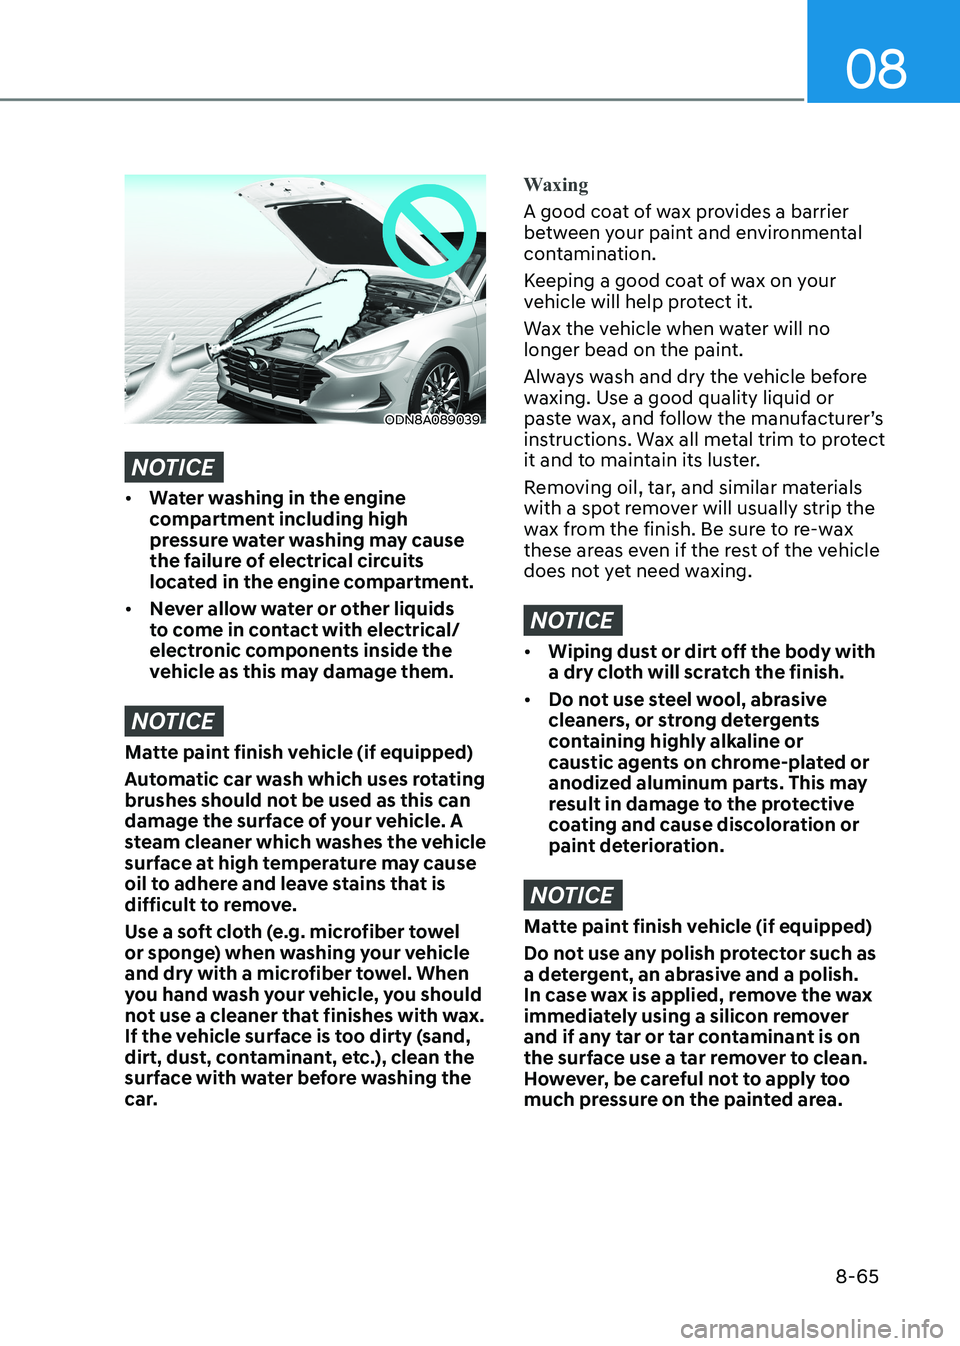
• Water washing in the engine
compartment including high
pressure water washing may cause
the failure of electrical circuits
located in the engine compartment.
• Never allow water or other liquids
to come in contact with electrical/
electronic components inside the
vehicle as this may damage them.
NOTICE
Matte paint finish vehicle (if equipped)
Automatic car wash which uses rotating
brushes should not be used as this can
damage the surface of your vehicle. A
steam cleaner which washes the vehicle
surface at high temperature may cause
oil to adhere and leave stains that is
difficult to remove.
Use a soft cloth (e.g. microfiber towel
or sponge) when washing your vehicle
and dry with a microfiber towel. When
you hand wash your vehicle, you should
not use a cleaner that finishes with wax.
If the vehicle surface is too dirty (sand,
dirt, dust, contaminant, etc.), clean the
surface with water before washing the
car.
Waxing
A good coat of wax provides a barrier
between your paint and environmental
contamination.
Keeping a good coat of wax on your
vehicle will help protect it.
Wax the vehicle when water will no
longer bead on the paint.
Always wash and dry the vehicle before
waxing. Use a good quality liquid or
paste wax, and follow the manufacturer’s
instructions. Wax all metal trim to protect
it and to maintain its luster.
Removing oil, tar, and similar materials
with a spot remover will usually strip the
wax from the finish. Be sure to re-wax
these areas even if the rest of the vehicle
does not yet need waxing.
NOTICE
• Wiping dust or dirt off the body with
a dry cloth will scratch the finish.
• Do not use steel wool, abrasive
cleaners, or strong detergents
containing highly alkaline or
caustic agents on chrome-plated or
anodized aluminum parts. This may
result in damage to the protective
coating and cause discoloration or
paint deterioration.
NOTICE
Matte paint finish vehicle (if equipped)
Do not use any polish protector such as
a detergent, an abrasive and a polish.
In case wax is applied, remove the wax
immediately using a silicon remover
and if any tar or tar contaminant is on
the surface use a tar remover to clean.
However, be careful not to apply too
much pressure on the painted area.