2023 HYUNDAI SONATA Two push
[x] Cancel search: Two pushPage 36 of 555
03
3 -7
Power adjustment (if equipped)
The front seat can be adjusted by
using the control switches located on
the outside of the seat cushion.Before
driving, adjust the seat to the proper
position so that you can easily control
the steering wheel, foot pedals and
controls on the instrument panel.
WARNING
NEVER allow children in the vehicle
unattended. The power seats are
operable when the vehicle is turned off.
NOTICE
To prevent damage to the seats: • Always stop adjusting the seats when
the seat has moved as far forward or
rearward as possible.
• Do not adjust the seats for longer
than necessary when the vehicle
is turned off. This may result in
unnecessary battery drain.
• Do not operate two or more seats at
the same time.This may result in an electrical malfunction.
ODN8039005
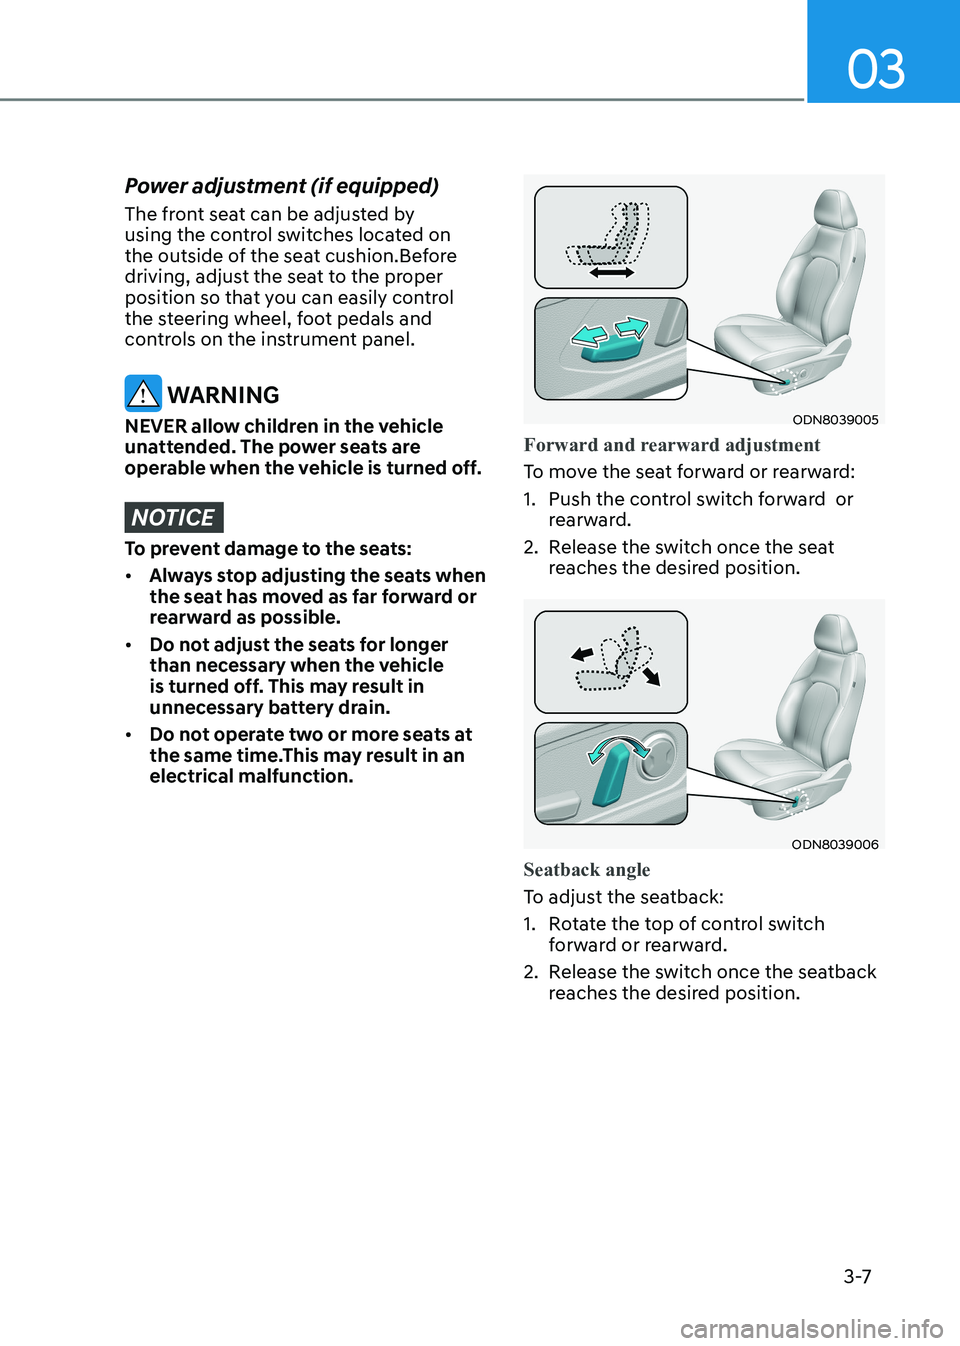
Forward and rearward adjustment
To move the seat forward or rearward:
1. Push the control switch forward or rearward.
2. Release the switch once the seat reaches the desired position.
ODN8039006
Seatback angle
To adjust the seatback:
1. Rotate the top of control switch
forward or rearward.
2. Release the switch once the seatback reaches the desired position.
Page 61 of 555
Seats & Safety System
3-32
After selecting a proper child seat
for your child, check to make sure it
fits properly in your vehicle. Follow
the instructions provided by the
manufacturer when installing the child
seat. Note these general steps when
installing the seat to your vehicle: •
Properly secure the child restraint to
the vehicle. All child restraints must
be secured to the vehicle with the lap
part of a lap/shoulder belt or with the
LATCH system.
• Make sure the child restraint is
firmly secured. After installing a
child restraint to the vehicle, push
and pull the seat forward-and-back
and side-to-side to verify that it
is securely attached to the seat. A
child restraint secured with a seat
belt should be installed as firmly as
possible. However, some side-to-side
movement can be expected.
• Secure the child in the child
restraint. Make sure the child is
properly strapped in the child restraint
according to the manufacturer
instructions.
CAUTION
A child restraint in a closed vehicle can
become very hot. To prevent burns,
check the seating surface and buckles
before placing your child in the child
restraint. Lower Anchors and Tether for
Children (LATCH System)
The LATCH system holds a child restraint
during driving and in an accident. This
system is designed to make installation
of the child restraint easier and reduce
the possibility of improperly installing
your child restraint. The LATCH system
uses anchors in the vehicle and
attachments on the child restraint. The
LATCH system eliminates the need to use
seat belts to secure the child restraint to
the rear seats.
Lower anchors are metal bars built into
the vehicle. There are two lower anchors
for each LATCH seating position that
will accommodate a child restraint with
lower attachments.
To use the LATCH system in your vehicle,
you must have a child restraint with
LATCH attachments.
The child seat manufacturer will provide
you with instructions on how to use the
child seat with its attachments for the
LATCH lower anchors.
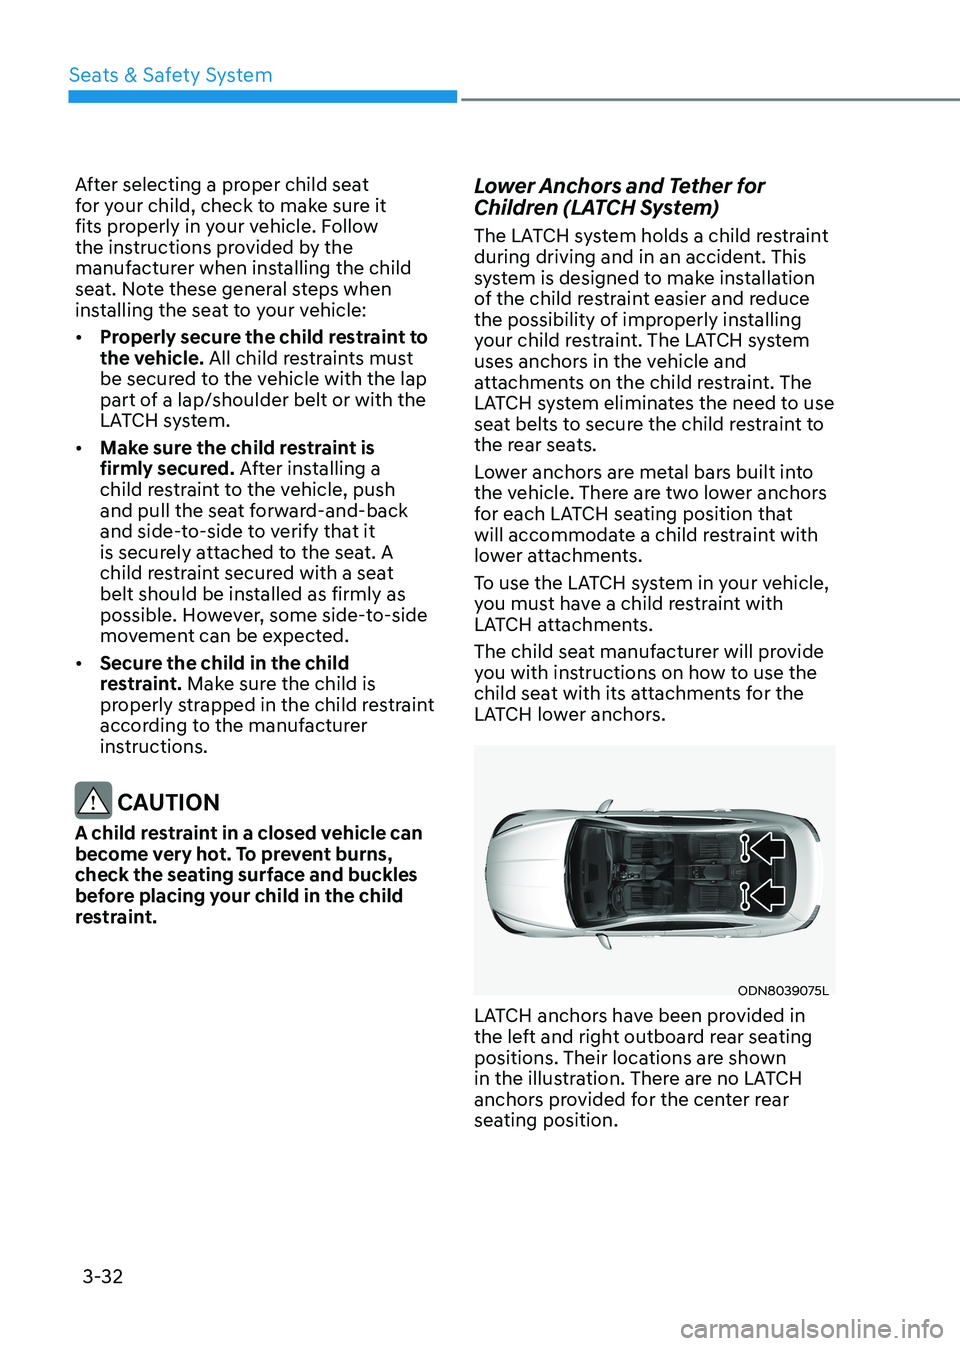
ODN8039075L
LATCH anchors have been provided in
the left and right outboard rear seating
positions. Their locations are shown
in the illustration. There are no LATCH
anchors provided for the center rear
seating position.
Page 158 of 555
Convenience Features
5-12
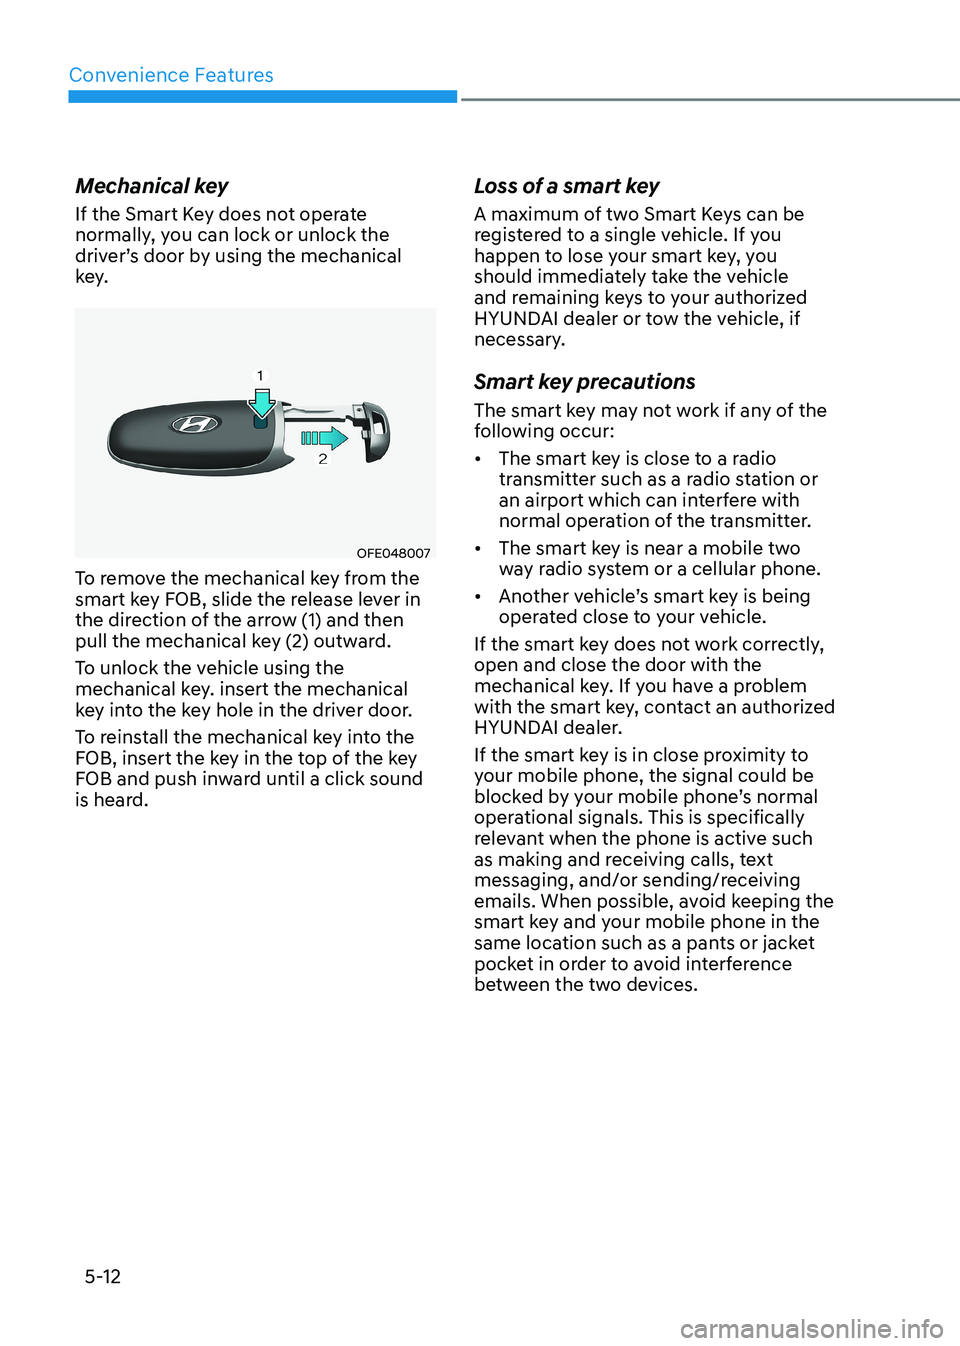
Mechanical key
If the Smart Key does not operate
normally, you can lock or unlock the
driver’s door by using the mechanical
key.
OFE048007
To remove the mechanical key from the
smart key FOB, slide the release lever in
the direction of the arrow (1) and then
pull the mechanical key (2) outward.
To unlock the vehicle using the
mechanical key. insert the mechanical
key into the key hole in the driver door.
To reinstall the mechanical key into the
FOB, insert the key in the top of the key
FOB and push inward until a click sound
is heard. Loss of a smart key
A maximum of two Smart Keys can be
registered to a single vehicle. If you
happen to lose your smart key, you
should immediately take the vehicle
and remaining keys to your authorized
HYUNDAI dealer or tow the vehicle, if
necessary.
Smart key precautions
The smart key may not work if any of the
following occur: •
The smart key is close to a radio
transmitter such as a radio station or
an airport which can interfere with
normal operation of the transmitter.
• The smart key is near a mobile two
way radio system or a cellular phone.
• Another vehicle’s smart key is being
operated close to your vehicle.
If the smart key does not work correctly, open and close the door with the
mechanical key. If you have a problem
with the smart key, contact an authorized
HYUNDAI dealer.
If the smart key is in close proximity to
your mobile phone, the signal could be
blocked by your mobile phone’s normal
operational signals. This is specifically
relevant when the phone is active such
as making and receiving calls, text
messaging, and/or sending/receiving
emails. When possible, avoid keeping the
smart key and your mobile phone in the
same location such as a pants or jacket
pocket in order to avoid interference
between the two devices.
Page 162 of 555
Convenience Features
5-16
Door locks
Operating Door Locks from
Outside the Vehicle
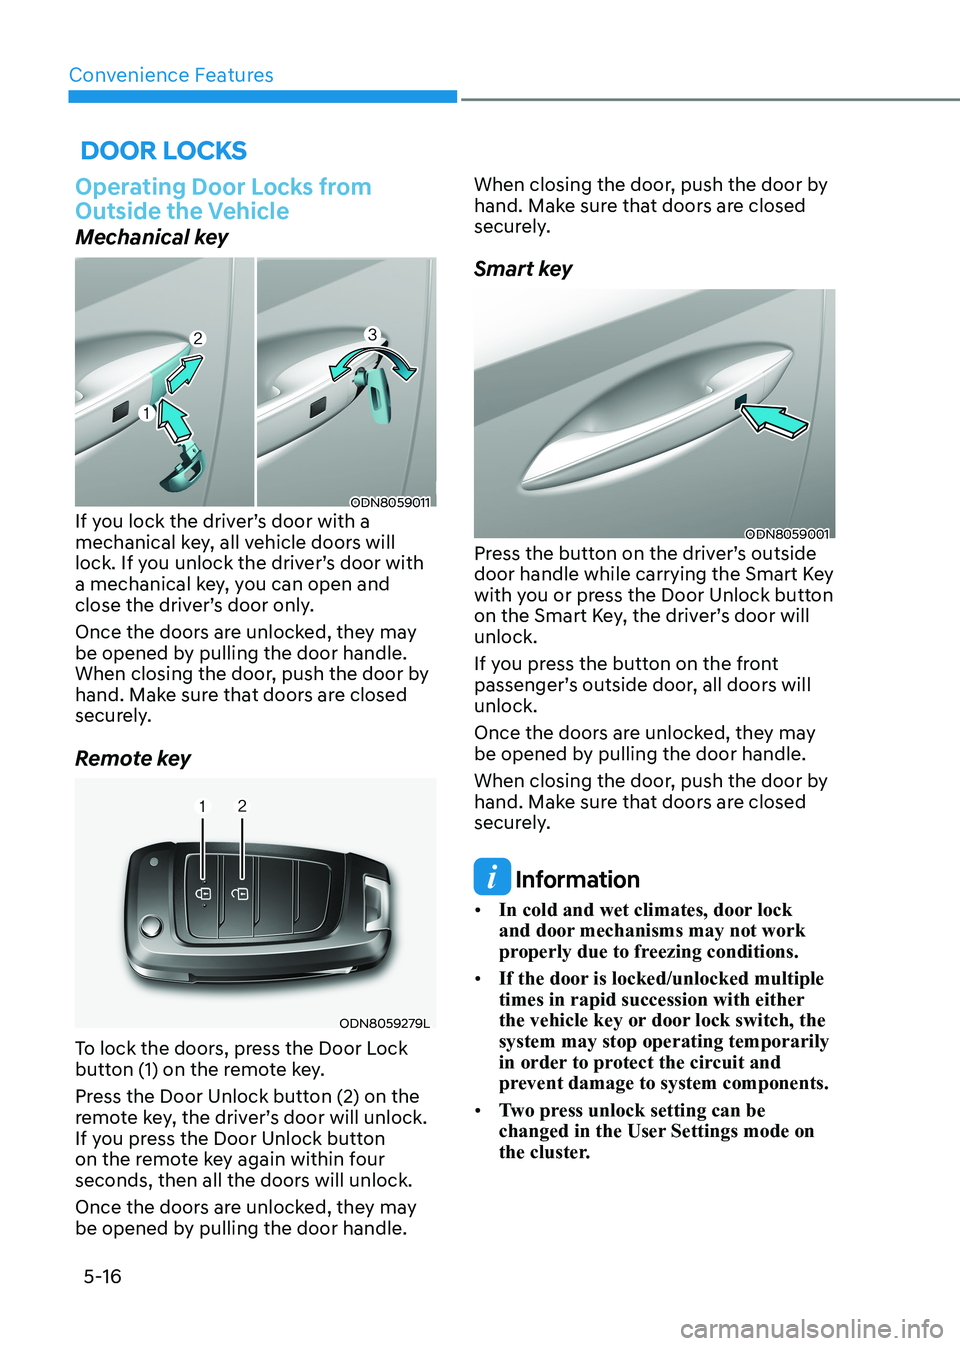
Mechanical key
ODN8059011
If you lock the driver’s door with a
mechanical key, all vehicle doors will
lock. If you unlock the driver’s door with
a mechanical key, you can open and
close the driver’s door only.
Once the doors are unlocked, they may
be opened by pulling the door handle.
When closing the door, push the door by
hand. Make sure that doors are closed
securely.
Remote key
ODN8059279L
To lock the doors, press the Door Lock
button (1) on the remote key.
Press the Door Unlock button (2) on the
remote key, the driver’s door will unlock.
If you press the Door Unlock button
on the remote key again within four
seconds, then all the doors will unlock.
Once the doors are unlocked, they may
be opened by pulling the door handle. When closing the door, push the door by
hand. Make sure that doors are closed
securely.
Smart key
ODN8059001
Press the button on the driver’s outside
door handle while carrying the Smart Key
with you or press the Door Unlock button
on the Smart Key, the driver’s door will unlock.
If you press the button on the front
passenger’s outside door, all doors will unlock.
Once the doors are unlocked, they may
be opened by pulling the door handle.
When closing the door, push the door by
hand. Make sure that doors are closed
securely.
Information
• In cold and wet climates, door lock
and door mechanisms may not work
properly due to freezing conditions.
• If the door is locked/unlocked multiple
times in rapid succession with either
the vehicle key or door lock switch, the system may stop operating temporarily
in order to protect the circuit and
prevent damage to system components.
• Two press unlock setting can be
changed in the User Settings mode on
the cluster.
Page 202 of 555
Convenience Features
5-56
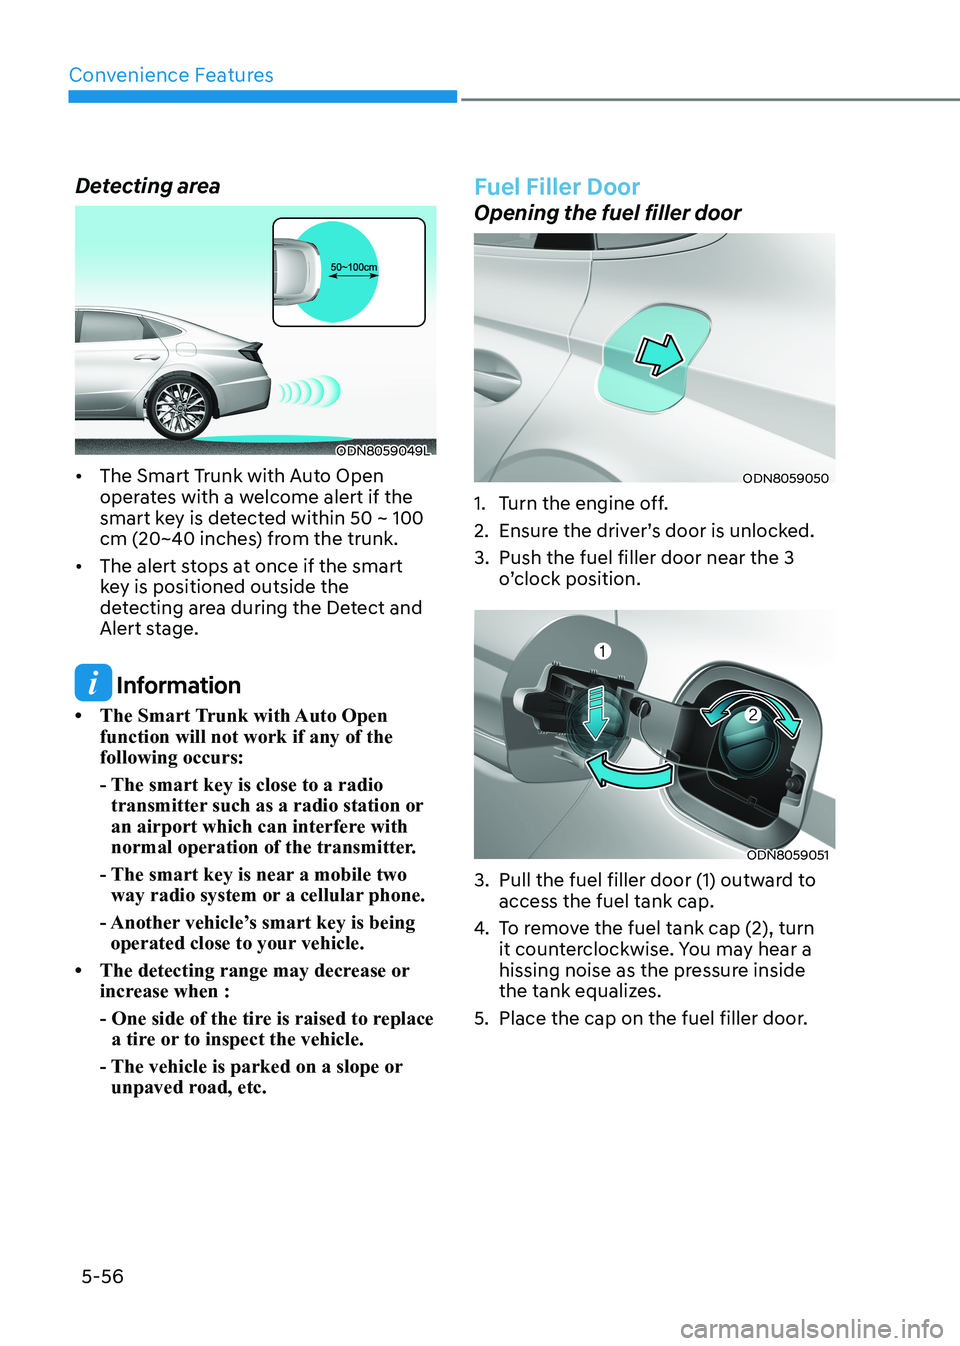
Detecting area
ODN8059049L
• The Smart Trunk with Auto Open operates with a welcome alert if the
smart key is detected within 50 ~ 100
cm (20~40 inches) from the trunk.
• The alert stops at once if the smart key is positioned outside the
detecting area during the Detect and
Alert stage.
Information
• The Smart Trunk with Auto Open function will not work if any of the following occurs:
- The smart key is close to a radio transmitter such as a radio station or
an airport which can interfere with
normal operation of the transmitter.
- The smart key is near a mobile two way radio system or a cellular phone.
- Another vehicle’s smart key is being operated close to your vehicle.
• The detecting range may decrease or increase when :
- One side of the tire is raised to replace a tire or to inspect the vehicle.
- The vehicle is parked on a slope or unpaved road, etc.
Fuel Filler Door
Opening the fuel filler door
ODN8059050
1. Turn the engine off.
2. Ensure the driver’s door is unlocked.
3. Push the fuel filler door near the 3 o’clock position.
ODN8059051
3. Pull the fuel filler door (1) outward to access the fuel tank cap.
4. To remove the fuel tank cap (2), turn
it counterclockwise. You may hear a
hissing noise as the pressure inside
the tank equalizes.
5. Place the cap on the fuel filler door.
Page 451 of 555
07
7-3
If you Have a Flat Tire While Driving
If a tire goes flat while you are driving: • Take your foot off the accelerator
pedal and let the vehicle slow down
while driving straight ahead. Do not
apply the brakes immediately or
attempt to pull off the road as this
may cause loss of vehicle control
resulting in an accident. When the
vehicle has slowed to such a speed
that it is safe to do so, brake carefully
and pull off the road. Drive off the
road as far as possible and park on
firm, level ground. If you are on a
divided highway, do not park in the
median area between the two traffic lanes.
• When the vehicle is stopped, press the
hazard warning flasher button, move
the shift button into P (Park), and
apply the parking brake, and place
the ignition switch in the LOCK/OFF position.
• Have all passengers get out of the
vehicle. Be sure they all get out on the
side of the vehicle that is away from
traffic.
• When changing a flat tire, follow the
instructions provided later in this
chapter.
If the engIne WIll not
s ta rt
If the Engine Doesn’t Turn Over
or Turns Over Slowly
• Be sure the shift button is in N
(Neutral) or P (Park). The engine starts
only when the shift button is in N
(Neutral) or P (Park).
• Check the battery connections to be
sure they are clean and tight.
• Turn on the interior light. If the light
dims or goes out when you operate
the starter, the battery is drained.
Do not push or pull the vehicle to start it.
This could cause damage to your vehicle.
See instructions for “Jump Starting”
provided in this chapter.
CAUTION
Push or pull starting the vehicle may
cause the catalytic converter to
overload which can lead to damage to
the emission control system.
If the Engine Turns Over
Normally but Doesn’t Start
Check the fuel level and add fuel if
necessary.
If the engine still does not start, have
your vehicle checked by an authorized
HYUNDAI dealer.