2023 HYUNDAI SONATA check engine light
[x] Cancel search: check engine lightPage 328 of 555
06
6-41
ESC OFF usage
When Driving
The ESC OFF mode should only be used
briefly to help free the vehicle if stuck in
snow by temporarily stopping operation
of the ESC to maintain wheel torque.
To turn ESC off while driving, press the
ESC OFF button while driving on a flat
road surface.
NOTICE
To prevent damage to the transmission: • Do not allow wheel(s) of one axle to
spin excessively while the ESC, ABS,
and parking brake warning lights
are displayed. The repairs would not
be covered by the vehicle warranty.
Reduce engine power and do not
spin the wheel(s) excessively while
these lights are displayed.
• When operating the vehicle on
a dynamometer, make sure the
ESC is turned off (ESC OFF light
illuminated).
Information
Turning the ESC off does not affect ABS
or standard brake system operation.
Vehicle Stability Management
(VSM)
The Vehicle Stability Management (VSM)
is a function of the Electronic Stability
Control (ESC) system. It helps ensure the
vehicle stays stable when accelerating
or braking suddenly on wet, slippery and
rough roads where traction over the four
tires can suddenly become uneven.
WARNING
Take the following precautions when
using the Vehicle Stability Management
(VSM): • ALWAYS check the speed and the
distance to the vehicle ahead. The
VSM is not a substitute for safe
driving practices.
• Never drive too fast for the road
conditions. The VSM system will not
prevent accidents. Excessive speed
in bad weather, slippery and uneven
roads can result in severe accidents.
VSM operation
VSM ON condition
The VSM operates when:
The Electronic Stability Control (ESC) is on.
When operating
When you apply your brakes under
conditions which may activate the ESC,
you may hear sounds from the brakes,
or feel a corresponding sensation in the
brake pedal. This is normal and it means
your VSM is active.
NOTICE
The VSM does not operate when: • Driving on a banked road such as
gradient or incline.
• Driving rearward.
• ESC OFF indicator light is on.
• EPS (Electric Power Steering)
warning light (
) is on or blinks.
Page 440 of 555

06
6-153
The severe weather conditions of winter
quickly wear out tires and cause other
problems. To minimize winter driving
problems, you should take the following
suggestions:
Snow or Icy Conditions
You need to keep sufficient distance
between your vehicle and the vehicle in
front of you.
Apply the brakes gently. Speeding, rapid
acceleration, sudden brake applications,
and sharp turns are potentially
very hazardous practices. During
deceleration, use engine braking to the
fullest extent. Sudden brake applications
on snowy or icy roads may cause the
vehicle to skid.
To drive your vehicle in deep snow, it
may be necessary to use snow tires.
Always carry emergency equipment.
Some of the items you may want to carry
include tow straps or chains, a flashlight,
emergency flares, sand, a shovel, jumper
cables, a window scraper, gloves, ground
cloth, coveralls, a blanket, etc.
Snow tires
WARNING
Snow tires should be equivalent in size
and type to the vehicle’s standard tires.
Otherwise, the safety and handling of
your vehicle may be adversely affected.
If you mount snow tires on your vehicle,
make sure to use radial tires of the same
size and load range as the original tires.
Mount snow tires on all four wheels
to balance your vehicle’s handling in
all weather conditions. The traction
provided by snow tires on dry roads
may not be as high as your vehicle's
original equipment tires. Check with
the tire dealer for maximum speed
recommendations.
Information
Do not install studded tires without first checking local, country and municipal
regulations for possible restrictions against
their use.
winter Driving
Page 451 of 555
07
7-3
If you Have a Flat Tire While Driving
If a tire goes flat while you are driving: • Take your foot off the accelerator
pedal and let the vehicle slow down
while driving straight ahead. Do not
apply the brakes immediately or
attempt to pull off the road as this
may cause loss of vehicle control
resulting in an accident. When the
vehicle has slowed to such a speed
that it is safe to do so, brake carefully
and pull off the road. Drive off the
road as far as possible and park on
firm, level ground. If you are on a
divided highway, do not park in the
median area between the two traffic lanes.
• When the vehicle is stopped, press the
hazard warning flasher button, move
the shift button into P (Park), and
apply the parking brake, and place
the ignition switch in the LOCK/OFF position.
• Have all passengers get out of the
vehicle. Be sure they all get out on the
side of the vehicle that is away from
traffic.
• When changing a flat tire, follow the
instructions provided later in this
chapter.
If the engIne WIll not
s ta rt
If the Engine Doesn’t Turn Over
or Turns Over Slowly
• Be sure the shift button is in N
(Neutral) or P (Park). The engine starts
only when the shift button is in N
(Neutral) or P (Park).
• Check the battery connections to be
sure they are clean and tight.
• Turn on the interior light. If the light
dims or goes out when you operate
the starter, the battery is drained.
Do not push or pull the vehicle to start it.
This could cause damage to your vehicle.
See instructions for “Jump Starting”
provided in this chapter.
CAUTION
Push or pull starting the vehicle may
cause the catalytic converter to
overload which can lead to damage to
the emission control system.
If the Engine Turns Over
Normally but Doesn’t Start
Check the fuel level and add fuel if
necessary.
If the engine still does not start, have
your vehicle checked by an authorized
HYUNDAI dealer.
Page 453 of 555
07
7-5
Jump starting procedure
1. Position the vehicles close enough
that the jumper cables will reach, but
do not allow the vehicles to touch.
2. Avoid fans or any moving parts in the engine compartment at all times, even
when the vehicles are turned off.
3. Turn off all electrical devices such as radios, lights, air conditioning, etc.
Put the vehicles in P (Park) and set
the parking brakes. Turn both vehicles
OFF.
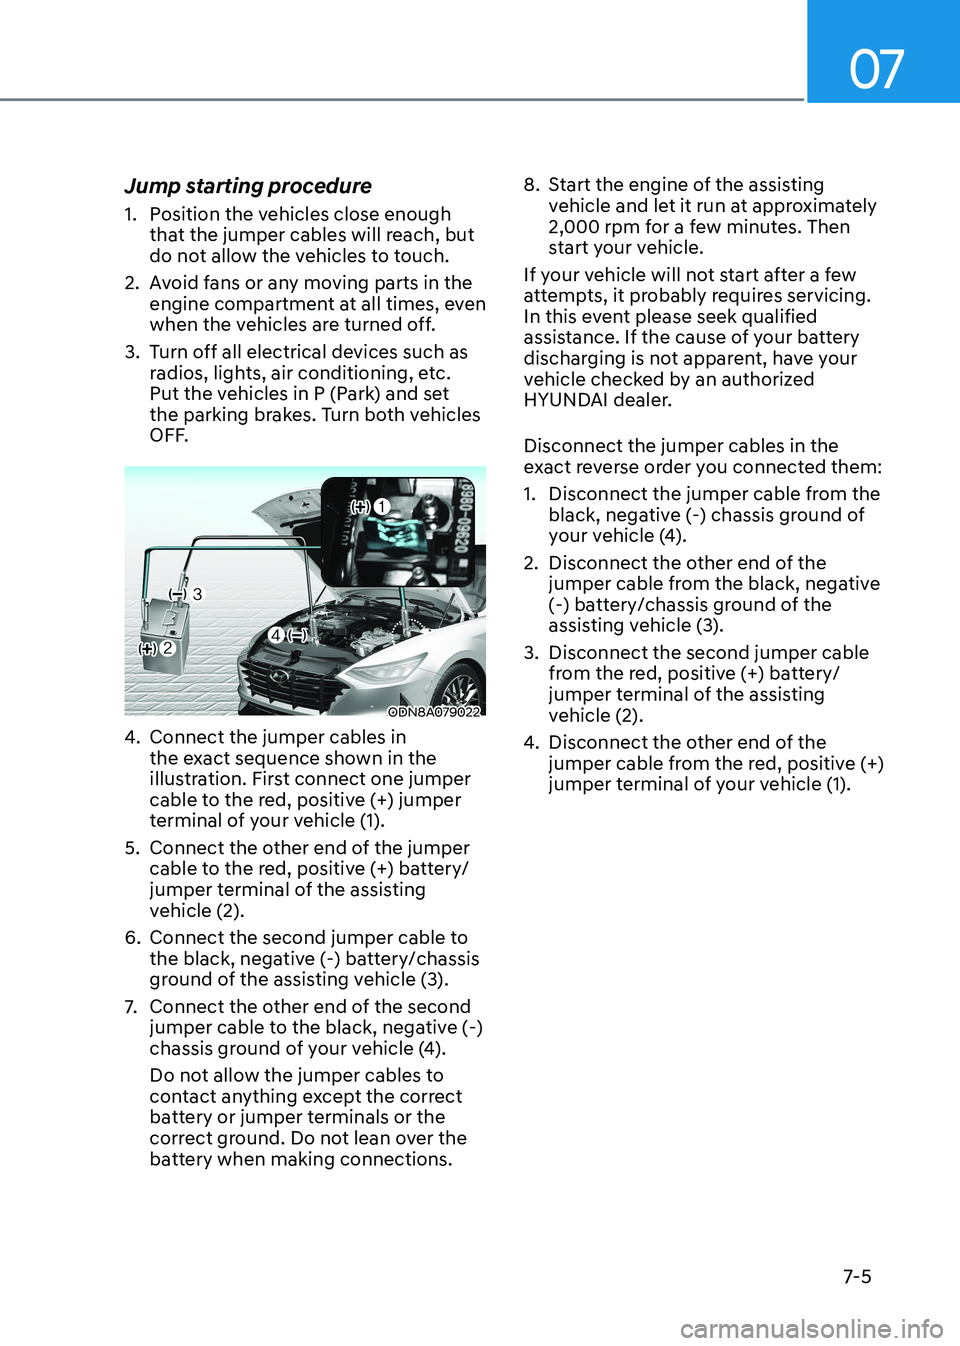
ODN8A079022
4. Connect the jumper cables in
the exact sequence shown in the
illustration. First connect one jumper
cable to the red, positive (+) jumper
terminal of your vehicle (1).
5. Connect the other end of the jumper cable to the red, positive (+) battery/
jumper terminal of the assisting
vehicle (2).
6. Connect the second jumper cable to the black, negative (-) battery/chassis
ground of the assisting vehicle (3).
7. Connect the other end of the second
jumper cable to the black, negative (-)
chassis ground of your vehicle (4).
Do not allow the jumper cables to
contact anything except the correct
battery or jumper terminals or the
correct ground. Do not lean over the
battery when making connections. 8. Start the engine of the assisting
vehicle and let it run at approximately
2,000 rpm for a few minutes. Then
start your vehicle.
If your vehicle will not start after a few
attempts, it probably requires servicing.
In this event please seek qualified
assistance. If the cause of your battery
discharging is not apparent, have your
vehicle checked by an authorized
HYUNDAI dealer. Disconnect the jumper cables in the
exact reverse order you connected them:
1. Disconnect the jumper cable from the black, negative (-) chassis ground of
your vehicle (4).
2. Disconnect the other end of the jumper cable from the black, negative
(-) battery/chassis ground of the
assisting vehicle (3).
3. Disconnect the second jumper cable from the red, positive (+) battery/
jumper terminal of the assisting
vehicle (2).
4. Disconnect the other end of the
jumper cable from the red, positive (+)
jumper terminal of your vehicle (1).
Page 470 of 555
Emergency Situations
7-22
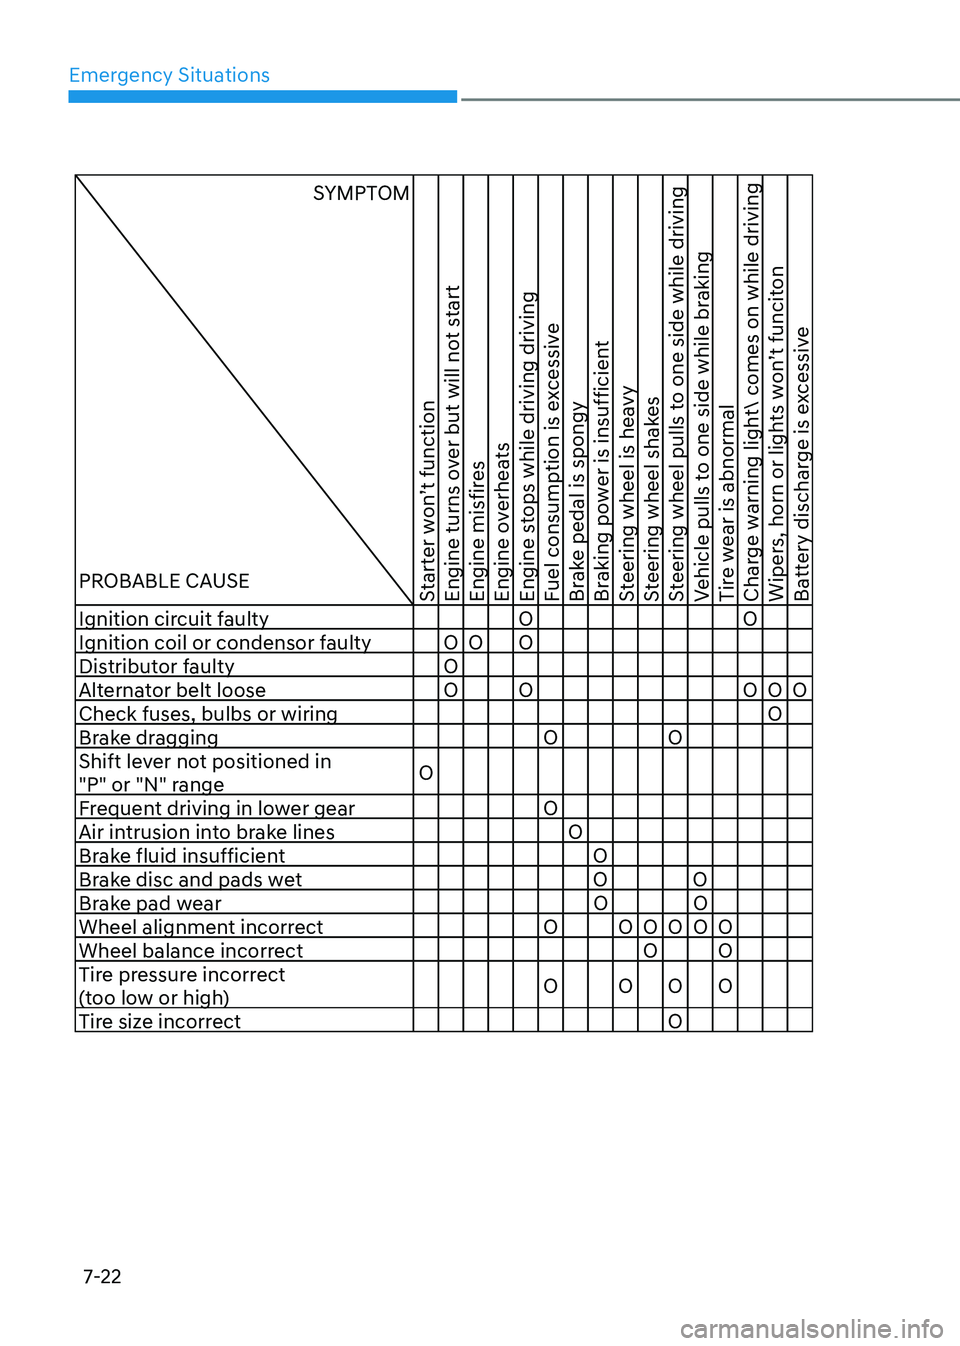
SYMPTOM
PROBABLE CAUSE
Starter won’t function
Engine turns over but will not start
Engine misfires
Engine overheats
Engine stops while driving driving
Fuel consumption is excessive
Brake pedal is spongy
Braking power is insufficient
Steering wheel is heavy
Steering wheel shakes
Steering wheel pulls to one side while driving
Vehicle pulls to one side while braking
Tire wear is abnormal
Charge warning light comes on while driving
Wipers, horn or lights won’t funciton
Battery discharge is excessive
Ignition circuit faulty O O Ignition coil or condensor faulty O O O
Distributor faulty O
Alternator belt loose O O O O O Check fuses, bulbs or wiring O
Brake dragging O O
Shift lever not positioned in
"P" or "N" range O
Frequent driving in lower gear O
Air intrusion into brake lines O
Brake fluid insufficient O
Brake disc and pads wet O O
Brake pad wear O O
Wheel alignment incorrect O O O O O O Wheel balance incorrect O O
Tire pressure incorrect
(too low or high) O O O O
Tire size incorrect O
Page 472 of 555
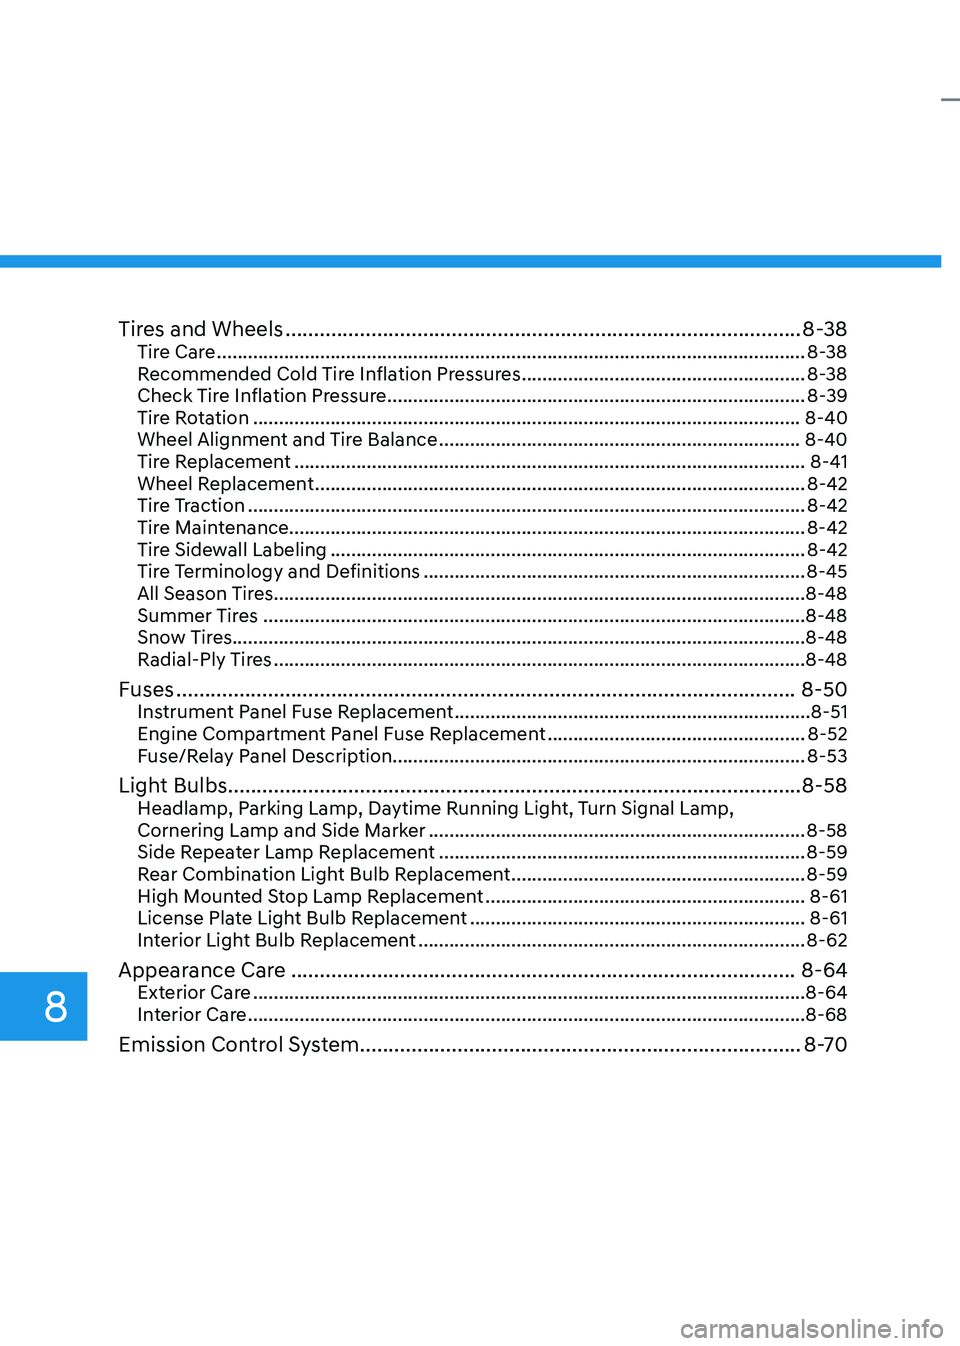
Tires and Wheels .......................................................................................... 8-38
Tire Care .................................................................................................................. 8-38
Recommended Cold Tire Inflation Pressures .......................................................8-38
Check Tire Inflation Pressure ................................................................................. 8-39
Tire Rotation .......................................................................................................... 8-40
Wheel Alignment and Tire Balance ...................................................................... 8-40
Tire Replacement ................................................................................................... 8-41
Wheel Replacement ............................................................................................... 8-42
Tire Traction ............................................................................................................ 8-42
Tire Maintenance.................................................................................................... 8-42
Tire Sidewall Labeling ............................................................................................ 8-42
Tire Terminology and Definitions .......................................................................... 8-45
All Season Tires ....................................................................................................... 8-48
Summer Tires ......................................................................................................... 8-48
Snow Tires...............................................................................................................8-48
Radial-Ply Tires ....................................................................................................... 8-48
Fuses ............................................................................................................ 8-50
Instrument Panel Fuse Replacement ..................................................................... 8-51
Engine Compartment Panel Fuse Replacement ..................................................8-52
Fuse/Relay Panel Description................................................................................ 8-53
Light Bulbs .................................................................................................... 8-58
Headlamp, Parking Lamp, Daytime Running Light, Turn Signal Lamp,
Cornering Lamp and Side Marker ......................................................................... 8-58
Side Repeater Lamp Replacement ....................................................................... 8-59
Rear Combination Light Bulb Replacement .........................................................8-59
High Mounted Stop Lamp Replacement ..............................................................8-61
License Plate Light Bulb Replacement ................................................................. 8-61
Interior Light Bulb Replacement ........................................................................... 8-62
Appearance Care ........................................................................................ 8-64
Exterior Care ........................................................................................................... 8-64
Interior Care ............................................................................................................ 8-68
Emission Control System ............................................................................. 8-70
8
Page 477 of 555
08
8 -7
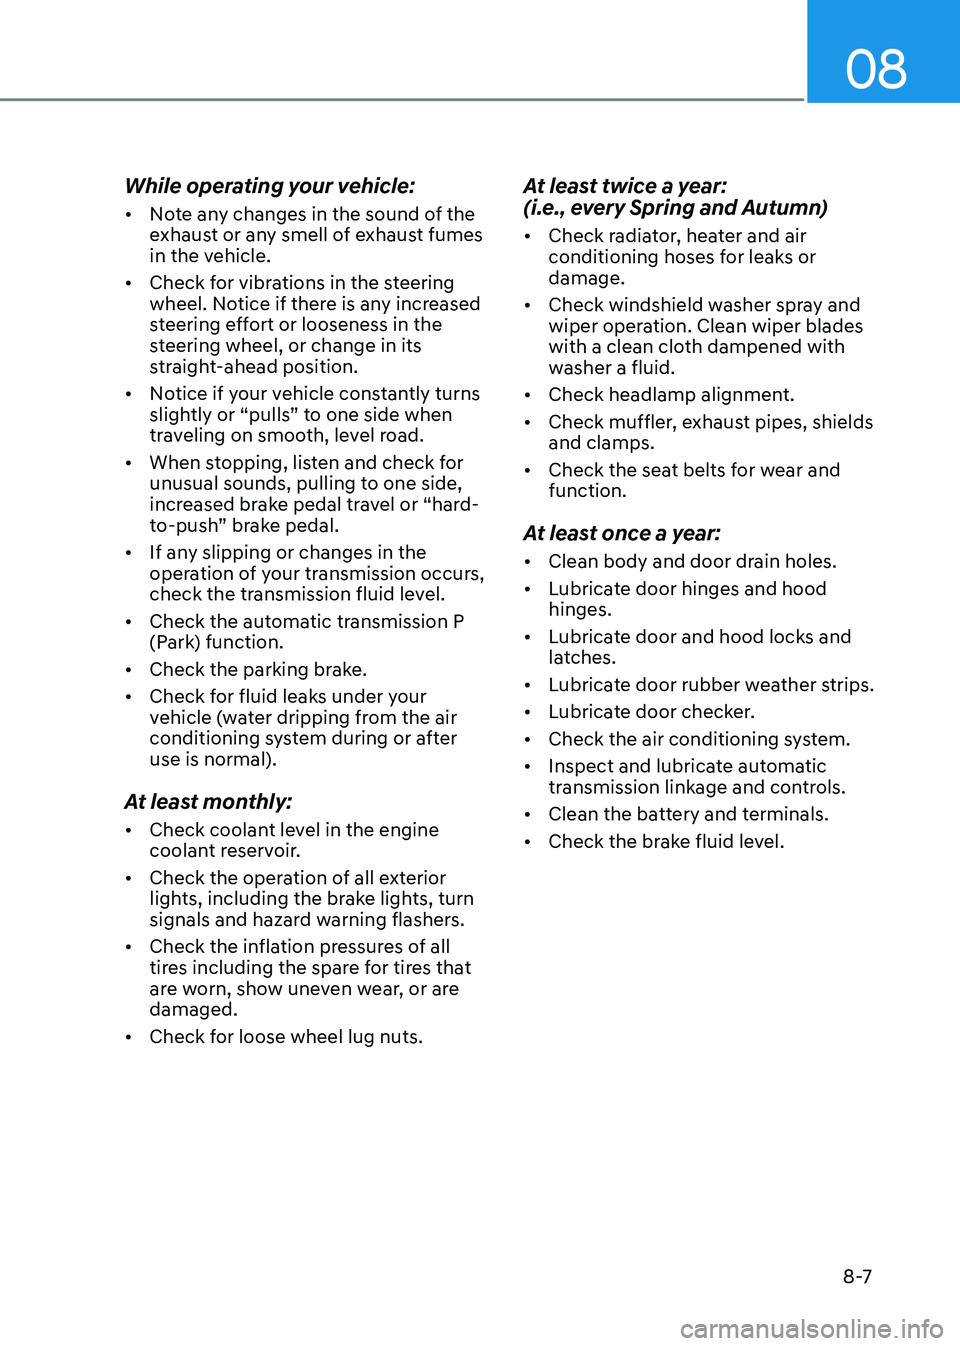
While operating your vehicle: •
Note any changes in the sound of the
exhaust or any smell of exhaust fumes
in the vehicle.
• Check for vibrations in the steering
wheel. Notice if there is any increased
steering effort or looseness in the
steering wheel, or change in its
straight-ahead position.
• Notice if your vehicle constantly turns
slightly or “pulls” to one side when
traveling on smooth, level road.
• When stopping, listen and check for
unusual sounds, pulling to one side,
increased brake pedal travel or “hard-
to-push” brake pedal.
• If any slipping or changes in the
operation of your transmission occurs,
check the transmission fluid level.
• Check the automatic transmission P
(Park) function.
• Check the parking brake.
• Check for fluid leaks under your
vehicle (water dripping from the air
conditioning system during or after use is normal).
At least monthly: • Check coolant level in the engine
coolant reservoir.
• Check the operation of all exterior
lights, including the brake lights, turn
signals and hazard warning flashers.
• Check the inflation pressures of all
tires including the spare for tires that
are worn, show uneven wear, or are damaged.
• Check for loose wheel lug nuts. At least twice a year:
(i.e., every Spring and Autumn) •
Check radiator, heater and air
conditioning hoses for leaks or damage.
• Check windshield washer spray and
wiper operation. Clean wiper blades
with a clean cloth dampened with
washer a fluid.
• Check headlamp alignment.
• Check muffler, exhaust pipes, shields and clamps.
• Check the seat belts for wear and function.
At least once a year: • Clean body and door drain holes.
• Lubricate door hinges and hood hinges.
• Lubricate door and hood locks and
latches.
• Lubricate door rubber weather strips.
• Lubricate door checker.
• Check the air conditioning system.
• Inspect and lubricate automatic
transmission linkage and controls.
• Clean the battery and terminals.
• Check the brake fluid level.
Page 495 of 555
08
8-25
Checking the Engine Oil and
Filter
• Have engine oil and filter changed
by an authorized HYUNDAI dealer
according to the Maintenance
Schedule at the beginning of this
chapter.
• If the maintenance schedule to
replace engine oil is exceeded,
the engine oil performance may
deteriorate, and the engine condition
may be affected. Therefore, replace
the engine oil according to the
maintenance schedule.
• To keep the engine in optimal
condition, use the recommended
engine oil and filter. If the
recommended engine oil and filter are
not used, replace it according to the
maintenance schedule under severe usage conditions.
• The purpose of the maintenance
schedule for engine oil replacement
is to prevent oil deterioration and it is
irrelevant to oil consumption. Check
and refill engine oil regularly.
WARNING
Used engine oil may cause irritation or
cancer of the skin if left in contact with
the skin for prolonged periods of time.
Always protect your skin by washing
your hands thoroughly with soap and
warm water as soon as possible after handling used oil.
Information
When the oil pressure is low due to insufficient engine oil, the Engine
Oil Pressure (
) warning light will
illuminate. In addition, the enhanced
engine protection system, which limits
the engine’s power is activated and the
Malfunction Indicator Lamp (
) will
illuminate when the vehicle is driven in
this state continuously. When oil pressure
is restored, the Engine Oil Pressure warning light will turn off and the engine
power will no longer be limited.
However, for gasoline 2.5 turbo engine,
when the oil pressure is restored, the warning light and the enhanced engine
protection system will turn off after the
engine is restarted.
CAUTION
The engine oil is very hot immediately
after the vehicle has been driven and
can cause burns during replacement.
Replace the engine oil after the engine
oil has cooled down.