2023 HYUNDAI KONA EV turn signal
[x] Cancel search: turn signalPage 67 of 548
2-2
Vehicle informationExtErior ovErviEw (i)
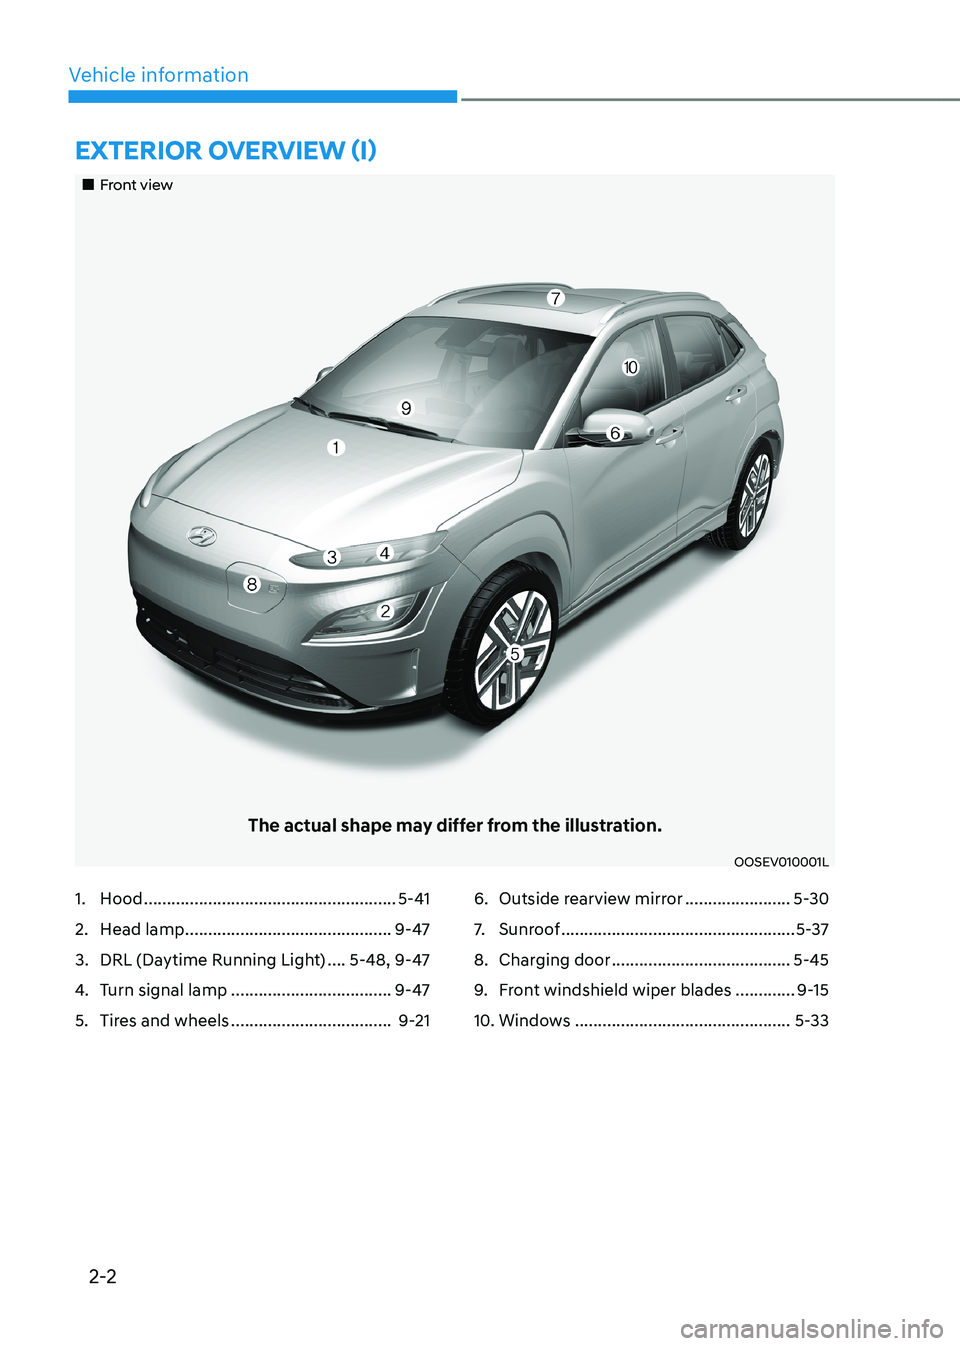
„„Front view
The actual shape may differ from the illustration.
OOSEV010001L
1. Hood ....................................................... 5-41
2. Head lamp ............................................. 9-47
3. DRL (Daytime Running Light) ....5-48, 9-47
4. Turn signal lamp ................................... 9-47
5. Tires and wheels ................................... 9-216. Outside rearview mirror
.......................5-30
7. Sunroof ................................................... 5-37
8. Charging door ....................................... 5-45
9. Front windshield wiper blades .............9-15
10. Windows ............................................... 5-33
Page 68 of 548
2-3
02
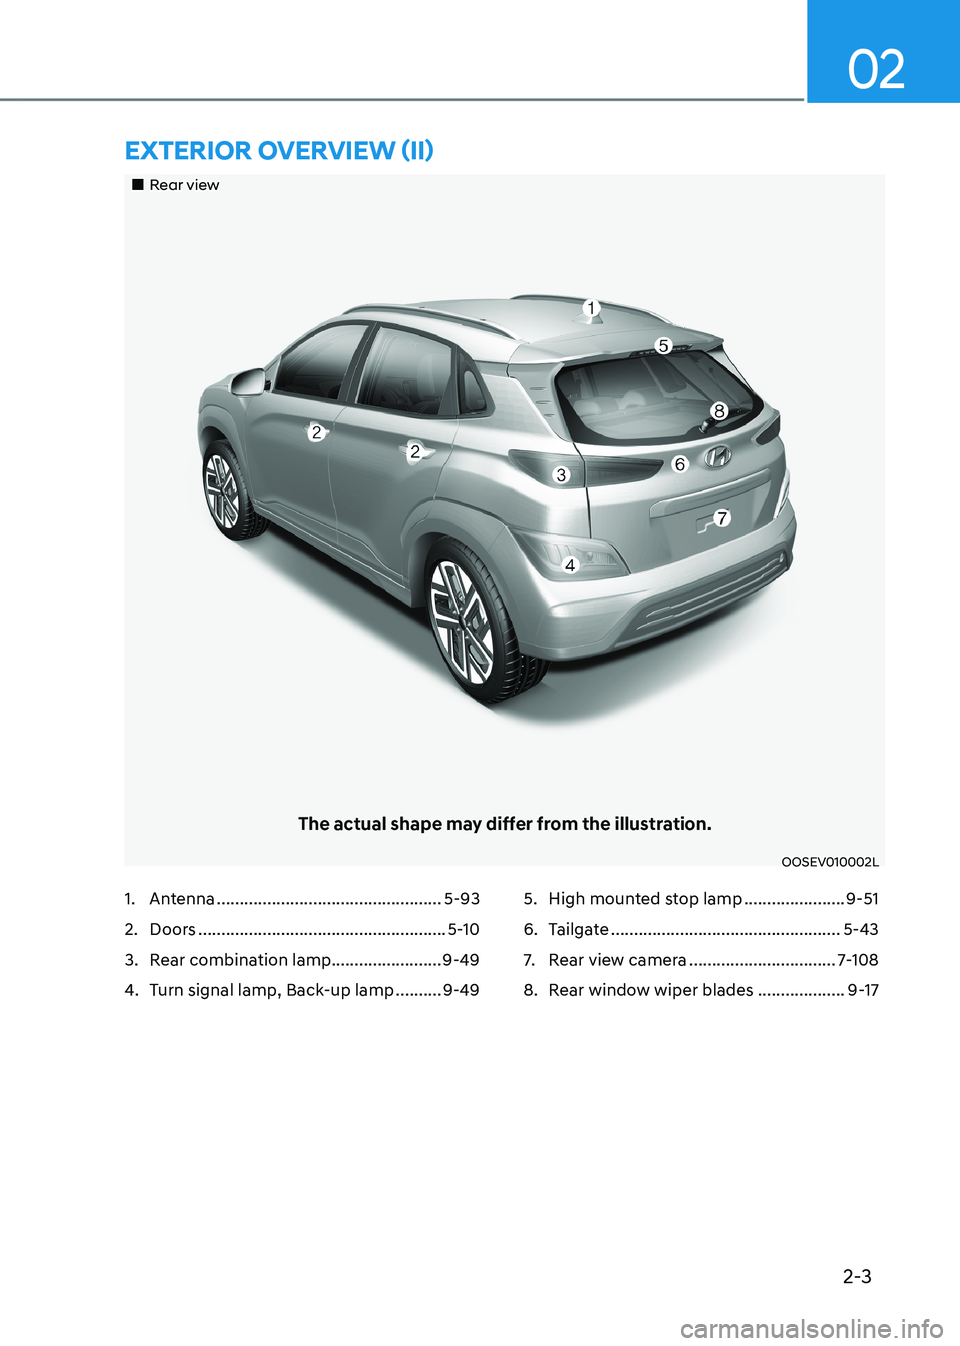
„„Rear view
The actual shape may differ from the illustration.
OOSEV010002L
ExtErior ovErviEw (ii)
1. Antenna ................................................. 5-93
2. Doors ...................................................... 5-10
3. Rear combination lamp........................ 9-49
4. Turn signal lamp, Back-up lamp ..........9-49 5. High mounted stop lamp
......................9-51
6. Tailgate .................................................. 5-43
7. Rear view camera ................................ 7-108
8. Rear window wiper blades ...................9-17
Page 70 of 548
2-5
02
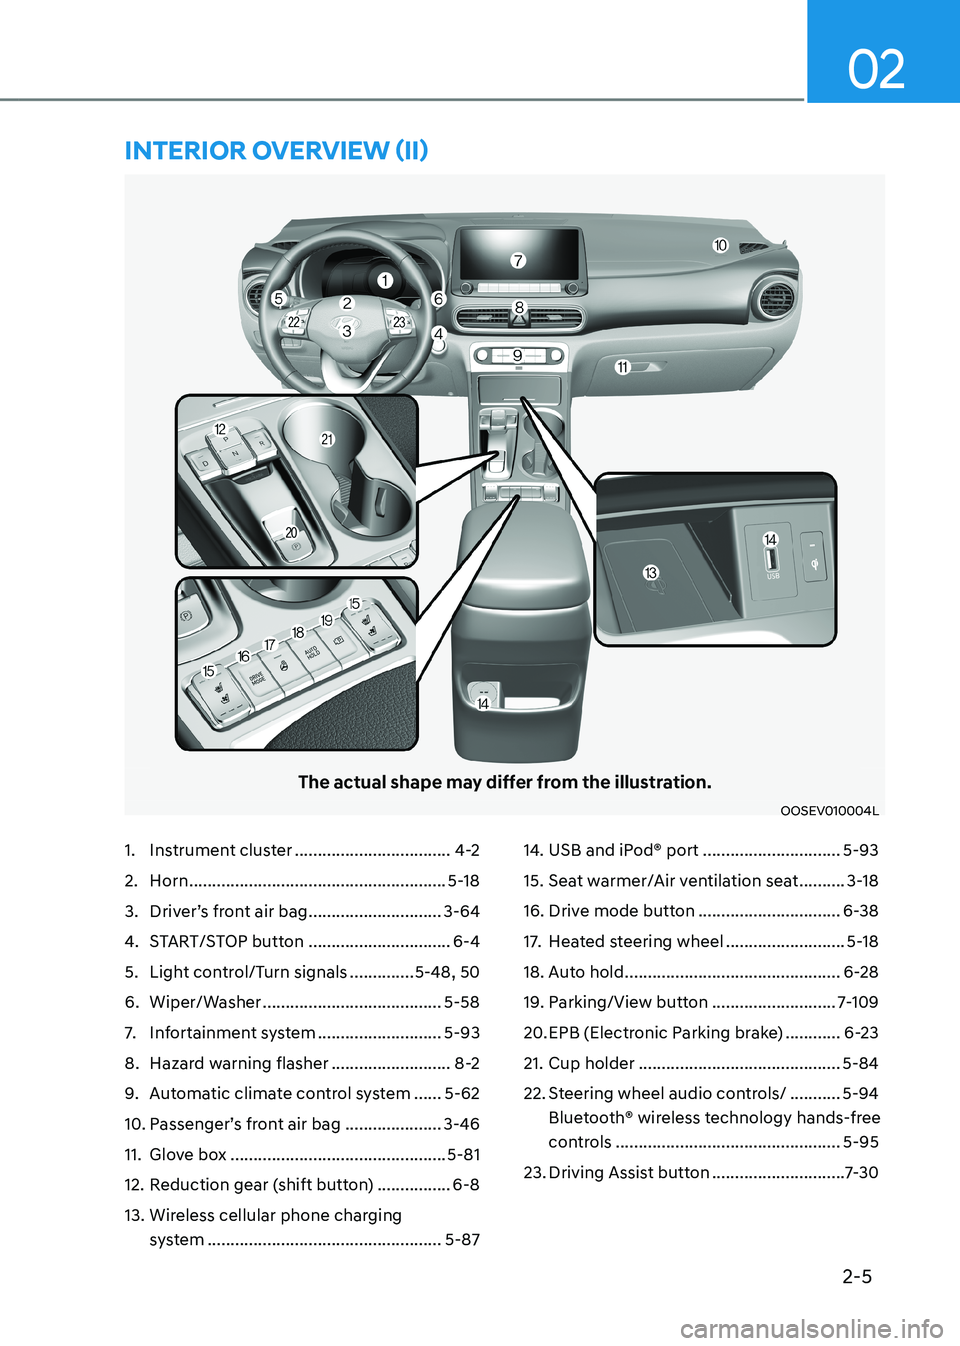
The actual shape may differ from the illustration.
OOSEV010004L
1. Instrument cluster ..................................4-2
2. Horn ........................................................ 5-18
3. Driver’s front air bag .............................3-64
4. START/STOP button ...............................6-4
5. Light control/Turn signals ..............5-48, 50
6. Wiper/Washer ....................................... 5-58
7. Infortainment system ...........................5-93
8. Hazard warning flasher ..........................8-2
9. Automatic climate control system ......5-62
10. Passenger’s front air bag ..................... 3-46
11. Glove box ............................................... 5-81
12. Reduction gear (shift button) ................6-8
13. Wireless cellular phone charging system ................................................... 5-8714. USB and iPod® port
..............................5-93
15. Seat warmer/Air ventilation seat ..........3-18
16. Drive mode button ...............................6-38
17. Heated steering wheel ..........................5-18
18. Auto hold ............................................... 6-28
19. Parking/View button ...........................7-109
20. EPB (Electronic Parking brake) ............6-23
21. Cup holder ............................................ 5-84
22. Steering wheel audio controls/ ...........5-94
Bluetooth® wireless technology hands-free
controls ................................................. 5-95
23. Driving Assist button .............................7-30
intErior ovErviEw (ii)
Page 73 of 548
Vehicle information
2-8
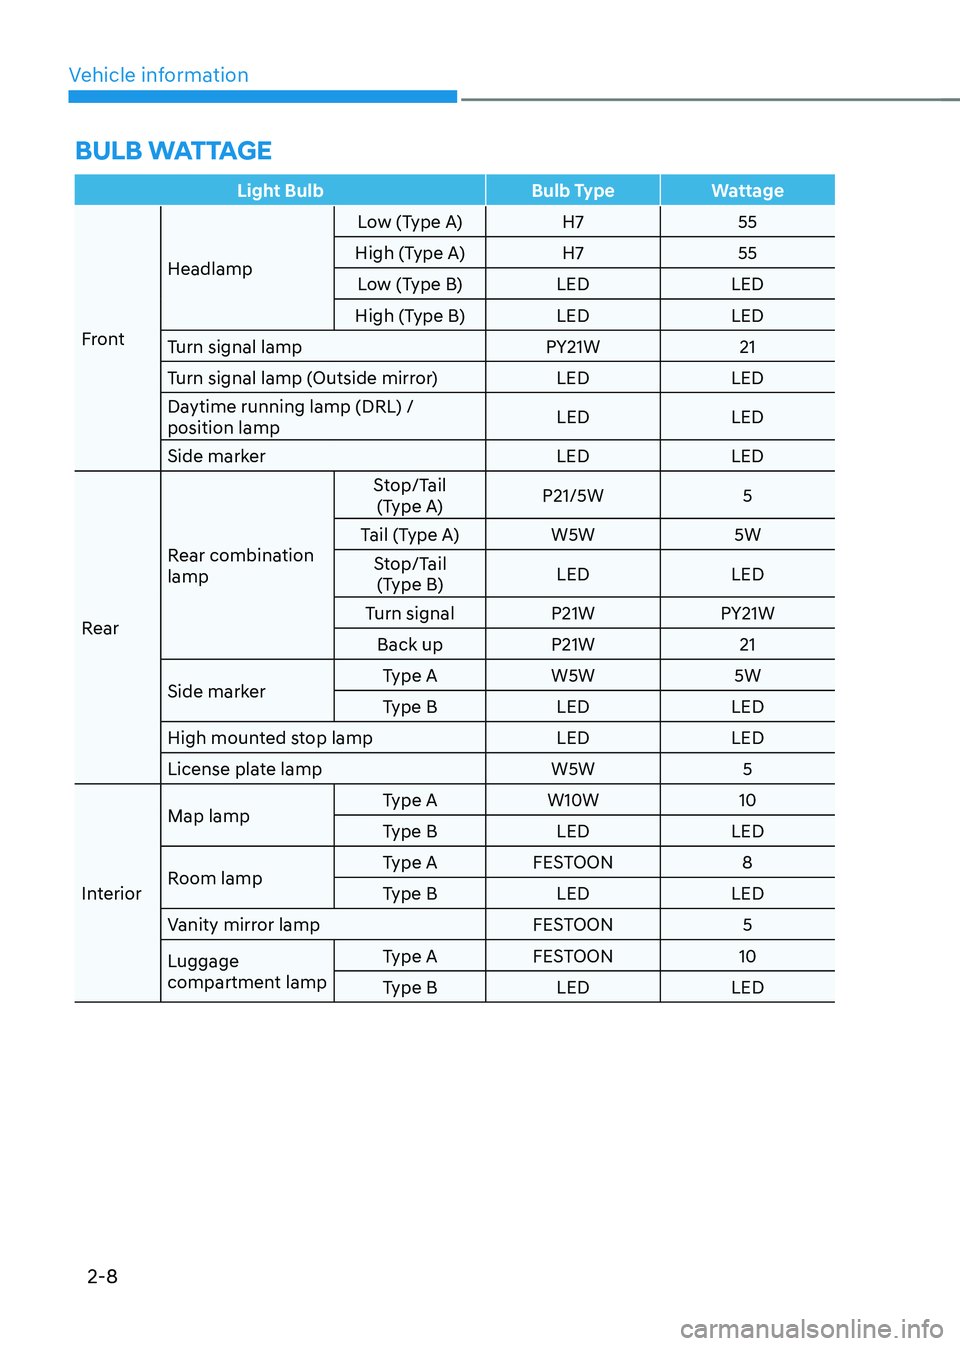
BuLB wattage
Light Bulb Bulb Type Wattage
FrontHeadlamp
Low (Type A) H7 55
High (Type A) H7 55 Low (Type B) LED LED
High (Type B) LED LED
Turn signal lamp PY21W 21
Turn signal lamp (Outside mirror) LED LED
Daytime running lamp (DRL) / position lamp LED LED
Side marker LED LED
Rear Rear combination lamp Stop/Tail
(Type A) P21/5W 5
Tail (Type A) W5W 5W Stop/Tail (Type B) LED LED
Turn signal P21W PY21W Back up P21W 21
Side marker Type A W5W 5W
Type B LED LED
High mounted stop lamp LED LED
License plate lamp W5W 5
Interior Map lamp
Type A W10W 10
Type B LED LED
Room lamp Type A FESTOON 8
Type B LED LED
Vanity mirror lamp FESTOON 5
Luggage
compartment lamp Type A FESTOON 10
Type B LED LED
Page 127 of 548
Safety system
3-48
SRS warning light
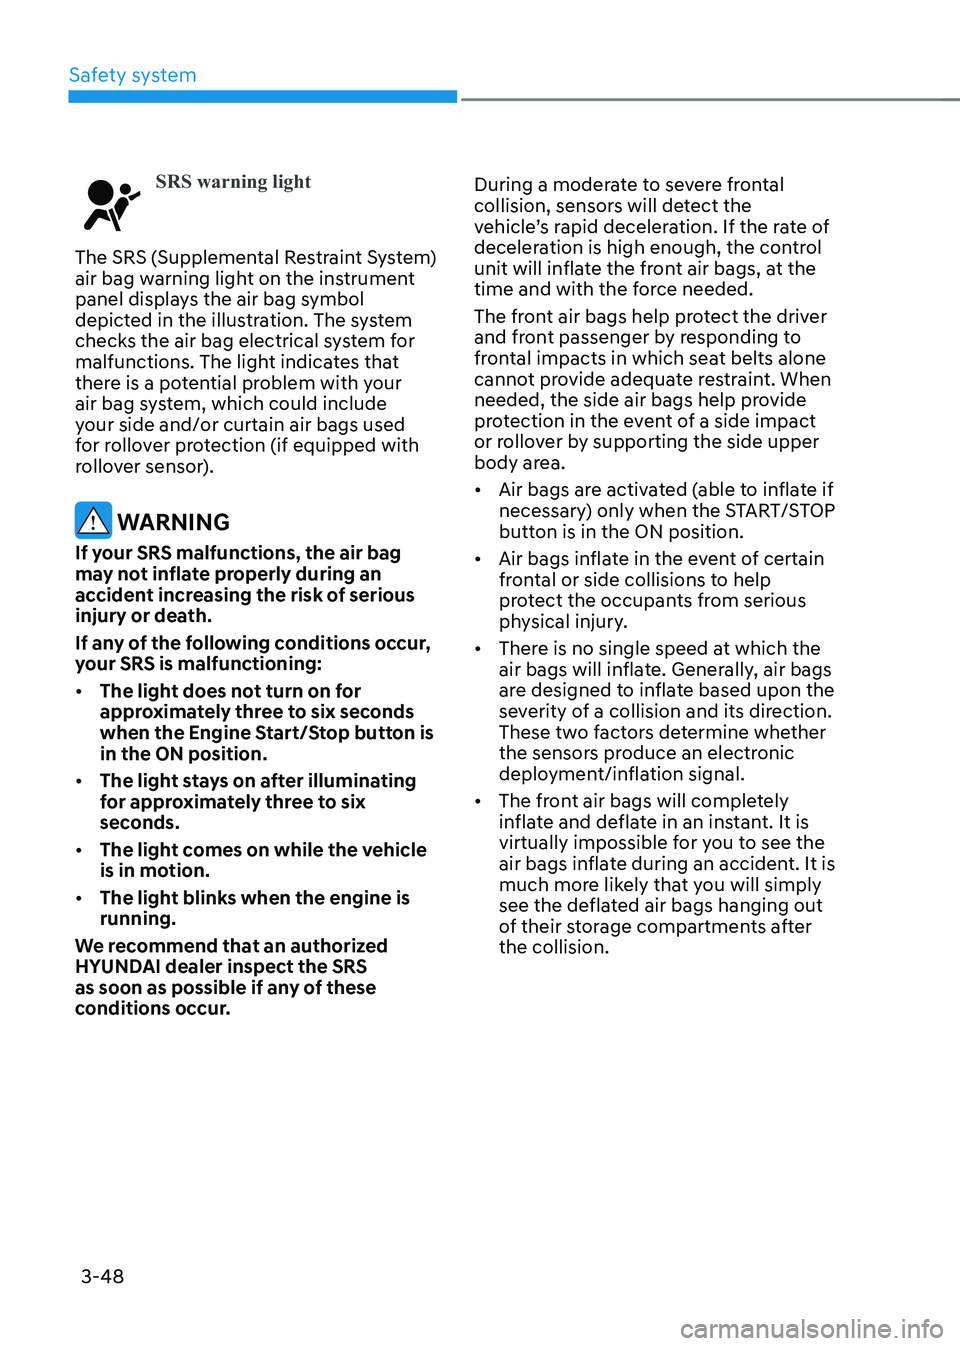
The SRS (Supplemental Restraint System)
air bag warning light on the instrument
panel displays the air bag symbol
depicted in the illustration. The system
checks the air bag electrical system for
malfunctions. The light indicates that
there is a potential problem with your
air bag system, which could include
your side and/or curtain air bags used
for rollover protection (if equipped with
rollover sensor).
WARNING
If your SRS malfunctions, the air bag
may not inflate properly during an
accident increasing the risk of serious
injury or death.
If any of the following conditions occur,
your SRS is malfunctioning: • The light does not turn on for
approximately three to six seconds
when the Engine Start/Stop button is in the ON position.
• The light stays on after illuminating
for approximately three to six
seconds.
• The light comes on while the vehicle
is in motion.
• The light blinks when the engine is running.
We recommend that an authorized
HYUNDAI dealer inspect the SRS
as soon as possible if any of these
conditions occur. During a moderate to severe frontal
collision, sensors will detect the
vehicle’s rapid deceleration. If the rate of
deceleration is high enough, the control
unit will inflate the front air bags, at the
time and with the force needed.
The front air bags help protect the driver
and front passenger by responding to
frontal impacts in which seat belts alone
cannot provide adequate restraint. When
needed, the side air bags help provide
protection in the event of a side impact
or rollover by supporting the side upper
body area. •
Air bags are activated (able to inflate if
necessary) only when the START/STOP
button is in the ON position.
• Air bags inflate in the event of certain
frontal or side collisions to help
protect the occupants from serious
physical injury.
• There is no single speed at which the
air bags will inflate. Generally, air bags
are designed to inflate based upon the
severity of a collision and its direction.
These two factors determine whether
the sensors produce an electronic
deployment/inflation signal.
• The front air bags will completely
inflate and deflate in an instant. It is
virtually impossible for you to see the
air bags inflate during an accident. It is
much more likely that you will simply
see the deflated air bags hanging out
of their storage compartments after the collision.
Page 157 of 548
Instrument cluster
4-14
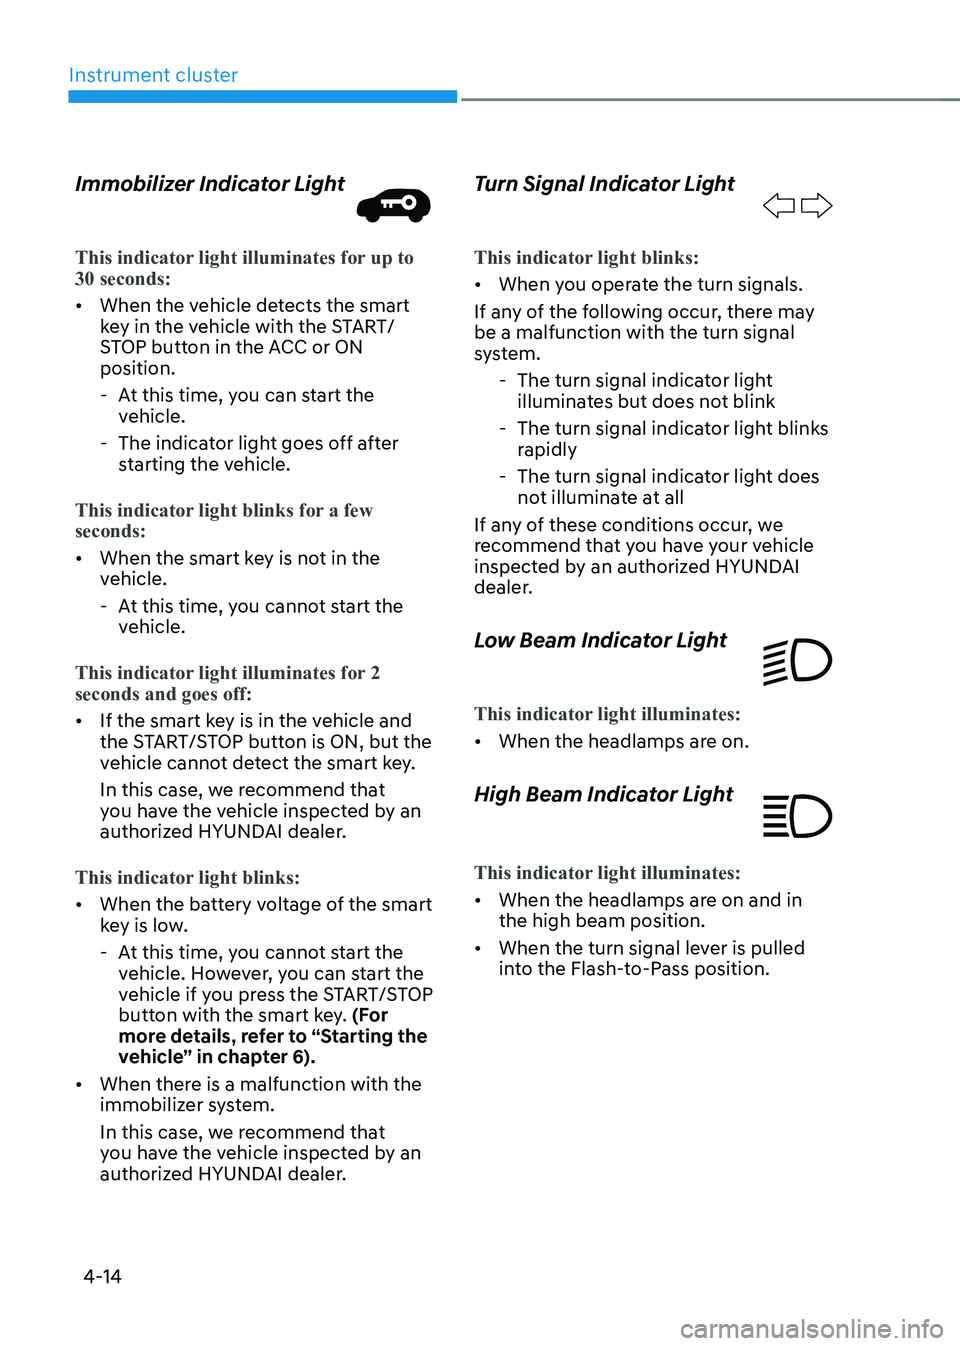
Immobilizer Indicator Light
This indicator light illuminates for up to 30 seconds:
•
When the vehicle detects the smart
key in the vehicle with the START/
STOP button in the ACC or ON position.
- At this time, you can start the vehicle.
- The indicator light goes off after starting the vehicle.
This indicator light blinks for a few seconds:
• When the smart key is not in the
vehicle.
- At this time, you cannot start the vehicle.
This indicator light illuminates for 2 seconds and goes off:
• If the smart key is in the vehicle and
the START/STOP button is ON, but the
vehicle cannot detect the smart key.
In this case, we recommend that
you have the vehicle inspected by an
authorized HYUNDAI dealer.
This indicator light blinks:
• When the battery voltage of the smart
key is low.
- At this time, you cannot start the vehicle. However, you can start the
vehicle if you press the START/STOP
button with the smart key. (For
more details, refer to “Starting the
vehicle” in chapter 6).
• When there is a malfunction with the
immobilizer system.
In this case, we recommend that
you have the vehicle inspected by an
authorized HYUNDAI dealer. Turn Signal Indicator Light
This indicator light blinks:
•
When you operate the turn signals.
If any of the following occur, there may be a malfunction with the turn signal
system. - The turn signal indicator light illuminates but does not blink
- The turn signal indicator light blinks rapidly
- The turn signal indicator light does not illuminate at all
If any of these conditions occur, we
recommend that you have your vehicle
inspected by an authorized HYUNDAI
dealer.
Low Beam Indicator Light
This indicator light illuminates:
• When the headlamps are on.
High Beam Indicator Light
This indicator light illuminates:
• When the headlamps are on and in the high beam position.
• When the turn signal lever is pulled
into the Flash-to-Pass position.
Page 179 of 548
Instrument cluster
4-36
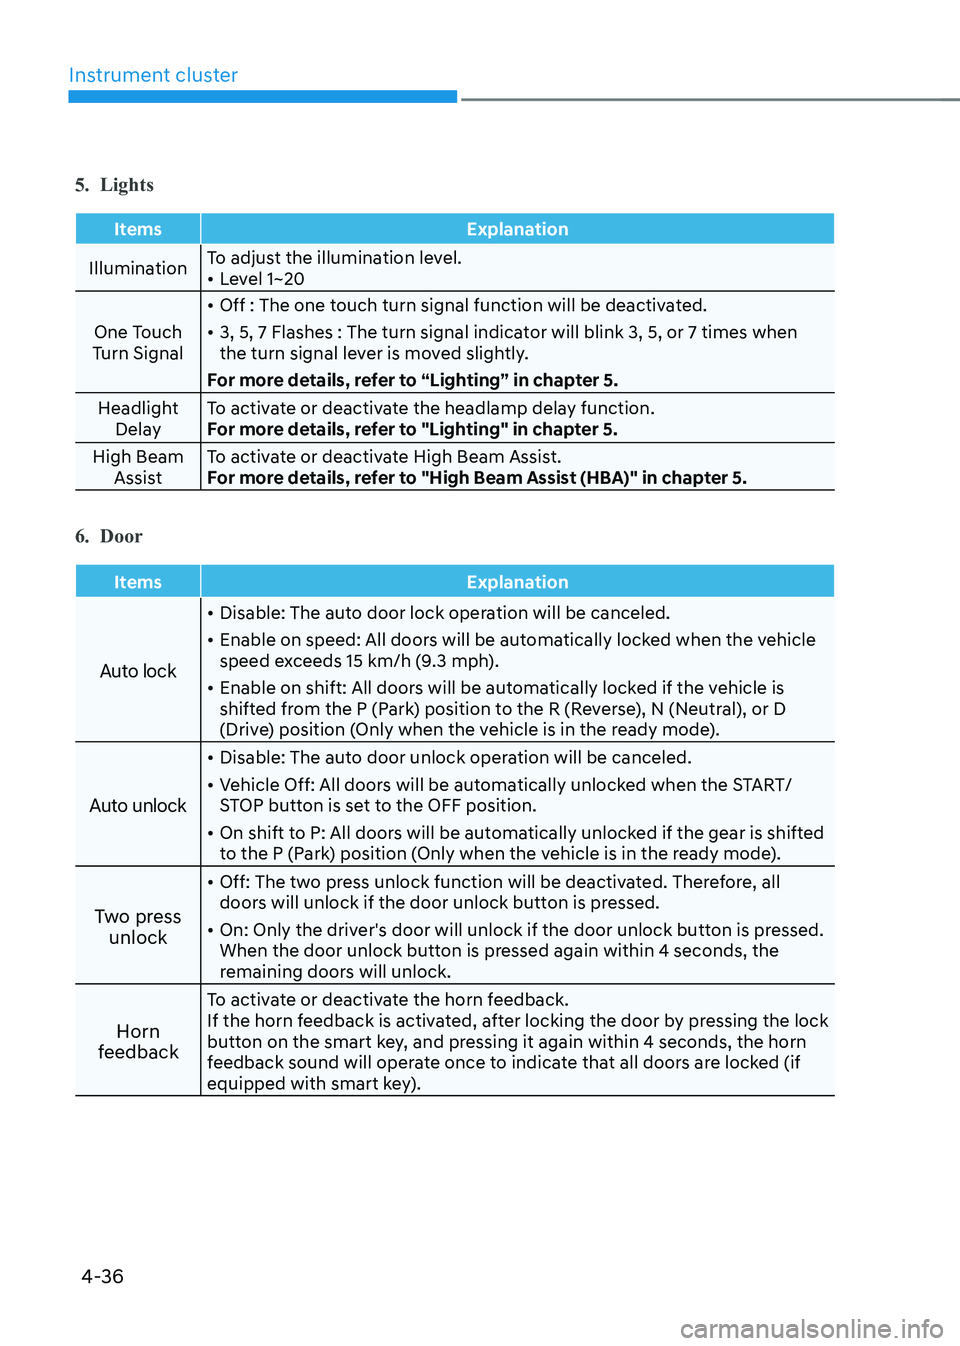
5. Lights
Items Explanation
IlluminationTo adjust the illumination level. •
Level 1~20
One Touch
Turn Signal •
Off : The one touch turn signal function will be deactivated.
• 3, 5, 7 Flashes : The turn signal indicator will blink 3, 5, or 7 times when
the turn signal lever is moved slightly.
For more details, refer to “Lighting” in chapter 5.
Headlight Delay To activate or deactivate the headlamp delay function.
For more details, refer to "Lighting" in chapter 5.
High Beam Assist To activate or deactivate High Beam Assist.
For more details, refer to "High Beam Assist (HBA)" in chapter 5.
6. Door
Items Explanation
Auto lock
•
Disable: The auto door lock operation will be canceled.
• Enable on speed: All doors will be automatically locked when the vehicle
speed exceeds 15 km/h (9.3 mph).
• Enable on shift: All doors will be automatically locked if the vehicle is
shifted from the P (Park) position to the R (Reverse), N (Neutral), or D
(Drive) position (Only when the vehicle is in the ready mode).
Auto unlock
• Disable: The auto door unlock operation will be canceled.
• Vehicle Off: All doors will be automatically unlocked when the START/
STOP button is set to the OFF position.
• On shift to P: All doors will be automatically unlocked if the gear is shifted
to the P (Park) position (Only when the vehicle is in the ready mode).
Two press unlock •
Off: The two press unlock function will be deactivated. Therefore, all
doors will unlock if the door unlock button is pressed.
• On: Only the driver's door will unlock if the door unlock button is pressed.
When the door unlock button is pressed again within 4 seconds, the
remaining doors will unlock.
Horn
feedback To activate or deactivate the horn feedback.
If the horn feedback is activated, after locking the door by pressing the lock
button on the smart key, and pressing it again within 4 seconds, the horn
feedback sound will operate once to indicate that all doors are locked (if
equipped with smart key).
Page 234 of 548
Convenient features
5-50
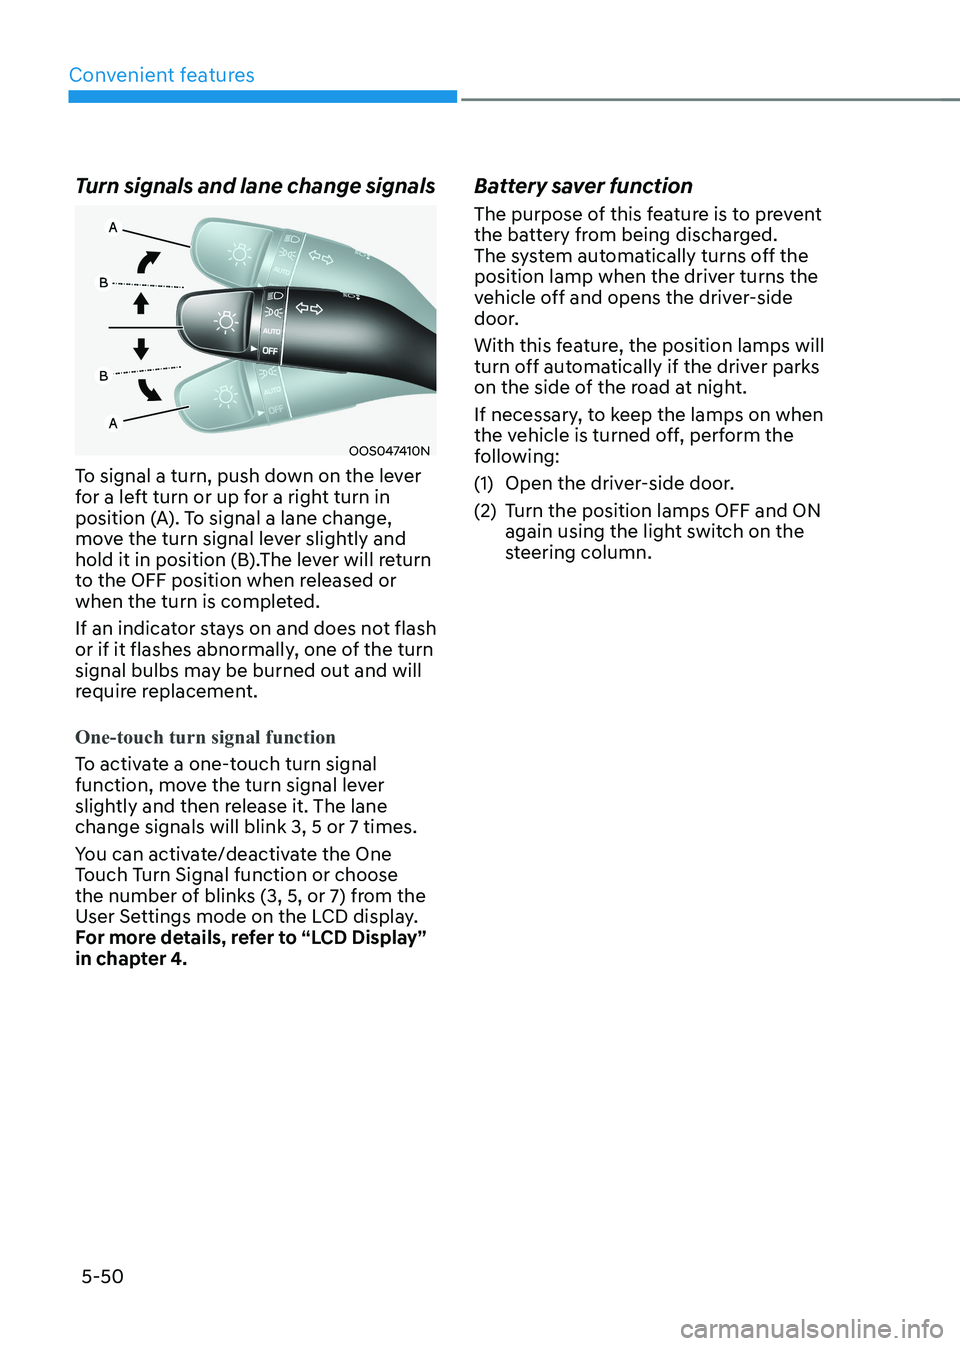
Turn signals and lane change signals
OOS047410N
To signal a turn, push down on the lever
for a left turn or up for a right turn in
position (A). To signal a lane change,
move the turn signal lever slightly and
hold it in position (B).The lever will return
to the OFF position when released or
when the turn is completed.
If an indicator stays on and does not flash
or if it flashes abnormally, one of the turn
signal bulbs may be burned out and will
require replacement.
One-touch turn signal function
To activate a one-touch turn signal
function, move the turn signal lever
slightly and then release it. The lane change signals will blink 3, 5 or 7 times.
You can activate/deactivate the One
Touch Turn Signal function or choose
the number of blinks (3, 5, or 7) from the
User Settings mode on the LCD display.
For more details, refer to “LCD Display”
in chapter 4. Battery saver function
The purpose of this feature is to prevent
the battery from being discharged.
The system automatically turns off the
position lamp when the driver turns the
vehicle off and opens the driver-side
door.
With this feature, the position lamps will
turn off automatically if the driver parks
on the side of the road at night.
If necessary, to keep the lamps on when
the vehicle is turned off, perform the
following:
(1) Open the driver-side door.
(2) Turn the position lamps OFF and ON
again using the light switch on the
steering column.