2023 HYUNDAI KONA EV air conditioning
[x] Cancel search: air conditioningPage 263 of 548
05
5-79
Information
• When the air conditioning is turned
on by Auto defogging system, if you
try to turn off the air conditioning,
the indicator will blink 3 times and
the air conditioning will not be
turned off.
• To maintain the effectiveness and
efficiency of the Auto Defogging
System, do not select Recirculation
mode while the system is operating.
• When the Auto Defogging System is
operating, the fan speed adjustment
knob, the temperature adjustment
knob, and the air intake control
button are all disabled.
NOTICE
Do not remove the sensor cover located
on the top of the windshield glass.
Damage to system parts could occur
and may not be covered by your vehicle
warranty.
Defroster
NOTICE
To prevent damage to the conductors
bonded to the inside surface of the rear
window, never use sharp instruments or
window cleaners containing abrasives
to clean the window.
Information
If you want to defrost and defog the
front windshield, refer to “Windshield
Defrosting and Defogging” in this chapter.
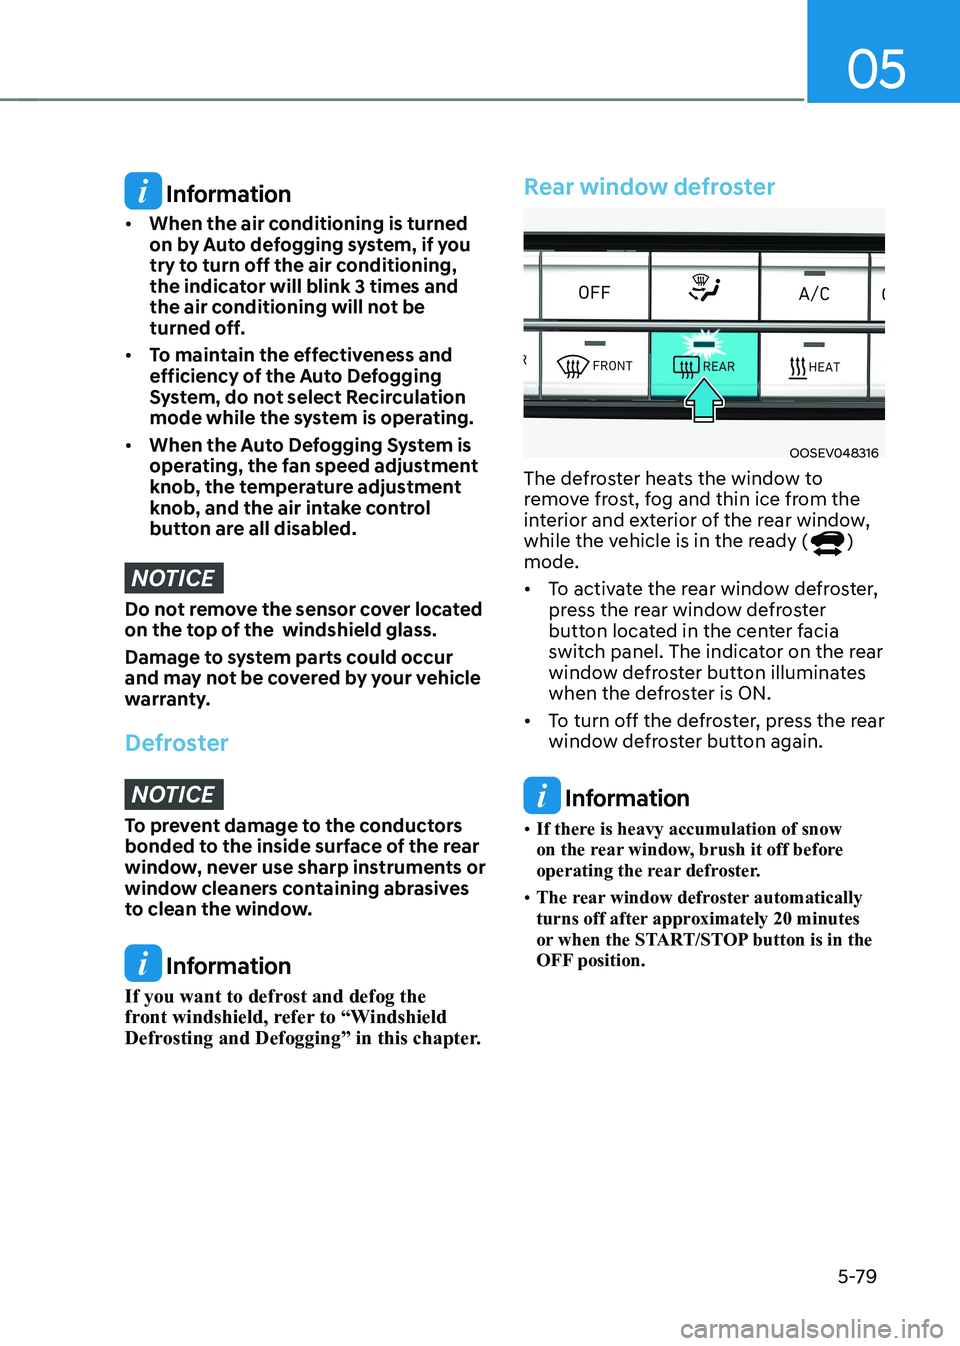
Rear window defroster
OOSEV048316
The defroster heats the window to
remove frost, fog and thin ice from the
interior and exterior of the rear window,
while the vehicle is in the ready (
)
mode. • To activate the rear window defroster,
press the rear window defroster
button located in the center facia
switch panel. The indicator on the rear
window defroster button illuminates
when the defroster is ON.
• To turn off the defroster, press the rear
window defroster button again.
Information
• If there is heavy accumulation of snow
on the rear window, brush it off before
operating the rear defroster.
• The rear window defroster automatically
turns off after approximately 20 minutes
or when the START/STOP button is in the
OFF position.
Page 264 of 548
Convenient features
5-80
Cluster ionizer (if equipped)
When the START/STOP button is in the ON position, the clean air function turns
on automatically.
Also, the clean air function turns off
automatically, when the START/STOP
button is in the OFF position.
Automatic ventilation (if equipped)
To increase cabin air quality and reduce
windscreen misting, air recirculation
mode switches off automatically after
5 minutes, depending on outside
temperature, A/C state, air direction
mode, and the air intake will change to
outside (fresh) mode.
To cancel or reactivate the
Automatic Ventilation
When the air conditioning system is on,
select Face level mode (
) and set the
air intake control to the outside (fresh)
air position. Then, while pressing the
A/C button, press air recirculation mode
button five times within 3 seconds.
When the automatic ventilation is set,
the air recirculation indicator will blink 6
times. When canceled, the indicator will blink 3 times.
ClimaTe ConTrol addiTional feaTures
Page 460 of 548
08
8-5
Jump starting procedure
1. Position the vehicles close enough
that the jumper cables will reach, but
do not allow the vehicles to touch.
2. Avoid fans or any moving parts in the motor compartment at all times, even
when the vehicles are turned off.
3. Turn off all electrical devices such as radios, lights, air conditioning, etc.
Put the vehicles in P (Park) and set
the parking brakes. Turn both vehicles
OFF.
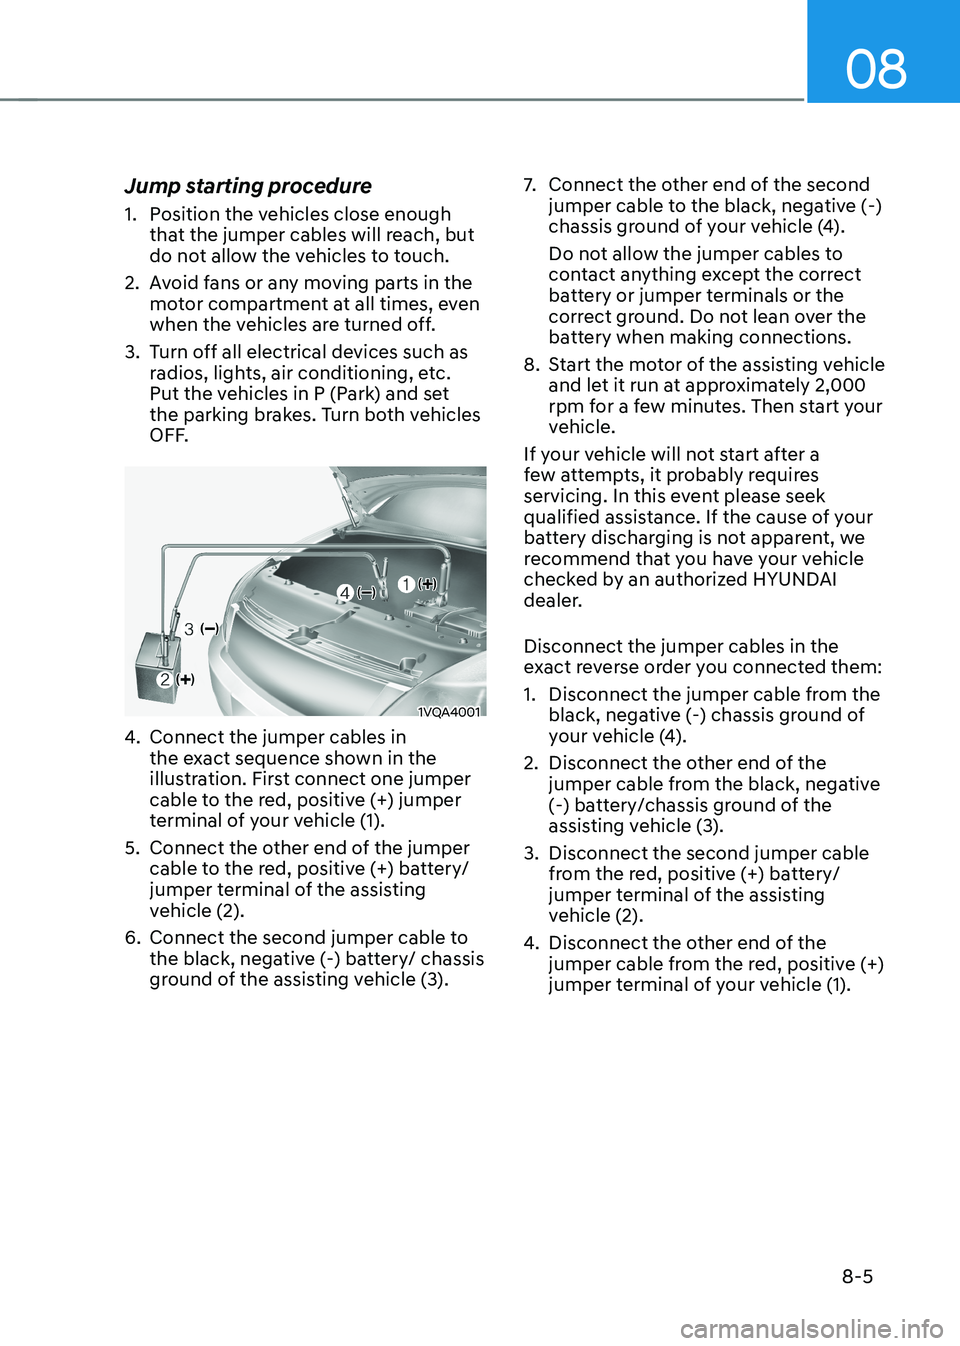
1VQA4001
4. Connect the jumper cables in
the exact sequence shown in the
illustration. First connect one jumper
cable to the red, positive (+) jumper
terminal of your vehicle (1).
5. Connect the other end of the jumper cable to the red, positive (+) battery/
jumper terminal of the assisting
vehicle (2).
6. Connect the second jumper cable to the black, negative (-) battery/ chassis
ground of the assisting vehicle (3). 7.
Connect the other end of the second
jumper cable to the black, negative (-)
chassis ground of your vehicle (4).
Do not allow the jumper cables to
contact anything except the correct
battery or jumper terminals or the
correct ground. Do not lean over the
battery when making connections.
8. Start the motor of the assisting vehicle and let it run at approximately 2,000
rpm for a few minutes. Then start your
vehicle.
If your vehicle will not start after a
few attempts, it probably requires
servicing. In this event please seek
qualified assistance. If the cause of your
battery discharging is not apparent, we
recommend that you have your vehicle
checked by an authorized HYUNDAI
dealer. Disconnect the jumper cables in the
exact reverse order you connected them:
1. Disconnect the jumper cable from the black, negative (-) chassis ground of
your vehicle (4).
2. Disconnect the other end of the jumper cable from the black, negative
(-) battery/chassis ground of the
assisting vehicle (3).
3. Disconnect the second jumper cable from the red, positive (+) battery/
jumper terminal of the assisting
vehicle (2).
4. Disconnect the other end of the
jumper cable from the red, positive (+)
jumper terminal of your vehicle (1).
Page 477 of 548
9
9. Maintenance
Motor compartment ......................................................................................... 9-3
Maintenance services ....................................................................................... 9-4
Owner’s responsibility ................................................................................................ 9-4
Owner maintenance precautions............................................................................... 9-4
Owner maintenance ......................................................................................... 9-5
Owner maintenance schedule .................................................................................... 9-5
Scheduled maintenance services ..................................................................... 9 -7
Maintenance Schedule ................................................................................................ 9 -7
Explanation of scheduled maintenance items ...............................................9-9
Cooling system ............................................................................................................ 9-9
Coolant ......................................................................................................................... 9-9
Reduction gear fluid.................................................................................................... 9-9
Brake hoses and lines.................................................................................................. 9-9Brake fluid ................................................................................................................... 9-9
Brake pads, calipers and rotors .................................................................................. 9-9
Suspension mounting bolts ........................................................................................ 9-9
Drive shafts and boots ................................................................................................ 9-9
Air conditioning refrigerant/compressor................................................................... 9-9
Coolant ............................................................................................................. 9-10
Brake fluid ......................................................................................................... 9-11
Checking the brake fluid level .................................................................................... 9-11
Washer fluid ..................................................................................................... 9-12
Checking the washer fluid level ................................................................................ 9-12
Climate control air filter................................................................................... 9-13
Filter inspection ............................................................................................... 9-13
Filter replacement ...................................................................................................... 9-13
Wiper blades .................................................................................................... 9-14
Blade inspection ......................................................................................................... 9-14
Blade replacement ................................................................................................... 9-14
Battery (12 Volt) ................................................................................................ 9-17
Battery usage.............................................................................................................. 9-18 Battery capacity label ................................................................................................ 9-18
Battery recharging ..................................................................................................... 9-18
Reset items ................................................................................................................. 9-19
Page 482 of 548
Maintenance
9-6
While operating your vehicle: •
Check for vibrations in the steering
wheel. Notice if there is any increased
steering effort or looseness in the
steering wheel, or change in its
straight-ahead position.
• Notice if your vehicle constantly turns
slightly or “pulls” to one side when
traveling on smooth, level road.
• When stopping, listen and check for
unusual sounds, pulling to one side,
increased brake pedal travel or “hard-
to-push” brake pedal.
• If any slipping or changes in the
operation of your reduction gear
occurs, check the reduction gear fluid
level.
• Check the reduction gear p (park) function.
• Check the parking brake.
• Check for fluid leaks under your
vehicle (water dripping from the air
conditioning system during or after use is normal).
At least monthly: • Check coolant level in the coolant
reservoir.
• Check the operation of all exterior
lights, including the stoplights, turn
signals and hazard warning flashers.
• Check the inflation pressures of all
tires including the spare for tires that
are worn, show uneven wear, or are damaged.
• Check for loose wheel lug nuts.
• Do not add regular green coolant. •
At least twice a year:
(i.e., every Spring and Autumn)
• Check radiator, heater and air
conditioning hoses for leaks or damage.
• Check windshield washer spray and
wiper operation. Clean wiper blades
with a clean cloth dampened with
washer fluid.
• Check headlamp alignment.
• Check the seat belts for wear and function.
At least once a year: • Clean body and door drain holes.
• Lubricate door hinges and hood hinges.
• Lubricate door and hood locks and
latches.
• Lubricate door rubber weather strips.
• Check the air conditioning system.
• Inspect and lubricate reduction gear
linkage and controls.
• Clean the battery and terminals.
• Check the brake fluid level.
Page 485 of 548
09
9-9
EXPLANATION OF SCHEDULED MAINTENANCE ITEMS
Cooling system
Check the cooling system parts, such
as radiator, coolant reservoir, hoses and
connections for leakage and damage.
Replace any damaged parts.
Coolant
The coolant should be changed at the
intervals specified in the maintenance schedule.
Reduction gear fluid
The reduction gear fluid should be
inspected according to the intervals
specified in the maintenance schedule.
Brake hoses and lines
Visually check for proper installation,
chafing, cracks, deterioration and any
leakage. Replace any deteriorated or
damaged parts immediately.
Brake fluid
Check the brake fluid level in the brake
fluid reservoir. The level should be
between “MIN” and “MAX” marks on the
side of the reservoir. Use only hydraulic
brake fluid conforming to DOT 3 or DOT 4
specification.
Brake pads, calipers and rotors
Check the pads for excessive wear, discs
for run out and wear, and calipers for
fluid leakage.
For more information on checking the
pads or lining wear limit, refer to the
HYUNDAI web site.
(http://service.hyundai-motor.com)
Suspension mounting bolts
Check the suspension connections for
looseness or damage. Retighten to the
specified torque.
Steering gear box, linkage &
boots/lower arm ball joint
With the vehicle stopped, check for
excessive free-play in the steering wheel.
Check the linkage for bends or damage.
Check the dust boots and ball joints
for deterioration, cracks, or damage.
Replace any damaged parts.
Drive shafts and boots
Check the drive shafts, boots and clamps
for cracks, deterioration, or damage.
Replace any damaged parts and, if
necessary, repack the grease.
Air conditioning refrigerant/
compressor
Check the air conditioning lines and
connections for leakage and damage.
Page 503 of 548
09
9-27
Temperature - A, B & C
The temperature grades are A (the
highest), B and C representing the tire’s
resistance to the generation of heat
and its ability to dissipate heat when
tested under controlled conditions on a
specified indoor laboratory test wheel.
Sustained high temperature can cause
the material of the tire to degenerate
and reduce tire life, and excessive
temperature can lead to sudden tire
failure. Grades B and A represent higher
levels of performance on the laboratory
test wheel than the minimum required
by law.
WARNING
The temperature grade for this tire is
established for a tire that is properly
inflated and not overloaded. Excessive
speed, under-inflation, over-inflation,
or excessive loading, either separately
or in combination, can cause heat build-
up and possible sudden tire failure.
This may cause loss of vehicle control
resulting in an accident.
WARNING
The temperature grade for this
tire is established for a tire that
is properly inflated and not
overloaded. Excessive speed,
under-inflation, over-inflation, or
excessive loading, either separately
or in combination, can cause heat build-up and possible sudden
tire failure. This may cause loss
of vehicle control resulting in an
accident.
Tire Terminology and Definitions
Air pressure
The amount of air inside the tire
pressing outward on the tire. Air
pressure is expressed in pounds per
square inch (psi) or kilopascal (kPa).
Accessory weight
This means the combined weight
of optional accessories. Some
examples of optional accessories
are automatic transmission, power
seats, and air conditioning.
Aspect ratio
The relationship of a tire’s height to its width. Belt
A rubber coated layer of cords that
is located between the plies and the
tread. Cords may be made from steel
or other reinforcing materials. Bead
The tire bead contains steel wires
wrapped by steel cords that hold the
tire onto the rim.
Bias ply tire
A pneumatic tire in which the plies
are laid at alternate angles less than
90 degrees to the centerline of the
tread.
Cold tire pressure
The amount of air pressure in a tire,
measured in pounds per square inch
(psi) or kilopascals (kPa) before a tire
has built up heat from driving.
Page 537 of 548
Index
I-2
A Accessing your vehicle .......................................................................................... 5-4
Auto door lock/unlock features ........................................................................ 5-13
Child-protector rear door locks ........................................................................ 5-14
Door locks ....................................................................................................... 5-10
Immobilizer system ............................................................................................ 5-9
Operating door locks from inside the vehicle ..................................................5-11
Operating door locks from outside the vehicle ................................................5-10
Rear Occupant Alert (ROA) ............................................................................. 5-14
Smart key .......................................................................................................... 5-4
Air bag - supplemental restraint system .............................................................. 3-42
Additional safety precautions ........................................................................... 3-64
Air bag warning labels ..................................................................................... 3-64
How does the air bags system operate? ............................................................3-47
Occupant Classification System (OCS) ...........................................................3-51
SRS care ........................................................................................................... 3-63
What to expect after an air bag inflates ............................................................3-51
Where are the air bags? .................................................................................... 3-44
Why didn’t my air bag go off in a collision? ...................................................3-57
Air conditioner compressor label......................................................................... 2-13 Air conditioning system ....................................................................................... 2-10
Appearance care................................................................................................... 9-52
Exterior care ..................................................................................................... 9-52
Interior care ...................................................................................................... 9-57
Automatic climate control system ....................................................................... 5-62
Automatic heating and air conditioning ...........................................................5-63
Manual heating and air conditioning ................................................................ 5-64
System maintenance ......................................................................................... 5-73
System operation .............................................................................................. 5-71
B
Battery (12 Volt) .................................................................................................. 9-17
Battery capacity label ....................................................................................... 9-18
Battery recharging ............................................................................................ 9-18
Battery usage .................................................................................................... 9-18
Reset items ....................................................................................................... 9-19