2023 HYUNDAI IONIQ 5 lug nut
[x] Cancel search: lug nutPage 28 of 680

01
1-23
CHarge typeS For eleCtriC VeHiCle
Charging Information
• AC Charge: The electric vehicle is charged by plugging into a AC charger installed at
your home or a public charging station. (For further details, refer to the ‘AC Charge’.)
• DC Charge: You can charge at high speeds at public charging stations. Refer to the
respective company’s manual that is provided for each DC charger type.
Battery performance and durability can deteriorate if the DC charger is used
constantly.
Use of DC charge should be minimized in order to help prolong high voltage battery
life.
• Portable Charge: The Electric vehicle can be charged by using household electricity.
The electrical outlet at your home must comply with regulations and can safely
accommodate the Voltage / Current (Amps) / Power (Watts) ratings specified on the
portable charge.
Charging Time Information
Charging type Standard battery type Extended battery type
AC charge Takes approx. 9 hours at room
temperature when charged to 100% Takes approx. 11 hours 5 minutes
at room temperature when
charged to 100%.
DC charge 350 kW
charger
Takes about 18 minutes at
room temperature when
charged from 10% to 80%. Can
be charged to 100%. Takes about 18 minutes at room
temperature when charged from
10% to 80%. Can be charged to 100%.
50 kW
charger Takes about 63 minutes at
room temperature when
charged from 10% to 80%. Can
be charged to 100%. Takes about 69 minutes at room
temperature when charged from
10% to 80%. Can be charged to 100%.
Portable charge Takes approx. 19 hours at room
temperature when charged to 100%. Takes approx. 31 hours at room
temperature when charged to 100%.
Information
Depending on the condition and durability of the high voltage battery, charger
specifications, and ambient temperature, the time required for charging the high voltage
battery may vary.
Page 37 of 680

Foreword / Electric Vehicle System Overview
1-32
6. Connect the charging plug to the
electric outlet at a AC charging station
to start charging.
ONE1Q011041
7. Check if the charging indicator light (
) of the high voltage battery in
the instrument cluster is turned ON.
Charging is not active when the
charging indicator light (
) is OFF.
When the charging connector and
charging plug are not connected
properly, reconnect the charging
cable to charge.
Information
• Even though charging is possible with
the Start/Stop button in the ON/START
position, for you safety, start charging when the Start/Stop button is in the
OFF position and the vehicle shifted to
P (Park). After charging has started, you can use electrical components such
as the radio by pressing the Start/Stop
button to the ACC or ON position.
• During AC charging, the radio
reception may be bad.
• During charging, the gear cannot be
shifted from P (Park) to any other gear.
ONE1Q011058E
8. After charging has started, the estimated charging time is displayed
on the instrument cluster for about 1
minute.
If you open the driver seat door while
charging, the estimated charging time
is also displayed on the instrument
cluster for about 1 minute. When
scheduled charging or scheduled
air conditioner/heater is set, the
estimated charging time is displayed
as “--” .
Information
Depending on the condition and durability
of the high voltage battery, charger
specifications, and ambient temperature,
the time required for charging the battery
may vary.
Page 51 of 680

Foreword / Electric Vehicle System Overview
1-46
ONX4EPHQ011009L
Plugged into vehicle (POWER Green ON,
FAULT Red Blink) • Diagnostic device failure
• Current leakage
• Abnormal temperature
Contact an authorized HYUNDAI dealer.
ONX4EPHQ011010L
• Leakage current failure (POWER Green
ON, FAULT Red Blink)
• After disconnecting and reconnecting
the power plug, press and release the
button for 2 seconds or longer to clear
the error.
Contact an authorized HYUNDAI dealer.
ONX4EPHQ011011L
Power saving mode • 7-segment display is turned off if there
is no status change for more than 1
minute.
Page 80 of 680

Vehicle Information, Consumer Information and Reporting Safety Defects
2-10
Items Tire sizeWheel
size Battery
type Inflation pressure kPa (psi)
Wheel lug nut
torque lbf-ft
(kgf-m, N-m)
Normal load
Maximum
load
Front RearFront Rear
Full size
tire
235/55R 19 7.5J X 19 2WD
Standard250
(36) 250
(36) 250
(36) 250
(36)
79~94
(11~13, 108~127)235/55R 19 7.5J X 19 2WD
Extended260
(38) 260
(38) 260
(38) 260
(38)
235/55R 19 7.5J X 19 AWD
Extended250
(36) 250
(36) 250
(36) 250
(36)
255/45R20 8.5J X 20 AWD
Extended235
(34) 235
(34) 235
(34) 235
(34)
NOTICE
• Ambient temperature affects the tire pressure (about 7kPa (1 psi) for every
12°F (7°C) change). If colder temperatures are anticipated, it is permissible to
increase cold tire inflation pressure by up to 20 kPa (3 psi) over the specification.
If extreme temperature changes are expected, be sure to check and adjust tire
pressure accordingly.
• Tire inflation pressure decreases with higher elevation, and increases with lower
elevation (about 10 kPa (2.4 psi) for every mile (or kilometer) elevation change).
Be sure to check and adjust tire pressure accordingly when driving through
changing elevations.
• Do not exceed the maximum inflation pressure, as found on the sidewall of the
tire(s).
CAUTION
When replacing tires, ALWAYS use the same size, type, brand, construction and
tread pattern supplied with the vehicle. If not, it can damage the related parts or
make it work irregularly.
tIres anD wheels
Page 594 of 680

Emergency Situations
8-16
ONE1081010
5. Plug the compressor power cord (4) into the vehicle power outlet.
NOTICE
Only use the front passenger side
power outlet when connecting the
power cord.
6. With the vehicle ON (
indicator ON), switch on
the compressor and let it run for
approximately 5~7 minutes to fill the
sealant up to proper pressure. (refer
to the Tire and Wheels, chapter 2).
The inflation pressure of the tire after
filling is unimportant and will be
checked/corrected later.
Be careful not to overinflate the tire
and stay away from the tire when filling it.
CAUTION
Tire pressure
Do not attempt to drive your vehicle if
the tire pressure is below 200 kPa (29
psi). This could result in an accident due
to sudden tire failure. 7.
Switch off the compressor.
8. Detach the hoses from the sealant bottle connector and from the tire
valve.
Return the Tire Mobility Kit to its storage
location in the vehicle.
OLMF064106
9. Immediately drive approximately 4~6
miles (7~10 km or, about 10min) to
evenly distribute the sealant in the
tire.
Do not exceed a speed of 50 mph (80
km/h). If possible, do not fall below a
speed of 12 mph (20 km/h).
While driving, if you experience any
unusual vibration, ride disturbance or
noise, reduce your speed and drive with
caution until you can safely pull off of the
side of the road.
Call for road side service or towing.
Page 595 of 680

08
8-17
OIGH067043
ONE1081009
10. After driving approximately 4~6 miles
(7~10 km or about 10 min), stop at a
safety location.
11. Connect the filling hose (3) of the
compressor directly to the tire valve.
12. Plug the compressor power cord into
the vehicle power outlet.
13. Adjust the tire inflation pressure to the
recomended tire inflation.
With the Vehicle is ON (
indicator ON) proceed as
follows.
- To increase the inflation pressure : Switch on the compressor. To
check the current inflation pressure
setting, briefly switch off the
compressor.
- To reduce the inflation pressure: Press the button (9) on the
compressor.
-
NOTICE
Do not let the compressor run for more
than 10 minutes, otherwise the device
will overheat and may be damaged.
Information
The pressure gauge may show higher than
actual reading when the compressor is
running. To get an accurate tire reading,
the compressor needs to be turned off.
CAUTION
If the inflation pressure is not
maintained, drive the vehicle a second
time, refer to step 9.
Then repeat steps 10 to 13.
Use of the TMK may be ineffectual for
tire damage larger than approximately
4 mm (0.16 in).
Contact an authorized HYUNDAI dealer
if the tire cannot be made roadworthy
with the Tire Mobility Kit.
WARNING
The tire inflation pressure must be at
least 220 kPa (32 psi). If it is not, do not
continue driving.
Call for road side service or towing.
CAUTION
Tire pressure sensor (if equipped with TPMS)
The sealant on the tire pressure sensor
and wheel should be removed when
you replace the tire with a new one and
inspect the tire pressure sensors. We
recommend that you get this done at an
authorized HYUNDAI dealer.
Page 596 of 680
Emergency Situations
8-18
Information
When reinstalling the repaired or
replaced tire and wheel on the vehicle, tighten the wheel lug nut to 79~94 lbf·ft
(11~13 kgf·m).
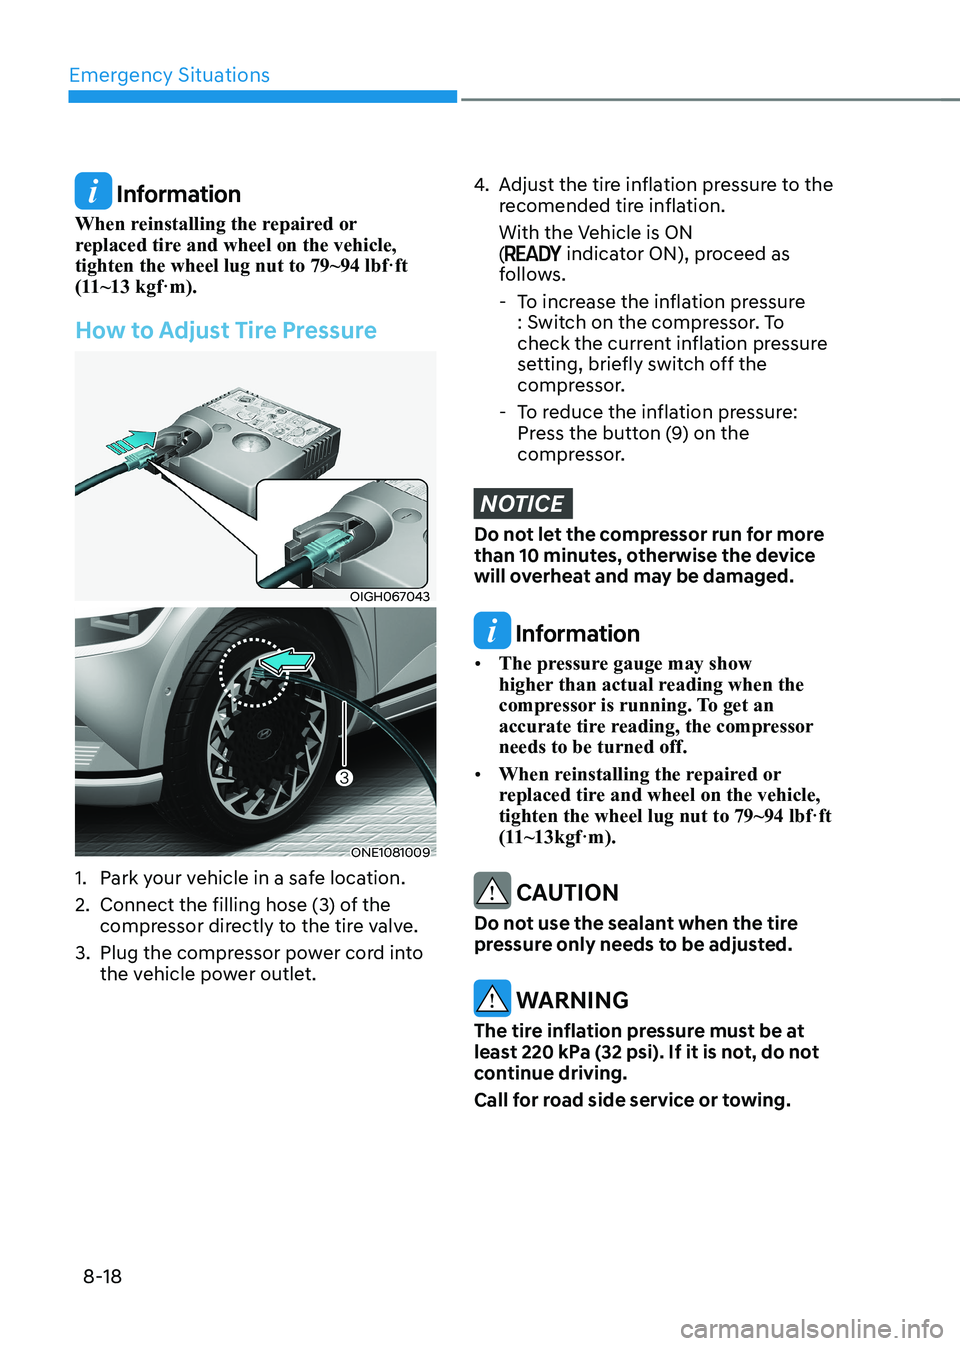
How to Adjust Tire Pressure
OIGH067043
ONE1081009
1. Park your vehicle in a safe location.
2. Connect the filling hose (3) of the compressor directly to the tire valve.
3. Plug the compressor power cord into the vehicle power outlet.
4. Adjust the tire inflation pressure to the
recomended tire inflation.
With the Vehicle is ON (
indicator ON), proceed as
follows.
- To increase the inflation pressure : Switch on the compressor. To
check the current inflation pressure
setting, briefly switch off the
compressor.
- To reduce the inflation pressure: Press the button (9) on the
compressor.
NOTICE
Do not let the compressor run for more
than 10 minutes, otherwise the device
will overheat and may be damaged.
Information
• The pressure gauge may show
higher than actual reading when the
compressor is running. To get an
accurate tire reading, the compressor needs to be turned off.
• When reinstalling the repaired or
replaced tire and wheel on the vehicle, tighten the wheel lug nut to 79~94 lbf·ft
(11~13kgf·m).
CAUTION
Do not use the sealant when the tire
pressure only needs to be adjusted.
WARNING
The tire inflation pressure must be at
least 220 kPa (32 psi). If it is not, do not
continue driving.
Call for road side service or towing.
Page 607 of 680

Maintenance
9-6
Owner Maintenance Schedule
When you stop for charging: • Check the coolant level in the coolant
reservoir.
• Check the windshield washer fluid
level.
• Check for low or under-inflated tires.
WARNING
Be careful when checking your coolant
level when the motor compartment is
hot. This may result in coolant being
blown out of the opening and cause
serious burns and other injuries.
While operating your vehicle: • Check for vibrations in the steering
wheel. Notice if there is any increased
steering effort or looseness in the
steering wheel, or change in its
straight-ahead position.
• Notice if your vehicle constantly turns
slightly or “pulls” to one side when
traveling on smooth, level road.
• When stopping, listen and check for
unusual sounds, pulling to one side,
increased brake pedal travel or “hard-
to-push” brake pedal.
• If any slipping or changes in the
operation of your gear shift occurs,
check the shift gear fluid level.
• Check the shift gear P (Park) function.
• Check the parking brake.
• Check for fluid leaks under your
vehicle (water dripping from the air
conditioning system during or after use is normal). At least monthly: •
Check coolant level in the coolant
reservoir.
• Check the operation of all exterior
lights, including the stoplights, turn
signals and hazard warning flashers.
• Check the inflation pressures of all
tires including the spare for tires that
are worn, show uneven wear, or are damaged.
• Check for loose wheel lug nuts.
At least twice a year: (for example,
every Spring and Autumn) • Check radiator, heater and air
conditioning hoses for leaks or damage.
• Check windshield washer spray and
wiper operation. Clean wiper blades
with a clean cloth dampened with
washer fluid.
• Check headlamp alignment.
• Check the seat belts for wear and function.
At least once a year: • Clean body and door drain holes.
• Lubricate door hinges and hood hinges.
• Lubricate door and hood locks and
latches.
• Lubricate door rubber weather strips.
• Check the air conditioning system.
• Inspect and lubricate shift gear
linkage and controls.
• Clean the battery (12V) and terminals.
• Check the brake fluid level.