2023 HYUNDAI IONIQ 5 air condition
[x] Cancel search: air conditionPage 306 of 680
Convenience Features
5-114
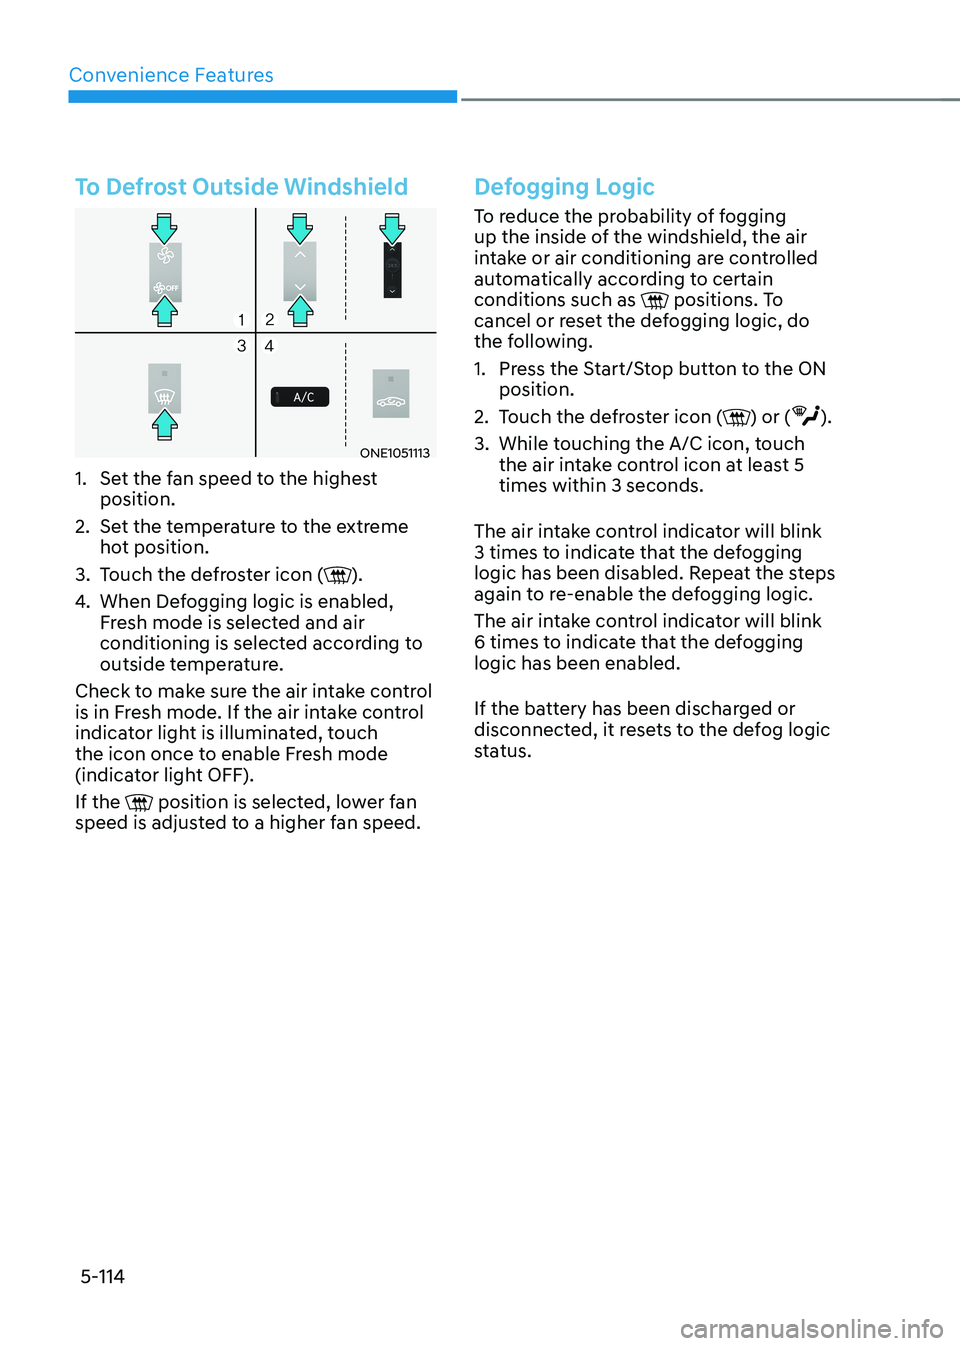
To Defrost Outside Windshield
ONE1051113
1. Set the fan speed to the highest position.
2. Set the temperature to the extreme hot position.
3. Touch the defroster icon (
).
4. When Defogging logic is enabled,
Fresh mode is selected and air
conditioning is selected according to
outside temperature.
Check to make sure the air intake control
is in Fresh mode. If the air intake control
indicator light is illuminated, touch
the icon once to enable Fresh mode
(indicator light OFF). If the
position is selected, lower fan
speed is adjusted to a higher fan speed.
Defogging Logic
To reduce the probability of fogging
up the inside of the windshield, the air
intake or air conditioning are controlled
automatically according to certain conditions such as
positions. To
cancel or reset the defogging logic, do
the following.
1. Press the Start/Stop button to the ON position.
2. Touch the defroster icon (
) or ().
3. While touching the A/C icon, touch the air intake control icon at least 5 times within 3 seconds.
The air intake control indicator will blink
3 times to indicate that the defogging
logic has been disabled. Repeat the steps
again to re-enable the defogging logic.
The air intake control indicator will blink
6 times to indicate that the defogging logic has been enabled.
If the battery has been discharged or
disconnected, it resets to the defog logic
status.
Page 308 of 680
Convenience Features
5-116
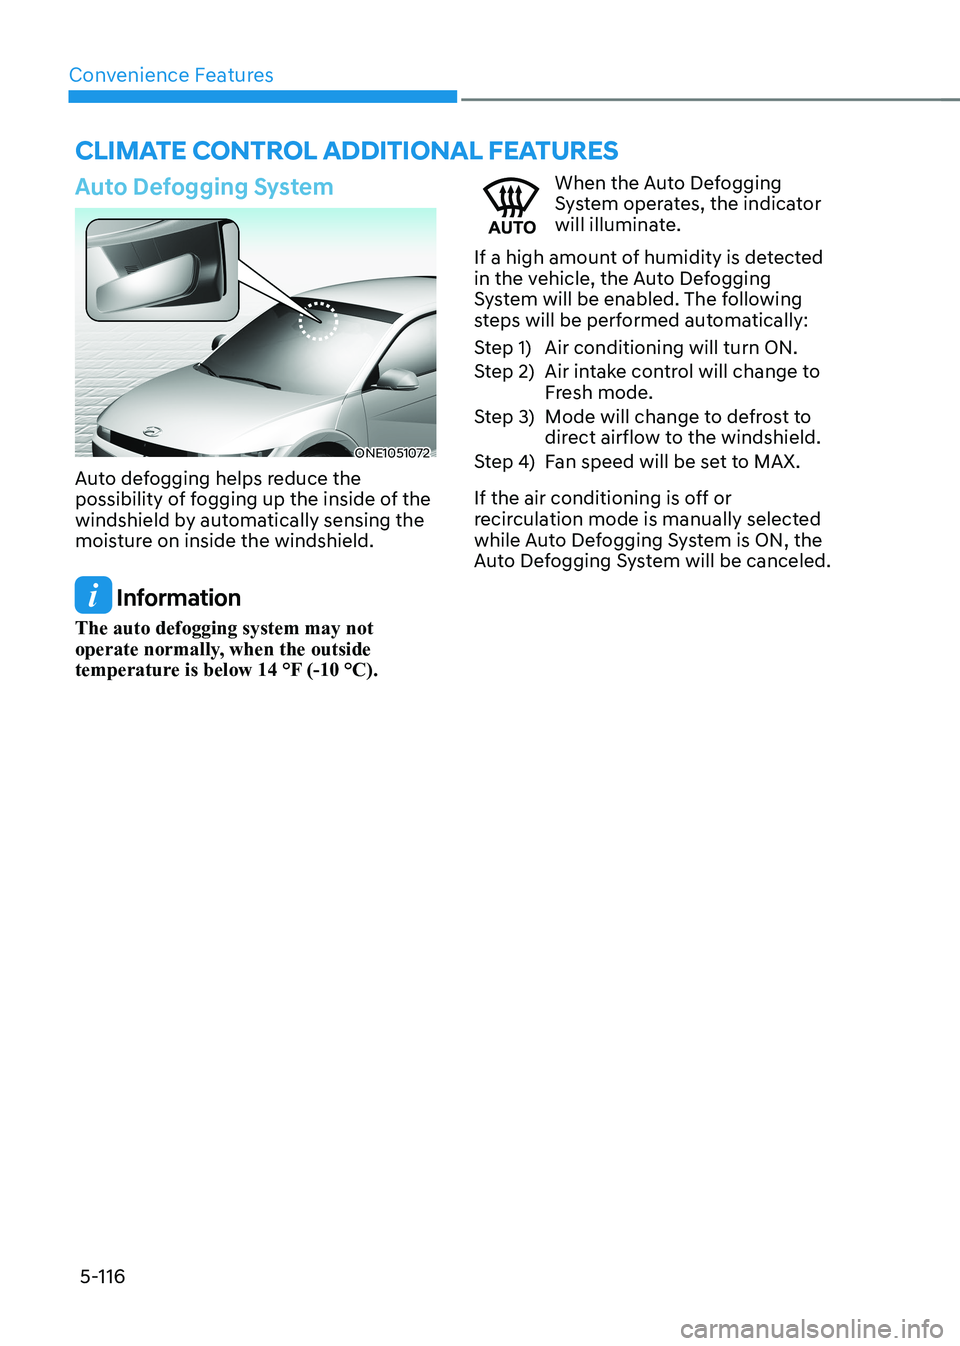
Auto Defogging System
ONE1051072
Auto defogging helps reduce the
possibility of fogging up the inside of the
windshield by automatically sensing the
moisture on inside the windshield.
Information
The auto defogging system may not
operate normally, when the outside
temperature is below 14 °F (-10 °C).
When the Auto Defogging
System operates, the indicator
will illuminate.
If a high amount of humidity is detected
in the vehicle, the Auto Defogging
System will be enabled. The following
steps will be performed automatically:
Step 1) Air conditioning will turn ON.
Step 2) Air intake control will change to Fresh mode.
Step 3) Mode will change to defrost to direct airflow to the windshield.
Step 4) Fan speed will be set to MAX.
If the air conditioning is off or
recirculation mode is manually selected
while Auto Defogging System is ON, the
Auto Defogging System will be canceled.
clImaTe conTrol addITIonal feaTUres
Page 309 of 680

05
5-117
Turning the Auto Defogging System ON or OFF
Climate control system
Touch the front windshield defroster
icon for 3 seconds when the Start/Stop
button is in the ON position. When the
Auto Defogging System is turned off, the
ADS OFF symbol will blink 3 times and
ADS OFF will be displayed on the climate
control information screen.
When the Auto Defogging System is
turned on, the ADS OFF symbol will blink 6 times without a signal.
Infotainment system
Auto Defogging System can be turned
on and off by selecting ‘Setup →
Vehicle Settings → Climate → Defog/
Defrost Options → Auto Defog’ from the
infotainment system screen.
For detailed information, refer to the
separately supplied infotainment
system manual.
Information
• When the air conditioning is turned
on by Auto Defogging System, if you
try to turn off the air conditioning, the
indicator will blink 3 times and the air conditioning will not be turned off.
• To maintain the effectiveness and
efficiency of the Auto Defogging
System, do not select Recirculation mode while the system is operating.
• When Auto Defogging System is operating, fan speed adjustment,
temperature adjustment, and air intake
control selection are all disabled.
NOTICE
Do not remove the sensor cover located
on the upper end of the windshield glass.
Damage to system parts could occur
and may not be covered by your vehicle
warranty.
Auto Dehumidify (if equipped)
To increase cabin air quality and reduce
windshield misting, recirculation mode
switches off automatically after about
5 minutes, depending on the outside
temperature, and the air intake will
change to fresh mode.
Turning Auto Dehumidify ON or OFF
Climate control system
To turn the Auto Dehumidify feature on
or off, select Face level () mode and
touch the air intake control icon at least
five times within three seconds. When
Auto Dehumidify is turned on, the air
intake control button indicator will blink
6 times. When turned off, the indicator will blink 3 times.
Infotainment system
Auto Dehumidify can be turned on and
off by selecting ‘Setup → Vehicle Settings
→ Climate → Automatic Ventilation →
Auto Dehumidify’ from the infotainment
system screen.
Information
If the battery (12V) is discharged or
disconnected, Auto dehumidify settings
will be reset. Readjust the settings to
turning Auto dehumidify option ON or
OFF.
For detailed information, refer to the separately supplied infotainment system manual.
Page 310 of 680

Convenience Features
5-118
Recirculating Air When Washer
Fluid Is Used
Recirculation mode automatically
activates to reduce any objectionable
scent of the washer fluid from entering
the cabin when the windshield washer is used.
Turning Activate upon Washer Fluid
Use ON or OFF
Activate upon Washer Fluid Use can be
turned on and off by selecting ‘Setup →
Vehicle Settings → Climate → Recirculate
Air → Activate upon Washer Fluid Use
(or Interlocking washer fluid)’ from the
infotainment system screen.
For detailed information, refer to the
separately supplied infotainment
system manual.
Auto. Controls That Use Climate
Control Settings (for driver’s
seat)
The temperature of the driver’s seat
warmer, air ventilated seat and heated
steering wheel is automatically
controlled depending on the inside and
outside temperature of the vehicle when
the vehicle is running.
To use these features, it must be
enabled from the Settings menu in the
infotainment system screen. Select: - Setup → Vehicle Settings → Seat →
Heated/Ventilated Features → Heated/
Ventilated Features → Auto. Controls
That Use Climate Control Settings
For more details on Auto Comfort
Control, refer to “Seat Warmers” and
“Air ventilation seats” section in chapter
3 and “Heated Steering Wheel” section
in this chapter.
Smart ventilation
The smart ventilation system maintains
pleasant/fresh air condition inside
the passenger compartment by
automatically detecting/controlling
the temperature and humidity, when
you drive the vehicle with the climate
control system in the OFF position.
When the smart ventilation system
starts to operate, the message “SMART
VENTILATION ON” appears for 5 seconds. • The smart ventilation system stops
operating, when the BLOWER DOWN
OFF button of the climate control
system is selected.
• The smart ventilation system stops
operating, when any button of the
climate control system is selected for
operation.
• The smart ventilation system may not
operate, when the vehicle is driven at
low speed.
Page 315 of 680

05
5-123
WARNING
Avoid electrical shocks. Do not place
your fingers or foreign objects (pin, etc.)
into a power outlet or touch the power
outlet with a wet hand.
NOTICE
To prevent damage to the power
outlets: • Use the power outlet only when the
vehicle is running and remove the
accessory plug after use. Using the
accessory plug for prolonged periods
of time with the vehicle off could
cause the battery to discharge.
• Only use 12 volts electric accessories
which are less than 180 watts in
electric capacity.
• Adjust the air-conditioner or heater
to the lowest operating level when
using the power outlet.
• Close the cover when not in use.
• Some electronic devices can
cause electronic interference
when plugged into a vehicle’s
power outlet. These devices may
cause excessive audio static and
malfunctions in other electronic
systems or devices used in your
vehicle.
• Push the plug in as far as it will go. If
good contact is not made, the plug
may overheat and the fuse may open.
• Plug in battery equipped electrical/
electronic devices with reverse
current protection. The current
from the battery may flow into the
vehicle’s electrical/electronic system
and cause system malfunction.
USB Charger (if equipped)
„„Front
ONE1051080
„„Rear
ONE1051081
The USB charger is designed to recharge
batteries of small size electrical devices using a USB cable.
The electrical devices can be recharged
when the Start/Stop button is in the ON
or START position.
The battery charging state may be
monitored on the electrical device.
Disconnect the USB cable from the USB
port after use.
Page 328 of 680
6
All Wheel Drive (AWD) ................................................................................... 6-43
Emergency Precautions ............................................................................................ 6-45
Drive Mode Integrated Control System (2WD) ............................................6-47
Drive Mode ................................................................................................................. 6-47
Drive Mode Integrated Control System (AWD) .............................................6-49
Drive Mode ................................................................................................................ 6-49
Drive Modes Characteristic ....................................................................................... 6-51
Active Air Flap ................................................................................................. 6-52
Malfunction ................................................................................................................ 6-52
Special Driving Conditions ............................................................................. 6-53
Hazardous Driving Conditions .................................................................................. 6-53
Rocking the Vehicle ................................................................................................... 6-53
Smooth Cornering ..................................................................................................... 6-54
Driving at Night ......................................................................................................... 6-54
Driving in the Rain ..................................................................................................... 6-54
Driving in Flooded Areas ............................................................................................ 6-55
Highway Driving ......................................................................................................... 6-55
Reducing the Risk of a Rollover ............................................................................... 6-56
Winter Driving ................................................................................................. 6-57
Snow or Icy Conditions .............................................................................................. 6-57
Winter Precautions .................................................................................................... 6-60
Vehicle Load Limit ........................................................................................... 6-61
The Loading Information Label ................................................................................ 6-62
Trailer Towing .................................................................................................. 6-68
If You Decide to Pull a Trailer .................................................................................... 6-68
Trailer Towing Equipment ........................................................................................... 6-71
Driving with a Trailer .................................................................................................. 6-72
Maintenance when Towing a Trailer ......................................................................... 6-75
Vehicle Weight ................................................................................................ 6 -76
Overloading ................................................................................................................ 6 -76
Page 352 of 680
Driving Your Vehicle
6-26
Power-Assist Brakes
Your vehicle has power-assisted brakes
that adjust automatically through normal usage.
If the vehicle is not running or is turned
off while driving, the power assist for
the brakes will not work. You can still
stop your vehicle by applying greater
force to the brake pedal than typical.
The stopping distance, however, will be
longer than with power brakes.
When the vehicle is not running, the
reserve brake power is partially depleted
each time the brake pedal is applied.
Do not pump the brake pedal when the
power assist has been interrupted.
WARNING
Take the following precautions: • Do not drive with your foot resting
on the brake pedal. This will create
abnormal high brake temperatures,
excessive brake lining and pad wear,
and increased stopping distances.
So increase the regeneration braking
level with the left paddle shift lever
to decrease the speed.
• When descending down a long or
steep hill, use the paddle shifter to
increase the regeneration braking
level in order to decrease your
speed without using the brake
pedal excessively. Applying the
brakes continuously will cause
the brakes to overheat and could
result in a temporary loss of braking
performance.
• Wet brakes may impair the vehicle's
ability to safely decelerate. Because
wet brakes increase braking distance
and cause noise troubles, select 0
step of the regenerative braking
system and depress the brake pedal
around 10 times, with keeping the
safe distance from other vehicles,
lightly in order to dry the braking
system. Such procedure may
decrease the driving distance by
restraining the regenerative braking
system, which is not a system
malfunction. Inspect the braking
system after car wash or driving over
wet road conditions.
NOTICE
• Do not continue depressing
the brake pedal if the ""
indicator is OFF. The battery may be
discharged.
• Noise and vibration generated
during braking is normal.
• Under normal operation, electric
brake pump noise and motor
vibration may occur temporarily in
below cases.
- When the pedal is depressed
suddenly.
- When the pedal is repeatedly
depressed in short intervals.
- When the ABS function is activated
while braking.
Braking SyStem
Page 353 of 680
06
6-27
Disc Brakes Wear Indicator
When your brake pads are worn and new
pads are required, you will hear a high
pitched warning sound from your front
or rear brakes. You may hear this sound
come and go or it may occur whenever
you depress the brake pedal.
Note that some driving conditions or
climates may cause a brake squeal
when you first apply (or lightly apply)
the brakes. This is normal and does not
indicate a problem with your brakes.
NOTICE
To avoid costly brake repairs, do not
continue to drive with worn brake pads.
Information
Always replace brake pads as complete
front or rear axle sets.
WARNING
Frequent braking may deform
components and worn the disc brake
causing vibration when braking.
Observe the speed limit to prevent
brake damage from excessive braking.
Brake wear, noise, vibration from
excessive braking or deformation of the
brakes caused by repeatedly braking in
high speed, racing on tracks, etc. can be
excluded from warranty coverage.
Electronic Parking Brake (EPB)
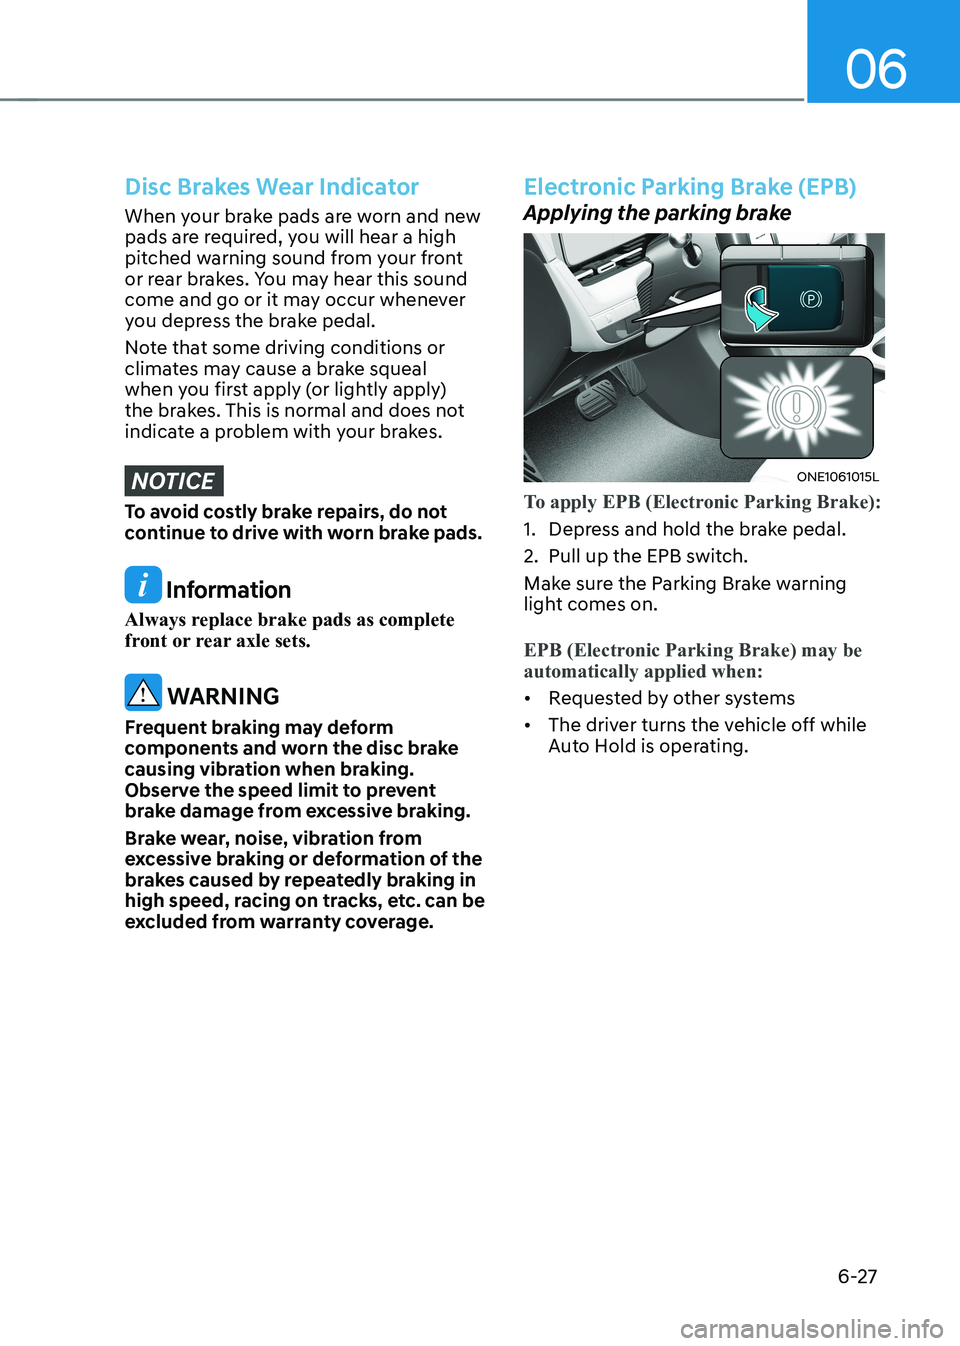
Applying the parking brake
ONE1061015L
To apply EPB (Electronic Parking Brake):
1. Depress and hold the brake pedal.
2. Pull up the EPB switch.
Make sure the Parking Brake warning
light comes on.
EPB (Electronic Parking Brake) may be automatically applied when:
• Requested by other systems
• The driver turns the vehicle off while
Auto Hold is operating.